前端3D引擎-Cesium自定义动态材质
本文代码基于Vue-cli4和使用WebGL的地图引擎Cesium,主要内容为三维场景下不同对象的动态材质构建。
参考了很多文章,链接附在文末。
为不同的几何对象添加动态材质
不知道这一小节的名称概况是否准确,在我的理解中Cesium中的集合实体分成两类:Primitive和Entity,一般翻译成图元和实体,图元更接近底层,实体是封装后的高级对象,使用更加简便,这里不对使用场景进行分析,但会介绍如果为这两种集合对象添加材质。
使用Primitive生成泛光墙
一般来说,Primitive的使用相对繁琐,相比Entity需要使用者自己初始化更多对象,包括外观、地理信息等,但正因为如此,为Primitive添加材质要方便很多,因为可以直接操作几何体的外观部分。首先我们初始化一个墙几何体:
var wallInstance = new Cesium.GeometryInstance({
  geometry: Cesium.WallGeometry.fromConstantHeights({
    positions: Cesium.Cartesian3.fromDegreesArray([
      97.0,
      43.0,
      107.0,
      43.0,
      107.0,
      40.0,
      97.0,
      40.0,
      97.0,
      43.0,
    ]),
    maximumHeight: 100000.0,
    vertexFormat: Cesium.MaterialAppearance.VERTEX_FORMAT,
  }),
})

viewer.scene.primitives.add(
  new Cesium.Primitive({
    geometryInstances: [wallInstance],
    appearance: new Cesium.MaterialAppearance(),
  })
)
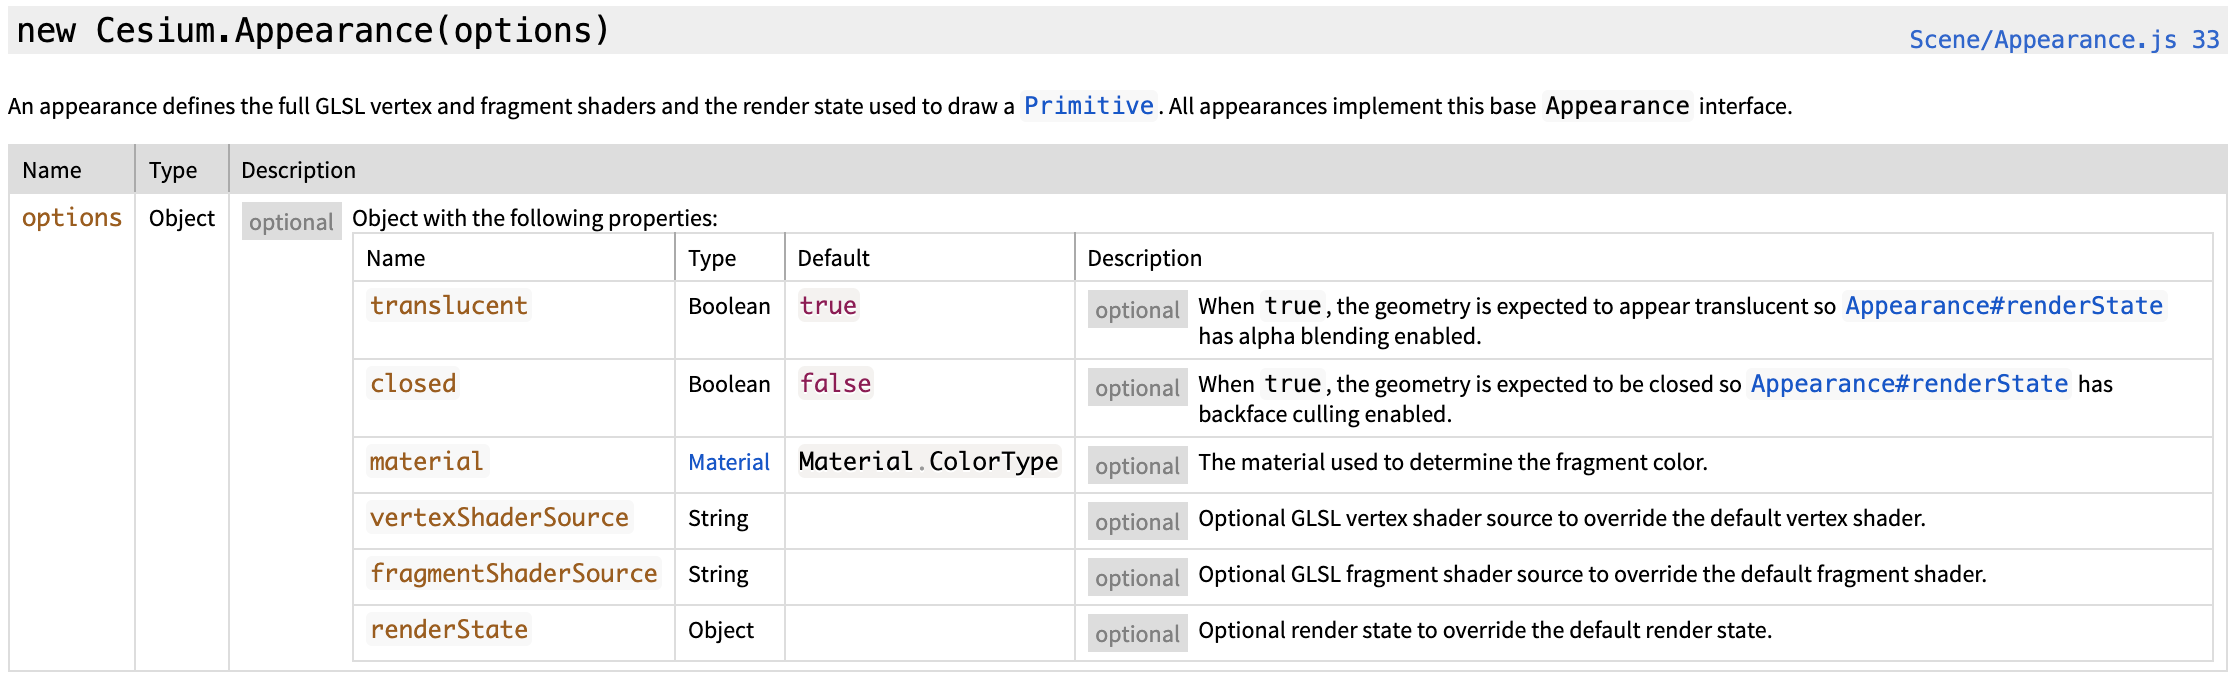
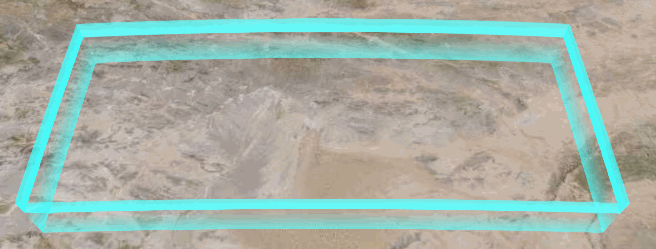
上文代码所创建的是一个只有基础外观的“墙”, 实例化 Cesium.MaterialAppearance() 这个类不传参数所得到的的就是下图的样子:

官方文档中我们可以查到有如下参数:
这里我们关注的是 material ,也就是所谓的“材质”,接下来补充上材质的代码:
let image = '/static/images/colors1.png', //选择自己的动态材质图片
color = new Cesium.Color.fromCssColorString('rgba(0, 255, 255, 1)'),
speed = 0,
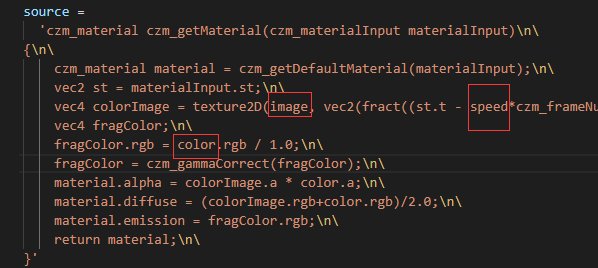
source =
'czm_material czm_getMaterial(czm_materialInput materialInput)\n\
{\n\
czm_material material = czm_getDefaultMaterial(materialInput);\n\
vec2 st = materialInput.st;\n\
vec4 colorImage = texture2D(image, vec2(fract((st.t - speed*czm_frameNumber*0.005)), st.t));\n\
vec4 fragColor;\n\
fragColor.rgb = color.rgb / 1.0;\n\
fragColor = czm_gammaCorrect(fragColor);\n\
material.alpha = colorImage.a * color.a;\n\
material.diffuse = (colorImage.rgb+color.rgb)/2.0;\n\
material.emission = fragColor.rgb;\n\
return material;\n\
}'
let material = new Cesium.Material({
fabric: {
type: 'PolylinePulseLink',
uniforms: {
color: color,
image: image,
speed: speed,
},
source: source,
},
translucent: function () {
return true
},
})
viewer.scene.primitives.add(
new Cesium.Primitive({
geometryInstances: [greenWallInstance],
appearance: new Cesium.MaterialAppearance({
material: material,
}),
})
)
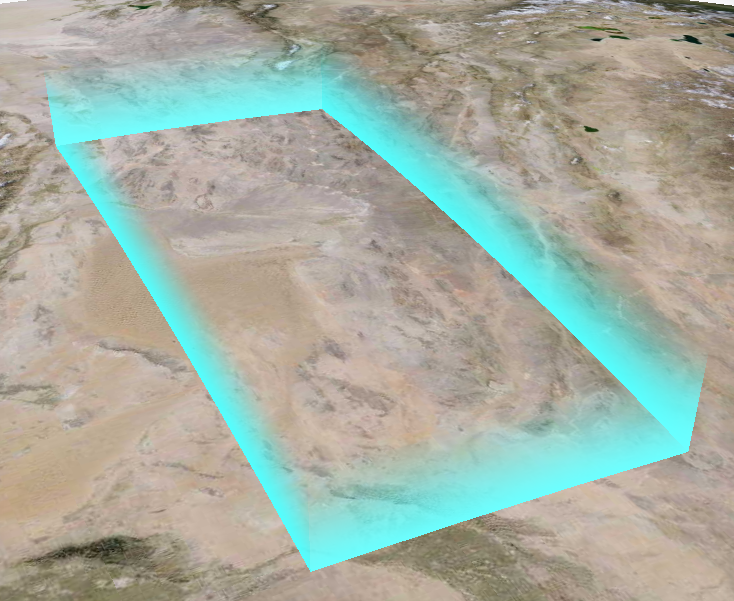
应用材质的效果图:
材质文件colros1.png:

通过上面的代码和截图可以看出材质文件和最后表现出的结果还是有很大差异的,而且变量source中的代码看起来似乎很难理解,这些内容会在下文进行说明,本节还是针对材质如何应用进行说明。
使用Entity生成流动线
参考Primitive的流程,我们先创建一个实体对象,这次我们换一个场景,改为创建流动线,参考的文章 流动线纹理
create(viewer) {
//创建射线
var data = {
center: {
id: 0,
lon: 114.302312702,
lat: 30.598026044,
size: 20,
color: Cesium.Color.PURPLE,
},
points: [
{
id: 1,
lon: 115.028495718,
lat: 30.200814617,
color: Cesium.Color.YELLOW,
size: 15,
},
{
id: 2,
lon: 110.795000473,
lat: 32.638540762,
color: Cesium.Color.RED,
size: 15,
},
{
id: 3,
lon: 111.267729446,
lat: 30.698151246,
color: Cesium.Color.BLUE,
size: 15,
},
{
id: 4,
lon: 112.126643144,
lat: 32.058588576,
color: Cesium.Color.GREEN,
size: 15,
},
{
id: 5,
lon: 114.885884938,
lat: 30.395401912,
color: Cesium.Color.BLUE,
size: 15,
},
{
id: 6,
lon: 112.190419415,
lat: 31.043949588,
color: Cesium.Color.BLUE,
size: 15,
},
{
id: 7,
lon: 113.903569642,
lat: 30.93205405,
color: Cesium.Color.BLUE,
size: 15,
},
{
id: 8,
lon: 112.226648859,
lat: 30.367904255,
color: Cesium.Color.BLUE,
size: 15,
},
{
id: 9,
lon: 114.86171677,
lat: 30.468634833,
color: Cesium.Color.BLUE,
size: 15,
},
{
id: 10,
lon: 114.317846048,
lat: 29.848946148,
color: Cesium.Color.BLUE,
size: 15,
},
{
id: 11,
lon: 113.371985426,
lat: 31.70498833,
color: Cesium.Color.BLUE,
size: 15,
},
{
id: 12,
lon: 109.468884533,
lat: 30.289012191,
color: Cesium.Color.BLUE,
size: 15,
},
{
id: 13,
lon: 113.414585069,
lat: 30.368350431,
color: Cesium.Color.SALMON,
size: 15,
},
{
id: 14,
lon: 112.892742589,
lat: 30.409306203,
color: Cesium.Color.WHITE,
size: 15,
},
{
id: 15,
lon: 113.16085371,
lat: 30.667483468,
color: Cesium.Color.SALMON,
size: 15,
},
{
id: 16,
lon: 110.670643354,
lat: 31.74854078,
color: Cesium.Color.PINK,
size: 15,
},
],
options: {
name: '',
polyline: {
width: 2,
material: [Cesium.Color.GREEN, 3000],
},
},
}
this.createFlyLines(data, viewer)
},
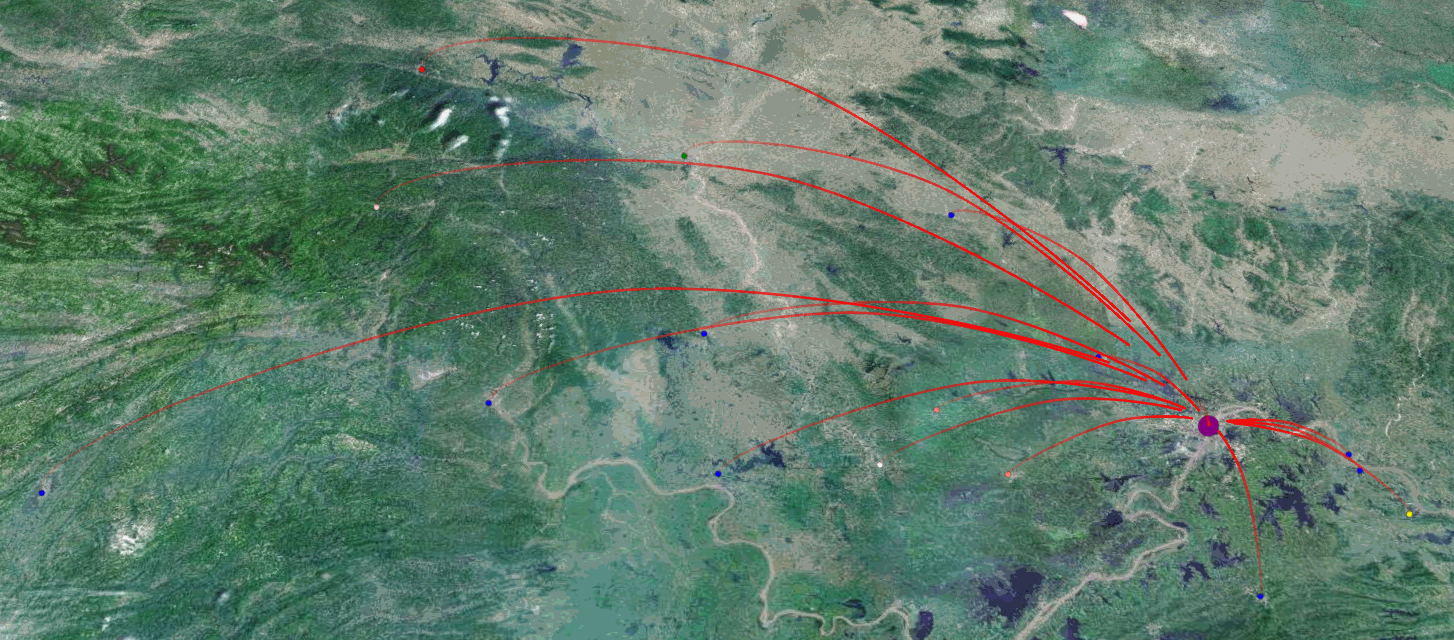
createFlyLines(data, viewer) {
const center = data.center
const cities = data.points
const startPoint = Cesium.Cartesian3.fromDegrees(
center.lon,
center.lat,
0
)
//中心点
viewer.entities.add({
position: startPoint,
point: {
pixelSize: center.size,
color: center.color,
},
})
//大批量操作时,临时禁用事件可以提高性能
viewer.entities.suspendEvents() //散点
cities.map((city) => {
let material = new Cesium.PolylineTrailMaterialProperty({
color: Cesium.Color.RED,
duration: 3000,
trailImage: '/static/images/colors1.png',
})
const endPoint = Cesium.Cartesian3.fromDegrees(city.lon, city.lat, 0)
viewer.entities.add({
position: endPoint,
point: {
pixelSize: city.size - 10,
color: city.color,
},
})
viewer.entities.add({
polyline: {
positions: this.generateCurve(startPoint, endPoint),
width: 2,
material: material,
},
})
})
viewer.entities.resumeEvents()
viewer.flyTo(viewer.entities)
},
/**
* 生成流动曲线
* @param startPoint 起点
* @param endPoint 终点
* @returns {Array}
*/
generateCurve(startPoint, endPoint) {
let addPointCartesian = new Cesium.Cartesian3()
Cesium.Cartesian3.add(startPoint, endPoint, addPointCartesian)
let midPointCartesian = new Cesium.Cartesian3()
Cesium.Cartesian3.divideByScalar(addPointCartesian, 2, midPointCartesian)
let midPointCartographic = Cesium.Cartographic.fromCartesian(
midPointCartesian
)
midPointCartographic.height =
Cesium.Cartesian3.distance(startPoint, endPoint) / 5
let midPoint = new Cesium.Cartesian3()
Cesium.Ellipsoid.WGS84.cartographicToCartesian(
midPointCartographic,
midPoint
)
let spline = new Cesium.CatmullRomSpline({
times: [0.0, 0.5, 1.0],
points: [startPoint, midPoint, endPoint],
})
let curvePoints = []
for (let i = 0, len = 200; i < len; i++) {
curvePoints.push(spline.evaluate(i / len))
}
return curvePoints
},
代码要多很多,但主要是点位信息,并且曲线实体的创建要更加复杂,我们着重关注 createFlyLines 这个方法就可以了,可以看到其中创建 material 的部分与Primitive略有不同,实例化的是一个自定义的类 PolylineTrailMaterialProperty。
let material = new Cesium.PolylineTrailMaterialProperty({
  color: Cesium.Color.WHITE,
  duration: 3000,
  trailImage: '/static/images/colors1.png',
})
具体原因我们还是从官方文档来看,可以发现与Primitive不同,传入material的不再是Material类,而是MaterialProperty类。
Cesium提供了一些MaterialProperty,分别代表不同的效果,但显然不能满足我们多样的业务需求,所以这时需要我们自定义这个MaterialProperty。
MaterialProperty
创建 PolylineTrailMaterialProperty.js 文件并导入:
import PolylineTrailMaterialProperty from '@/utils/cesium/PolylineTrailMaterialProperty'
import * as Cesium from 'cesium/Cesium'

export class PolylineTrailMaterialProperty {
  constructor(options) {
    options = Cesium.defaultValue(options, Cesium.defaultValue.EMPTY_OBJECT)

    this._definitionChanged = new Cesium.Event()
    this._color = undefined
    this._colorSubscription = undefined
    this._time = performance.now()

    this.color = options.color
    this.duration = options.duration
    this.trailImage = options.trailImage
  }
}

Object.defineProperties(PolylineTrailMaterialProperty.prototype, {
  isConstant: {
    get: function () {
      return false
    },
  },

  definitionChanged: {
    get: function () {
      return this._definitionChanged
    },
  },

  color: Cesium.createPropertyDescriptor('color'),
})

PolylineTrailMaterialProperty.prototype.getType = function () {
  return 'PolylineTrail'
}

PolylineTrailMaterialProperty.prototype.getValue = function (time, result) {
  if (!Cesium.defined(result)) {
    result = {}
  }

  result.color = Cesium.Property.getValueOrClonedDefault(
    this._color,
    time,
    Cesium.Color.WHITE,
    result.color
  )
  result.image = this.trailImage
  result.time =
    ((performance.now() - this._time) % this.duration) / this.duration

  return result
}

PolylineTrailMaterialProperty.prototype.equals = function (other) {
  return (
    this === other ||
    (other instanceof PolylineTrailMaterialProperty &&
      Cesium.Property.equals(this._color, other._color))
  )
}

Cesium.Material.PolylineTrailType = 'PolylineTrail'
Cesium.Material.PolylineTrailImage = '/static/images/colors1.png'
Cesium.Material.PolylineTrailSource =
  'czm_material czm_getMaterial(czm_materialInput materialInput)\n\
                           {\n\
                             czm_material material = czm_getDefaultMaterial(materialInput);\n\
                             vec2 st = materialInput.st;\n\
                             vec4 colorImage = texture2D(image, vec2(fract(st.s - time), st.t));\n\
                             material.alpha = colorImage.a * color.a;\n\
                             material.diffuse = (colorImage.rgb+color.rgb)/2.0;\n\
                             return material;\n\
                           }'

Cesium.Material._materialCache.addMaterial(Cesium.Material.PolylineTrailType, {
  fabric: {
    type: Cesium.Material.PolylineTrailType,
    uniforms: {
      color: new Cesium.Color(1.0, 0.0, 0.0, 0.5),
      image: Cesium.Material.PolylineTrailImage,
      time: 0,
    },
    source: Cesium.Material.PolylineTrailSource,
  },
  translucent: function () {
    return true
  },
})

Cesium.PolylineTrailMaterialProperty = PolylineTrailMaterialProperty
在定义自己的 MaterialProperty 时,需要设置几个公共的方法,分别是:getValue、isConstant、definitionChanged、equals
- getValue:用来获取某个时间点的特定属性值,包括两个参数:type和result,分别是用于传递时间点和存储属性值。
- isConstant:用来判断该属性是否会随时间变化,是一个bool类型。Cesium会通过这个变量来决定是否需要在场景更新的每一帧中都获取该属性的数值,从而来更新三维场景中的物体。如果
isConstant为true,则只会获取一次数值,除非definitionChanged事件被触发。 - definitionChanged:是一个事件,可以通过该事件,来监听该Property自身所发生的变化,比如数值发生修改。
- equals:用来检测属性值是否相等。
具体参考 Cesium自定义材质
实际效果见下图:
材质是如何“炼”成的
Fabric
在 MaterialProperty 之前的代码主要是构建弧线,然后为弧线添加动态效果,至于效果什么样,就全部取决于MaterialProperty这个类如何运作,可以看到与上文为Primitive添加的 Material 相似,它们都包含一个 fabric 对象,这个单词直译为“织物”,也就是说它是覆盖在模型上的一层衣服,它有颜色(color)和图片(image),如果想让这层效果动起来,还需要一个时间变量,比如在泛光墙的例子中的“speed”,流动线例子中的“time”。Cesium的官方文档中定义它为一个用于生成材质的JSON对象。

WebGL的shader(着色器)
那如何将我们定义的几个变量变成想象中的材质呢?这里就涉及到上文代码中最晦涩难懂的那两段字符串,这是一种从属于WebGL技术的独立语法,叫做shader(着色器),从这里开始已经步入了图形学的领域,我虽然很有兴趣但是暂时还没打算入坑,可以看下这篇 【Cesium 颜狗初步】fabric 材质定义与自定义着色器实践,比较通俗易懂,也有示例。
以我的粗浅理解来看,WebGL作为HTML5的API为我们提供了一个更好的与客户端硬件图形部分的交互,来实现更好的视觉效果。
动态墙和流动线shader的简单说明
如果不想看长篇大论,还是希望能直接实现效果可以参考上面的代码,如果只是想微调效果也不需要细致学习shader的用法,我们仔细看下就能看出规律。Fabric 一节中我们提到时间变量,但是泛光墙的例子中似乎与时间无关,实际上这也是个动态材质,将speed设置为正数后,墙面会有上下移动的效果。
其实看下参数就明白,它们都有在shader中出场:
uniforms: {
  color: color,
  image: image,
  speed: speed,
},
只不过shader会以它独特的方法来解析这些我们传入的图形和参数,比如这里修改speed后面乘的数值,可以改变动态图像每一单位的变化速度,修改下面fragColor的部分可以改变颜色的处理方式,在原本的例子中这里其实是混合了传入的颜色和一个基本的颜色,我这里改成了除1,也就是传入什么颜色就用什么颜色,不过还要考虑与图片素材的混合,另外,shader的数字基本都是使用浮点型,比如这里要用“1.0”,用“1”就会报错。流动线的shader类似,其实差别不大,因为我这里也是只用了两个简单的例子。
轻松应用复杂特效:EarthSDK
如果既不想研究WebGL又不想要5毛钱的特效,有没有办法呢?也不是没有,涉及到比较垂直的领域,就需要有乐于奉献的大佬提供开发包了,这里我推荐EarthSDK,简单展示一下实现的效果:
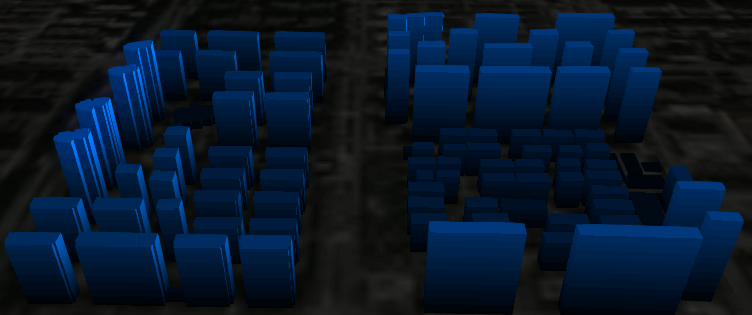
出于图片大小的考虑,这里限制了帧数,实际效果要更好,这里使用的是测试用的shp文件,根据坐标绘制形状,再根据层高拉升模型的高度,之后只要应用SDK中的效果就可以了,这里贴下部分配置,url做了代理,这里用的是我自己部署的shp文件:
{
  ref: 'tileset1',
  czmObject: {
    xbsjType: 'Tileset',
    xbsjGuid: '739ae1b9-bf61-455a-89d4-280668ed6f3c',
    name: '白模测试1',
    url: '/tileset/tileset.json',
    xbsjStyle: 'var style = {\n    color: "vec4(0, 0.5, 1.0,1)"\n}',
    xbsjClippingPlanes: {},
    xbsjCustomShader: {
      fsBody: this.fsBody,
    },
  },
},
{
  ref: 'scaneline',
  czmObject: {
    xbsjType: 'Scanline',
    xbsjGuid: 'c827bdc1-c14b-4452-81de-7b2ce427b786',
    name: '扫描线',
    position: [2.1201528021066163, 0.5451706303633767, 0],
    show: true,
    radius: 1000,
    timeDuration: '3',
    currentTime: 0,
    color: [0.5, 0.8, 1.0, 1.0],
  },
},
配置并不算难,详细内容看文档就可以EarthSDK官网
另外他们家的另一个产品CesiumLab在GIS开发中也很实用。
参考资料
【Cesium 颜狗初步】fabric 材质定义与自定义着色器实践
除了上面提到的,还有一些不错的参考
【三维GIS可视化】基于Vue+Cesium+Supermap实现智慧城市(四)
这个系列作者写得很详细,学到了很多

 浙公网安备 33010602011771号