
二Spring框架--3容器类和aware接口
二Spring框架--3容器类和aware接口
2.1 BeanFactory与FactoryBean
(1)beanfactory
是接口,提供了IOC容器最基本的形式,给具体IOC容器的实现提供了规范。是一个工厂类,负责生产、管理bean依赖的工厂类(实例化、定位、配置应用程序中的对象及建立对象的依赖关系)。
获取beanfactory的三种形式:
 //方式一:
Resource resource = new FileSystemResource("beans.xml");
 BeanFactory factory = new XmlBeanFactory(resource);
//方式二
 ClassPathResource resource = new ClassPathResource("beans.xml");
 BeanFactory factory = new XmlBeanFactory(resource);
//方式三
 ApplicationContext context = new ClassPathXmlApplicationContext(new String[] {"applicationContext.xml", "applicationContext-part2.xml"});
 BeanFactory factory = (BeanFactory) context;
beanfactory提供六中方法:
package org.springframework.beans.factory;
import org.springframework.beans.BeansException;
public interface BeanFactory {
     String FACTORY_BEAN_PREFIX = "&";
     Object getBean(String name) throws BeansException;
     <T> T getBean(String name, Class<T> requiredType) throws BeansException;
     <T> T getBean(Class<T> requiredType) throws BeansException;
     Object getBean(String name, Object... args) throws BeansException;
     boolean containsBean(String name);
     boolean isSingleton(String name) throws NoSuchBeanDefinitionException;
     boolean isPrototype(String name) throws NoSuchBeanDefinitionException;
     boolean isTypeMatch(String name, Class<?> targetType) throws NoSuchBeanDefinitionException;
     Class<?> getType(String name) throws NoSuchBeanDefinitionException;
     String[] getAliases(String name);
}
- boolean containsBean(String beanName) 判断工厂中是否包含给定名称的bean定义,若有则返回true
- Object getBean(String) 返回给定名称注册的bean实例。根据bean的配置情况,如果是singleton模式将返回一个共享实例,否则将返回一个新建的实例,如果没有找到指定bean,该方法可能会抛出异常
- Object getBean(String, Class) 返回以给定名称注册的bean实例,并转换为给定class类型
- Class getType(String name) 返回给定名称的bean的Class,如果没有找到指定的bean实例,则抛出NoSuchBeanDefinitionException异常
- boolean isSingleton(String) 判断给定名称的bean定义是否为单例模式
- String[] getAliases(String name) 返回给定bean名称的所有别名
(2)factorybean
接口,为IOC容器中的bean的实现提供灵活的方式,可以通过实现该factorybean接口,实现getobject方法,用简单工厂模式和装饰模式,为bean进行拓展。这个bean是可以修饰对象生成的工厂bean。
从Spring3.0开始,FactoryBean开始支持泛型,即接口声明改为FactoryBean
使用:
需要实现一个类,该类实现接口factorybean,注册入IOC容器后,通过getbean(beanname)获取到的bean对象不是factorybean的实现类,而是其内getobject返回的对象;要获取factorybean实现类,需要getBean(&BeanName)。
适用场景:
一般情况,spring用反射机制及bean的class属性指定实现类实例化bean。但是,特殊情况下,bean实例化过程复杂,在配置文件中对于bean的实现复杂的情况,可以用一个编码方式,实现该接口可以定制实例化bean的逻辑,可以隐藏实现细节,透明地给上层调用。
public interface FactoryBean<T> {
    T getObject() throws Exception;

    Class<?> getObjectType();

    boolean isSingleton();
}
开发案例一:
配置:
<beans xmlns="http://www.springframework.org/schema/beans"
             xmlns:xsi="http://www.w3.org/2001/XMLSchema-instance"
             xmlns:context="http://www.springframework.org/schema/context"
             xmlns:aop="http://www.springframework.org/schema/aop"
             xmlns:tx="http://www.springframework.org/schema/tx"
             xsi:schemaLocation="http://www.springframework.org/schema/beans
                     http://www.springframework.org/schema/beans/spring-beans-3.0.xsd
                     http://www.springframework.org/schema/context
                     http://www.springframework.org/schema/context/spring-context-3.0.xsd
                     http://www.springframework.org/schema/aop
                     http://www.springframework.org/schema/aop/spring-aop-3.0.xsd
                     http://www.springframework.org/schema/tx
                     http://www.springframework.org/schema/tx/spring-tx-3.0.xsd">

 <bean id="student" class="com.spring.bean.Student">
  <property name="name" value="zhangsan" />
 </bean>

 <bean id="school" class="com.spring.bean.School">
 </bean>

 <bean id="factoryBeanPojo" class="com.spring.bean.FactoryBeanPojo">
    <property name="type" value="student" />
 </bean>
</beans>
factoryBean实现类:
import org.springframework.beans.factory.FactoryBean;

public class FactoryBeanPojo implements FactoryBean{
	private String type;

	@Override
	public Object getObject() throws Exception {
		if("student".equals(type)){
			return new Student();
		}else{
			return new School();
		}

	}

	@Override
	public Class getObjectType() {
		return School.class;
	}

	@Override
	public boolean isSingleton() {
		return true;
	}

	public String getType() {
		return type;
	}

	public void setType(String type) {
		this.type = type;
	}

}
这里,通过beanconfig.xml向IOC容器注册如三个bean,其中一个为factorybean实现类。
import org.springframework.context.support.ClassPathXmlApplicationContext;

import com.spring.bean.FactoryBeanPojo;

public class FactoryBeanTest {
     public static void main(String[] args){
          String url = "com/spring/config/BeanConfig.xml";
          ClassPathXmlApplicationContext cpxa = new ClassPathXmlApplicationContext(url);
          Object school=  cpxa.getBean("factoryBeanPojo");
          FactoryBeanPojo factoryBeanPojo= (FactoryBeanPojo) cpxa.getBean("&factoryBeanPojo");
          System.out.println(school.getClass().getName());
          System.out.println(factoryBeanPojo.getClass().getName());
     }
}
可知getbean获取的对象为factorybean内getobject返回的IOC容器内的对象。
开发案例二:(重点看)
模仿ProxyFactoryBean功能,开发相似的代理类,用来代理一个对象,对每个对象的所有方法做一个拦截和功能拓展。
/**
 * my factory bean<p>
 * 代理一个类,拦截该类的所有方法,在方法的调用前后进行日志的输出
 *
 */
public class MyFactoryBean implements FactoryBean<Object>, InitializingBean, DisposableBean {

     private static final Logger logger = LoggerFactory.getLogger(MyFactoryBean.class);
     private String interfaceName;
     private Object target;
     private Object proxyObj;
     @Override
     public void destroy() throws Exception {
          logger.debug("destroy......");
     }

     //继承InitializingBean,在初始化设置bean(就是factorybean实现类)属性后(这里在xml配置interfaceName和target值)
     //然后proxyObj这里设置,用Proxy代理生成代理类
     @Override
     public void afterPropertiesSet() throws Exception {
          proxyObj = Proxy.newProxyInstance(
               this.getClass().getClassLoader(),
               new Class[] { Class.forName(interfaceName) },
               new InvocationHandler() {
                    @Override
                    public Object invoke(Object proxy, Method method, Object[] args) throws Throwable {
                         logger.debug("invoke method......" + method.getName());
                         logger.debug("invoke method before......" + System.currentTimeMillis());
                         Object result = method.invoke(target, args);
                         logger.debug("invoke method after......" + System.currentTimeMillis());
                         return result;            }
               });
          logger.debug("afterPropertiesSet......");
     }

     //返回上面生成的代理类proxyObj(根据属性接口名和被代理类动态代理)
     @Override
     public Object getObject() throws Exception {
          logger.debug("getObject......");
          return proxyObj;
     }

     @Override
     public Class<?> getObjectType() {
          return proxyObj == null ? Object.class : proxyObj.getClass();
     }

     @Override
     public boolean isSingleton() {
          return true;
     }

     public String getInterfaceName() {
          return interfaceName;
     }

     public void setInterfaceName(String interfaceName) {
          this.interfaceName = interfaceName;
     }

     public Object getTarget() {
          return target;
     }

     public void setTarget(Object target) {
          this.target = target;
     }

     public Object getProxyObj() {
          return proxyObj;
     }

     public void setProxyObj(Object proxyObj) {
          this.proxyObj = proxyObj;
     }

}
配置beanfactory实现类的xml
<bean id="fbHelloWorldService" class="com.ebao.xxx.MyFactoryBean">
    <property name="interfaceName" value="com.ebao.xxx.HelloWorldService" />
    <property name="target" ref="helloWorldService" />
</bean>
//这里的属性为需要生成代理类的接口名和被代理类,这样就通过beanfactory实现类,对IOC容器中的target类生成动态代理对象,通过getobject返回,就完成对IOC中bean的处理。(这里起作用的拦截器完成对bean内方法的扩充)
测试:
@RunWith(JUnit4ClassRunner.class)
@ContextConfiguration(classes = { MyFactoryBeanConfig.class })
public class MyFactoryBeanTest {
    @Autowired
    private ApplicationContext context;
    /**
     * 测试验证FactoryBean原理,代理一个servcie在调用其方法的前后,打印日志亦可作其他处理
     * 从ApplicationContext中获取自定义的FactoryBean
     * context.getBean(String beanName) ---> 最终获取到的Object是FactoryBean.getObejct(),
     * 使用Proxy.newInstance生成service的代理类
     */
    @Test
    public void testFactoryBean() {
        HelloWorldService helloWorldService = (HelloWorldService) context.getBean("fbHelloWorldService");
        helloWorldService.getBeanName();
        helloWorldService.sayHello();
    }
}
2.2 ApplicationContext与BeanFactory
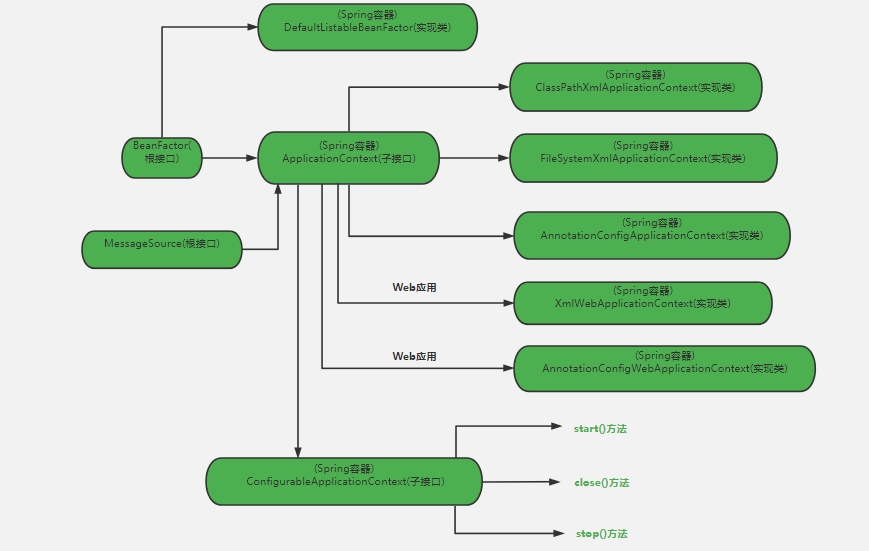
在Spring中有两个最基本的工厂,BeanFactory和ApplicationContext。BeanFactory是Spring框架的基础设施,面向的是Spring本身,也就是用于创建Spring扩展的其他内容,如Spring Security、Spring JDBC等;
而ApplicationContext这个容器类是面向开发者的,也就是应用上下文——配置文件等,开发者能够使用这个工厂实现自己的功能。

ApplicationContext以一种更向面向框架的方式工作以及对上下文进行分层和实现继承,ApplicationContext包还提供了以下的功能:
• MessageSource, 提供国际化的消息访问
• 资源访问,如URL和文件
• 事件传播
• 载入多个(有继承关系)上下文 ,使得每一个上下文都专注于一个特定的层次,比如应用的web层;
2.2.1 WebApplicationContext
(1) webApplicationContext为web应用准备,允许从相对于web根目录的路径中装载配置文件完成初始化工作 ,从webApplicationContext中可以获得ServletContext的引用,整个web应用上下文对象(也称为spring上下文,webApplicationContext)作为属性存放在servletcontext中,key为ROOT_WEB_APPLICATION_CONTEXT_ATTRIBUTE。这样web应用可以访问spring上下文。
同时spring中提供WebApplicationContextUtils的getWebApplicationContext(ServletContext src)方法来获得WebApplicationContext对象。
public interface WebApplicationContext extends ApplicationContext {
String ROOT_WEB_APPLICATION_CONTEXT_ATTRIBUTE = WebApplicationContext.class.getName() + ".ROOT";
     ServletContext getServletContext();
spring和web应用的上下文之间的融合,如下图:
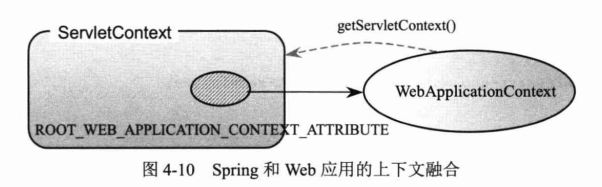
两个对象可以互相获取。
webApplicationContext的继承关系如下:
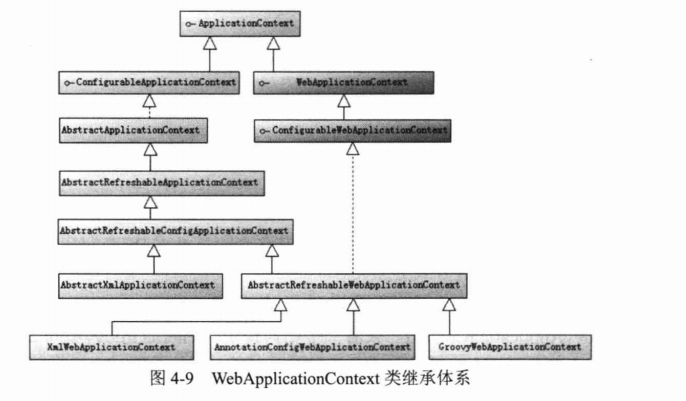
ConfigurableWebApplicationContext扩展了WebApplicationContext,它允许通过配置的方式实例化,同时设置两个重要方法
public interface ConfigurableWebApplicationContext extends WebApplicationContext, ConfigurableApplicationContext {
//为spring设置web应用上下文,以便两者整合
	void setServletContext(ServletContext servletContext);
//设置Spring配置的文件地址
	void setConfigLocation(String configLocation);
(2)webapplicationcontext借助servletcontext初始化
webApplicationContext初始化需要ServletContext,也就是说需要web容器(servletContext)启动前提下才能完成启动工作 ,可以通过在web.xml中配置自启动Servlet或Web容器监听来实现web容器的启动
Spring分别提供启动WebApplicationContext的servlet和Web容器监听器
org.springframework.web.context.ContextLoaderListener
*org.springframework.web.context.ContexLoaderServlet 此方法目前以废弃* 该类是声明自启动的servlet
1 当使用xml配置信息
!--从类路径下加载Spring配置文件,classpath特指类路径下加载-->
    <context-param>
        <param-name>contextConfigLocation</param-name>
        <param-value>
            classpath:smart-context.xml
        </param-value>
    </context-param>
    <!--负责启动spring容器的监听器  还可以声明自启动的Servlet   ContextLoaderServlet-->
    <listener>
        <listener-class>org.springframework.web.context.ContextLoaderListener</listener-class>
    </listener>
2 如果使用@Configuration的java类提供配置信息的配置,web.xml配置修改如下
<!--通过指定context参数,让Spring使用AnnotationConfigWebApplicationContext启动容器而非XmlWebApplicationContext   默认没配置时是使用XmlWebApplicationContext-->
    <context-param>
        <param-name>contextClass</param-name>
        <param-value>
            org.springframework.web.context.support.AnnotationConfigWebApplicationContext
        </param-value>
    </context-param>
<!--指定标注了@Configuration的类,多个可以用逗号分隔-->
    <context-param>
        <param-name>contextConfigLocation</param-name>
        <param-value>com.example.Car,com.example.Boss</param-value>
    </context-param>
    <!--监听器将根据上面的配置使用AnnotationConfigWebApplicationContext
    根据contextConfigLocation
    指定的配置类启动Spring容器-->
    <listener>
        <listener-class>org.springframework.web.context.ContextLoaderListener</listener-class>
    </listener>
启动步骤:
启动spring的容器,默认是xml的文件,需要在web.xml文件中配置contextConfigLocation指定配置文件,然后contextConfigLocation指定配置@configuration配置类;如果配置方式为配置类@configuration注解,则web.xml中contextClass配置容器实现类为AnnotationConfigWebApplicationContext。最后,分别添加ContextLoaderListener的启动监听器,在servletcontext启动的时候,完成web容器的启动。
2.3 ServletContext
略
2.16 Aware接口
aware接口是感知的意思,实现该接口的bean,可以访问并获取spring容器中对应前缀的对象实例。
这些Aware系列接口增强了Spring bean的功能,但是也会造成对Spring框架的绑定,增大了与Spring框架的耦合度。(Aware是“意识到的,察觉到的”的意思,实现了Aware系列接口表明:可以意识到、可以察觉到)
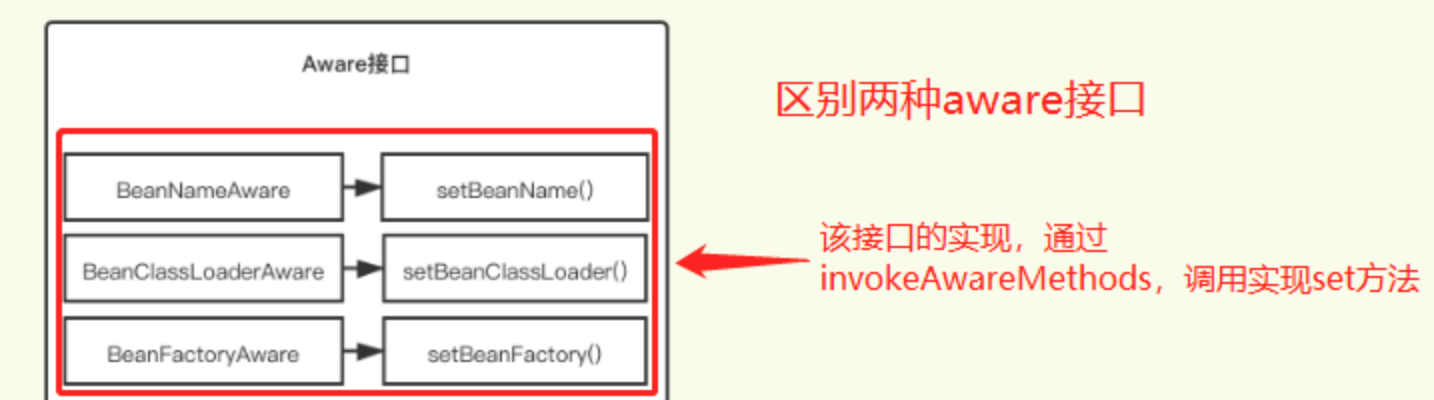
aware接口扩展点图
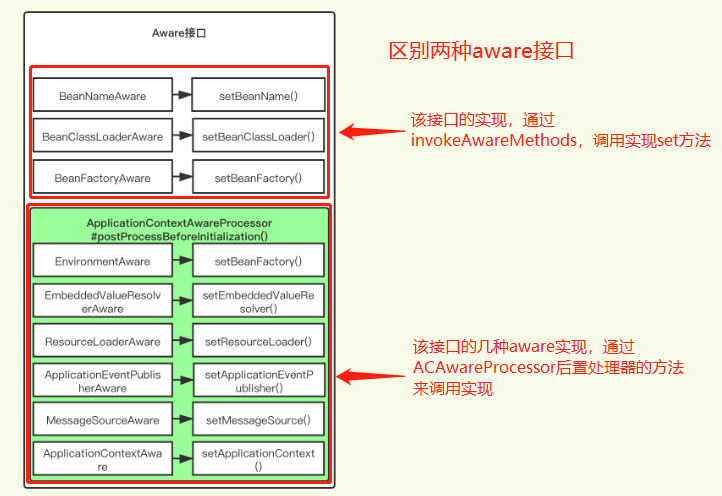
(注意:
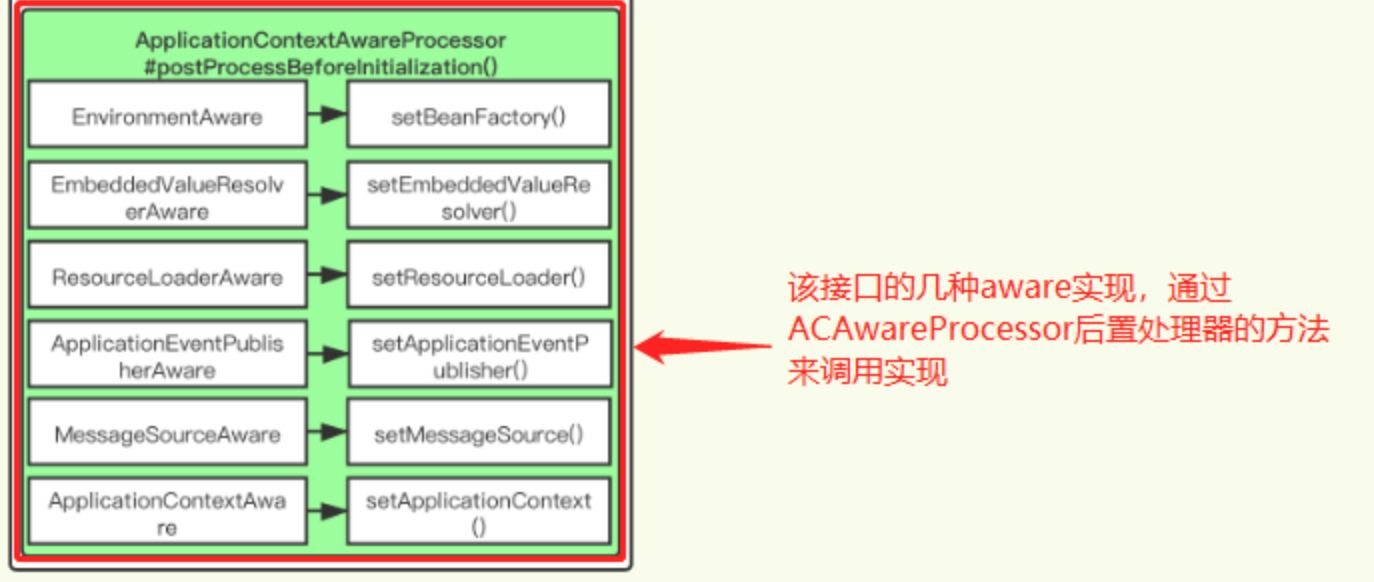
后面几种aware接口实现属性的set注入,是通过后置处理器ApplicationContextAwareProcessor完成的,首先因为,applicationContext实现了对应的environment,messageSource等接口

其次,调用aware接口的set方法设置属性,通过applicationContext来赋值。
)
//实现该接口的bean,会执行setxxx方法,使得bean能够aware该属性
public interface BeanNameAware extends Aware {
	void setBeanName(String name);
}
XXXAware接口,实现不同的aware接口,可以获取不同的spring内置bean或者功能
Bean implements XXXAware
让bean可获取XXX资源,并操作,来实现对bean的扩展。
此外,每一种XXXAware对应一个XXXAwareProcessor进行处理,然后一个xxxAwareProcessor可以处理多个xxxAware接口。
XXXAwareProcessor本质是后置处理器
class ApplicationContextAwareProcessor implements BeanPostProcessor {
2.16.1实现原理:
(1)在Spring中,获取bean时,初始化bean
context.getBean()->doGetBean()->createBeat()->doCreateBeat()->initializeBean()
initializeBean() 方法如下:
protected Object initializeBean(final String beanName, final Object bean, @Nullable RootBeanDefinition mbd) {
    if (System.getSecurityManager() != null) {
        AccessController.doPrivileged((PrivilegedAction<Object>) () -> {
            invokeAwareMethods(beanName, bean);
            return null;
        }, getAccessControlContext());
    } else {
        // 若bean实现了XXXAware接口进行方法的回调
        invokeAwareMethods(beanName, bean);
    }

    Object wrappedBean = bean;
    if (mbd == null || !mbd.isSynthetic()) {
        // 初始化前,执行bean的后置处理器
        wrappedBean = applyBeanPostProcessorsBeforeInitialization(wrappedBean, beanName);
    }

    try {
        // 调用初始化方法
        invokeInitMethods(beanName, wrappedBean, mbd);
    } catch (Throwable ex) {
        throw new BeanCreationException(
                (mbd != null ? mbd.getResourceDescription() : null),
                beanName, "Invocation of init method failed", ex);
    }
    if (mbd == null || !mbd.isSynthetic()) {
        wrappedBean = applyBeanPostProcessorsAfterInitialization(wrappedBean, beanName);
    }

    return wrappedBean;
}
调用了invokeAwareMethods() 方法(值针对上图中的一些XXXAware)
如果bean实现了Aware接口,就能够执行对应Aware接口的方法
private void invokeAwareMethods(final String beanName, final Object bean) {
    if (bean instanceof Aware) {
        // bean实现了BeanNameAware
        if (bean instanceof BeanNameAware) {
            ((BeanNameAware) bean).setBeanName(beanName);
        }
        // 实现了BeanClassLoaderAware接口
        if (bean instanceof BeanClassLoaderAware) {
            ClassLoader bcl = getBeanClassLoader();
            if (bcl != null) {
                ((BeanClassLoaderAware) bean).setBeanClassLoader(bcl);
            }
        }
        // 实现了BeanFactoryAware
        if (bean instanceof BeanFactoryAware) {
            ((BeanFactoryAware) bean).setBeanFactory(AbstractAutowireCapableBeanFactory.this);
        }
    }
}
(3)支持bean初始化前beforeInitialization处理的后置处理器
调用了方法applyBeanPostProcessorsBeforeInitialization(),创建了ApplicationContextAwareProcessor后置处理器,会调用此后置处理器的方法
ApplicationContextAwareProcessor#postProcessBeforeInitialization()如下:
// 初始化前调用 此Bean后置处理器处理
@Override
@Nullable
public Object postProcessBeforeInitialization(Object bean, String beanName) throws BeansException {
    if (!(bean instanceof EnvironmentAware || bean instanceof EmbeddedValueResolverAware ||
            bean instanceof ResourceLoaderAware || bean instanceof ApplicationEventPublisherAware ||
            bean instanceof MessageSourceAware || bean instanceof ApplicationContextAware)){
        return bean;
    }

    AccessControlContext acc = null;

    // 获取系统安全管理器,默认获取为空
    if (System.getSecurityManager() != null) {
        acc = this.applicationContext.getBeanFactory().getAccessControlContext();
    }

    if (acc != null) {
        AccessController.doPrivileged((PrivilegedAction<Object>) () -> {
            // 调用Aware接口
            invokeAwareInterfaces(bean);
            return null;
        }, acc);
    }
    else {
        invokeAwareInterfaces(bean);
    }

    return bean;
}
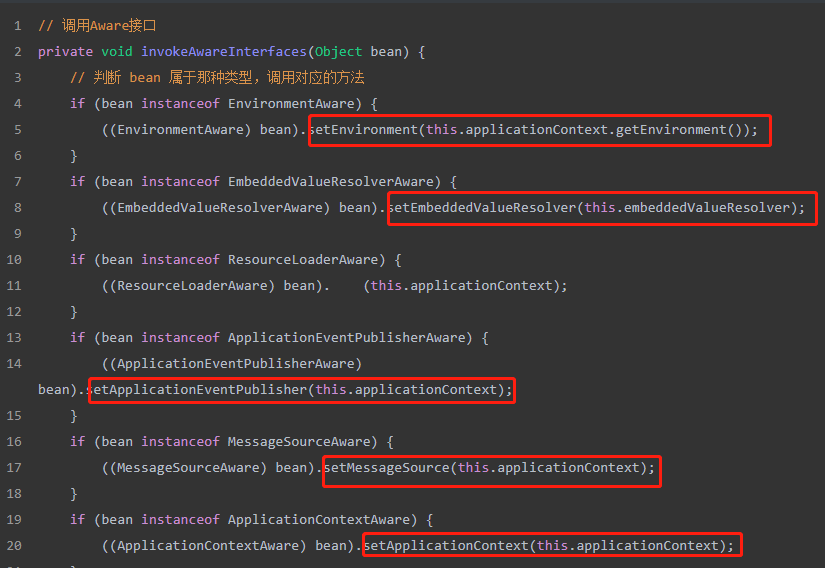
后置处理逻辑中调用了invokeAwareInterfaces方法()
(获取spring内置bean,例如environment,embeddedvalueresolver等bean,需要后置处理器ACAwareProcessor的方法实现)
// 调用Aware接口
private void invokeAwareInterfaces(Object bean) {
    // 判断 bean 属于那种类型,调用对应的方法
    if (bean instanceof EnvironmentAware) {
        ((EnvironmentAware) bean).setEnvironment(this.applicationContext.getEnvironment());
    }
    if (bean instanceof EmbeddedValueResolverAware) {
        ((EmbeddedValueResolverAware) bean).setEmbeddedValueResolver(this.embeddedValueResolver);
    }
    if (bean instanceof ResourceLoaderAware) {
        ((ResourceLoaderAware) bean).    (this.applicationContext);
    }
    if (bean instanceof ApplicationEventPublisherAware) {
        ((ApplicationEventPublisherAware) bean).setApplicationEventPublisher(this.applicationContext);
    }
    if (bean instanceof MessageSourceAware) {
        ((MessageSourceAware) bean).setMessageSource(this.applicationContext);
    }
    if (bean instanceof ApplicationContextAware) {
        ((ApplicationContextAware) bean).setApplicationContext(this.applicationContext);
    }
}
2.16.2 AwareProcessor
class ApplicationContextAwareProcessor implements BeanPostProcessor {

     public Object postProcessBeforeInitialization(Object bean, String beanName) throws BeansException {
该awareProcessor本质是BeanPostProcessor,会在执行时候,执行postProcessBeforeInitialization,来完成aware的set方法。

 浙公网安备 33010602011771号