和Keyle一起学StrangeIoc – MVCSContext

MVCSContext: the big picture
本篇基本上就是介绍Strange框架的基本方法使用与部署Unity3d项目,另外所有框架的思路都是一致的,让项目变得易于维护。现在让我们一起开始吧。
This section is basically a recipe for building a Strange app with MVCSContext. In the last section I described all the parts; in this one I’ll explain how to assemble them.
So you want to write a game. You’ve got Unity humming, MonoDevelop all warmed up and a cup of coffee in your hand (or whisky, if you're surfing the Ballmer Curve). Then someone says, “Hey, use Strange!” Now, she’s a smart cookie; she explains all the benefits and convinces you that you want to give it a go. Where to start?
Well, in the best vonTrapp tradition, let’s start at the very beginning.
Concepts
基本概念
StrangeIOC中所指 MVCS 的 “S”,为服务(程序外部的服务例如:web服务)
MVCSContext is Strange’s way of wrapping up the whole micro-architecture into a convenient, easy-to-use package. As the name suggests, it’s designed to work as an MVCS application (The ‘S’ is for Service, which refers to anything outside your application, such as a web service).
你现在需要学会部署以下条目
1.应用程序的入口点是一个叫做 ContextView 的类,只需实例化 MVCSContext 的MonoBehaviour 的类
2.MVCSContext 具有对上下文的约束力
3.dispatcher 是一个消息总线,允许你在你的App中发送消息。MVCSContext中发送的对象是TmEvent类型的。另外你也可以使用Signal重写(替换)这部分内容。
4.命令总是被IEvents或是Signals触发,一个命令只对应一个程序逻辑
5.使用Model存储程序(模块/功能)状态
6.使用Serviers模块与外部服务通信
7.Monobehaviours附加到GameObject上作为视图
8.中介者也是Monobehaviours类,但是与其他视图的中介隔离,下图则为 详细
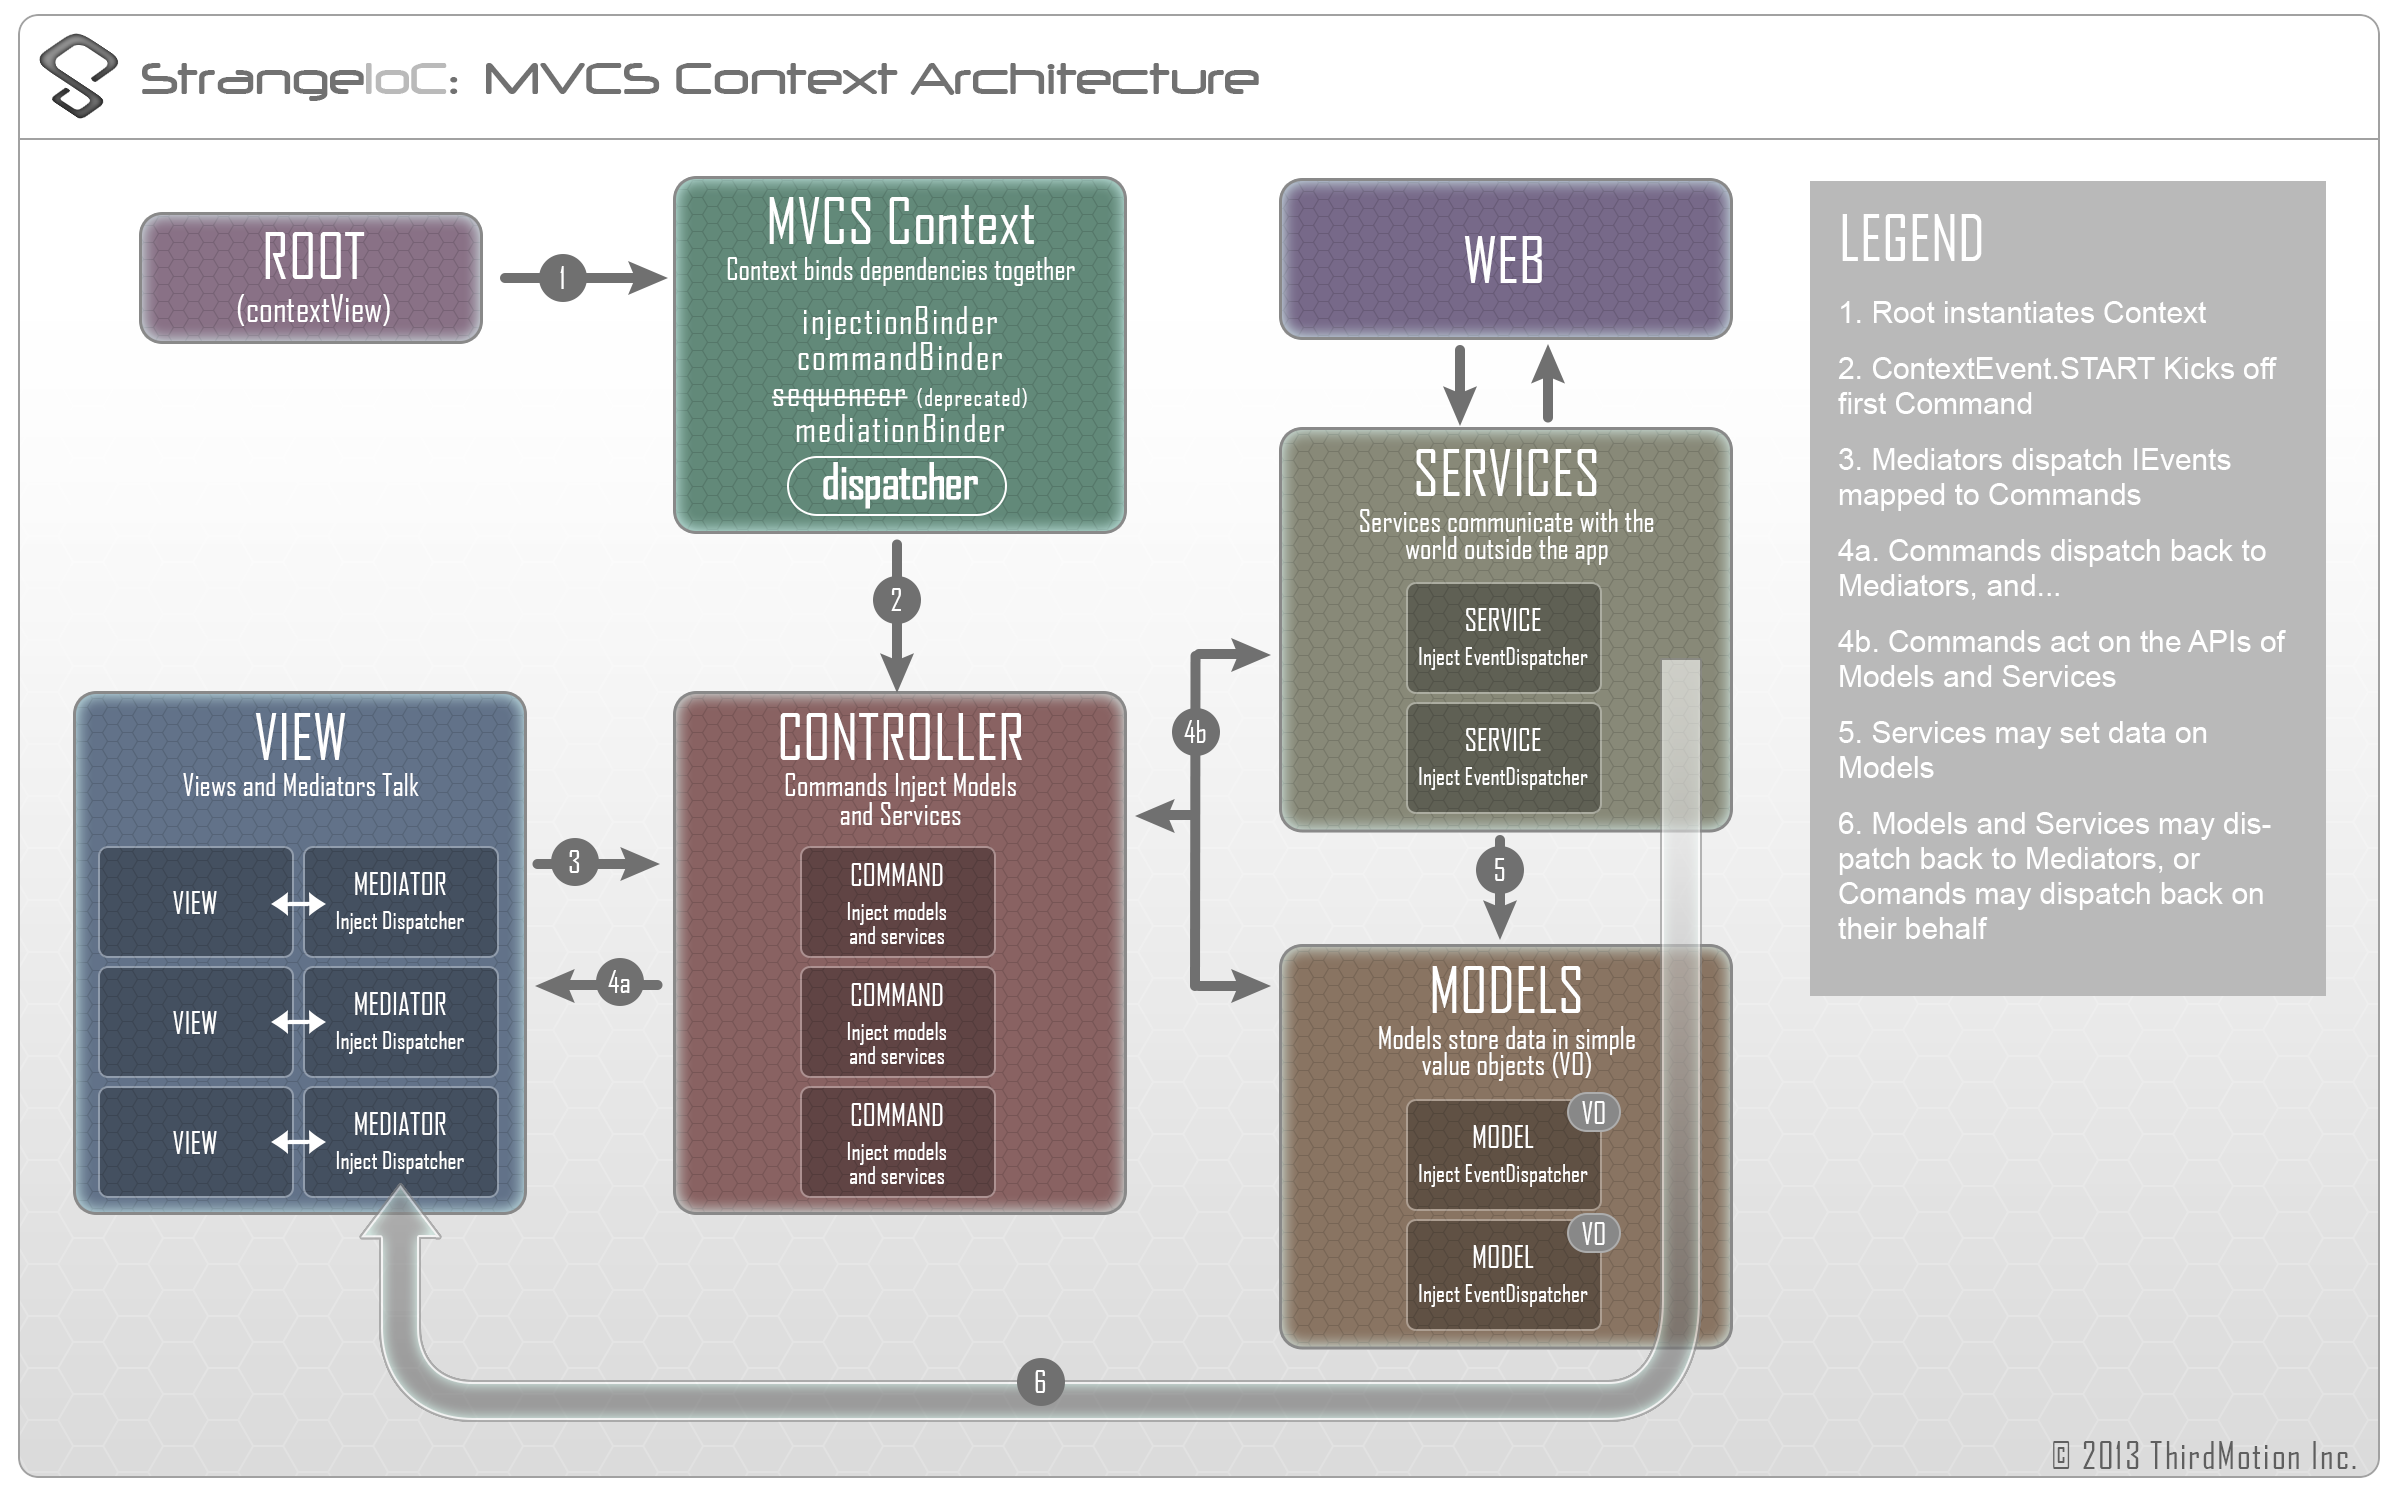
So here again are all the parts you’ll be assembling:
- The entry point to your app is a class called a ContextView, which is simply a MonoBehaviour that instantiates the MVCSContext.
- The MVCSContext (technically, a subclass of MVCSContext) is where you set up all your bindings (see Section 1, Binding).
- The dispatcher is a communication bus, allowing you to send messages throughout your app. The dispatcher used in MVCSContext sends objects called TmEvents. Alternatively, you can follow the steps outlined above to re-wire the Context to use Signals.
- Commands are classes triggered by IEvents or Signals. When a Command executes it carries out some part of the application logic.
- Models store state.
- Services communicate with the world outside the application.
- Views are MonoBehaviours attached to GameObjects: the bits of the game your player actually sees and interacts with.
- Mediators are also MonoBehaviours, but with the very specific function of insulating the View from the rest of the app.
Here’s a chart showing how these pieces work together:
Set up your project
请下载本屌在Overview章节具体代码切换至
StrangeIoC > examples > Assets > scenes > myfirstproject > TestView.unity
Download the Strange repo. Inside it you’ll find a complete Unity project with examples to look at (I suggest you go through these). Find a folder called "myfirstproject" and open the TextView.unity file within (StrangeIoC > examples > Assets > scenes > myfirstproject > TestView.unity).
刚才你打开的只是一个Example 你在项目中实际使用的东西在这里(StrangeIOC主文件夹) Assets/scripts/strange
Take note that, while I'm going to walk you through this project to get you comfy, you don't need nearly all the stuff you've downloaded when you use Strange in your own project. Everything you really need is in:
Assets/scripts/strange
and within that the important subdirectories are framework and extensions.
A scene is set...
你打开这个场景你可以看到ViewGO对象和它结构之下的摄像机,ContextView 将是游戏层级结构的顶层(虽然StrangeIoc不强制要求要有顶级物体),一切GameObject会在它的结构之内。因为在场景多上下文的情况下你可以清晰的认知到哪个视图从属哪个上下文。点击游戏开始 文字在旋转,在Inspector内你可以看到MyFitstProjectRoot,打开它。
When you open the scene in Unity you'll find a GameObject named “ViewGO” and a camera inside of it. ContextView will be the top of your game hierarchy and everything else will go inside it. Although Unity does not require you to have a singular top-level GameObject, Strange works best this way (specifically, when there is more than one context, Strange uses the display hierarchy to determine which Context any given View belongs to). There's also a MonoBehaviour attached called "MyFirstProjectRoot".
Play this simple app and see what it does. See what happens when you click on the rotating text. Nothing spectacular here. We're just demonstrating structure for now.
In the Property Inspector, double-click MyFirstProjectRoot to launch MonoDevelop.
A ContextView begins...
ContextView 是 MonoBehaviour类型用来实例化您的上下文,程序从ContextView启动。
ContextView is a MonoBehaviour that instantiates your context. MyFirstProjectRoot subclasses ContextView, and is where our app begins.
using System;
using UnityEngine;
using strange.extensions.context.impl;

namespace strange.examples.myfirstproject
{
    public class MyFirstProjectRoot : ContextView
    {
        void Awake()
        {
            context = new MyFirstContext(this, true);
            context.Start ();
        }
    }
}
strange.extensions.context.impl 如何使用?
定义一个ContextView类型的 context,你只需要简单的了解你定义的context是什么东西就可以了。我们写一个myfirstcontext(参考myfirstprojectroot),它告诉context(上下文)这个Gameobject就是ContextView的范围。当我们调用Start,它将在context运行一些有用的东西,但是实际上没有启动APP(你也可能在加载一个文件)。
Note how we’re “using” the strange.extensions.context.impl folder. Everything in Strange is tightly namespaced like this, so you import only what you need.
The rest of this code is really simple. ContextView defines a property called context which of course refers to our context. We simply need to define what it is. We’ve writen one called MyFirstContext. The reference this refers to MyFirstProjectRoot. It tells the Context which GameObject is to be considered the ContextView. The true Iindicates that once we call start, everything else will proceed. It can sometimes be useful to have the context run, but not actually launch the app (for example, if you’re awaiting the loading of a file), but this is a more advanced use case than we care about here.
Finally, call context.Start() to kick it into action.
The Context binds...
如上所述,上下文是所有binding发生的地方,如果没有binding的话Strangeioc的各个模块只是一盘散沙,Context则是起到胶水的作用。我们扩展了MVCSContext(扩展了 注入器,消息总线,命令模式,model与Service的支持,还有视图中介),是我们的代码变得简洁。
As I explained above, the Context is where all the binding happens. Without bindings, a Strange application is just a pile of disconnected parts. The Context is the glue that brings order to the chaos. Since we’re extending MVCSContext, we get a whole bunch of binding goodness for free without any work. MVCSContext is designed to give us everything we need to cleanly structure an IoC-style application: an Injector, a message bus, Command patterns, model and service support, and View mediation. Here’s the code for our simple Context.
using System;
using UnityEngine;
using strange.extensions.context.api;
using strange.extensions.context.impl;
using strange.extensions.dispatcher.eventdispatcher.api;
using strange.extensions.dispatcher.eventdispatcher.impl;

namespace strange.examples.myfirstproject
{
    public class MyFirstContext : MVCSContext
    {

        public MyFirstContext () : base()
        {
        }

        public MyFirstContext (MonoBehaviour view, bool autoStartup) : base(view, autoStartup)
        {
        }

        protected override void mapBindings()
        {
            injectionBinder.Bind<IExampleModel>()
                .To<ExampleModel>()
                .ToSingleton();
            injectionBinder.Bind<IExampleService>()
                .To<ExampleService>()
                .ToSingleton();

            mediationBinder.Bind<ExampleView>()
                .To<ExampleMediator>();

            commandBinder.Bind(ExampleEvent.REQUEST_WEB_SERVICE)
                .To<CallWebServiceCommand>();
            commandBinder.Bind(ContextEvent.START)
                .To<StartCommand>().Once ();

        }
    }
}
正如你所见的的扩展后的mvcscontext,这意味着我们继承其所有映射(你会发现深入讨论这个类更有趣)。我们已经有一个injectionbinder和commandbinder和一个diapatcher。请注意,dispatcher在应用域中都可访问且与commandbinder耦合,所以任何事件可以触发回调也派出触发命令和Sequences(命令队列)。
As you see we’re extending MVCSContext, which means we inherit all its mappings (you might find it interesting to explore that class in depth). So we already have things like an injectionBinder and a commandBinder and a dispatcher. Note that the dispatcher is accessible all across the app, and is coupled to the commandBinder, so any event dispatched can trigger callbacks and also trigger commands and sequences.
这里的映射的只是你期望而且已经读取过的components。注入器:我们映射一个模型(model)一个服务(Service)并且都为单例。我们在这个示例中,只有一个视图 (ExampleView),我们将它绑定到中介 (ExampleMediator),最后,我们映射了两个命令,更重要的是我们绑定了ContextEvent.START命令,用它来触发应用程序启动事件,你应该将某些命令或序列绑定到它,就好比Init()整个App一样的工作。你也可以看到在最后我们使用了Once()函数(上一章节我有翻译到)解绑命令。
The mappings here are just what you’d expect if you’ve read about the various components. For injection, we’re mapping one model and one service, both as Singletons. We’re going to have just one view (ExampleView) for this example, and we bind it to a Mediator (ExampleMediator). Finally, we’re mapping two commands. The more important of the two is StartCommand. It’s bound to a special event: ContextEvent.START. This is the event fired to kick off your app. You should bind some command (or sequence) to it and think of that command as being like an init() for your entire app. Also see that we’ve bound it with .Once(), which a special method that Unbinds the event after a single firing.
注意还有一个叫PostBindings()的方法,它将你的代码在banding之后在Launch()函数执行之前调用,另一个有用的函数是call
DontDestroyOnLoad(contextView),在Loading新场景后保留你的上下文。
Note that there's also a postBindings() method. This is a useful place to put other code you need to run after binding, but before Launch(). MVCSContext uses this to process any Views which register early (before mapBindings() is called). Another obvious and useful case for this is to callDontDestroyOnLoad(contextView) inside postBindings(), in order to retain the contextView (and the Context!) when you load in a new scene.
A Command fires...
因为StartCommand已被绑定到了ContextEvent.START,所有触发的时候StartCommand会被实例化与执行。
So ContextEvent.START fires, and because it’s bound to StartCommand, a new instance of StartCommand will be instantiated and executed.
using System;
using UnityEngine;
using strange.extensions.context.api;
using strange.extensions.command.impl;
using strange.extensions.dispatcher.eventdispatcher.impl;

namespace strange.examples.myfirstproject
{
    public class StartCommand : EventCommand
    {
        [Inject(ContextKeys.CONTEXT_VIEW)]
        public GameObject contextView{get;set;}

        public override void Execute()
        {
            GameObject go = new GameObject();
            go.name = "ExampleView";
            go.AddComponent<ExampleView>();
            go.transform.parent = contextView.transform;
        }
    }
}
StartCommand的扩展意味着
1.它是一个合法的命令 可以使用commandBinder
2.它将继承从Command与EventCommand的一切
StartCommand extends EventCommand which means that (a) it’s a legal Command that the commandBinder can work with and (b) it inherits everything from Command and from EventCommand. In particular, extending EventCommand means that you get an IEvent injected and you get access to the dispatcher.
If you just extended Command, you wouldn’t have automatic access to those objects, but you could still inject them manually by adding this:
如果你只是想扩展这些命令,你就不能自动方位这些对象,但是你可以手动注入他们
[Inject(ContextKeys.CONTEXT_DISPATCHER)]
IEventDispatcher dispatcher{get;set;}

[Inject]
IEvent evt{get;set;}
注意这里有两种不同的类型。IEventDispatcher和游戏对象都使用命名实例。那是因为我们要引用这些对象的特定版本。我们只需要找到标记了ContextView的那个GameObject,唯一可以通信的是被ContextKeys.CONTEXT_DISPATHER标记的上下文 ,IEvent只是简单映射一个Value,一定没有name。
Note the two different types of injection being used here. IEventDispatcher and GameObject are both using named instances. That’s because we want to refer to very specific versions of these objects. We don’t want just any GameObject, we want the one marked as ContextView. Nor do will we settle for any old IEventDispatcher. The only one that will serve to communicate around the Context is the one marked by ContextKeys.CONTEXT_DISPATCHER. The IEvent, on the other hand, is simply mapped for the consumption of this particular command (technically it’s mapped to a “value”). So no name is required.
我们在这个项目中依赖的是ContextView,我们将给它添加一个子视图
由 commandBinder 会自动触发 execute () 方法。在大多数情况下,执行的顺序看起来像这样的
1.实例化Command绑定到IEvent.type上
2.注入的依赖项,包括 IEvent 本身。
3.调用Execute()
4.删除Command
The dependency we’ll use in the current scenario is the ContextView. We’ll add a child view to it.
The Execute() method is automatically fired by the commandBinder. In most situations, the order of execution looks like this
- Instantiate the Command(s) bound to the IEvent.type.
- Inject the dependencies, including the IEvent itself.
- Call
Execute() - Delete the Command
该命令并不一定要立刻清理,我们会在某个时间点清理掉,如果你看Execute()的代码你会发现是纯的Unity写法,创建一个GameObject对象,MonoBehaviour 附加到它上面,然后在母物体上添加ContextView,我们将使用特定的MonoBehaviour,一个IView视图,我们在context中映射这个视图 Mediator 会自动导入,这意味着我们创建了一个新的 ExampleMediator
The Command doesn’t have to be cleaned up immediately, but we’ll get to that in a bit. If you look at the code inside the Execute() method, you’ll see that it’s pure Unity. Create a GameObject, attach a MonoBehaviour to it, then parent that GameObject to ContextView. The specific MonoBehaviour we’re using, however, happens to be a Strange IView. And since we mapped that view in our context...
mediationBinder.Bind<ExampleView>().To<ExampleMediator>();
...the view is automatically mediated, which means a new ExampleMediator has just been created!
A View is mediated...
如果你已经花了几分钟来编码,并会用C#,那么我有一些对你的建议
1.通过扩展视图,你可以通过代码连接到各个视图,要使用StrangeIOC你必须自己扩展视图或是自己重写这部分功能,如果你不扩展依旧还是要实现IView接口,确保Context可以操作你的MonoBehaviour.
2.请注意我们注入的IEventDispatcher,他和StartCommand的dispatcher不是同一个,我们查看相关代码,如下…
If you’ve spent more than a few minutes coding for Unity, you’ve created a View. You’d call it a MonoBehaviour, but the point is that a View is anything you see or interact with. I’m not going to spend any time walking through the ExampleView code. You can look in the example files and if you already know C# and Unity you won’t need it explained. I only want to draw your attention to two bits. First:
public class ExampleView : View
By extending View, you get the code that connects each View to the Context. To use Strange, you either need to extend View or write this functionality yourself. But if you don’t extend View, you still need to implement the IView interface. This is required to ensure that the Context can operate on your MonoBehaviour. (I might look for ways to fix this in a future version, allowing you to map a Mediator onto any MonoBehaviour).
The second item to point out:
[Inject]
public IEventDispatcher dispatcher{get; set;}
Note that we’re injecting IEventDispatcher. But this is NOT the same dispatcher as the one in StartCommand. Look closely at the code. The one in written in EventCommand (which I showed above) looks like this:
[Inject(ContextKeys.CONTEXT_DISPATCHER)]
public IEventDispatcher dispatcher{get; set;}
…通过名称注入在通用的context dispatcher中使用特殊的命令,View不会注入dispatcher,mediation的关注点是隔离视图
By naming the injection, the command specifies that it’s using the common context dispatcher. The View should never inject that dispatcher. The whole point of mediation is to insulate your view from the app and vice-versa. Strange allows injection into the View, but that capability is best when it’s tightly confined. Injecting a local dispatcher for communication with the Mediator is fine. So is injecting a config/layout file (which is useful if you’re publishing to multiple platforms). But if you listen to my advice at all, never inject a model or service or anything else that extends outside the pool of the View and its Mediator.
I’ll tell you right now: this is the hardest concept of this entire framework for most developers to grasp. A View should solely be about display and input. The View should inform the Mediator when certain inputs have occurred. The Mediator (which is allowed to inject the context dispatcher) abstracts the bit of View that is concerned with communicating with the rest of your app. This protects the app from view code — which is often chaotic — and protects your views when the reverse situation is the case.
So don’t say I never did nuthin’ for ya.
3.重写View的积累中Monobehaviour的方法例如handlersAwake()、 start () 和 OnDestroy() 确保你的程序正常运行
Finally in regard to views, note that the base View class uses standard MonoBehaviour handlersAwake(), Start(), and OnDestroy(). So if you override those handlers, make sure you callbase.Awake(), etc so that the Strange bits run properly.
Now let’s look at the Mediator.
using System;
using UnityEngine;
using strange.extensions.dispatcher.eventdispatcher.api;
using strange.extensions.mediation.impl;

namespace strange.examples.myfirstproject
{
    public class ExampleMediator : EventMediator
    {
        [Inject]
        public ExampleView view{ get; set;}

        public override void OnRegister()
        {
            view.dispatcher.AddListener
                (ExampleView.CLICK_EVENT, onViewClicked);
            dispatcher.AddListener
                (ExampleEvent.SCORE_CHANGE, onScoreChange);
            view.init ();
        }

        public override void OnRemove()
        {
            view.dispatcher.RemoveListener
                (ExampleView.CLICK_EVENT, onViewClicked);
            dispatcher.RemoveListener
                (ExampleEvent.SCORE_CHANGE, onScoreChange);
            Debug.Log("Mediator OnRemove");
        }

        private void onViewClicked()
        {
            Debug.Log("View click detected");
            dispatcher.Dispatch(ExampleEvent.REQUEST_WEB_SERVICE,
                "http://www.thirdmotion.com/");
        }

        private void onScoreChange(IEvent evt)
        {
            string score = (string)evt.data;
            view.updateScore(score);
        }
    }
}
At the top, see where we’ve injected the ExampleView. This is how the Mediator knows about the View it’s mediating. Mediators are allowed to know quite a lot about their View. (The Mediator is often considered “throw-away code”, because it’s highly particular to the specifics of both the View and the App). Certainly this Mediator is allowed to know that the View has a dispatcher and that this dispatcher has an event called ExampleView.CLICK_EVENT. By listening to this event, the Mediator sets up a handler (onViewClicked()) which tells the rest of the app what this click means.
I emphasized those last words to once again clarify my earlier point: the View should not be sending the event REQUEST_WEB_SERVICE. The View is just a View. It should dispatch events like: HELP_BUTTON_CLICKED, COLLISION, SWIPE_RIGHT. It would be the job of the Mediator to map those events to ones meaningful to the rest of the app, such as REQUEST_HELP, MISSILE_ENEMY_COLLISION, PLAYER_RELOAD. The latter events are mapped to Commands and it’s these Commands which will call the help system, calculate a score increase (adding it to a score model) or determine if the player is allowed to reload.
The OnRegister() and OnRemove() methods are like constructors and deconstructors for the mediator. OnRegister() occurs right after injection, so I usually use it to set up listeners and call aninit() function on the View. OnRemove() occurs as a result of the MonoBehaviour OnDestroy() call. It fires in time for you to clean up. Make sure you remove all your listeners or the Mediator may not be properly garbage collected.
Finally note that by extending EventMediator we have access to the common dispatcher. The Mediator listens for the SCORE_CHANGE event off the common bus, which we’ll come to in a moment. And when the View issues a click, the Mediator dispatches REQUEST_WEB_SERVICE to that same bus. Which brings us to...
Another Command fires...
Looking way back at the Context, there was this line which we sort of glossed over:
commandBinder.Bind(ExampleEvent.REQUEST_WEB_SERVICE).To<CallWebServiceCommand>();
当事件总线接收到此事件 将执行 CallWebServiceCommand
This means that whenever the common bus receives this event, it’ll launch the CallWebServiceCommand. Now, we’re not going to actually call a web service, since this isn’t that kind of tutorial, but it draws your attention to a slightly different way of using Commands.
using System;
using System.Collections;
using UnityEngine;
using strange.extensions.context.api;
using strange.extensions.command.impl;
using strange.extensions.dispatcher.eventdispatcher.api;

namespace strange.examples.myfirstproject
{
    public class CallWebServiceCommand : EventCommand
    {
        [Inject]
        public IExampleModel model{get;set;}

        [Inject]
        public IExampleService service{get;set;}

        public override void Execute()
        {
            Retain ();
            service.dispatcher.AddListener
                (ExampleEvent.FULFILL_SERVICE_REQUEST, onComplete);
            string url = evt.data as string
            service.Request(url);
        }

        private void onComplete(IEvent result)
        {
            service.dispatcher.RemoveListener
                (ExampleEvent.FULFILL_SERVICE_REQUEST, onComplete);
            model.data = result.data as string;
            dispatcher.Dispatch(ExampleEvent.SCORE_CHANGE, evt.data);
            Release ();
        }
    }
}
不要忘记了 Retain () 和 Release()
So by now, most of this should be intelligible to you. We’re injecting the ExampleModel and ExampleService into this command. We listen to the service, and call a method on it. We're using the data payload of the event fired by the mediator (the url). When the service finishes (which could be instantly or in 5ms or in 30 seconds!) it dispatches, triggering onComplete(). We unmap the listener, set a value on the model, then dispatch a SCORE_CHANGE which is received by the mediator.
This is all great, but if you’ve been paying close attention you’ll recall that I mentioned before that Commands are immediately cleaned up after Execute() complete. So why isn’t this Command garbage collected? The answer is the Retain() method called at the top of the Command. Retain()marks this Command as exempt from cleanup. It will be held onto until Release() is called. Obviously, this means that calling Release() is very important, or you run the risk of a memory leak.
And we’re served...
You can look at ExampleModel and ExampleService to see how they work, but they’re really simple. Models are just places to store data, and Services are involved in calling out to the Web (or elsewhere). They really have only one rule, but it’s simple.
DON’T ALLOW MODELS AND SERVICES TO LISTEN FOR EVENTS.
如果阅读过全文我便不解释下面的注意事项了,请记住不要破坏MVCS的结构,每个部分只做自己的本质工作不要越界
Let me repeat that. No, nevermind, it’s bold and in caps so you probably heard me. Models and Services are used by Commands, they’re not part of the communication chain, nor should they be used in that way. I can’t emphasize strongly enough that you don’t want to do this.
You can certainly inject into them, and there’s nothing the matter with injecting a local dispatcher (as we do here) and allowing it to talk back to your Commands. There’s also nothing wrong with injecting the context dispatcher and dispatching events. But...
DON’T ALLOW MODELS AND SERVICES TO LISTEN FOR EVENTS.
Oh, did I say that again? So sorry.
Mapping Across Contexts
当你完成某项功能需要跨context访问的时候 提供了一个 CrossContext 函数,如果你使用这个函数该context将会与所有上下文共享
Generally speaking, you want to abide by the Context boundary. After all,, the boundary is there for a reason: it allows parts of your app to function in isolation, increasing modularity. But there are times when some object...perhaps a model, a service or a Signal...needs to be accessible across more than one Context. In v.0.6.0 of Strange we added a mechanism to make this easier, and easy it is:
injectionBinder.Bind<IStarship>().To<HeartOfGold>().ToSingleton().CrossContext();
Adding CrossContext() signals that the binding should be instantiated across the Context boundary. It will be available to all child Contexts. Note that you can also override a CrossContext binding. If you map the key locally, the local binding will override the CrossContext one.
本篇算是实践篇,在翻译结束后我会开源相关的项目印证这些实例。一个好程猿要不停的学习提高自己,既狂妄自大也不能妄自菲薄,一步一个脚印认真的在这条路上一直一直走下去。

 浙公网安备 33010602011771号