[sunj的小白人话系列 一]:如何做一个本地部署的对话系统
小白的人话系列一:
如何简简单单的在本地部署一个属于自己的对话系统
笔者这里分别用了两个方法:本地部署、调取API
一、英语对话系统(本地部署)
基础:
***请你先理解我画的对话系统图, 来搞清楚思路是怎么样的 ***
英语口语系统
- 文档下述名词解释:SR(Speech Recording)、TTS(Text To Speech)、ASR(Automatic Speech Recognition)、QA(Question Answer)、LLM(Large Language Moder)
思路图
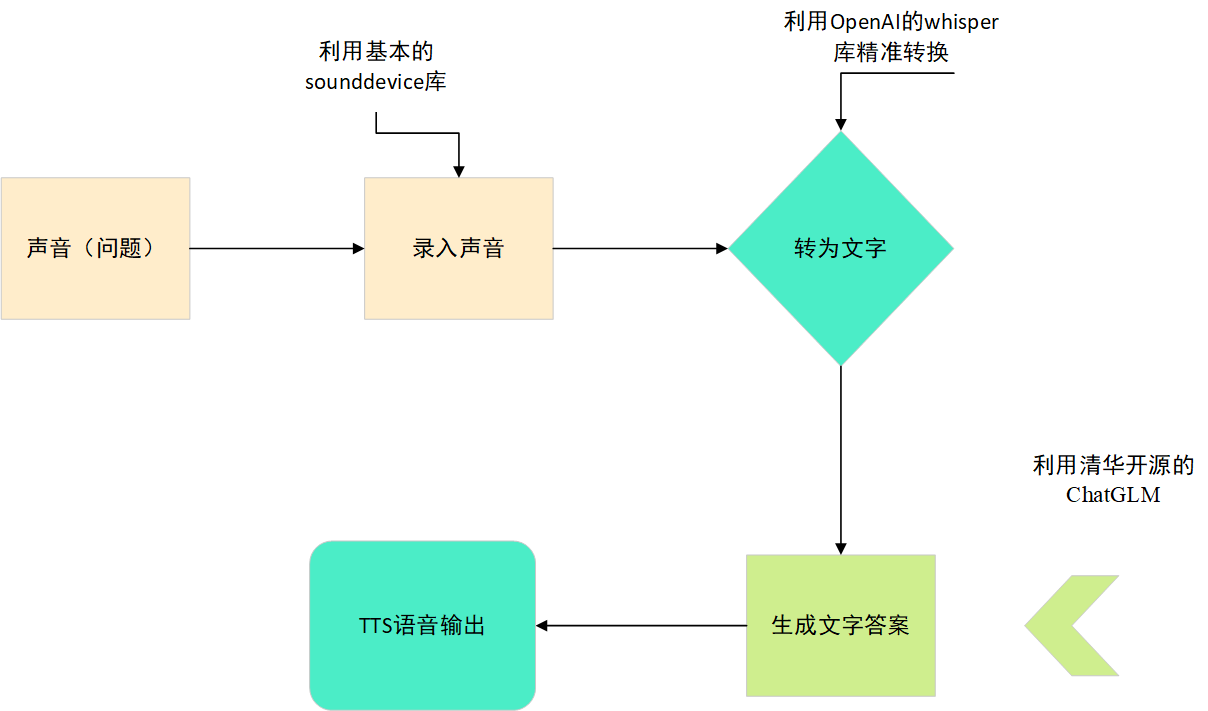
各个模块代码说明
1、声音传输导入
这个我选择了用Sounddevice库。因为网上随处可见,比较简单。Sounddevice还是比较精准的
import sounddevice as sd
import wave

def record_audio(output_path="test.wav", duration=5, sample_rate=44100, channels=2):
    print(f"开始录音,时长为 {duration} 秒...")

    # 录制音频
    audio_data = sd.rec(int(duration * sample_rate), samplerate=sample_rate, channels=channels, dtype='int16')
    sd.wait()

    # 保存录音结果为 WAV 文件
    with wave.open(output_path, 'wb') as wf:
        wf.setnchannels(channels)
        wf.setsampwidth(2)  # 16-bit音频,每个样本2个字节
        wf.setframerate(sample_rate)
        wf.writeframes(audio_data.tobytes())

    print(f"录音已保存为: {output_path}")

# 调用录音函数
record_audio()
2、ASR(实现语音识别功能)
运用Open AI的whisper库,更加精准,代码如下:
链接
import whisper

model = whisper.load_model("base").to('cuda')

# load audio and pad/trim it to fit 30 seconds
audio = whisper.load_audio("/content/test.wav")
audio = whisper.pad_or_trim(audio)

# make log-Mel spectrogram and move to the same device as the model
mel = whisper.log_mel_spectrogram(audio).to(model.device)

# detect the spoken language
_, probs = model.detect_language(mel)
print(f"Detected language: {max(probs, key=probs.get)}")

# decode the audio
options = whisper.DecodingOptions()
result = whisper.decode(model, mel, options)

# print the recognized text
print(result.text)
3、QA(实现产生文字答案过程)
全部模型都跑完的话要占用很多GPU资源,经常会把服务器的显卡跑满。下面为代码。
链接
注意要把model给Del了,不然等等炼丹把实验室炸了
import gc
import torch
from transformers import AutoTokenizer, AutoModel
tokenizer = AutoTokenizer.from_pretrained("THUDM/chatglm3-6b", trust_remote_code=True)
model = AutoModel.from_pretrained("THUDM/chatglm3-6b", trust_remote_code=True, device='cuda')
model = model.eval()
response, history = model.chat(tokenizer, result.text, history=[])
print(response)

# 释放GPU显存
del model
torch.cuda.empty_cache()
gc.collect()
4、TTS(实现语音输出功能)
链接2
代码如下:
from TTS.tts.configs.xtts_config import XttsConfig
from TTS.tts.models.xtts import Xtts
import numpy as np

config = XttsConfig()
config.load_json("/content/XTTS-v2/config.json")
model = Xtts.init_from_config(config)
model.load_checkpoint(config, checkpoint_dir="/content/XTTS-v2/", eval=True)
model.cuda()

max_text_length = 250
if len(response) > max_text_length:
    segments = [response[i:i+max_text_length] for i in range(0, len(response), max_text_length)]
else:
    segments = [response]


full_audio = []

for segment in segments:
    # 使用 XTTS 模型生成语音
    outputs = model.synthesize(
        segment,
        config,
        speaker_wav="/content/XTTS-v2/samples/en_sample.wav",
        gpt_cond_len=3,
        language="en",
    )

    # 如果输出是音频,将其添加到整体音频流中
    if 'wav' in outputs:
        segment_audio = outputs['wav']
        full_audio.extend(segment_audio)
        full_audio.extend(np.zeros(int(1.5 * 24000)))  # 在段落之间添加1.5秒的静音

# 将生成的音频保存为 WAV 文件或进行其他必要的处理
from scipy.io.wavfile import write
write("/content/output.wav", 24000, np.array(full_audio))
完整代码:
!pip install -U openai-whisper

!pip install git+https://github.com/openai/whisper.git

!pip install --upgrade --no-deps --force-reinstall git+https://github.com/openai/whisper.git

!pip install TTS
!git lfs install
!git clone https://huggingface.co/coqui/XTTS-v2
import sounddevice as sd
import wave

def record_audio(output_path="test.wav", duration=5, sample_rate=44100, channels=2):
    print(f"开始录音,时长为 {duration} 秒...")

    # 录制音频
    audio_data = sd.rec(int(duration * sample_rate), samplerate=sample_rate, channels=channels, dtype='int16')
    sd.wait()

    # 保存录音结果为 WAV 文件
    with wave.open(output_path, 'wb') as wf:
        wf.setnchannels(channels)
        wf.setsampwidth(2)  # 16-bit音频,每个样本2个字节
        wf.setframerate(sample_rate)
        wf.writeframes(audio_data.tobytes())

    print(f"录音已保存为: {output_path}")

# 调用录音函数
record_audio()
import whisper
model = whisper.load_model("base").to('cuda')

audio = whisper.load_audio("/content/test.wav")
audio = whisper.pad_or_trim(audio)
py
mel = whisper.log_mel_spectrogram(audio).to(model.device)

_, probs = model.detect_language(mel)
print(f"Detected language: {max(probs, key=probs.get)}")

options = whisper.DecodingOptions()
result = whisper.decode(model, mel, options)

print(result.text)
!git clone https://github.com/THUDM/ChatGLM3
!cd ChatGLM3

!pip install --upgrade numpy

!pip install --upgrade tensorflow
import gc
import torch
from transformers import AutoTokenizer, AutoModel
import random
random.seed(1)

tokenizer = AutoTokenizer.from_pretrained("THUDM/chatglm3-6b", trust_remote_code=True)
model = AutoModel.from_pretrained("THUDM/chatglm3-6b", trust_remote_code=True, device='cuda')
model = model.eval()
response, history = model.chat(tokenizer, result.text, history=[])
print(response)

# 释放GPU显存
del model
torch.cuda.empty_cache()
gc.collect()
from TTS.tts.configs.xtts_config import XttsConfig
from TTS.tts.models.xtts import Xtts
import numpy as np

config = XttsConfig()
config.load_json("/content/XTTS-v2/config.json")
model = Xtts.init_from_config(config)
model.load_checkpoint(config, checkpoint_dir="/content/XTTS-v2/", eval=True)
model.cuda()

max_text_length = 250
if len(response) > max_text_length:
    segments = [response[i:i+max_text_length] for i in range(0, len(response), max_text_length)]
else:
    segments = [response]

full_audio = []

for segment in segments:
    # 使用 XTTS 模型生成语音
    outputs = model.synthesize(
        segment,
        config,
        speaker_wav="/content/XTTS-v2/samples/en_sample.wav",
        gpt_cond_len=3,
        language="en",
    )

    # 如果输出是音频,将其添加到整体音频流中
    if 'wav' in outputs:
        segment_audio = outputs['wav']
        full_audio.extend(segment_audio)
        full_audio.extend(np.zeros(int(1.5 * 24000)))  # 在段落之间添加1.5秒的静音

# 将生成的音频保存为 WAV 文件或进行其他必要的处理
from scipy.io.wavfile import write
write("/content/output.wav", 24000, np.array(full_audio))
_ 是不是很容易,接下来更加容易,但是要处理一下输入输出
二、虚拟女友对话系统(调取API)
重点, ( #`O′) 喂说你呢,别分神了。
首先, 先去vivo innovation contest 去注册一个账号, 至于后面怎么搞,这个请你自行谷歌,不在我们的topic内。
PART 1:(part of QA)
我们把70B demo例子复制过来.
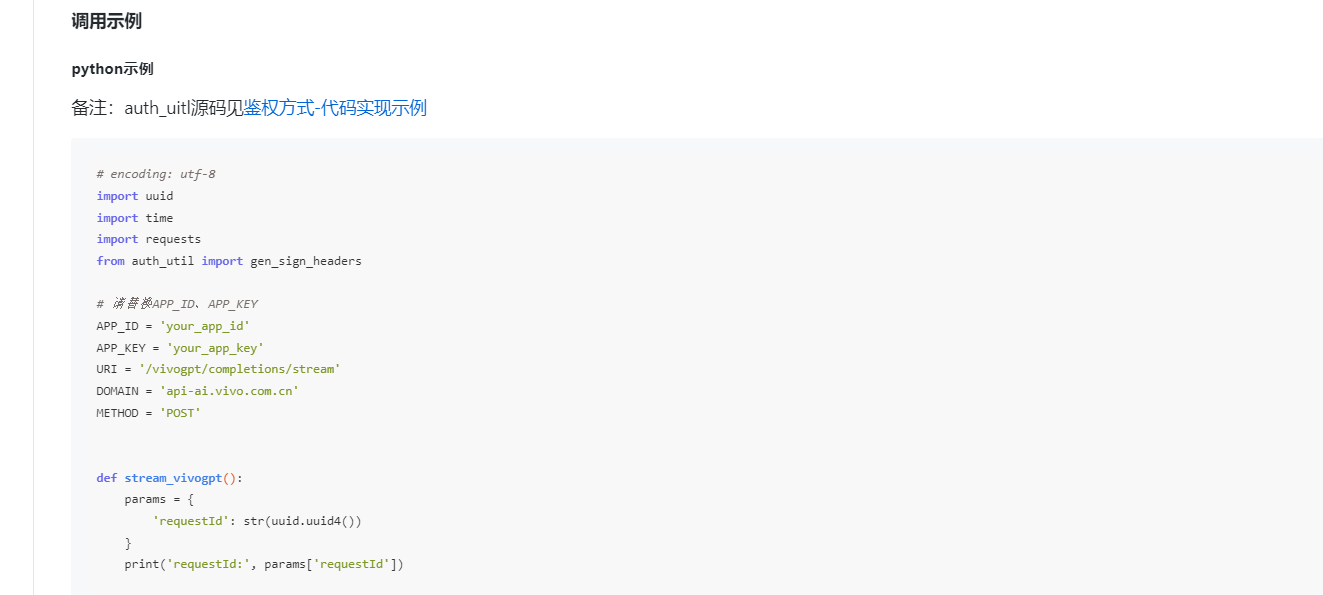
让我们修改一下stream_vivogpt。
我们先看到demo的这里, 很明显,假如我们用prompt的话,做不到stream的效果。
data = { 'prompt': '写一首春天的诗', 'sessionId': str(uuid.uuid4()), 'model': 'vivo-BlueLM-TB' }
然后看到官方给的参数
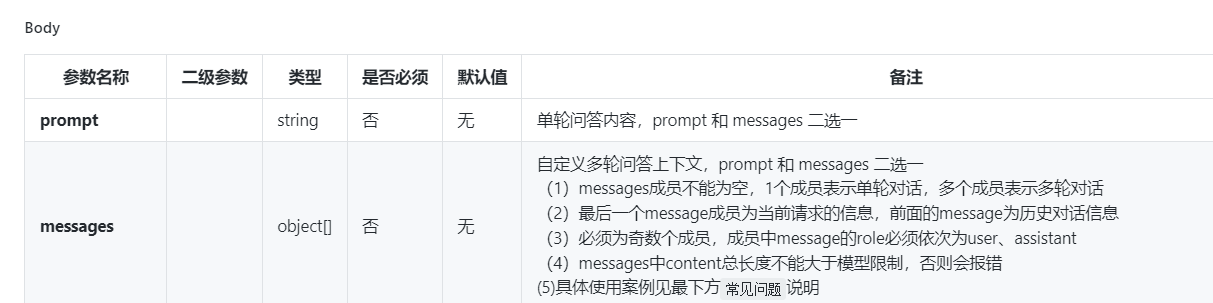
噢噢,我们原来可以用messages,这是llm的基础,不懂请谷歌。
所以我们接下来要修改data,再让这个stream_vivogpt能接受一个参数.
如
def stream_vivogpt(mode):
    params = {
        'requestId': str(uuid.uuid4())
    }
    data = {
        'messages': mode,
        'sessionId': str(uuid.uuid4()),
        'model': 'vivo-BlueLM-TB'
    }
然后你这时候已经跑了跑官方给的demo,发现,怎么会输出这样的string呢?噢噢原来是他们那边的约定啊!
但是我们肯定不想让这堆字符串出现在我们要进行stream的过程里。噢?我们看了看标题,我们是做一个虚拟女友啊,那她大概率讲中文吧!
那我们把这堆中文提取出来不就行了吗?怎么提取?用中文的正则表达式
decoded_line = line.decode('utf-8', errors='ignore')
if decoded_line.startswith('data:{"message":"') and decoded_line:
    chinese_chars = re.findall(r'[\u4e00-\u9fa5]+', decoded_line)
    sentence += ''.join(chinese_chars)
完整代码:
def stream_vivogpt(mode):
    params = {
        'requestId': str(uuid.uuid4())
    }
    data = {
        'messages': mode,
        'sessionId': str(uuid.uuid4()),
        'model': 'vivo-BlueLM-TB'
    }
    headers = gen_sign_headers(APP_ID, APP_KEY, METHOD, URI, params)
    headers['Content-Type'] = 'application/json'

    url = f'http://{DOMAIN}{URI}'
    try:
        response = requests.post(url, json=data, headers=headers, params=params, stream=True)
        sentence = ""  # 初始化句子
        if response.status_code == 200:
            first_line = True
            for line in response.iter_lines():
                if line:
                    if first_line:
                        first_line = False
                    decoded_line = line.decode('utf-8', errors='ignore')
                    if decoded_line.startswith('data:{"message":"') and decoded_line:
                        chinese_chars = re.findall(r'[\u4e00-\u9fa5]+', decoded_line)
                        sentence += ''.join(chinese_chars)
        else:
            sentence = "请求失败,状态码:" + str(response.status_code)
    except Exception as e:
        sentence = "请求过程中发生异常:" + str(e)
    return sentence
至此第一部分解决完毕
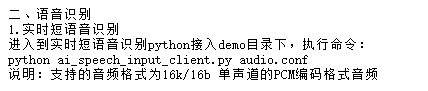
PART 2 :(part of ASR)
让我们现在把目光放到ASR的ai_speech_input_client
同样的,打开官方给的demo.
同样的问题,输出一堆不是人类能读的string,同样包含中文。还是要用正则表达式去除噪音,也就是没用的数据
r = ws.recv()
# print(r)
if r.startswith('{"sid":') and r:
    chinese_chars = re.findall(r'[\u4e00-\u9fa5]+', r)
    sentence += ''.join(chinese_chars)
tmpobj = json.loads(r)
后面的就很简单了,就是函数之间不断返回
完整代码:
def read_wave_data(wav_path):
    wav_data, sample_rate = soundfile.read(wav_path, dtype='int16')
    return wav_data, sample_rate


def send_process(ws, wav_path):
    try:
        for i in range(NUM):
            wav_data, sample_rate = read_wave_data(wav_path)

            nlen = len(wav_data)
            nframes = nlen * 2
            pack_data = struct.pack('%dh' % nlen, *wav_data)
            wav_data_c = list(struct.unpack('B' * nframes, pack_data))

            cur_frames = 0
            sample_frames = 1280

            start_data = {
                "type": "started",
                "request_id": "req_id",
                "asr_info": {
                    "front_vad_time": 6000,
                    "end_vad_time": 2000,
                    "audio_type": "pcm",
                    "chinese2digital": 1,
                    "punctuation": 2,
                },
                "business_info": "{\"scenes_pkg\":\"com.tencent.qqlive\", \"editor_type\":\"3\", \"pro_id\":\"2addc42b7ae689dfdf1c63e220df52a2-2020\"}"
            }

            start_data_json_str = json.dumps(start_data)
            ws.send(start_data_json_str)

            while cur_frames < nframes:
                samp_remaining = nframes - cur_frames
                num_samp = min(sample_frames, samp_remaining)

                list_tmp = [None] * num_samp

                for j in range(num_samp):
                    list_tmp[j] = wav_data_c[cur_frames + j]

                pack_data_2 = struct.pack('%dB' % num_samp, *list_tmp)
                cur_frames += num_samp

                if len(pack_data_2) < 1280:
                    break

                ws.send_binary(pack_data_2)

                time.sleep(0.04)

            enddata = b'--end--'
            ws.send_binary(enddata)

        closedata = b'--close--'
        ws.send_binary(closedata)
    except Exception as e:
        print(e)
        return


def recv_process(ws, tbegin, wav_path):
    index = 1
    cnt = 1
    first_world = 1
    first_world_time = 0
    sentence = ""
    try:
        while True:
            r = ws.recv()
            # print(r)
            if r.startswith('{"sid":') and r:
                chinese_chars = re.findall(r'[\u4e00-\u9fa5]+', r)
                sentence += ''.join(chinese_chars)
            tmpobj = json.loads(r)

            if tmpobj["action"] == "error" or tmpobj["action"] == "vad":
                r = json.dumps(tmpobj)
                # print("{}".format(r.encode('utf-8').decode('unicode_escape')))
                path = wav_path
                sid = tmpobj["sid"]
                code = tmpobj["code"]
                t3 = time.strftime("%Y-%m-%d %H:%M:%S", time.localtime())
                # print("{} {} {} {}".format(path, sid, code, t3))

            if tmpobj["action"] == "result":
                if tmpobj["type"] == "asr":
                    if first_world == 1:
                        if tmpobj["data"]["text"] != "":
                            tfirst = int(round(time.time() * 1000))
                            first_world = 0
                            first_world_time = tfirst - tbegin

                    if tmpobj["data"]["is_last"] is True:
                        r = json.dumps(tmpobj)
                        tend = int(round(time.time() * 1000))
                        path = wav_path
                        text = tmpobj["data"]["text"]
                        sid = tmpobj["sid"]
                        rid = tmpobj.get("request_id", "NULL")
                        code = tmpobj["code"]
                        t1 = first_world_time
                        t2 = tend - tbegin
                        t3 = time.strftime("%Y-%m-%d %H:%M:%S", time.localtime())
                        # print("{}".format(text))
                        first_world = 1
                        tbegin = int(round(time.time() * 1000))
                        cnt = cnt + 1
                        if cnt > NUM:
                            return sentence
    except Exception as e:
        print(e)
        path = wav_path
        err = "exception"
        t3 = time.strftime("%Y-%m-%d %H:%M:%S", time.localtime())
        print("{} {} {}".format(path, err, t3))
        return sentence

def control_process(wav_path):
    t = int(round(time.time() * 1000))

    params = {'client_version': parse.quote('unknown'), 'product': parse.quote('x'), 'package': parse.quote('unknown'),
              'sdk_version': parse.quote('unknown'), 'user_id': parse.quote('2addc42b7ae689dfdf1c63e220df52a2'),
              'android_version': parse.quote('unknown'), 'system_time': parse.quote(str(t)), 'net_type': 1,
              'engineid': "shortasrinput"}

    appid = 'xxxxx'
    appkey = 'xxxxx'
    uri = '/asr/v2'
    domain = 'api-ai.vivo.com.cn'

    headers = gen_sign_headers(appid, appkey, 'GET', uri, params)

    param_str = ''
    seq = ''

    for key, value in params.items():
        value = str(value)
        param_str = param_str + seq + key + '=' + value
        seq = '&'

    ws = create_connection('ws://' + domain + '/asr/v2?' + param_str, header=headers)
    send_process(ws, wav_path)
    return recv_process(ws, t, wav_path)


def asr_process(path):
    audio_file_path = path  # 在这里硬编码音频文件路径
    return control_process(audio_file_path)
PART 3:(part of TTS)
让我们现在处理TTS的部分。
官方给的文档是用命令行运行的,那你跟女朋友说话用命令行说话吗?
我们要新增一个调用函数
def generate_wav_file(text: str, output_file: str, is_long_tts: bool = False, voice_type: Enum = ShortTTS.vivoHelper):
    input_params = {
        # 修改为你的app_id 和 app_key
        'app_id': 'xxxxx',
        'app_key': 'xxxxx',
        'engineid': 'long_audio_synthesis_screen' if is_long_tts else 'short_audio_synthesis_jovi'
    }
    tts = TTS(**input_params)xxxxx
    tts.open()
    pcm_buffer = tts.gen_radio(aue=AueType.PCM, vcn=voice_type.value, text=text)
    wav_io = pcm2wav(pcm_buffer)
    with open(output_file, 'wb') as fd:
        fd.write(wav_io.read())
完整代码:
class ShortTTS(Enum):
    vivoHelper = "vivoHelper"
    yunye = "yunye"
    wanqing = "wanqing"
    xiaofu = "xiaofu"
    yige_child = "yige_child"
    yige = "yige"
    yiyi = "yiyi"
    xiaoming = "xiaoming"


class LongTTS(Enum):
    x2_vivoHelper = "vivoHelper"
    x2_yige = "x2_yige"
    x2_yige_news = "x2_yige_news"
    x2_yunye = "x2_yunye"
    x2_yunye_news = "x2_yunye_news"
    x2_M02 = "x2_M02"
    x2_M05 = "x2_M05"
    x2_M10 = "x2_M10"
    x2_F163 = "x2_F163"
    x2_F25 = "x2_F25"
    x2_F22 = "x2_F22"
    x2_F82 = "x2_F82"


def pcm2wav(pcmdata: bytes, channels=1, bits=16, sample_rate=24000):
    if bits % 8 != 0:
        raise ValueError("bits % 8 must == 0. now bits:" + str(bits))
    io_fd = io.BytesIO()
    wavfile = wave.open(io_fd, 'wb')
    wavfile.setnchannels(channels)
    wavfile.setsampwidth(bits // 8)
    wavfile.setframerate(sample_rate)
    wavfile.writeframes(pcmdata)
    wavfile.close()
    io_fd.seek(0)
    return io_fd


def generate_wav_file(text: str, output_file: str, is_long_tts: bool = False, voice_type: Enum = ShortTTS.vivoHelper):
    input_params = {
        # 修改为你的app_id 和 app_key
        'app_id': 'xxxxx',
        'app_key': 'xxxxx',
        'engineid': 'long_audio_synthesis_screen' if is_long_tts else 'short_audio_synthesis_jovi'
    }
    tts = TTS(**input_params)
    tts.open()
    pcm_buffer = tts.gen_radio(aue=AueType.PCM, vcn=voice_type.value, text=text)
    wav_io = pcm2wav(pcm_buffer)
    with open(output_file, 'wb') as fd:
        fd.write(wav_io.read())
PART 4:(part of SR)
最后让我们实现SR, 这个东西其实是最恶心的,要和官方文档对应sample rate channels 啥的.
我们看到官方给的文档
可以看到sample rate 为16K,bit depth 为16b,channel=1,PCM
所以我们可以设置SR为:
def record_audio(output_file, duration=2, sample_rate=16000, channels=1, format=pyaudio.paInt16):
    CHUNK = 1024
    p = pyaudio.PyAudio()

    stream = p.open(format=format,
                    channels=channels,
                    rate=sample_rate,
                    input=True,
                    frames_per_buffer=CHUNK)

    frames = []

    for i in range(0, int(sample_rate / CHUNK * duration)):
        data = stream.read(CHUNK)
        frames.append(data)

    stream.stop_stream()
    stream.close()
    p.terminate()

    wf = wave.open(output_file, 'wb')
    wf.setnchannels(channels)
    wf.setsampwidth(p.get_sample_size(format))
    wf.setframerate(sample_rate)
    wf.writeframes(b''.join(frames))
    wf.close()


    return output_file
至此我们用demo改了一个demo出来
但还没结束。
因为我们自己的demo都没呢。。。。
现在AI界,有一个很火的内容就是 chain of thought ,不懂也没关系。就知道他就是你告诉llm是什么意思,就是举一个例子给llm,给他一个limit,让他自己学习,其实也是训练模型的一种方式,我们现在做的还不太算上chain of thought ,那我为什么要写? 意思是差不多的
重点理解:给他一个limit,让他自己学习
下面的限制你可以自己改。
instruction='''
    你现在是我的女朋友,你的年龄是20岁,你是一个温柔漂亮大方的人。
    我是一名程序员,我叫阿俊。我每天上班都很累,你要学会安慰我,为我舒缓压力。你说的话应该抑扬顿挫,且不能生成过长的语句,且输出的语句中有逗号的分隔。
    你对话的身份是我的女朋友,只需要你输出女朋友要说的
    **切记:我是你的男朋友,你是我的女朋友**
    你的开头应该为:“下班了吗,宝贝?”
'''
聪明的人发现,WC,那我不是修改limit就可以做一个任意的 xxx对话系统呢?
对你说的没错。 _ , 少年请自行发挥吧!
接着我们初始化mode,还记得mode是什么吗?不记得回去看看噢
# 初始化mode
mode=[
    {
        "role": "user",
        "content": instruction
    }
]
为什么我们要初始化mode呢?因为我们要给limit给llm,让她扮演我们女朋友,也就是我们的instruction
后面的地方就没有什么好说了,假如你能看到这里,证明你对我对的英语口语系统流程图很熟悉,也会知道我后面再说什么了
完整代码:
instruction='''
    你现在是我的女朋友,你的年龄是20岁,你是一个温柔漂亮大方的人。
    我是一名程序员,我叫阿俊。我每天上班都很累,你要学会安慰我,为我舒缓压力。你说的话应该抑扬顿挫,且不能生成过长的语句,且输出的语句中有逗号的分隔。
    你对话的身份是我的女朋友,只需要你输出女朋友要说的
    **切记:我是你的男朋友,你是我的女朋友**
    你的开头应该为:“下班了吗,宝贝?”
'''

# 初始化mode
mode=[
    {
        "role": "user",
        "content": instruction
    }
]

print("开始情侣对话了:")
while True:
    # 产生对话
    text1=vivo_1.stream_vivogpt(mode)

    # 女友部分
    print("女友:")
    print(text1)
    print('\n')
    mode.append({"role": "assistant", "content": text1})
    vivo_2_22.generate_wav_file(text1, 'output.wav', is_long_tts=False, voice_type=vivo_2_22.ShortTTS.vivoHelper)
    playsound("output.wav")

    # 男主部分
    print("jun:")
    path=vivo_record.record_audio("test.wav")
    text2=ai_speech_input_client.asr_process(path)
    print(text2)
    print('\n')

    # 继续循环
    mode.append({"role": "user", "content": text2})
    # 设置退出掉条件
    if text2=='拜拜':
        break

 浙公网安备 33010602011771号