性能测试工具Locust
使用Python代码来定义用户行为。用它可以模拟百万计的并发用户访问你的系统。
Locust安装
1、安装Python:
安装Python2 或Python3
2、安装Locuse
2.1, 通过pip命令安装 /> pip install locustio
2.2, 通过GitHub上克隆项目安装(Python3推荐):https://github.com/locustio/locust
3、安装 pyzmq
If you intend to run Locust distributed across multiple processes/machines, we recommend you to also install pyzmq.
如果你打算运行Locust 分布在多个进程/机器,我们建议你也安装pyzmq.
通过pip命令安装。 /> pip install pyzmq
4、安装成功,CMD敲入命令验证。 /> locust --help
编写简单的性能测试脚本
创建load_test.py文件,通过Python编写性能测试脚本。
class UserBehavior(TaskSet):

    @task(1)
    def baidu(self):
        self.client.get("/")


class WebsiteUser(HttpLocust):
    task_set = UserBehavior
    min_wait = 3000
    max_wait = 6000
创建UserBehavior()类继承TaskSet类,为用户行为。
创建baidu() 方法表示一个行为,访问百度首页。用@task() 装饰该方法为一个任务。1表示一个Locust实例被挑选执行的权重,数值越大,执行频率越高。在当前UserBehavior()行为下只有一个baidu()任务,所以,这里的权重设置为几,并无影响。
WebsiteUser()类用于设置性能测试。
task_set :指向一个定义了的用户行为类。
min_wait :用户执行任务之间等待时间的下界,单位:毫秒。
max_wait :用户执行任务之间等待时间的上界,单位:毫秒。
运行性能测试
切换到性能测试脚本所在的目录,启动性能测试:
------------------------------------------------------------------
.../> locust -f load_test.py --host=https://www.baidu.com
[2016-11-19 22:38:16,967] fnngj-PC/INFO/locust.main: Starting web monitor at *:8089
[2016-11-19 22:38:16,967] fnngj-PC/INFO/locust.main: Starting Locust 0.7.5
-----------------------------------------------------------------
load_test.py 为测试脚本,https://www.baidu.com 为测试的网站。
打开浏览器访问:http://127.0.0.1:8089
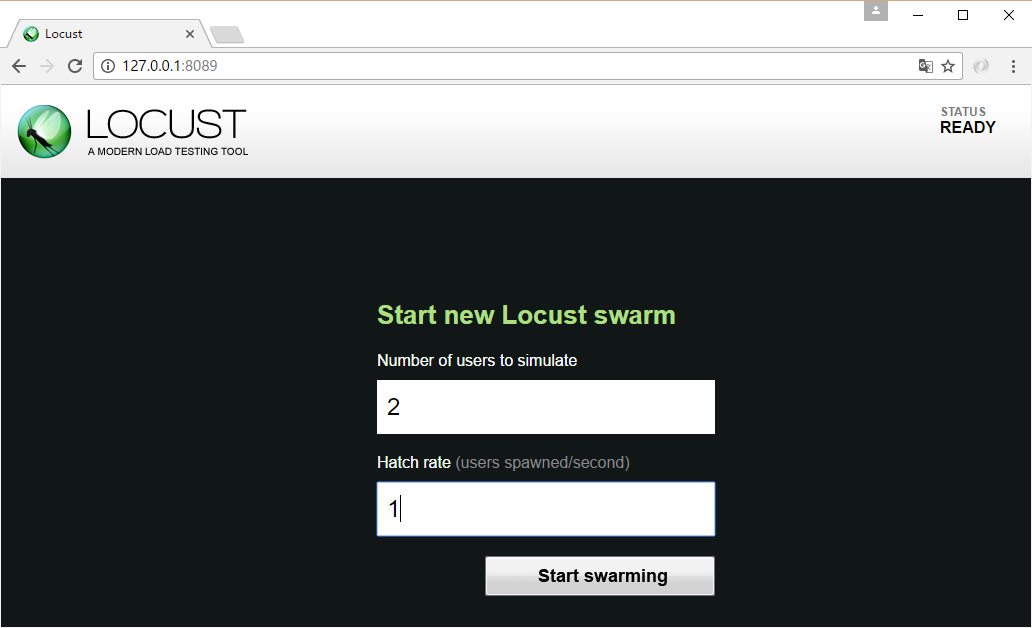
Number of users to simulate 设置模拟用户数
Hatch rate (users spawned/second) 每秒产生(启动)的用户数。
点击Start swarming 开始运行性能测试。
难点在性能测试脚本的编写上。

 浙公网安备 33010602011771号