

Spring IoC 容器
Spring IoC容器
通过装配电脑的例子(代码与内容在 https://www.cnblogs.com/Jing61/p/19365197 中),我们了解到在Spring中,实现控制反转的是IoC容器,其核心实现方式为依赖注入。Spring提供IoC容器用于管理各类资源(即容纳开发者开发的各种Bean,且开发者可从中获取发布在Spring IoC容器中的Bean)。这种设计的优势在于降低了对象之间的耦合度——在一个系统中,部分类无需开发者了解其具体实现,只需知晓其功能即可。与开发者主动创建对象不同,IoC容器中对象的产生由容器负责,这便是控制反转。基于降低开发难度、实现模块解耦以及便于测试的原则,Spring IoC理念在各类JavaEE开发中得到了广泛应用。
Spring IoC容器的设计
Spring IoC容器的设计主要基于BeanFactory和ApplicationContext两个接口,其中ApplicationContext是BeanFactory的子接口之一。换句话说,BeanFactory是Spring IoC容器定义的最底层接口,而ApplicationContext是其高级接口之一,并且对BeanFactory的功能进行了诸多实用扩展。在大多数场景下,都会优先使用ApplicationContext作为Spring IoC容器。
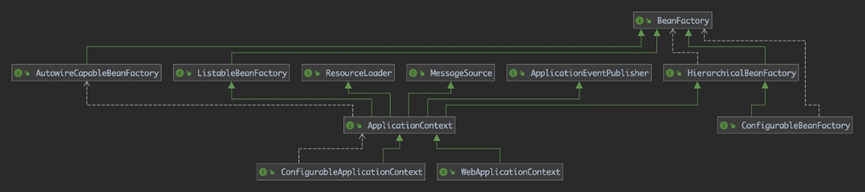
从上述设计图中可以看到BeanFactory位于设计的最底层,它提供了Spring IoC最基础的功能支持,其源代码如下:
package org.springframework.beans.factory;

import org.springframework.beans.BeansException;
import org.springframework.core.ResolvableType;
import org.springframework.lang.Nullable;

public interface BeanFactory {

    String FACTORY_BEAN_PREFIX = "&";

    Object getBean(String name, Object... args) throws BeansException;

    <T> T getBean(Class<T> requiredType) throws BeansException;

    <T> T getBean(Class<T> requiredType, Object... args) throws BeansException;

    <T> ObjectProvider<T> getBeanProvider(Class<T> requiredType);

    <T> ObjectProvider<T> getBeanProvider(ResolvableType requiredType);

    boolean containsBean(String name);

    boolean isSingleton(String name) throws NoSuchBeanDefinitionException;

    boolean isPrototype(String name) throws NoSuchBeanDefinitionException;

    boolean isTypeMatch(String name, ResolvableType typeToMatch) throws NoSuchBeanDefinitionException;

    boolean isTypeMatch(String name, Class<?> typeToMatch) throws NoSuchBeanDefinitionException;

    @Nullable
    Class<?> getType(String name) throws NoSuchBeanDefinitionException;

    @Nullable
    Class<?> getType(String name, boolean allowFactoryBeanInit) throws NoSuchBeanDefinitionException;

    String[] getAliases(String name);
}
Spring IoC容器的初始化和依赖注入
Bean的定义和初始化在Spring IoC容器中分为两大步骤:先完成Bean的定义,再进行初始化和依赖注入。
Bean的定义(三步流程)
- Resource定位:Spring IoC容器根据开发者的配置进行资源定位,在Spring开发中,常见的配置方式包括XML文件配置或注解代码配置,定位的具体内容由开发者提供。
- BeanDefinition的载入:将Resource定位到的配置信息保存到
BeanDefinition中,此时并不会创建Bean的实例。 - BeanDefinition的注册:将
BeanDefinition中的信息发布到Spring IoC容器中,注意此时仍未创建对应的Bean实例。
完成以上三步后,Bean仅在Spring IoC容器中完成了定义,尚未进行初始化,也未完成依赖注入(即未将配置的资源注入到Bean中),因此此时Bean还无法使用。
对于Bean的初始化和依赖注入,Spring提供了一个配置选项lazy-init,其含义为是否延迟初始化Bean。在未进行任何额外配置的情况下,lazy-init的默认值为default,实际等效于false,即Spring IoC容器默认会自动初始化Bean。若将lazy-init设置为true,则只有当开发者通过Spring IoC容器的getBean方法获取该Bean时,才会触发Bean的初始化和依赖注入过程。
Spring Bean的生命周期
Spring IoC容器的核心目的是管理Bean,而Bean在容器中存在完整的生命周期,其初始化和销毁都需要经历特定过程。在实际开发中,若需要对Bean的行为进行自定义扩展,可在生命周期的关键节点插入自定义代码,这就需要深入理解Spring Bean的生命周期。Spring对Bean的生命周期管理具备极强的可扩展性,正确掌握Bean的生命周期,能帮助开发者在Bean的初始化和销毁阶段添加自定义方法,以满足特定业务需求。
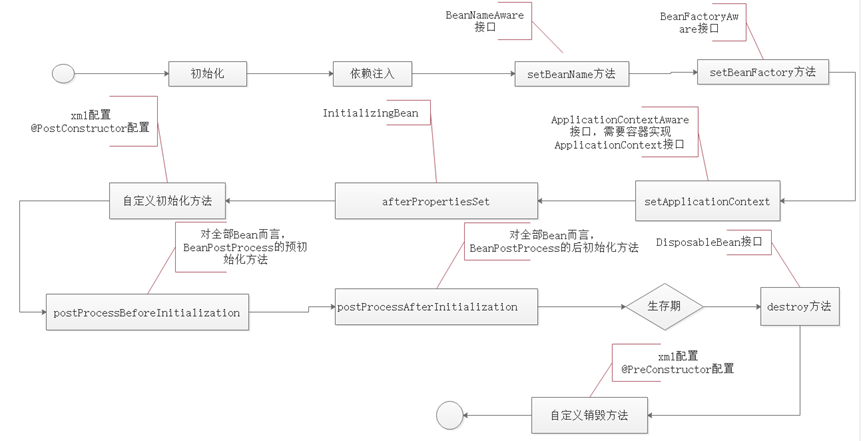
如上图所示,Spring Bean的生命周期较为复杂,以下对每个关键步骤进行详细说明:
- Spring启动后,查找并加载需要被Spring管理的Bean,执行Bean的实例化操作;
- Bean实例化完成后,将Bean的依赖对象和属性值注入到Bean中;
- 若Bean实现了
BeanNameAware接口,Spring会调用该Bean的setBeanName()方法,并将Bean的id作为参数传入; - 若Bean实现了
BeanFactoryAware接口,Spring会调用该Bean的setBeanFactory()方法,并将BeanFactory容器实例传入; - 若Bean实现了
ApplicationContextAware接口,且当前Spring IoC容器是ApplicationContext的实现类,Spring会调用该Bean的setApplicationContext()方法,将Bean所在的应用上下文引用传入; - 若Bean实现了
InitializingBean接口,Spring会调用该Bean的afterPropertiesSet()方法; - 若Bean在配置中定义了自定义初始化方法(如通过XML的
init-method属性或注解@PostConstruct配置),Spring会调用该自定义初始化方法; - 若容器中存在
BeanPostProcessor接口的实现类,Spring会调用其postProcessBeforeInitialization()方法(对所有Bean均生效,属于预初始化操作); - 若容器中存在
BeanPostProcessor接口的实现类,Spring会调用其postProcessAfterInitialization()方法(对所有Bean均生效,属于后初始化操作); - 此时Bean已完全初始化就绪,可被应用程序使用,Bean将一直驻留在应用上下文中,直至应用上下文被销毁;
- 若Bean实现了
DisposableBean接口,在应用上下文销毁时,Spring会调用该Bean的destroy()方法; - 若Bean在配置中定义了自定义销毁方法(如通过XML的
destroy-method属性或注解@PreDestroy配置),在应用上下文销毁时,Spring会调用该自定义销毁方法。
对Spring Bean生命周期测试
以下是基于Spring Bean生命周期的测试代码(在原有基础上进行优化调整):
1. 配置文件(spring-beans.xml)
<?xml version="1.0" encoding="UTF-8"?>
<beans xmlns="http://www.springframework.org/schema/beans"
       xmlns:xsi="http://www.w3.org/2001/XMLSchema-instance"
       xsi:schemaLocation="http://www.springframework.org/schema/beans http://www.springframework.org/schema/beans/spring-beans.xsd">
    <bean id="intelCpu" class="com.computer.component.IntelCPU" />
    <bean id="admCpu" class="com.computer.component.AMDCpu" />
    <bean id="kingstoneRam" class="com.computer.component.KingstoneRam" />
    <bean id="kingmaxRam" class="com.computer.component.KingmaxRam" />
    <bean id="intelBoard" class="com.computer.component.IntelBoard" >
        <property name="cpu" ref="intelCpu" />
        <property name="ram" ref="kingstoneRam" />
     </bean>

    <bean id="ausuBoard" class="com.computer.component.AUSUBoard" >
        <property name="cpu" ref="admCpu" />
        <property name="ram" ref="kingmaxRam" />
     </bean>

    <bean id="computer" class="com.computer.computer.Computer" >
        <property name="mainboard" ref="intelBoard" />
    </bean>

    <bean id="myMainboard" class="com.computer.component.IntelBoard">
        <property name="ram" >
            <bean class="com.computer.component.KingmaxRam"/>
        </property>
        <property name="cpu" >
            <bean class="com.computer.component.IntelCPU"/>
        </property>
    </bean>
    <bean id="myComputer" class="com.computer.computer.Computer" init-method="init" destroy-method="destroy2">
        <property name="mainboard" ref="myMainboard"/>
    </bean>
</beans>
2. 实体类(Computer.java)
package com.computer.computer;

import com.computer.component.Mainboard;
import org.springframework.beans.BeansException;
import org.springframework.beans.factory.*;
import org.springframework.beans.factory.config.BeanPostProcessor;
import org.springframework.context.ApplicationContext;
import org.springframework.context.ApplicationContextAware;

/**
 * 测试spring bean的生命周期
 */
public class Computer implements BeanNameAware, BeanFactoryAware,
        ApplicationContextAware, BeanPostProcessor, InitializingBean,
        DisposableBean {
    private Mainboard mainboard;//主板

    public Computer(){
        System.out.println("computer的初始化。。。");
    }

    //电脑的显示器、鼠标键等其它属性省略
    public void setMainboard(Mainboard mainboard) {
        this.mainboard = mainboard;
    }

    public void doWork(){
        System.out.println("开始工作...");
        for(int i=0;i<100;i++)
            System.out.print(i+"  ");
        System.out.println("结束工作!");
    }
    public void start(){
        mainboard.startPower();
    }
    public void shutdown(){
        mainboard.shutdownPower();
    }
    public double getPrice(){
        return mainboard.getPrice()+mainboard.getCpu().getPrice()+mainboard.getRam().getPrice();
    }
    public String getSetting(){//读取电脑配置信息以及价格总额
        String ret;
        ret="电脑组成如下!主板:"+mainboard.getName()+",CPU:"+mainboard.getCpu().getName()+",内存:"+mainboard.getRam().getName()+"\n";
        ret+="这个配置的价格为:"+getPrice();
        return ret;
    }

    @Override
    public void setBeanName(String name) {
        System.out.println("setBeanName:" + name);
    }

    @Override
    public void setBeanFactory(BeanFactory beanFactory) throws BeansException {
        System.out.println("setBeanFactory:" + beanFactory);
    }

    @Override
    public void setApplicationContext(ApplicationContext applicationContext) throws BeansException {
        System.out.println("setApplicationContext:" + applicationContext);
    }

    /**
     * 对全部Bean而言,BeanPostProcess的预初始化方法
     */
    @Override
    public Object postProcessBeforeInitialization(Object bean, String beanName) throws BeansException {
        System.out.println("对全部Bean而言,BeanPostProcess的预初始化方法:" + beanName);
        return BeanPostProcessor.super.postProcessBeforeInitialization(bean, beanName);
    }

    @Override
    public void afterPropertiesSet() throws Exception {
        System.out.println("afterPropertiesSet.....");
    }

    public void init(){
        System.out.println("自定义初始化方法.....");
    }

    /**
     * 对全部Bean而言,BeanPostProcess的后初始化方法
     */
    @Override
    public Object postProcessAfterInitialization(Object bean, String beanName) throws BeansException {
        System.out.println("postProcessAfterInitialization:" + beanName);
        return BeanPostProcessor.super.postProcessAfterInitialization(bean, beanName);
    }

    @Override
    public void destroy() throws Exception {
        System.out.println("destroy......");
    }

    public void destroy2(){
        System.out.println("自定义销毁方法");
    }
}
3. 测试类(ClientDemo.java)
package com.computer;

import com.computer.computer.Computer;
import org.springframework.context.support.ClassPathXmlApplicationContext;

public class ClientDemo {
    public static void main(String[] args) {
        var context = new ClassPathXmlApplicationContext("spring-beans.xml");
        var computer = context.getBean("computer", Computer.class);
        computer.doWork();
        System.out.println(computer.getSetting());
        context.close();
    }
}
4. 运行结果
computer的初始化。。。
setBeanName:computer
setBeanFactory:org.springframework.beans.factory.support.DefaultListableBeanFactory@b3d7190: defining beans [intelCpu,admCpu,kingstoneRam,kingmaxRam,intelBoard,ausuBoard,computer,myMainboard,myComputer]; root of factory hierarchy
setApplicationContext:org.springframework.context.support.ClassPathXmlApplicationContext@64a294a6, started on Thu Dec 18 10:22:53 CST 2025
afterPropertiesSet.....
computer的初始化。。。
setBeanName:myComputer
setBeanFactory:org.springframework.beans.factory.support.DefaultListableBeanFactory@b3d7190: defining beans [intelCpu,admCpu,kingstoneRam,kingmaxRam,intelBoard,ausuBoard,computer,myMainboard,myComputer]; root of factory hierarchy
setApplicationContext:org.springframework.context.support.ClassPathXmlApplicationContext@64a294a6, started on Thu Dec 18 10:22:53 CST 2025
afterPropertiesSet.....
自定义初始化方法.....
对全部Bean而言,BeanPostProcess的预初始化方法:admCpu
对全部Bean而言,BeanPostProcess的预初始化方法:admCpu
postProcessAfterInitialization:admCpu
postProcessAfterInitialization:admCpu
对全部Bean而言,BeanPostProcess的预初始化方法:kingmaxRam
对全部Bean而言,BeanPostProcess的预初始化方法:kingmaxRam
postProcessAfterInitialization:kingmaxRam
postProcessAfterInitialization:kingmaxRam
对全部Bean而言,BeanPostProcess的预初始化方法:ausuBoard
对全部Bean而言,BeanPostProcess的预初始化方法:ausuBoard
postProcessAfterInitialization:ausuBoard
postProcessAfterInitialization:ausuBoard
开始工作...
0  1  2  3  4  5  6  7  8  9  10  11  12  13  14  15  16  17  18  19  20  21  22  23  24  25  26  27  28  29  30  31  32  33  34  35  36  37  38  39  40  41  42  43  44  45  46  47  48  49  50  51  52  53  54  55  56  57  58  59  60  61  62  63  64  65  66  67  68  69  70  71  72  73  74  75  76  77  78  79  80  81  82  83  84  85  86  87  88  89  90  91  92  93  94  95  96  97  98  99  结束工作!
电脑组成如下!主板:Intel主板,CPU:IntelCPU,内存:Kingstone内存
这个配置的价格为:6200.0
destroy......
自定义销毁方法
destroy......

 浙公网安备 33010602011771号