
JMonkeyEngine3——NiftyGui RadioButton
RadioButton
RadioButton 用于从多个选项中选择一个选项。RadioButton 被分组,因此同一时间组中只有一个 RadioButton 可以处于活动状态。在 Nifty 中,分组是使用 RadioButtonGroup 实现的。RadioButton 链接到单个 RadioButtonGroup。RadioButtonGroup 本身不可见。它仅用于管理与其链接的所有 RadioButton 的选择。
RadioButton 是实际可见的控件。其“id”用于标识组中活动的 RadioButton。RadioButton 的“group”属性将 RadioButton 链接到单个 RadioButtonGroup,这样当激活新的 RadioButton 时,同一组中的其他 RadioButton 就可以停用。
你可以使用 Builder 模式从 Java 创建 RadioButtons 以及 RadioButtonGroup,或者使用 Niftys 标准 <control name="radioButton"></control> 标签从 XML 创建。
常用属性
对于RadioButton组件,如下:
| Name | Datatype | Default | Description |
| group | String (nifty-id) | null | 此 RadioButton 所属的 RadioButtonGroup 的“id”。对于属于同一 RadioButtonGroup 的所有 RadioButton,只能有一个 RadioButton 处于活动状态。 |
对于RadioButtonGroup,如下:
| allowDeselection | Boolean | false | 你可以将 allowDeselection 设置为“true”,以不强制选择 RadioButtonGroup。将其设置为“true”时,你可以取消选择所选的 RadioButton,这样就不会选择任何 RadioButton。默认值为“false”,这将强制选择至少一个 RadioButton(属于此 RadioButtonGroup)。 |
EventBus Notification
RadioButton 支持 EventBus 通知。你可以为 RadioButtonGroup 或单个 RadioButton 订阅事件。
当 RadioButtonGroup 的选择发生改变时,将生成RadioButtonGroupStateChangedEvent,其中包含新选择的 RadioButton 和已取消选择的 RadioButton。
你也可以订阅单个 RadioButton 事件。当单个 RadioButton 改变状态时,它会发布RadioButtonStateChangedEvent。
Java Builder 示例
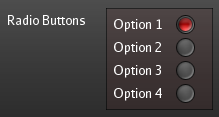
创建一个 RadioButtonGroup 控件和四个链接到该 RadioButtonGroup 的 RadioButton。请注意,您可以自行向每个 RadioButton 添加标签,并显示它们彼此之间的关联。
 1 ...
 2 control(new RadioGroupBuilder("RadioGroup-1")); // the RadioGroup id is used to link radiobuttons logical together so that only one of them can be active at a certain time
 3 panel(new PanelBuilder() {{
 4   control(builders.createLabel("Radio Buttons"));
 5   childLayoutHorizontal();
 6   panel(new PanelBuilder() {{
 7     childLayoutVertical();
 8     backgroundColor("#8001");
 9     paddingLeft("7px");
10     paddingRight("7px");
11     paddingTop("4px");
12     paddingBottom("4px");
13     width("105px");
14     onActiveEffect(new EffectBuilder("border") {{
15       effectParameter("color", "#0008");
16     }});
17     panel(new PanelBuilder() {{
18       childLayoutHorizontal();
19       control(builders.createLabel("Option 1", "60px"));
20       control(new RadioButtonBuilder("option-1") {{
21         group("RadioGroup-1"); // the id of the RadioButtonGroup to link this RadioButton to
22       }});
23     }});
24     panel(new PanelBuilder() {{
25       childLayoutHorizontal();
26       control(builders.createLabel("Option 2", "60px"));
27       control(new RadioButtonBuilder("option-2") {{
28         group("RadioGroup-1"); // the id of the RadioButtonGroup to link this RadioButton to
29       }});
30     }});
31     panel(new PanelBuilder() {{
32       childLayoutHorizontal();
33       control(builders.createLabel("Option 3", "60px"));
34       control(new RadioButtonBuilder("option-3") {{
35         group("RadioGroup-1"); // the id of the RadioButtonGroup to link this RadioButton to
36       }});
37     }});
38     panel(new PanelBuilder() {{
39       childLayoutHorizontal();
40       control(builders.createLabel("Option 4", "60px"));
41       control(new RadioButtonBuilder("option-4") {{
42         group("RadioGroup-1"); // the id of the RadioButtonGroup to link this RadioButton to
43       }});
44     }});
45   }});
46 }});
47 ...
XML 示例
使用 XML 创建相同的 RadioButtons:
 1 <!-- using XML -->
 2 <control id="RadioGroup-1" name="radioButtonGroup"/>
 3 <panel childLayout="horizontal">
 4   <control name="label" text="Radio Buttons" />
 5   <panel childLayout="vertical" backgroundColor="#8001" paddingLeft="7px" paddingRight="7px" paddingTop="4px" paddingBottom="4px" width="105px">
 6     <effect>
 7       <onActive name="border" color="#0008" />
 8     </effect>
 9     <panel childLayout="horizontal">
10       <control name="label" text="Option 1" width="60px" />
11       <control name="radioButton" id="option-1" group="RadioGroup-1" />
12     </panel>
13     <panel childLayout="horizontal">
14       <control name="label" text="Option 2" width="60px" />
15       <control name="radioButton" id="option-2" group="RadioGroup-1" />
16     </panel>
17     <panel childLayout="horizontal">
18       <control name="label" text="Option 3" width="60px" />
19       <control name="radioButton" id="option-3" group="RadioGroup-1" />
20     </panel>
21     <panel childLayout="horizontal">
22       <control name="label" text="Option 4" width="60px" />
23       <control name="radioButton" id="option-4" group="RadioGroup-1" />
24     </panel>
25   </panel>
26 </panel>
参考
https://github.com/nifty-gui/nifty-gui/wiki/Radiobutton
案例
创建一个xml文件,内容如下:
 1 <?xml version="1.0" encoding="UTF-8" standalone="yes"?>
 2 <nifty xmlns:xsi="http://www.w3.org/2001/XMLSchema-instance" xmlns="http://nifty-gui.lessvoid.com/nifty-gui" xsi:schemaLocation="https://raw.githubusercontent.com/void256/nifty-gui/1.4/nifty-core/src/main/resources/nifty.xsd https://raw.githubusercontent.com/void256/nifty-gui/1.4/nifty-core/src/main/resources/nifty.xsd">
 3     <useControls filename="nifty-default-controls.xml"/>
 4     <useStyles filename="nifty-default-styles.xml"/>
 5     <screen id="screen0" controller="mygame.NiftyGuiRadioButton" >
 6         <layer id="layer0" childLayout="center">
 7             <panel id="panel0" height="30%" style="nifty-panel-simple" width="50%" childLayout="vertical" y="276" x="383">
 8                 <control name="label" id="title" text="quality level" height="50px" font="aurulent-sans-16.fnt" width="100px" align="center" valign="center"/>
 9                 <control name="radioButtonGroup" id="radioGroup0"/>
10                 <panel id="panel1" height="30%" style="nifty-panel-simple" backgroundColor="#666666ff" width="50%" align="center" childLayout="center">
11                     <control name="radioButton" id="radiobutton0" align="left" group="radioGroup0"/>
12                     <control name="radioButton" id="radiobutton1" group="radioGroup0"/>
13                     <control name="radioButton" id="radiobutton2" align="right" group="radioGroup0"/>
14                 </panel>
15             </panel>
16         </layer>
17     </screen>
18 </nifty>
值得注意的是,第9行定义了一个id为radioGroup0的RadioGroup,随后的第11~13行三个RadioButton都设置了group为radioGroup0,另外注意层级结构,RadioGroup不一定要是RadioButtons的父级,也可以和RadioButtons同级,并且不一定要先定义在RadioButtons之前,如下:
 1 <?xml version="1.0" encoding="UTF-8" standalone="yes"?>
 2 <nifty xmlns:xsi="http://www.w3.org/2001/XMLSchema-instance" xmlns="http://nifty-gui.lessvoid.com/nifty-gui" xsi:schemaLocation="https://raw.githubusercontent.com/void256/nifty-gui/1.4/nifty-core/src/main/resources/nifty.xsd https://raw.githubusercontent.com/void256/nifty-gui/1.4/nifty-core/src/main/resources/nifty.xsd">
 3     <useControls filename="nifty-default-controls.xml"/>
 4     <useStyles filename="nifty-default-styles.xml"/>
 5     <screen id="screen0" controller="mygame.NiftyGuiRadioButton" >
 6         <layer id="layer0" childLayout="center">
 7             <panel id="panel0" height="30%" style="nifty-panel-simple" width="50%" childLayout="vertical" y="276" x="383">
 8                 <control name="label" id="title" text="quality level" height="50px" font="aurulent-sans-16.fnt" width="100px" align="center" valign="center"/>
 9                 <panel id="panel1" height="30%" style="nifty-panel-simple" backgroundColor="#666666ff" width="50%" align="center" childLayout="center">
10                     <control name="radioButton" id="radiobutton0" align="left" group="radioGroup0"/>
11                     <control name="radioButton" id="radiobutton1" group="radioGroup0"/>
12                     <control name="radioButton" id="radiobutton2" align="right" group="radioGroup0"/>
13                     <control name="radioButtonGroup" id="radioGroup0"/>
14                 </panel>
15             </panel>
16         </layer>
17     </screen>
18 </nifty>
第13行表明RadioGroup可以和RadioButtons同级,并且可以定义在RadioButtons之后(顺序无关),但是必须是同一个Screen内的,如下这样是无效的:
 1 <?xml version="1.0" encoding="UTF-8" standalone="yes"?>
 2 <nifty xmlns:xsi="http://www.w3.org/2001/XMLSchema-instance" xmlns="http://nifty-gui.lessvoid.com/nifty-gui" xsi:schemaLocation="https://raw.githubusercontent.com/void256/nifty-gui/1.4/nifty-core/src/main/resources/nifty.xsd https://raw.githubusercontent.com/void256/nifty-gui/1.4/nifty-core/src/main/resources/nifty.xsd">
 3     <useControls filename="nifty-default-controls.xml"/>
 4     <useStyles filename="nifty-default-styles.xml"/>
 5     <screen id="screen0" controller="mygame.NiftyGuiRadioButton" >
 6         <layer id="layer0" childLayout="center">
 7             <panel id="panel0" height="30%" style="nifty-panel-simple" width="50%" childLayout="vertical" y="276" x="383">
 8                 <control name="label" id="title" text="quality level" height="50px" font="aurulent-sans-16.fnt" width="100px" align="center" valign="center"/>
 9                 <panel id="panel1" height="30%" style="nifty-panel-simple" backgroundColor="#666666ff" width="50%" align="center" childLayout="center">
10                     <control name="radioButton" id="radiobutton0" align="left" group="radioGroup0"/>
11                     <control name="radioButton" id="radiobutton1" group="radioGroup0"/>
12                     <control name="radioButton" id="radiobutton2" align="right" group="radioGroup0"/>
13                 </panel>
14             </panel>
15         </layer>
16     </screen>
17     <screen id="screen1"><control name="radioButtonGroup" id="radioGroup0"/></screen>
18 </nifty>
然后是Java代码:
 1 import com.jme3.app.SimpleApplication;
 2 import com.jme3.math.ColorRGBA;
 3 import com.jme3.niftygui.NiftyJmeDisplay;
 4 import de.lessvoid.nifty.Nifty;
 5 import de.lessvoid.nifty.controls.RadioButton;
 6 import de.lessvoid.nifty.screen.Screen;
 7 import de.lessvoid.nifty.screen.ScreenController;
 8
 9 /**
10  * @date 2024年7月12日16点56分
11  * @author JohnKkk
12  */
13 public class NiftyGuiRadioButton extends SimpleApplication implements ScreenController{
14
15     private Nifty m_Nifty;
16
17     public static void main(String[] args) {
18         NiftyGuiRadioButton niftyGuiLabel = new NiftyGuiRadioButton();
19         niftyGuiLabel.start();
20     }
21
22     @Override
23     public void simpleInitApp() {
24         // 设置默认背景色
25         getViewPort().setBackgroundColor(ColorRGBA.DarkGray);
26
27         // 初始化Nifty
28         NiftyJmeDisplay niftyDisplay = NiftyJmeDisplay.newNiftyJmeDisplay(
29                 assetManager,
30                 inputManager,
31                 audioRenderer,
32                 guiViewPort);
33         m_Nifty = niftyDisplay.getNifty();
34         // 将NiftyGUI显示对象添加到JME3中
35         guiViewPort.addProcessor(niftyDisplay);
36
37         m_Nifty.fromXml("Interface/NiftyGuiRadioButton.xml", "screen0");
38
39         // 禁用flyCam并显示鼠标
40         flyCam.setEnabled(false);
41         inputManager.setCursorVisible(true);
42     }
43
44     @Override
45     public void bind(Nifty nifty, Screen screen0) {
46     }
47
48     @Override
49     public void onStartScreen() {
50     }
51
52     @Override
53     public void onEndScreen() {
54     }
55
56 }
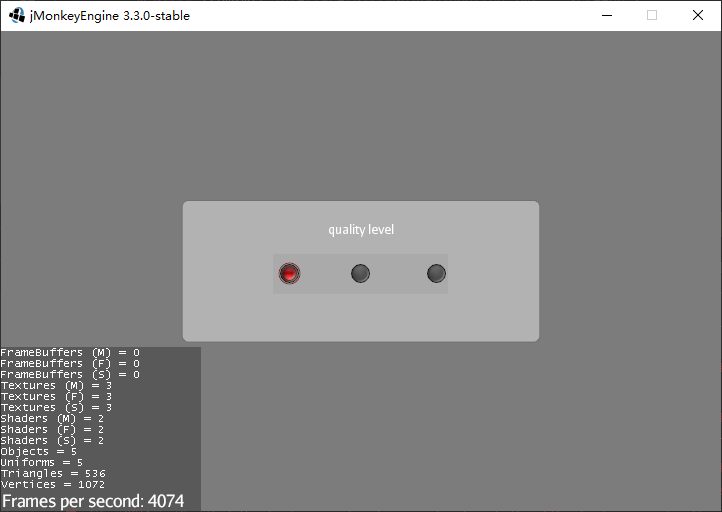
启动我们的JME3程序后,可以看到默认选中了第一个RadioButton,并且只能选中其他一个(因为是同一个RadioGroup的):
我们添加EventBus订阅,如下:
1 @NiftyEventSubscriber(id="radioGroup0")
2     public final void onRadioButtonGroup0Event(final String id, final RadioButtonGroupStateChangedEvent event){
3         System.out.println("当前选中:" + event.getSelectedId() + ",上一个选中的是:" + event.getPreviousSelectedId());
4     }
然后我们启动JME3程序,点击过程中打印如下:

RadioButton默认选中设置
我们每次启动JME3程序,默认选中的都是第一个RadioButton,我们如果希望默认选中其他RadioButton,我们只能通过Java代码实现,无法通过xml完成,我们可以在启动屏幕之前(即onStartScreen)进行这个设置,你可能会觉得,这样一来会不会触发EventBus事件?答案是不会的,只要我们在onStartScreen之前执行这一步,就不会触发EventBus事件。
修改Java代码,在bind()方法中添加如下逻辑:
1 @Override
2     public void bind(Nifty nifty, Screen screen0) {
3         RadioButton radioButton1 = screen0.findElementById("radiobutton1").getNiftyControl(RadioButton.class);
4         System.out.println("radioButton:" + radioButton1.isActivated());
5         radioButton1.select();
6     }
我们获取id为radioButton1的RadioButton,然后调用select()方法选中它。
重新启动JME3程序,结果如下:
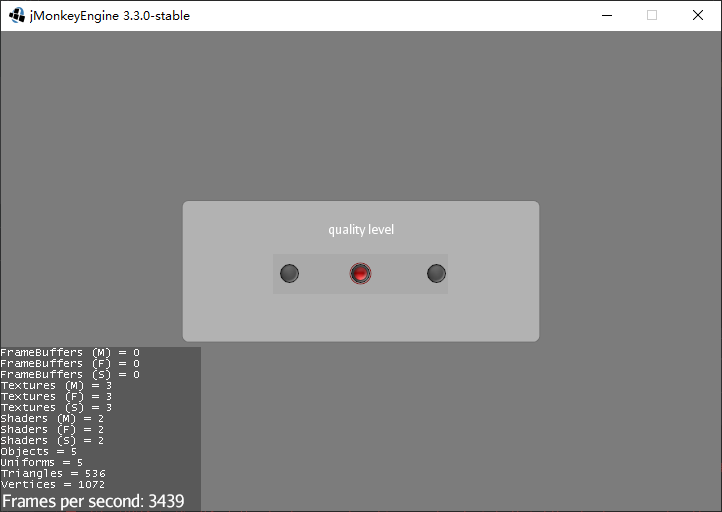
你可能会在一开始看到选中第一个RadioButton,然后迅速选中为第二个RadioButton,这似乎没法避免,算是NiftyGui的一个bug吧。

 浙公网安备 33010602011771号