邮件发送
邮件发送
目录
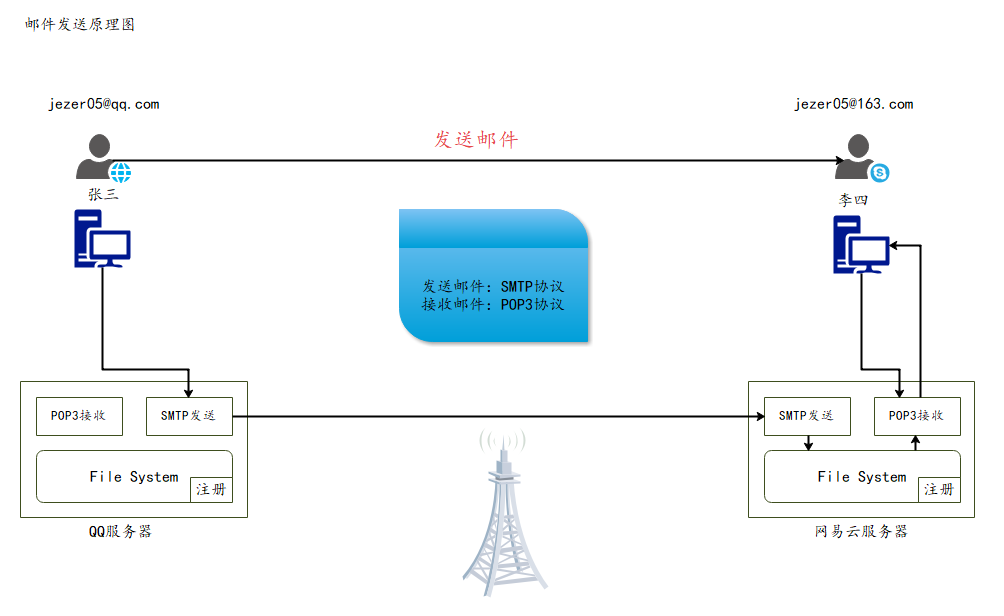
1. 邮件发送原理
2. 导入jar包
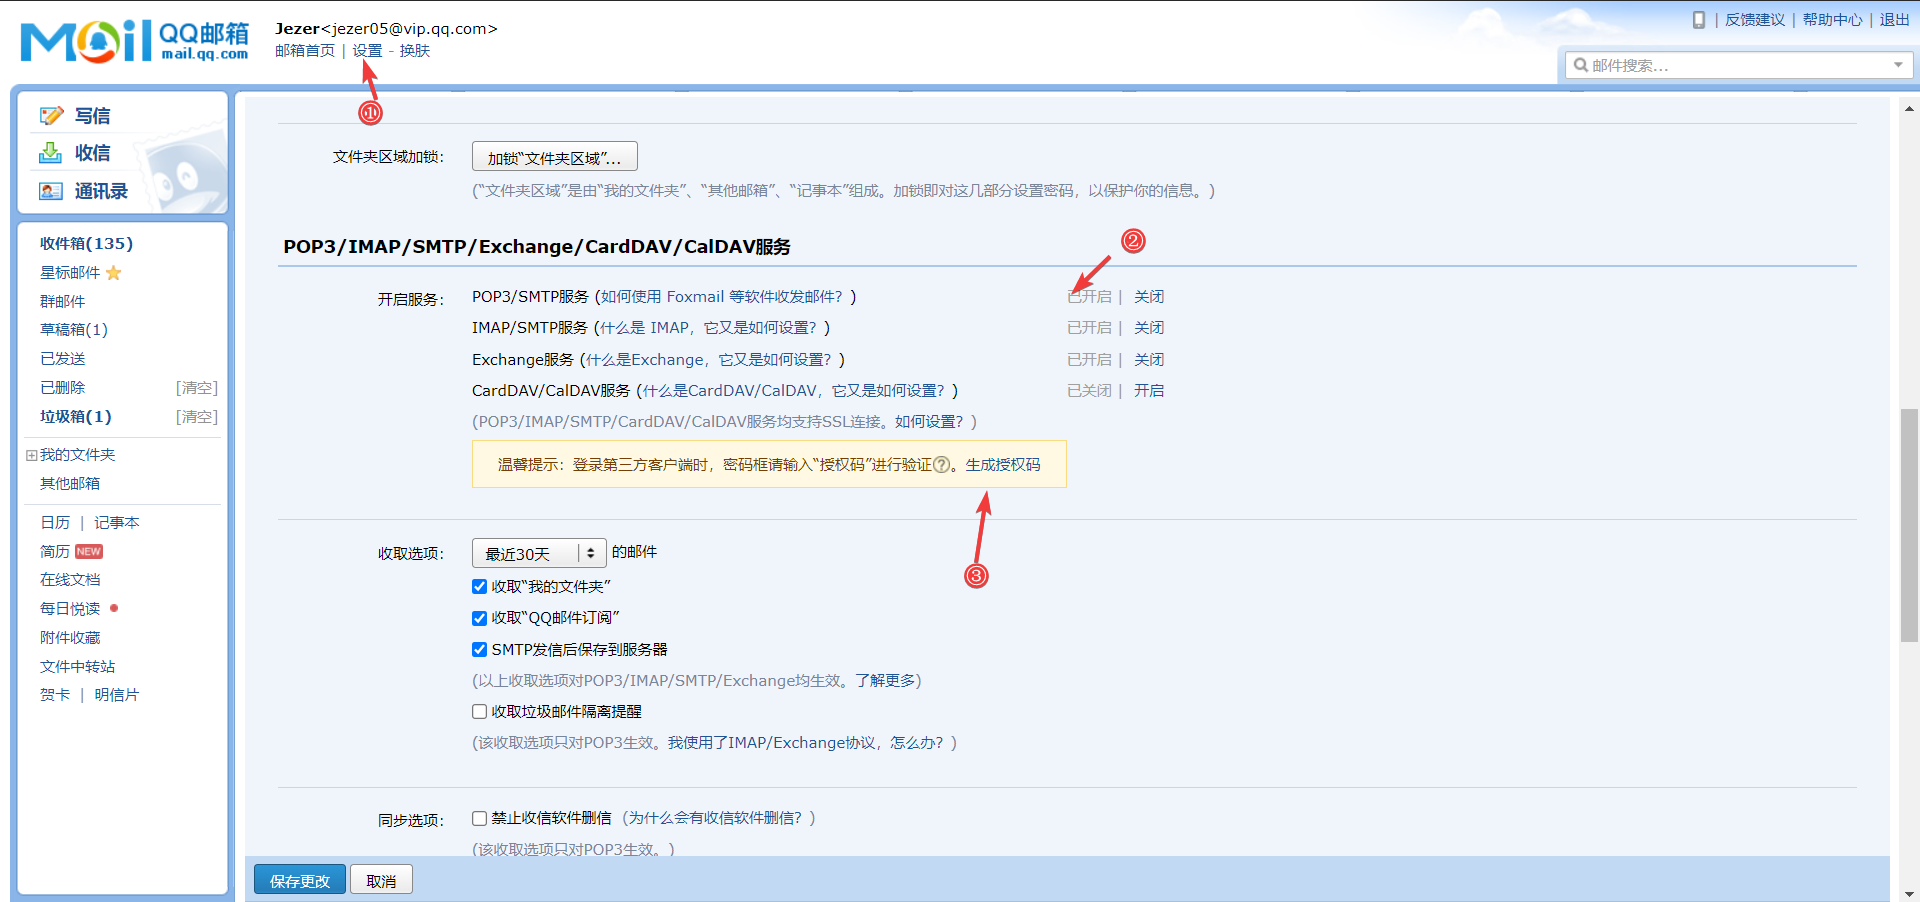
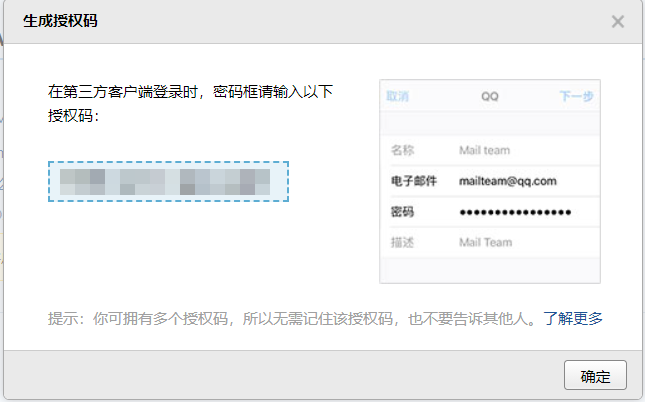
3. 获取授权码
4. 简单文本邮件发送实现

步骤:
1.创建session对象
2.创建Transport对象
3.使用邮箱的用户名和授权码连上邮件服务器
4.创建一个Message对象(需要传递session)
- message需要指明发件人、收件人以及文件内容
5.发送邮件
6.关闭连接
import com.sun.mail.util.MailSSLSocketFactory;

import javax.mail.*;
import javax.mail.internet.InternetAddress;
import javax.mail.internet.MimeMessage;
import java.util.Properties;

/**
 * @author Jay_Soul
 */
public class Mailing {
    public static void main(String[] args) throws Exception {

        Properties prop=new Properties();
        prop.setProperty("mail.host","smtp.qq.com");///设置QQ邮件服务器
        prop.setProperty("mail.transport.protocol","smtp");///邮件发送协议
        prop.setProperty("mail.smtp.auth","true");//需要验证用户密码

        //QQ邮箱需要设置SSL加密,其他邮箱不需要
        MailSSLSocketFactory sf=new MailSSLSocketFactory();
        sf.setTrustAllHosts(true);
        prop.put("mail.smtp.ssl.enable","true");
        prop.put("mail.smtp.ssl.socketFactory",sf);

        //使用javaMail发送邮件的5个步骤
        //1.创建定义整个应用程序所需要的环境信息的session对象

        //QQ才有!其他邮箱就不用
        Session session=Session.getDefaultInstance(prop, new Authenticator() {
            @Override
            public PasswordAuthentication getPasswordAuthentication() {
                //发件人邮件用户名、授权码
                return new PasswordAuthentication("XXXX@qq.com","授权码");
            }
        });

        //开启session的debug模式,这样可以查看到程序发送Email的运行状态
        session.setDebug(true);
        //2.通过session得到transport对象
        Transport ts=session.getTransport();

        //3.使用邮箱的用户名和授权码连上邮件服务器
        ts.connect("smtp.qq.com","XXXX@qq.com","授权码");

        //4.创建邮件:写文件
        //注意需要传递session
        MimeMessage message=new MimeMessage(session);
        //指明邮件的发件人
        message.setFrom(new InternetAddress("XXXX@qq.com"));
        //指明邮件的收件人
        message.setRecipient(Message.RecipientType.TO,new InternetAddress("XXXX@qq.com"));
        //邮件标题
        message.setSubject("发送的标题");
        //邮件的文本内容,本质是html语言
        message.setContent("内容","text/html;charset=UTF-8");

        //5.发送邮件
        ts.sendMessage(message,message.getAllRecipients());

        //6.关闭连接
        ts.close();

    }

}
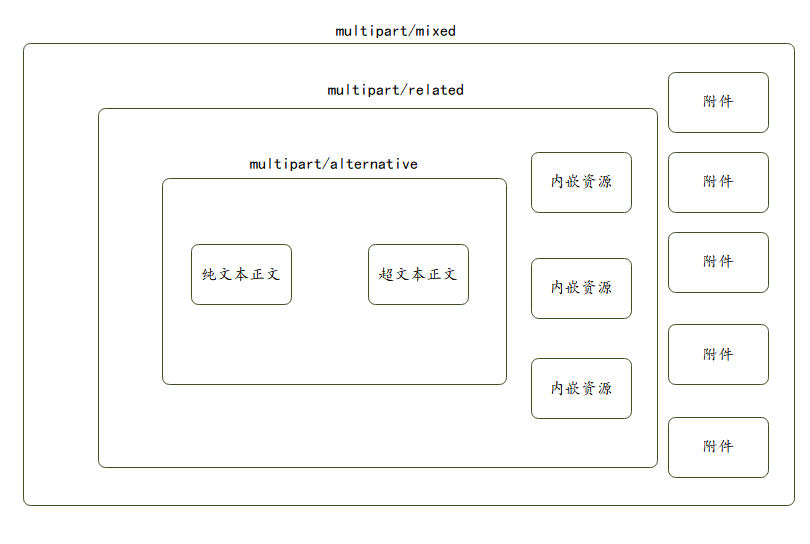
5.复杂文件内容的发送
5.1 文件构成解析
5.2 包含图片的发送
import com.sun.mail.util.MailSSLSocketFactory;

import javax.activation.DataHandler;
import javax.activation.FileDataSource;
import javax.mail.*;
import javax.mail.internet.InternetAddress;
import javax.mail.internet.MimeBodyPart;
import javax.mail.internet.MimeMessage;
import javax.mail.internet.MimeMultipart;
import java.util.Properties;

/**
 * @author Jay_Soul
 */
public class Mailing {
    public static void main(String[] args) throws Exception {

        Properties prop=new Properties();
        prop.setProperty("mail.host","smtp.qq.com");///设置QQ邮件服务器
        prop.setProperty("mail.transport.protocol","smtp");///邮件发送协议
        prop.setProperty("mail.smtp.auth","true");//需要验证用户密码

        //QQ邮箱需要设置SSL加密,其他邮箱不需要
        MailSSLSocketFactory sf=new MailSSLSocketFactory();
        sf.setTrustAllHosts(true);
        prop.put("mail.smtp.ssl.enable","true");
        prop.put("mail.smtp.ssl.socketFactory",sf);

        //使用javaMail发送邮件的5个步骤
        //1.创建定义整个应用程序所需要的环境信息的session对象

        //QQ才有!其他邮箱就不用
        Session session=Session.getDefaultInstance(prop, new Authenticator() {
            @Override
            public PasswordAuthentication getPasswordAuthentication() {
                //发件人邮件用户名、授权码
                return new PasswordAuthentication("XXXX@qq.com","授权码");
            }
        });

        //开启session的debug模式,这样可以查看到程序发送Email的运行状态
        session.setDebug(true);
        //2.通过session得到transport对象
        Transport ts=session.getTransport();

        //3.使用邮箱的用户名和授权码连上邮件服务器
        ts.connect("smtp.qq.com","XXXX@qq.com","授权码");

        //4.创建邮件:写文件
        //注意需要传递session
        MimeMessage message=new MimeMessage(session);
        //指明邮件的发件人
        message.setFrom(new InternetAddress("XXXX@qq.com"));
        //指明邮件的收件人
        message.setRecipient(Message.RecipientType.TO,new InternetAddress("XXXX@qq.com"));
        //邮件标题
        message.setSubject("发送的标题");
        //邮件的文本内容
        //=================================准备图片数据=======================================
        //准备图片数据
        MimeBodyPart image=new MimeBodyPart();
        //图片需要经过数据化的处理
        DataHandler dh = new DataHandler(new FileDataSource("C:\\Users\\Jay_Soul\\Desktop\\cutcamera.png"));
        //在body中放入这个处理过图片的数据
        image.setDataHandler(dh);
        //给这个图片设置一个ID名字
        image.setContentID("1.png");
        //设置图片名字,避免名字异常
        image.setFileName("头像.png");

        //准备正文的数据
        MimeBodyPart text = new MimeBodyPart();
        text.setContent("这是一张头像<img src='cid:1.png'>","text/html;charset=UTF-8");

        //描述数据关系
        MimeMultipart mm =new MimeMultipart();
        mm.addBodyPart(text);
        mm.addBodyPart(image);
        mm.setSubType("related");

        //设置到消息中,保存修改
        message.setContent(mm);
        message.saveChanges();

        //5.发送邮件
        ts.sendMessage(message,message.getAllRecipients());

        //6.关闭连接
        ts.close();

    }

}
5.3 包含文件的发送
对文件内容进行了封装
import com.sun.mail.util.MailSSLSocketFactory;

import javax.activation.DataHandler;
import javax.activation.FileDataSource;
import javax.mail.*;
import javax.mail.internet.*;
import java.io.UnsupportedEncodingException;
import java.util.Properties;

/**
 * @author Jay_Soul
 */
public class Mailing {
    public static void main(String[] args) throws Exception {

        Properties prop=new Properties();
        prop.setProperty("mail.host","smtp.qq.com");///设置QQ邮件服务器
        prop.setProperty("mail.transport.protocol","smtp");///邮件发送协议
        prop.setProperty("mail.smtp.auth","true");//需要验证用户密码

        //QQ邮箱需要设置SSL加密,其他邮箱不需要
        MailSSLSocketFactory sf=new MailSSLSocketFactory();
        sf.setTrustAllHosts(true);
        prop.put("mail.smtp.ssl.enable","true");
        prop.put("mail.smtp.ssl.socketFactory",sf);

        //使用javaMail发送邮件的5个步骤
        //1.创建定义整个应用程序所需要的环境信息的session对象

        //QQ才有!其他邮箱就不用
        Session session=Session.getDefaultInstance(prop, new Authenticator() {
            @Override
            public PasswordAuthentication getPasswordAuthentication() {
                //发件人邮件用户名、授权码
                return new PasswordAuthentication("XXXX@qq.com","授权码");
            }
        });

        //开启session的debug模式,这样可以查看到程序发送Email的运行状态
        session.setDebug(true);
        //2.通过session得到transport对象
        Transport ts=session.getTransport();

        //3.使用邮箱的用户名和授权码连上邮件服务器
        ts.connect("smtp.qq.com","XXXX@qq.com","授权码");

        //4.创建邮件:写文件
        MimeMessage mimeMessage = imageMail(session);

        //5.发送邮件
        ts.sendMessage(mimeMessage,mimeMessage.getAllRecipients());

        //6.关闭连接
        ts.close();

    }
    public static MimeMessage imageMail(Session session) throws MessagingException {

        //消息的固定信息
        MimeMessage mimeMessage = new MimeMessage(session);

        //邮件发送人
        mimeMessage.setFrom(new InternetAddress("jezer05@qq.com"));
        //邮件接收人,可以同时发送给很多人,我们这里只发给自己;
        mimeMessage.setRecipient(Message.RecipientType.TO, new InternetAddress("jezer05@qq.com"));
        mimeMessage.setSubject("我也不知道是个什么东西就发给你了"); //邮件主题


        /*
        编写邮件内容
        1.图片
        2.附件
        3.文本
         */

        //图片
        MimeBodyPart body1 = new MimeBodyPart();
        body1.setDataHandler(new DataHandler(new FileDataSource("C:\\Users\\Jay_Soul\\Desktop\\头像.png")));
        body1.setContentID("1.png"); //图片设置ID
        body1.setFileName("头像.png");

        //文本
        MimeBodyPart body2 = new MimeBodyPart();
        body2.setContent("请注意,我不是广告<img src='cid:1.png'>","text/html;charset=utf-8");

        //附件
        MimeBodyPart body3 = new MimeBodyPart();
        body3.setDataHandler(new DataHandler(new FileDataSource("C:\\Users\\Jay_Soul\\Desktop\\javaWeb帮助文档.md")));
        try {
            body3.setFileName(MimeUtility.encodeText("javaWeb帮助文档.md")); //附件设置名字,注意中文乱码问题
        } catch (UnsupportedEncodingException e) {
            e.printStackTrace();
        }

        MimeBodyPart body4 = new MimeBodyPart();
        body4.setDataHandler(new DataHandler(new FileDataSource("C:\\Users\\Jay_Soul\\Desktop\\mail-1.4.7.jar")));
        body4.setFileName("1.jar"); //附件设置名字

        //拼装邮件正文内容
        MimeMultipart multipart1 = new MimeMultipart();
        multipart1.addBodyPart(body1);
        multipart1.addBodyPart(body2);
        multipart1.setSubType("related"); //1.文本和图片内嵌成功!

        //new MimeBodyPart().setContent(multipart1); //将拼装好的正文内容设置为主体
        MimeBodyPart contentText =  new MimeBodyPart();
        contentText.setContent(multipart1);

        //拼接附件
        MimeMultipart allFile =new MimeMultipart();
        allFile.addBodyPart(body3); //附件
        allFile.addBodyPart(body4); //附件
        allFile.addBodyPart(contentText);//正文
        allFile.setSubType("mixed"); //正文和附件都存在邮件中,所有类型设置为mixed;


        //放到Message消息中
        mimeMessage.setContent(allFile);
        mimeMessage.saveChanges();//保存修改


        return mimeMessage;

    }


}
6. JavaWeb发送邮件
现在很多的网站都提供有用户注册功能, 通常我们注册成功之后就会收到一封来自注册网站的邮件。邮件里面的内容可能包含了我们的注册的用户名和密码以及一个激活账户的超链接等信息。今天我们也来实现一个这样的功能,用户注册成功之后,就将用户的注册信息以Email的形式发送到用户的注册邮箱当中,实现发送邮件功能就得借助于JavaMail了。
- 新建一个JavaWeb项目,配置tomcat,添加jar包

<?xml version="1.0" encoding="UTF-8"?>
<project xmlns="http://maven.apache.org/POM/4.0.0"
         xmlns:xsi="http://www.w3.org/2001/XMLSchema-instance"
         xsi:schemaLocation="http://maven.apache.org/POM/4.0.0 http://maven.apache.org/xsd/maven-4.0.0.xsd">
    <modelVersion>4.0.0</modelVersion>

    <groupId>com.jezer</groupId>
    <artifactId>WebMailing</artifactId>
    <version>1.0-SNAPSHOT</version>
    <packaging>war</packaging>

    <dependencies>
        <!-- https://mvnrepository.com/artifact/javax.activation/activation -->
        <dependency>
            <groupId>javax.activation</groupId>
            <artifactId>activation</artifactId>
            <version>1.1.1</version>
        </dependency>
        <!-- https://mvnrepository.com/artifact/javax.mail/mail -->
        <dependency>
            <groupId>javax.mail</groupId>
            <artifactId>mail</artifactId>
            <version>1.4.7</version>
        </dependency>
        <!-- https://mvnrepository.com/artifact/javax.servlet/javax.servlet-api -->
        <dependency>
            <groupId>javax.servlet</groupId>
            <artifactId>javax.servlet-api</artifactId>
            <version>4.0.1</version>
            <scope>provided</scope>
        </dependency>
        <dependency>
            <groupId>javax.servlet.jsp</groupId>
            <artifactId>javax.servlet.jsp-api</artifactId>
            <version>2.3.3</version>
        </dependency>
        <dependency>
            <groupId>junit</groupId>
            <artifactId>junit</artifactId>
            <version>4.13.2</version>
        </dependency>
    </dependencies>
</project>
- 编写对应的用户实体类
Lombok
package com.jezer.pojo;

import java.io.Serializable;

/**
 * @author Jay_Soul
 */
public class User implements Serializable {
    private String username;
    private String password;
    private String email;

    public User() {
    }

    public String getUsername() {
        return username;
    }

    public void setUsername(String username) {
        this.username = username;
    }

    public String getPassword() {
        return password;
    }

    public void setPassword(String password) {
        this.password = password;
    }

    public String getEmail() {
        return email;
    }

    public void setEmail(String email) {
        this.email = email;
    }

    public User(String username, String password, String email) {
        this.username = username;
        this.password = password;
        this.email = email;
    }

    @Override
    public String toString() {
        return "User{" +
                "username='" + username + '\'' +
                ", password='" + password + '\'' +
                ", email='" + email + '\'' +
                '}';
    }
}
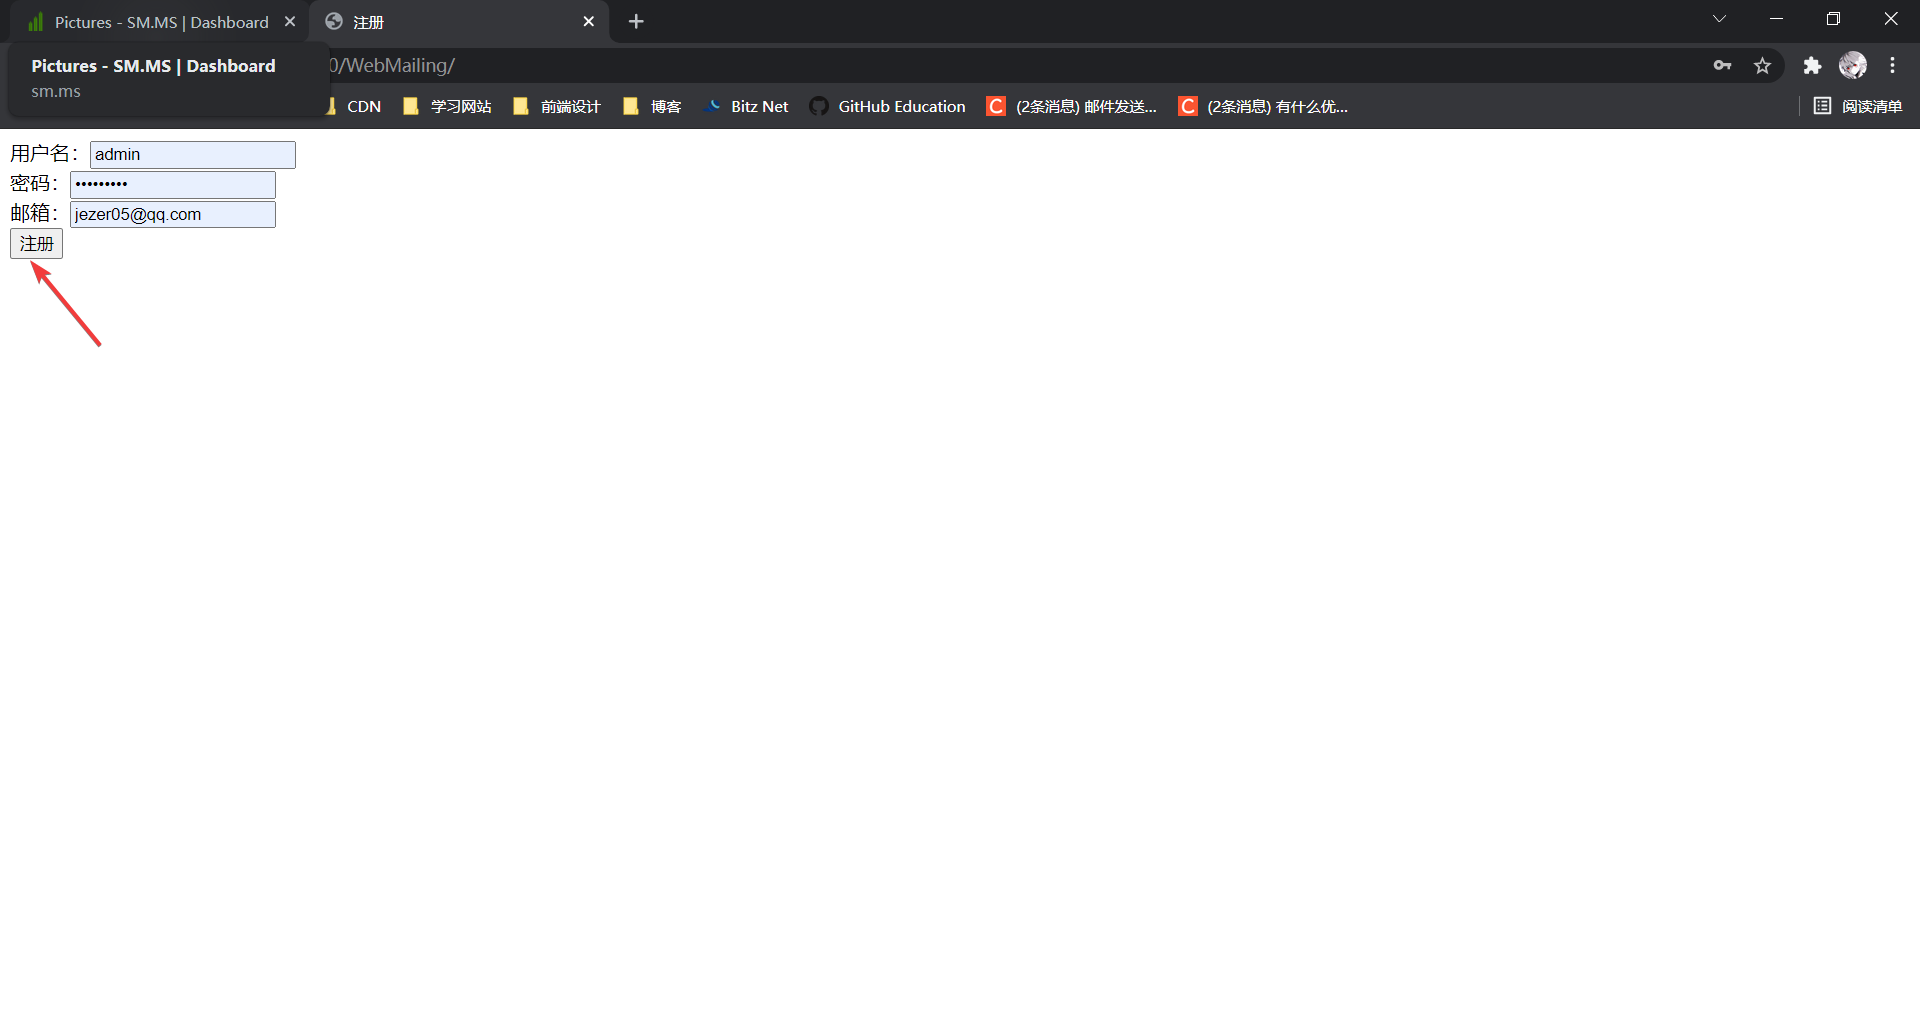
- 前端注册页面
<%@ page contentType="text/html;charset=UTF-8" language="java" %>
<html>
<head>
    <title>注册</title>
</head>
<body>

<form action="${pageContext.request.contextPath}/register.do" method="post">
    用户名:<input type="text" name="username"><br/>
    密码:<input type="password" name="password"><br/>
    邮箱:<input type="text" name="email"><br/>
    <input type="submit" value="注册">
</form>
</body>
</html>
- 邮件发送工具类
package com.jezer.utils;

import com.sun.mail.util.MailSSLSocketFactory;
import com.jezer.pojo.User;

import javax.mail.*;
import javax.mail.internet.InternetAddress;
import javax.mail.internet.MimeMessage;
import java.util.Properties;

/**
 * 网站3s原则:用户体验
 * 多线程实现用户体验!! (异步处理)
 * @author Jay_Soul
 */
public class MailSender extends Thread{
    //用于给用户发送邮件的邮箱
    private String from = "jezer05@qq.com";
    //邮箱的用户名
    private String username = "Jezer";
    //邮箱的密码
    private String password = "授权码";
    //发送邮件的服务器地址
    private String host = "smtp.qq.com";

    private User user;
    public MailSender(User user){
        this.user = user;
    }

    /**
     * 重写run方法的实现,在run方法中发送邮件给指定的用户
     */
    @Override
    public void run() {
        try{
            Properties prop = new Properties();
            prop.setProperty("mail.host", host);
            prop.setProperty("mail.transport.protocol", "smtp");
            prop.setProperty("mail.smtp.auth", "true");

            // 关于QQ邮箱,还要设置SSL加密,加上以下代码即可
            MailSSLSocketFactory sf = new MailSSLSocketFactory();
            sf.setTrustAllHosts(true);
            prop.put("mail.smtp.ssl.enable", "true");
            prop.put("mail.smtp.ssl.socketFactory", sf);

            //1、创建定义整个应用程序所需的环境信息的 Session 对象
            Session session = Session.getDefaultInstance(prop, new Authenticator() {
                @Override
                public PasswordAuthentication getPasswordAuthentication() {
                    //发件人邮件用户名、授权码
                    return new PasswordAuthentication("jezer05@qq.com", "授权码");
                }
            });

            //开启Session的debug模式,这样就可以查看到程序发送Email的运行状态
            session.setDebug(true);

            //2、通过session得到transport对象
            Transport ts = session.getTransport();

            //3、使用邮箱的用户名和授权码连上邮件服务器
            ts.connect(host, username, password);

            //4、创建邮件
            MimeMessage message = new MimeMessage(session);
            message.setFrom(new InternetAddress(from)); //发件人
            message.setRecipient(Message.RecipientType.TO, new InternetAddress(user.getEmail())); //收件人
            message.setSubject("用户注册邮件"); //邮件的标题

            String info = "恭喜您注册成功,您的用户名:" + user.getUsername() + ",您的密码:" + user.getPassword() + ",请妥善保管,如有问题请联系网站客服!!";

            message.setContent(info, "text/html;charset=UTF-8");
            message.saveChanges();

            //发送邮件
            ts.sendMessage(message, message.getAllRecipients());
            ts.close();
        }catch (Exception e) {
            throw new RuntimeException(e);
        }
    }
}
- 编写对应的servlet处理类
package com.jezer.servlet;

import com.jezer.pojo.User;
import com.jezer.utils.MailSender;

import javax.servlet.ServletException;
import javax.servlet.http.HttpServlet;
import javax.servlet.http.HttpServletRequest;
import javax.servlet.http.HttpServletResponse;
import java.io.IOException;

/**
 * @author Jay_Soul
 */

public class RegisterServlet extends HttpServlet {
    @Override

    protected void doGet(HttpServletRequest request, HttpServletResponse response) throws ServletException, IOException {
        try {
            //接收用户请求,封装成对象
            String username = request.getParameter("username");
            String password = request.getParameter("password");
            String email = request.getParameter("email");
            User user = new User(username,password,email);

            //用户注册成功之后,给用户发送一封邮件
            //我们使用线程来专门发送邮件,防止出现耗时,和网站注册人数过多的情况;
            MailSender send = new MailSender(user);
            //启动线程,线程启动之后就会执行run方法来发送邮件
            send.start();

            //注册用户
            request.setAttribute("message", "注册成功,我们已经发了一封带了注册信息的电子邮件,请查收!如网络不稳定,可能过会儿才能收到!!");
            request.getRequestDispatcher("info.jsp").forward(request, response);
        } catch (Exception e) {
            e.printStackTrace();
            request.setAttribute("message", "注册失败!!");
            request.getRequestDispatcher("info.jsp").forward(request, response);
        }
    }

    @Override
    protected void doPost(HttpServletRequest request, HttpServletResponse response) throws ServletException, IOException {
        doGet(request, response);
    }
}
- 注册Servlet
<?xml version="1.0" encoding="UTF-8"?>
<web-app xmlns="http://xmlns.jcp.org/xml/ns/javaee"
         xmlns:xsi="http://www.w3.org/2001/XMLSchema-instance"
         xsi:schemaLocation="http://xmlns.jcp.org/xml/ns/javaee http://xmlns.jcp.org/xml/ns/javaee/web-app_4_0.xsd"
         version="4.0">
    <servlet>
        <servlet-name>RegisterServlet</servlet-name>
        <servlet-class>com.jezer.servlet.RegisterServlet</servlet-class>
    </servlet>
    <servlet-mapping>
        <servlet-name>RegisterServlet</servlet-name>
        <url-pattern>/register.do</url-pattern>
    </servlet-mapping>

</web-app>
- 发送成功或失败的反馈页面
<%--
  Created by IntelliJ IDEA.
  User: Jay_Soul
  Date: 2021/10/14
  Time: 17:52
  To change this template use File | Settings | File Templates.
--%>
<%@ page contentType="text/html;charset=UTF-8" language="java" %>
<html>
<head>
    <title>提示信息</title>
</head>
<body>
${message}
</body>
</html>
- Tomcat运行
7. 坑点记录
7.1 案发经历
- 我直接创建一个没有原型的Maven项目
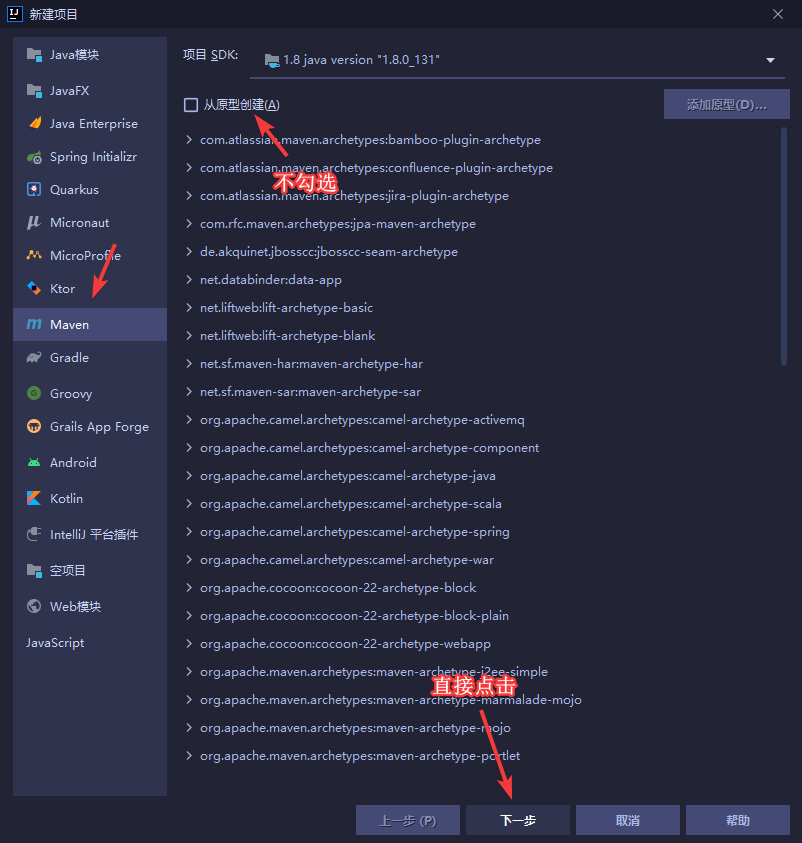
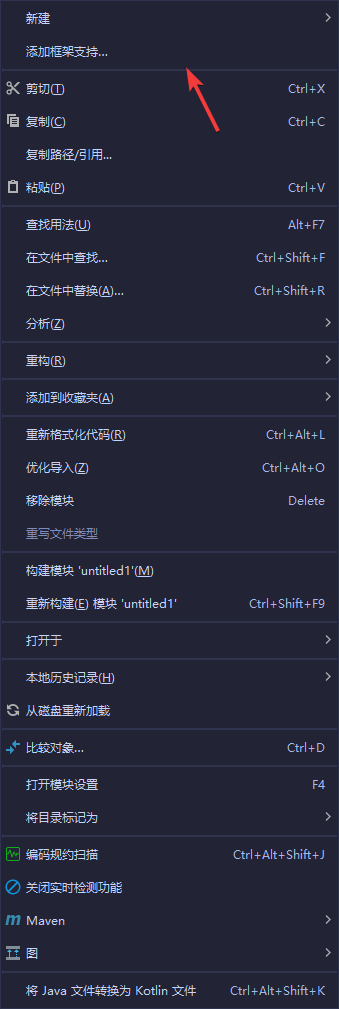
- 然后在项目中添加框架支持(不是新建模块)
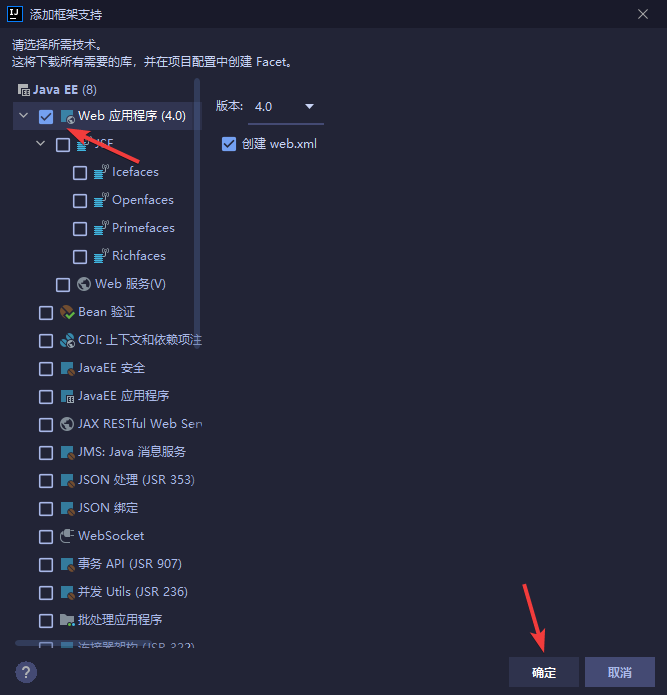
-
选择Web应用程序
-
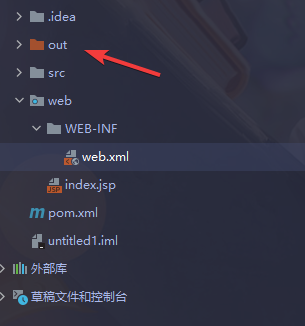
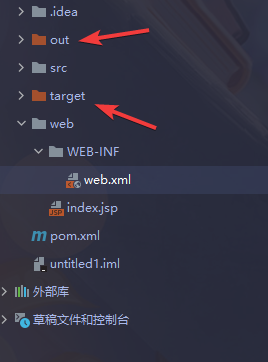
当我一切准备就绪后,满怀期待的启动Tomcat,结果报了404,看了一眼Tomact,发现生成了
out文件夹,并没有``target文件夹(这个问题之前遇见过),我在pom.xml中加入war 即可(希望大佬能解释一波原理),我们可以看到target`文件夹出来了
- 再一次快快乐乐的点击运行Tomcat,网站也正常弹出index.jsp界面,结果点下注册,她还是来了!
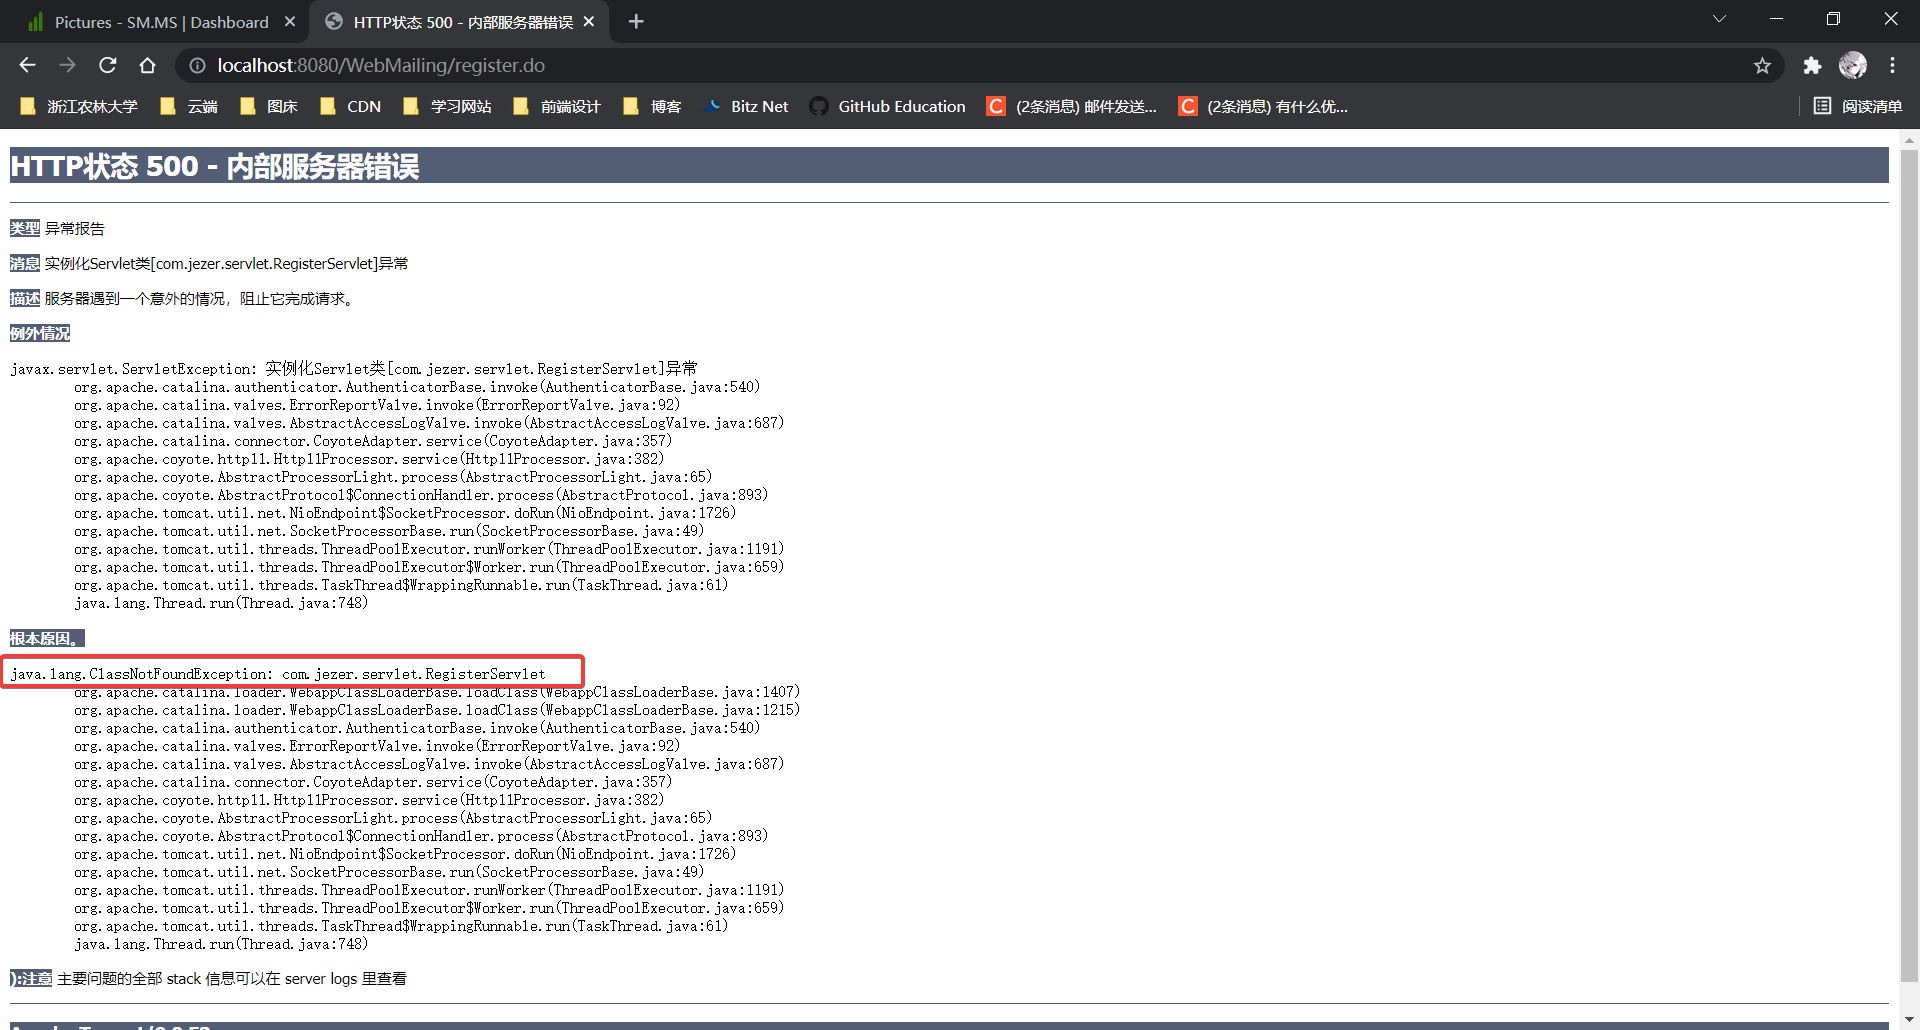
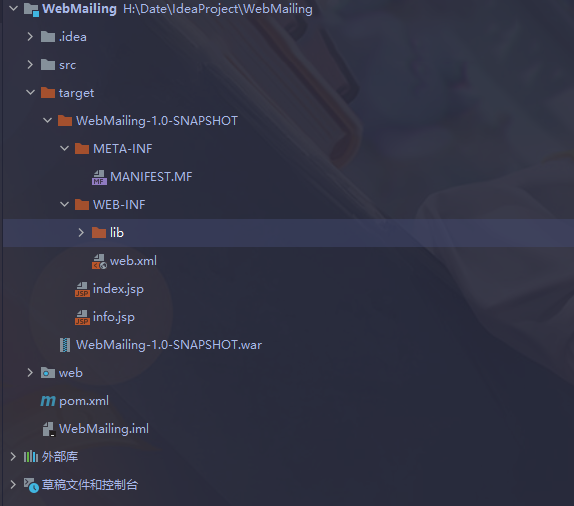
- 从报错信息可以看到,服务器没找到servlet类,我大胆猜测,class类没进webapp(其实我还是把整个代码过了一遍,以为是代码问题,绷不住了),我打开
target文件夹一看,果不其然,他真的很干净
- 又到了紧张刺激的环节,我把Maven选项卡搞了个遍,还有不停的查看项目结构,导入jar包......痛苦

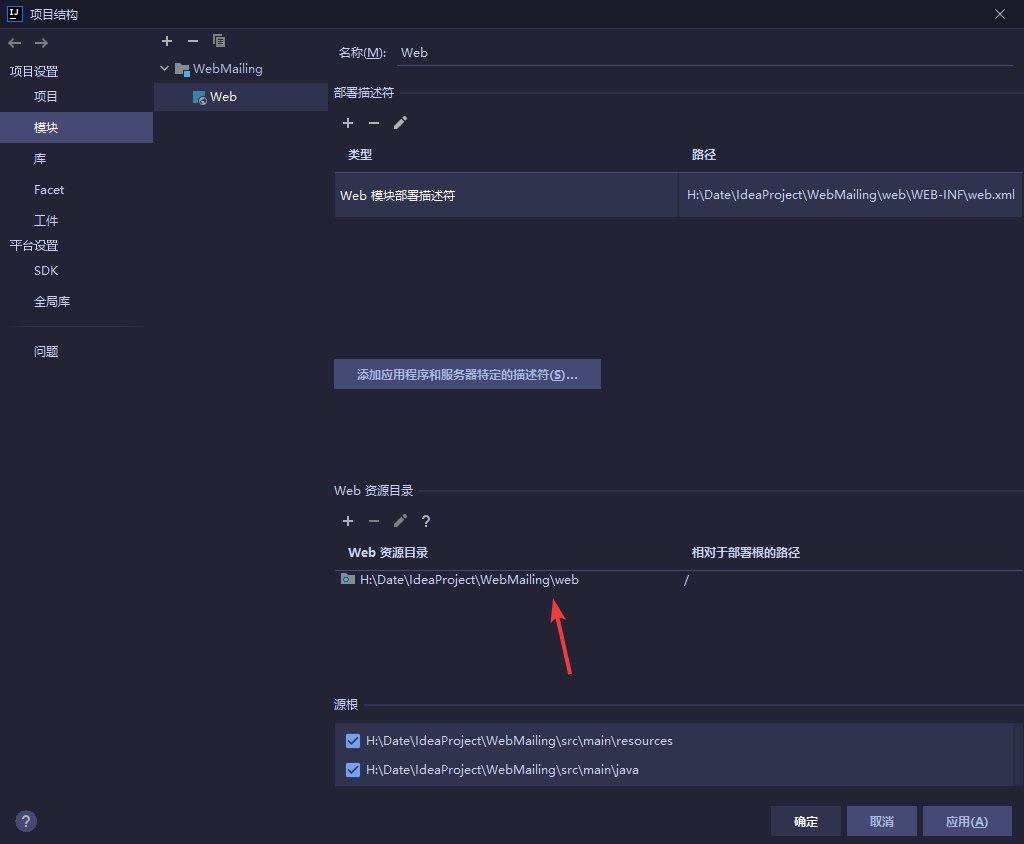
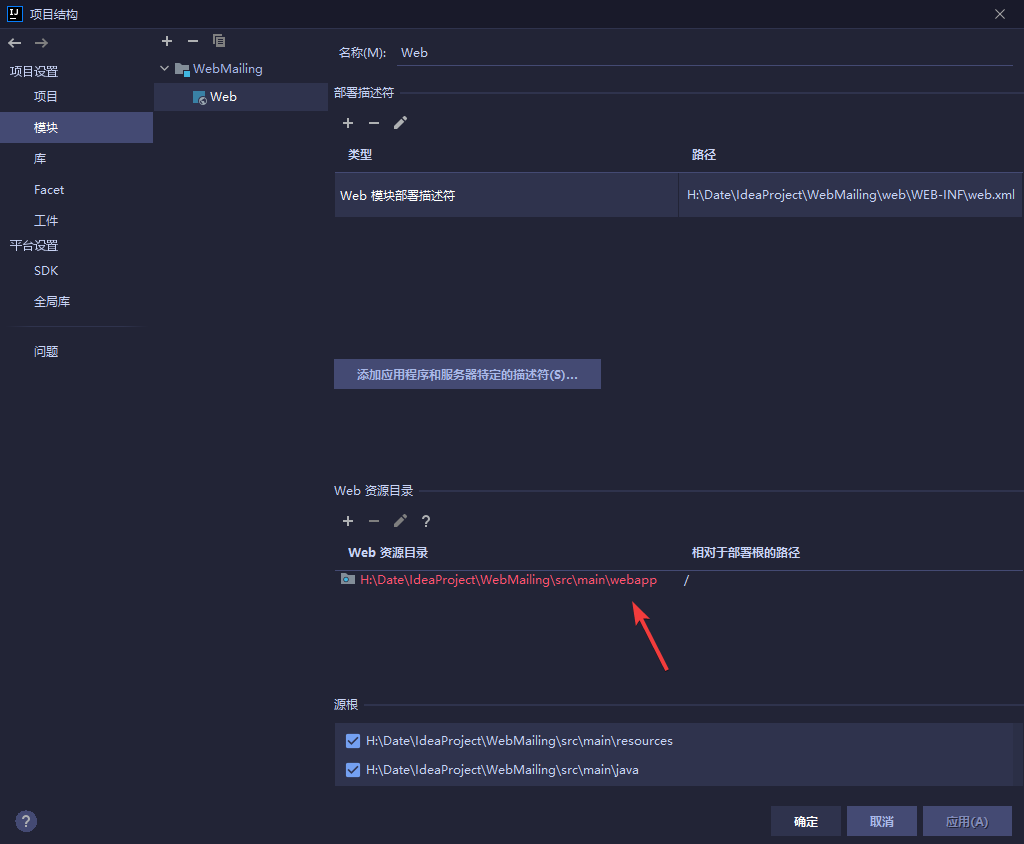
- 在各种瞎点的过程中,get了意外的收获,我发现web资源目录发生了改变,那个地址不就是从原型导入的地址吗,web文件的蓝色圆点标志也消失了(现在知道,那个蓝色圆点标志就代表服务器文件夹所在地)

- 现在可以确定一件事,只要出现
class文件,问题就可以顺利解决,当我点击生命周期中的install后,惊奇发现,target文件终于出现class文件,同时报了一段错误webxml attribute is required (or pre-existing WEB-INF/web.xml if executing in update mode)翻译成中文需要 webxml 属性(或预先存在的 WEB-INF/Web.xml如果在更新模式下执行)
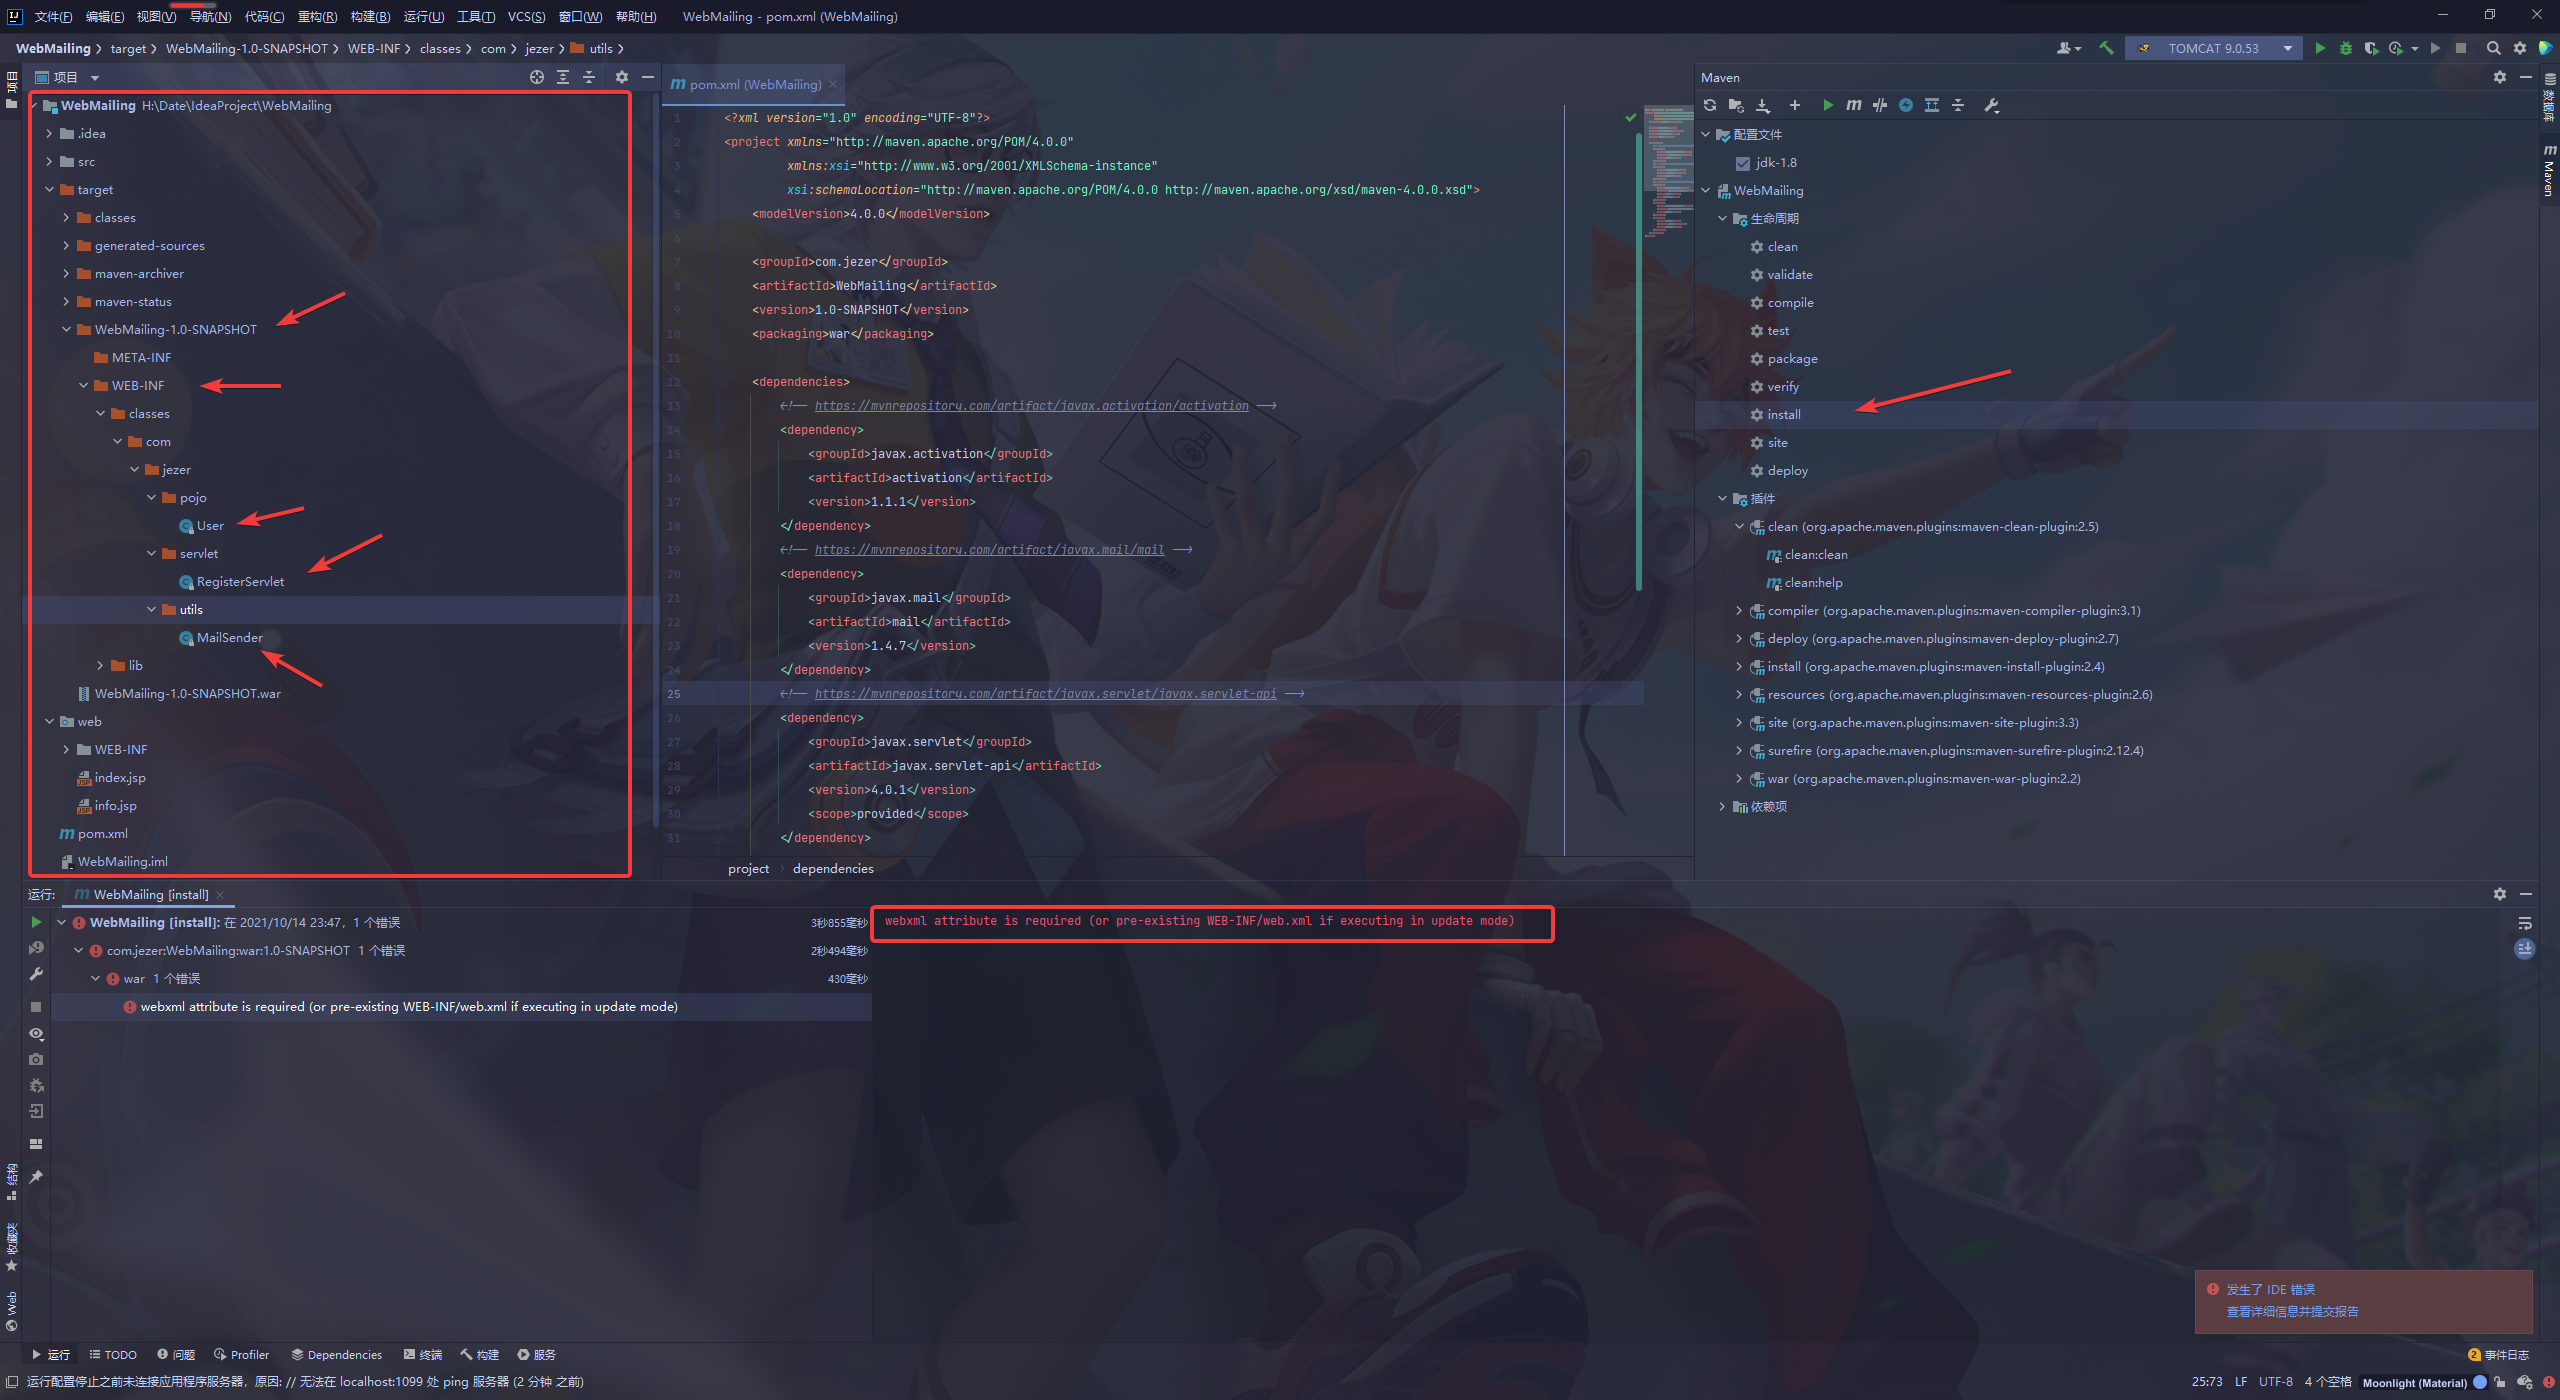
- 之后我点击启动Tomcat,突然发现问题解决了,猛男落泪了。
7.2 总结
个人猜测,可能是Maven项目默认认为webapp在src下,所以一直加载不出class,如果一开始选择创建新模块就没这么多事了,以上全为个人观点,我是小白,很多原理也不清楚,希望大佬能在评论区指点迷津

 浙公网安备 33010602011771号