
plantuml使用教程【转】
Table of Contents
- 前言
- 什么是PlantUML
- 在Emacs里配置PlantUML(参考:Run it from Emacs)
- 其他软件里的PlantUML下载和安装
- 如何使用
- 顺序图(Sequence Diagram)
- 简单示例
- 注释语句
- 申明参与者
- 使用非字母的参与者名称(Use non-letters in participants)
- 发送消息给自己(Message to Self)
- 改变箭头的样式(Change arrow style)
- 改变箭头的颜色(Change arrow color)
- 消息序号(Message sequence numbering)
- 标题(Title)
- 图形图例(Legend the diagram)
- 分割图形(Splitting diagrams)
- 消息分组(Grouping message)
- 消息注解(Notes on messages)
- 一些其他的注解方式(Some other notes)
- 使用HTML进行格式化(Formatting using HTML)
- 用例图(Use Case Diagram)
- 类图(Class Diagram)
- 活动图(Activity Diagram)
- 活动图Beta
- 顺序图(Sequence Diagram)
前言
本文多数内容引用自官网文档,并非本人原创,也谈不上翻译,只是把自己 理解的东西用中文写出来。
编写本文的目的旨在记录个人在学习PlantUML时对官网上一些内容的理解,以 及总结学习过程中遇到的问题,并将其分享。文章中如有不对之处欢迎大家直 言指正,以免造成误导。
版权:本文可自由转载,但不能商用,不能衍生,保持署名。转载请注明作者及出处.
Creative Commons Attribution-NonCommercial-NoDerivatives 4.0 International License.
什么是PlantUML
PlantUML是一个快速创建UML图形的组件,官网上之所以称它是一个组件,我 想主要是因为多数情况下我们都是在Eclipse、NetBenas、Intellijidea、 Emacs、Word等软件里来使用PlantUML(参看各软件相关配置)。
- PlantUML支持的图形有:
- sequence diagram,
- use case diagram,
- class diagram,
- activity diagram (here is the new syntax),
- component diagram,
- state diagram,
- object diagram,
- wireframe graphical interface
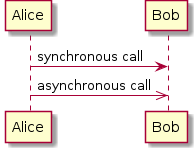
- PlantUML通过简单和直观的语言来定义图形,它可以生成PNG、SVG和二进制 图片。下面是一个简单的示例:
#+BEGIN_SRC plantuml :file ../img/orgmode-babel-sequenceuml.png
  Alice -> Bob: synchronous call
  Alice ->> Bob: asynchronous call
#+END_SRC
![]()
在官网上有一个简单的在线Demo服务, 有兴趣的朋友可以上去看下。
在Emacs里配置PlantUML(参考:Run it from Emacs)
- 下载
plantuml.jar到你的硬盘上(官网下载页面) - 安装生成图片用的软件Graphviz
## 如果是Ubuntu系统,可以直接运行下面的命令安装
sudo apt-get install graphviz
- 在
.emacs里添加配置,把plantuml添加到org-babel-load-languages加载语言列表里。;; active Org-babel languages (org-babel-do-load-languages 'org-babel-load-languages '(;; other Babel languages (plantuml . t)))
然后把刚下载到的
plantuml.jar文件的存放路径也添加到.emacs文件中,以方便Emacs调用。(setq org-plantuml-jar-path (expand-file-name "~/path/to/plantuml.jar"))
重启Emacs,复制上面的示例代码试一下吧!
其他软件里的PlantUML下载和安装
如何使用
顺序图(Sequence Diagram)
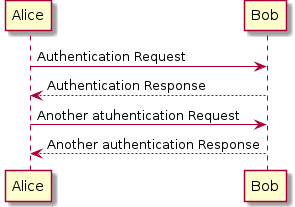
简单示例
顺序图用 -> , -->, <-, <-- 来绘制参与者(Participants)之 间的消息(Message)。
#+BEGIN_SRC plantuml :file ../img/plantuml-quickstart-s1.png
  Alice -> Bob: Authentication Request
  Bob --> Alice: Authentication Response

  Alice -> Bob: Another atuhentication Request
  Alice <-- Bob: Another authentication Response
#+END_SRC
注释语句
以单引号开始头行,即是一个单行注释。多行注释可以使用"/'"表 示注释内容的开始,然后使用"'/"来表示注释内容的结束。
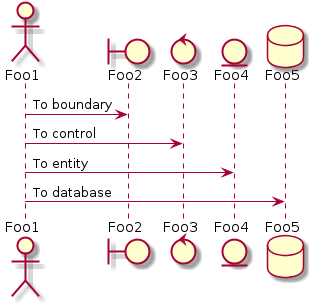
申明参与者
申明参与者,可以使用 participant 关键词,也可以使用下面的参与者 分类关键词来申明参与者:
- actor
- boundary
- control
- entity
- database
不同的参与者类型,其图标也是不一样的。
#+BEGIN_SRC plantuml :file ../img/plantuml-quickstart-s2.png
  actor Foo1
  boundary Foo2
  control Foo3
  entity Foo4
  database Foo5
  Foo1 -> Foo2 : To boundary
  Foo1 -> Foo3 : To control
  Foo1 -> Foo4 : To entity
  Foo1 -> Foo5 : To database
#+END_SRC
使用 as 关键词可以为参与者起一个别名,这样在对引用长名的参与者时, 会方便很多。在参与者申明语句后行尾可以追加背景色的设置,只要把标准 的HTML颜色值 写在后面就行了。
#+BEGIN_SRC plantuml :file ../img/plantuml-quickstart-s3.png
  actor Bob #red
  ' The only defference between actor
  ' and participant is the drawing
  participant Alice
  participant "I have a really\nlong name" as L #99ff99
  /' You can also declare:
     participant L as "I have a really\nlong name" #99ff99
    '/

  Alice -> Bob: Authentication Request
  Bob -> Alice: Authentication Response
  Bob -> L: Log transaction
#+END_SRC

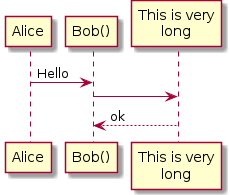
使用非字母的参与者名称(Use non-letters in participants)
针对非字母的参与者名,我们可以使用双引号,同样也可以为比较长的名字 起个别名,方法同上使用 as 关键词。
使用上面的关键词来申明参与者,是一种显示申明;而采用引号来申明参与 者则是一种隐示申明方法,它不需要专门的位置去定义。
#+BEGIN_SRC plantuml :file ../img/plantuml-quickstart-s4.png
  Alice -> "Bob()" : Hello
  "Bob()" -> "This is very\nlong" as Long
  ' You can also declare:
  ' "Bob()" -> Long as "This is very\nlong"
  Long --> "Bob()" : ok
#+END_SRC
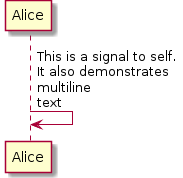
发送消息给自己(Message to Self)
一个参与者可以给自己发送消息,消息名如果需要有多行文本,可以用 \n 来表示换行。
#+BEGIN_SRC plantuml :file ../img/plantuml-quickstart-s5.png
  Alice -> Alice: This is a signal to self.\nIt also demonstrates\nmultiline \ntext
#+END_SRC
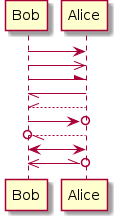
改变箭头的样式(Change arrow style)
在用例图里可以通过以下方式来改变箭头的样式:
- 使用
\或/来替换<或>可以让箭头只显示上半部分或下半 部分。 - 重复输入箭头或斜杠(
>>//),用来绘制空心箭头。 - 使用双横线
--替代-可以用来绘制点线。 - 在箭头后面加个
o可以在箭头前绘制一个圆圈。 - 使用
<->可用来绘制双向箭头。
#+BEGIN_SRC plantuml :file ../img/plantuml-quickstart-s6.png
  Bob -> Alice
  Bob ->> Alice
  Bob -\ Alice
  Bob \\- Alice
  Bob //-- Alice

  Bob ->o Alice
  Bob o\\-- Alice

  Bob <-> Alice
  Bob <<-\\o Alice
#+END_SRC
改变箭头的颜色(Change arrow color)
要改变箭头的颜色,可以使用HTML颜色符号,参看下面的例子:
#+BEGIN_SRC plantuml :file ../img/plantuml-quickstart-s7.png
  Bob -[#red]> Alice : hello
  Alice -[#0000FF]->Bob : ok
#+END_SRC
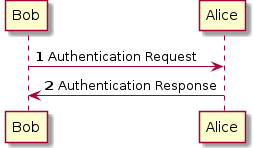
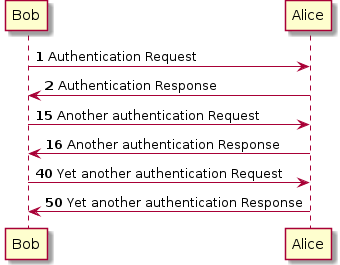
消息序号(Message sequence numbering)
关键词 autonumber 用来给自动的给消息添加上序号。
#+BEGIN_SRC plantuml :file ../img/plantuml-quickstart-s8.png
  autonumber
  Bob -> Alice : Authentication Request
  Bob <- Alice : Authentication Response
#+END_SRC
如果需要指定一个起始号码,可以直接在 autonumber 后面加个数字就行 了,如果要设置自增量,再在后面加一个数字就行了( autonumber start increment )。
#+BEGIN_SRC plantuml :file ../img/plantuml-quickstart-s9.png
  autonumber
  Bob -> Alice : Authentication Request
  Bob <- Alice : Authentication Response

  autonumber 15
  Bob -> Alice : Another authentication Request
  Bob <- Alice : Another authentication Response

  autonumber 40 10
  Bob -> Alice : Yet another authentication Request
  Bob <- Alice : Yet another authentication Response
#+END_SRC
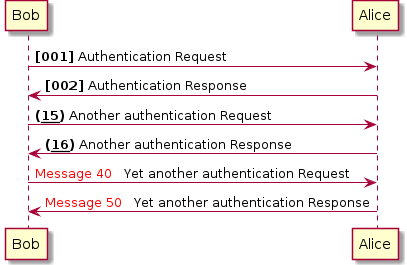
我们也可以为序号指定数字格式,这个格式化的过程实际上是Java类 DecimalFormat 来执行的( 0 表示数字, # 缺省补零位数)。
同样的,也可以使用一些HTML标签来控制数字的样式。
#+BEGIN_SRC plantuml :file ../img/plantuml-quickstart-s10.png
  autonumber "<b>[000]"
  Bob -> Alice : Authentication Request
  Bob <- Alice : Authentication Response

  autonumber 15 "<b>(<u>##</u>)"
  Bob -> Alice : Another authentication Request
  Bob <- Alice : Another authentication Response

  autonumber 40 10 "<font color=red>Message 0  "
  Bob -> Alice : Yet another authentication Request
  Bob <- Alice : Yet another authentication Response
#+END_SRC
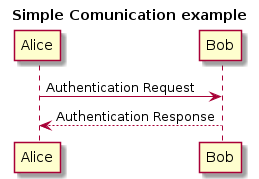
标题(Title)
要给图形加一个标题可以用 title 关键词来设置。
#+BEGIN_SRC plantuml :file ../img/plantuml-quickstart-s11.png
  title Simple Comunication example

  Alice -> Bob : Authentication Request
  Bob --> Alice : Authentication Response
#+END_SRC
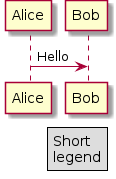
图形图例(Legend the diagram)
使用 legend 和 end legend 关键词可以设置图形的图例。图例可以设 为左对齐、右对齐和居中对齐。
#+BEGIN_SRC plantuml :file ../img/plantuml-quickstart-s12.png
  Alice -> Bob : Hello
  legend right
   Short
   legend
  endlegend
#+END_SRC
分割图形(Splitting diagrams)
关键词 newpage 是用来把图形分割成几个图片的。每一个被分割出来的 图片可以看作是一个新的页面( new page ),如果要给新的页面添加一 个标题,可以紧跟在关键词 newpage 之后来设置。
使用这个方法可以方便的在Word里把比较长的图形分别打印到几个不同的页 面上(有点分页符的概念)。
#+BEGIN_SRC plantuml :file ../img/plantuml-quickstart-s13.png
  Bliss -> Tia : I love you
  Bliss -> Tia : I miss you

  newpage

  Bliss -> Tia : Let's go home
  Bliss -> Tia : Quick

  newpage A title for the\nlast page

  Tia -> Bliss : Give me money
  Tia -> Bliss : No money No love
#+END_SRC
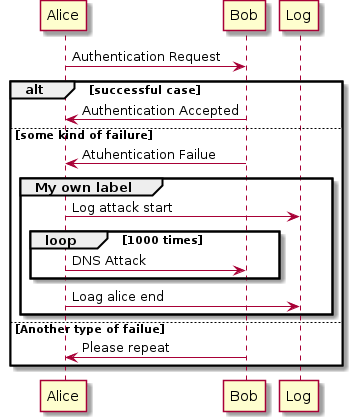
消息分组(Grouping message)
有时候可能需要对消息进行分组,那么可以使用下面的关键词来实现:
- alt/else
- opt
- loop
- par
- break
- critical
- group, 这个关键词后面的文字会作为组名显示在图形上
上面的关键词后可以添加一些文本用来显示在头部(注: group 除外,因 为它后面的文本用来显示在组名称的位置)。在组嵌套组的结构里可以用关 键词 end 来关闭组或者说是表示一个组符号的结束符(类似if/endif )。
#+BEGIN_SRC plantuml :file ../img/plantuml-quickstart-s14.png
  Alice -> Bob: Authentication Request

  alt successful case
    Bob -> Alice: Authentication Accepted
  else some kind of failure
    Bob -> Alice: Atuhentication Failue
    group My own label
      Alice -> Log : Log attack start
      loop 1000 times
        Alice -> Bob: DNS Attack
      end
      Alice -> Log : Loag alice end
    end
  else Another type of failue
    Bob -> Alice: Please repeat
  end
#+END_SRC
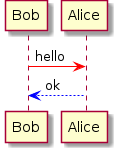
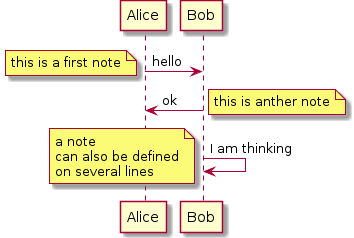
消息注解(Notes on messages)
我们可能经常会在消息的左边或右边使用注解,要添加注解,只要使用 note left 或 note right 关键词就可以了。
#+BEGIN_SRC plantuml :file ../img/plantuml-quickstart-s15.png
  Alice -> Bob : hello
  note left: this is a first note

  Bob -> Alice : ok
  note right: this is anther note

  Bob -> Bob : I am thinking
  note left
       a note
       can also be defined
       on several lines
  end note
#+END_SRC
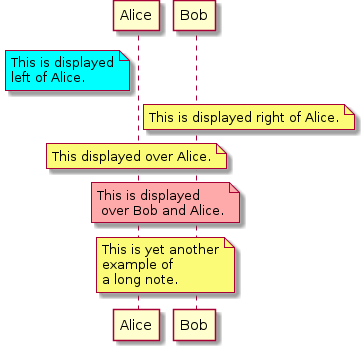
一些其他的注解方式(Some other notes)
通过使用关键词 note left of , note right of 或 note over , 我们还可以把注解放置在与之相关的参与者的左边或右边,或下方。
通过改变注解的背景色,我们还可以高亮一个注解文本块。
如果要使用多行注解,可以使用关键词 end note 来表示注解的结束。
#+BEGIN_SRC plantuml :file ../img/plantuml-quickstart-s16.png
  participant Alice
  participant Bob
  note left of Alice #aqua
       This is displayed
       left of Alice.
  end note

  note right of Alice: This is displayed right of Alice.

  note over Alice: This displayed over Alice.

  note over Alice, Bob #FFAAAA: This is displayed\n over Bob and Alice.

  note over Bob, Alice
       This is yet another
       example of
       a long note.
  end note
#+END_SRC
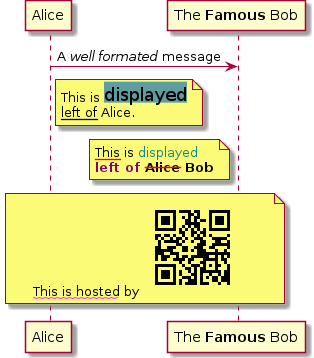
使用HTML进行格式化(Formatting using HTML)
我们可以使用少量的HTML标签来格式化文本:
<b>加粗文本<u>或<u:#AAAAAA>或<u:colorName>用来加下划线<i>斜体<s>或<s:#AAAAAA>或<s:colorName>用来加删除线<w>或<w:#AAAAAA>或<w:colorName>用来加波浪线<color:#AAAAAA>或<color:colorName>用来设置文本颜色<back:#AAAAAA>或<back:colorName>用来设置背景色<size:nn>设置字体大小<img src="file">或<img:file>用来添加图片,图片文件必须 是可以访问得到才行。<img src="http://url">或<img:http://url>用来添加一个互 联网图片,同样的图片地址必须是可用的才行。
#+BEGIN_SRC plantuml :file ../img/plantuml-quickstart-s17.png
  participant Alice
  participant "The <b>Famous</b> Bob" as Bob

  Alice -> Bob : A <i>well formated</i> message
  note right of Alice
    This is <back:cadetblue><size:18>displayed</size></back>
    <u>left of</u> Alice.
  end note
  note left of Bob
    <u:red>This</u> is <color #118888>displayed</color>
    <b><color purple>left of</color> <s:red>Alice</strike> Bob</b>
  end note
  note over Alice, Bob
    <w:#FF33FF>This is hosted</w> by <img ../img/code.png>
  end note
#+END_SRC
用例图(Use Case Diagram)
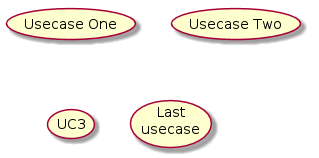
用例(Usecase)
用例可以用一对小括号括起来表示,也可以使用 usecase 关键词来定义。 用例也可以通过使用 as 关键词来设置别名,在建立关系的时候可以使用 别名。
#+BEGIN_SRC plantuml :file ../img/plantuml-quickstart-u1.png
  @startuml
  (Usecase One)
  (Usecase Two) as (UC2)
  usecase UC3
  usecase (Last\nusecase) as UC4
  @enduml
#+END_SRC
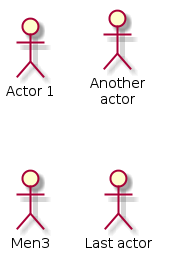
参与者(Actors)
定义参与者时,可以把参与者的名称放在两个冒号的中间,也可以用 actor 关键词来定义参与者。同样参与着也可以使用别名。
#+BEGIN_SRC plantuml :file ../img/plantuml-quickstart-u2.png
  @startuml
  :Actor 1:
  :Another\nactor: as Men2
  actor Men3
  actor :Last actor: as Men4
  @enduml
#+END_SRC
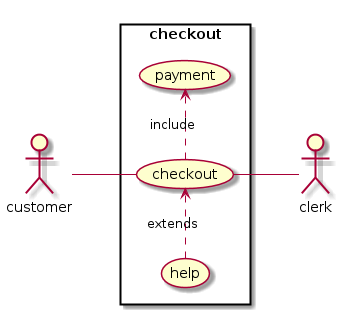
示例
#+BEGIN_SRC plantuml :file ../img/plantuml-quickstart-u99.png
  left to right direction
  skinparam packageStyle rect
  actor customer
  actor clerk
  rectangle checkout {
    customer -- (checkout)
    (checkout) .> (payment) : include
    (help) .> (checkout) : extends
    (checkout) -- clerk
  }
#+END_SRC
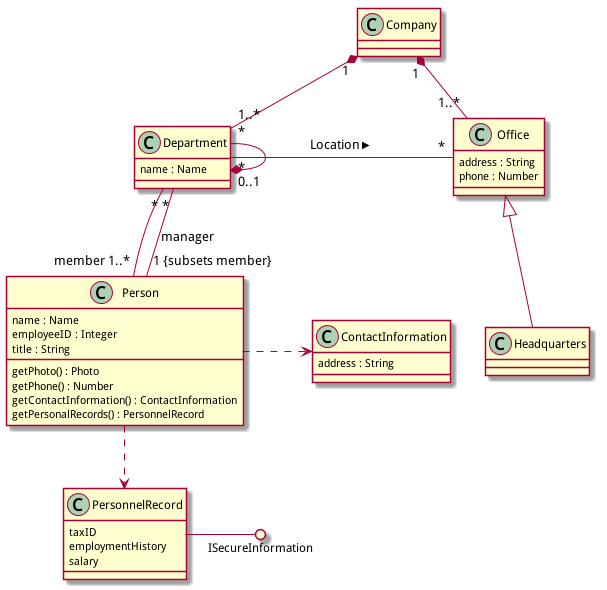
类图(Class Diagram)
示例1
活动图(Activity Diagram)
简单活动(Simple Activity)
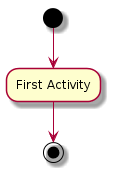
在活动图中,你可以使用 (*) 来表示活动开始点和结束点。使用 --> 来表示箭头。
#+BEGIN_SRC plantuml :file ../img/plantuml-quickstart-a1.png
  (*) --> "First Activity"
  "First Activity" --> (*)
#+END_SRC
带标注的箭头(Label on arrows)
缺省情况下,活动图的箭头是没有标注的。但我们可以通过方括号 [labels] 来设置标注,只要把它放在箭头定义的后面就可以了。
#+BEGIN_SRC plantuml :file ../img/plantuml-quickstart-a2.png
  (*) --> "First Activity"
  -->[You can put also labels] "Second Activity"
  -->(*)
#+END_SRC

改变箭头的方向(Changing arrow direction)
我们可以使用 -> 创建一个水平箭头,也可以通过下面的方式来改变箭头 的方向:
-down->向下(这个是默认的,等同于 =–>=)-right->向右-left->向左-up->向上
#+BEGIN_SRC plantuml :file ../img/plantuml-quickstart-a3.png
  (*) --> "1"
  -right-> "2"
  -down-> "3"
  -left-> "4"
  -le-> "5"
  -up-> "6"
  -l-> "7"
  -do-> "8"
  -d-> "9"
  -> "10"
  --> (*)
#+END_SRC

在描述箭头时, up|down|left|right 这几个单词的写法可以简化, 用单词开头的一个或两个字母来替换就行了,比如 -down-> 也可以写成 -d-> 或者 -do-> 。
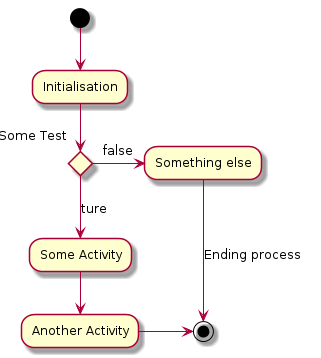
分支(Branches)
在PlantUML里,我们可以使用 if/then/else 关键词来定义分支。
#+BEGIN_SRC plantuml :file ../img/plantuml-quickstart-a4.png
  (*) --> "Initialisation"

  if " Some Test" then
    -->[ture] "Some Activity"
    --> "Another Activity"
    -right-> (*)
  else
    ->[false] "Something else"
    -->[Ending process] (*)
  endif
#+END_SRC
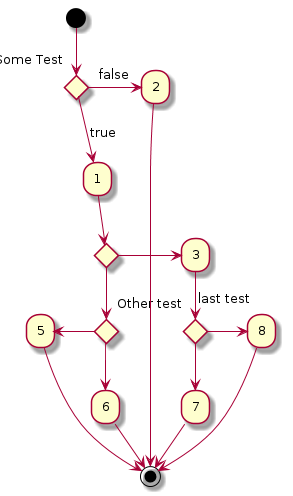
多分支(More on Branches)
直接给例子:
#+BEGIN_SRC plantuml :file ../img/plantuml-quickstart-a5.png
  (*) --> if "Some Test" then
    -->[true] "1"

    if "" then
      -> "3" as a3
    else
      if "Other test" then
        -left-> "5"
        --> (*)
      else
        --> "6"
        --> (*)
      endif
    endif

  else
    ->[false] "2"
    --> (*)
  endif

  a3 --> if "last test" then
    --> "7"
    --> (*)
  else
    -> "8"
    --> (*)
  endif
#+END_SRC
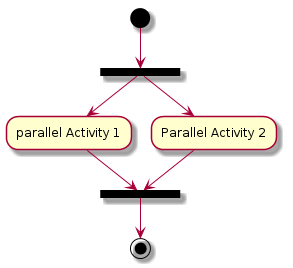
同步块(Synchronization)
同步块可以用“=== code ===”来表示。
#+BEGIN_SRC plantuml :file ../img/plantuml-quickstart-a6.png
  (*) --> ===B1===
  --> "parallel Activity 1"
  --> ===B2===

  ===B1=== --> "Parallel Activity 2"
  --> ===B2===

  --> (*)
#+END_SRC
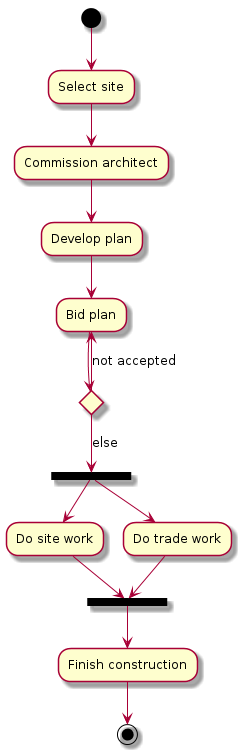
一个小实例
#+BEGIN_SRC plantuml :file ../img/plantuml-quickstart-a7.png
  (*) --> "Select site"
  --> "Commission architect"
  --> "Develop plan"
  --> "Bid plan" as bp
  if "" then
    -->[else] ===B1===
    --> "Do site work"
    --> ===B2===
    ===B1=== --> "Do trade work"
    --> ===B2===
    --> "Finish construction"
    --> (*)
  else
    -u->[not accepted] bp
  endif
#+END_SRC
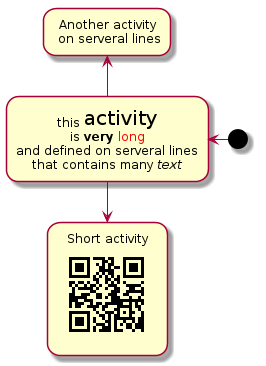
长文本的活动描述(Long activity description)
在定义活动的时候,有时候需要用多行文字来描述这个活动,这时我们可以 在描述里添加换行符 \n ,也可以使用少量的HTML标签。
以下是可以使用的HTML标签:
<b>
<i>
<font size="nn"> or <size:nn> to change font size
<font color="#AAAAAA"> or <font color="colorName">
<color:#AAAAAA> or <color:colorName>
<img:file.png> to include an image
针对较长文本描述活动,可以起一个较短别名(如:"long text" as A1), 在图形定义脚本中可以直接使用别名,参看下面的例子中的A1。
1: #+BEGIN_SRC plantuml :file ../img/plantuml-quickstart-a8.png
2:   (*) -l-> "this <size:20>activity</size>
3:             is <b>very</b> <color:red>long</color>
4:             and defined on serveral lines
5:             that contains many <i>text</i>" as A1
6:   -up-> "Another activity\n on serveral lines"
7:
8:   A1 --> "Short activity\n<img:../img/code.png>"
9: #+END_SRC
注释(Notes)
PlantUML可以通过在脚本里使用 note 来添加注释文本块。
note commands:
- note left
- note right
- note top
- note bottom
PlantUML用上面列表里的命令来标注一个注释块的开始,然后用 end note 来标注注释块的结束。同时note命令也允许使用单行定义一个文本块, 详见下面的例子。
#+BEGIN_SRC plantuml :file ../img/plantuml-quickstart-a9.png
  (*) --> "Some Activity" as s
  note right: This activity has to be defined
  s --> (*)
  note left
    This note is on
    serveral lines
  end note
#+END_SRC

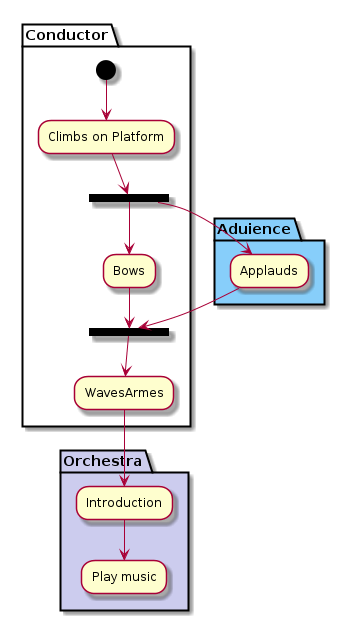
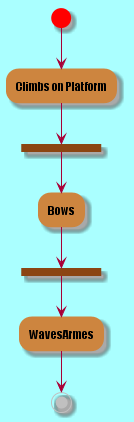
分区(Partition)
通过分区关键词 partition 可以定义一个分区,并且可以使用HTML的 颜色码或颜色名来设置分区的背景色。在你申明一个活动时,PlantUML会自动 的把这个活动对象放置到最后使用的分区中。当然,也可以使用end partitio 关闭分区定义。
#+BEGIN_SRC plantuml :file ../img/plantuml-quickstart-a10.png
  partition Conductor
  (*) --> "Climbs on Platform"
  --> === S1 ===
  --> Bows
  end partition

  partition Aduience #LightSkyBlue
  === S1 === --> Applauds

  partition Conductor
  Bows --> === S2 ===
  --> WavesArmes
  Applauds --> === S2 ===
  end partition

  partition Orchestra #CCCCEE
  WavesArmes --> Introduction
  --> "Play music"
 end partition
#+END_SRC
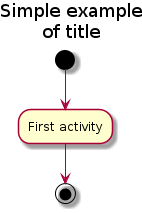
图形标题(Title the diagram)
标题关键词 title 用来设置一个图形的标题文本,我们可以在 title 和 end title 两个关键词之间放置比较长的标题文本。
#+BEGIN_SRC plantuml :file ../img/plantuml-quickstart-a11.png
  title Simple example\nof title
  (*) --> "First activity"
  --> (*)
#+END_SRC
皮肤(Skinparam)
皮肤命令 skinparam 可以改变图形的颜色和字体。这些命令可以在以下 的位置中使用:
- 在图形定义里使用,
- 在包含的文件里使用,
- 在一个配置文件里使用,这个配置文件一般由命令行或ANT的Task来提供。
#+BEGIN_SRC plantuml :file ../img/plantuml-quickstart-a12.png
  skinparam backgroundColor #AAFFFF
  skinparam activityStartColor red
  skinparam activityBarColor SaddleBrown
  skinparam activityEndColor Silver
  skinparam activityBackgroundColor Peru
  skinparam activityBorderColor Peru
  skinparam activityFontName Impact
  skinparam activityShape octagon

  (*) --> "Climbs on Platform"
  --> === S1 ===
  --> Bows
  --> === S2 ===
  --> WavesArmes
  --> (*)
#+END_SRC
使用 skinparam activityShape octagon 命令可以把活动图形改成八角 形的。(好像没效果!)
完整示例(Complete Example)
#+BEGIN_SRC plantuml :file ../img/plantuml-quickstart-a13.png
  'http://click.sourceforge.net/images/activity-diagram-small.png
  title Servlet Container

  (*) --> "ClickServlet.handleRequest()"
  --> "new Page"

  if "Page.onSecurityCheck" then
    ->[true] "Page.onInit()"

    if "isForward?" then
      ->[no] "Process controls"

      if "continue processing?" then
        -->[yes] ===RENDERING===
      else
        -->[no] ===REDIRECT_CHECK===
      endif

    else
      -->[yes] ===RENDERING===
    endif

    if "is Post?" then
      -->[yes] "Page.onPost()"
      --> "Page.onRender()" as render
      --> ===REDIRECT_CHECK===
    else
      -->[no] "Page.onGet()"
      --> render
    endif

  else
    -->[false] ===REDIRECT_CHECK===
  endif

  if "Do redirect?" then
    ->[yes] "redirect request"
    --> ==BEFORE_DESTORY===
  else
    if "Do Forward?" then
      -left->[yes] "Forward request"
      --> ==BEFORE_DESTORY===
    else
      -right->[no] "Render page template"
      --> ==BEFORE_DESTORY===
    endif
  endif

  --> "Page.onDestory()"
  -->(*)
#+END_SRC

活动图Beta
Beta版本的活动图简化了活动图的符号定义,从 V7947 这个版本开始, PlantUML就开始引入了一些简化写法,当然到目前(20140627)为止还不是 很完善,但这个版本里的一些简化写法已经是PlantUML后续版本的发展方向。
下文中将会用几个简单的示例来介绍Beta版活动图的新功能,有兴趣的朋友 也可以试一下,在使用新的写法之前需要把 GraphViz 更新到最新版本。
关于更多的PlantUML版本更新信息可以参考官网页面(What's New?)
简单活动(Simple Activity)
在这个例子里,活动元素从一个 : 开始,然后到一个 ; 结束。 开始和结束符号,可以用 start 和 end 两个关键词来表示。之前版 本的开始和结束符都是用同一个符号 (*) 来表示的,个人觉得新的写法 逻辑更清晰,代码可读性更高。
至于更多的文本格式,大家可以参考:Creole engine
#+BEGIN_SRC plantuml :file ../img/plantuml-quickstart-ab1.png
  start

  :Hello world;

  :This is on defined on
  serveral **lines**;

  stop
#+END_SRC

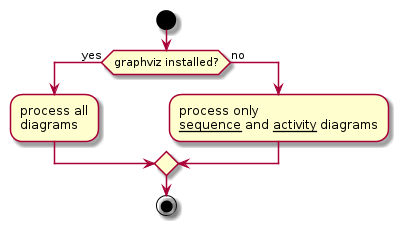
条件符号(Conditional)
和之前一样,还是使用 if , then 和 else 关键词,但分支条件的 标签 Labels 可以直接写在关键词 then和 else 的后面,并用小括 号括起来就可以了(如: (Labels) )。
#+BEGIN_SRC plantuml :file ../img/plantuml-quickstart-ab2.png
  start

  if (graphviz installed?) then (yes)
    :process all\ndiagrams;
  else (no)
    :process only
    __sequence__ and __activity__ diagrams;
  endif

  stop
#+END_SRC
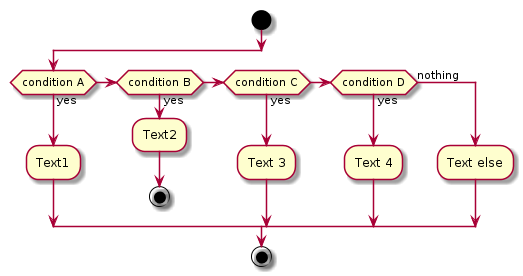
在新版本里除了使用 else 外,还新加了一个 elseif 关键词,有了这 个语法,我们就可以绘制一系列条件的活动图。
#+BEGIN_SRC plantuml :file ../img/plantuml-quickstart-ab3.png
  start
  if (condition A) then (yes)
    :Text1;
  elseif (condition B) then (yes)
    :Text2;
    stop
  elseif (condition C) then (yes)
    :Text 3;
  elseif (condition D) then (yes)
    :Text 4;
  else (nothing)
    :Text else;
  endif
  stop
#+END_SRC
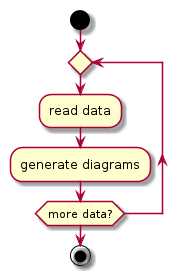
重复循环(Repeat Loop)
通过 repeat 和 repeat while 关键词可以创建循环结构的图形。
#+BEGIN_SRC plantuml :file ../img/plantuml-quickstart-ab4.png
  start

  repeat
    :read data;
    :generate diagrams;
  repeat while (more data?)

  stop
#+END_SRC
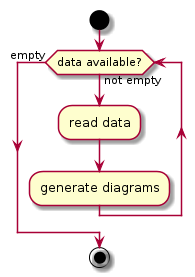
条件循环(While Loop)
“条件循环”和上面的“重复循环”不太一样,上面的“重复循环”是先执行一次 循环体里的内容,然后再执行断言条件,看是否重复执行循环体;而条件循 环则将断言放到了最前面,因此它是先判断是否满足条件再执行循环体里的 内容。
要创建条件循环结构的图形可以通过使用 while 和 end while 两个关 键词来实现。如果要给条件分支加上标注,可以在 while 条件后加上一 个 is 关键词,然后用小括号括上要标注的内容;在 end while 后可 以直接用小括号括上要标注的内容。
#+BEGIN_SRC plantuml :file ../img/plantuml-quickstart-ab5.png
  start
  while (data available?) is (not empty)
    :read data;
    :generate diagrams;
  end while (empty)
  stop
#+END_SRC
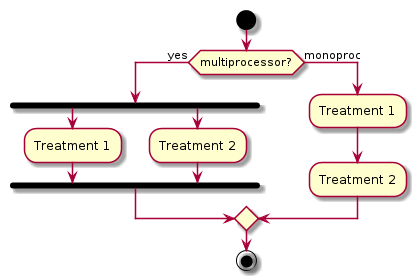
并行处理(Parallel Processing)
fork , fork again 和 end fork 三个关键词用来表示并行处理结 构。
#+BEGIN_SRC plantuml :file ../img/plantuml-quickstart-ab6.png
  start
  if (multiprocessor?) then (yes)
    fork
      :Treatment 1;
    fork again
      :Treatment 2;
    end fork
  else (monoproc)
    :Treatment 1;
    :Treatment 2;
  endif
  stop
#+END_SRC
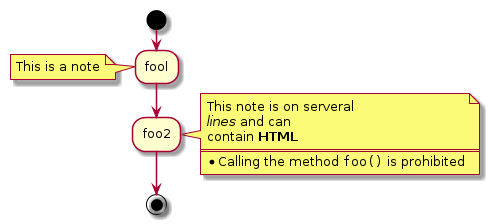
注解的文本样式(Notes)
注解里的文本样式是通过 Creole wiki syntax 来实现的。关于Creole引擎, 大家可以参考维基百科上的介绍。
#+BEGIN_SRC plantuml :file ../img/plantuml-quickstart-ab7.png
  start
  :fool;
  note left: This is a note
  :foo2;
  note right
    This note is on serveral
    //lines// and can
    contain <b>HTML</b>
    ====
    * Calling the method ""foo()"" is prohibited
  end note
  stop
#+END_SRC
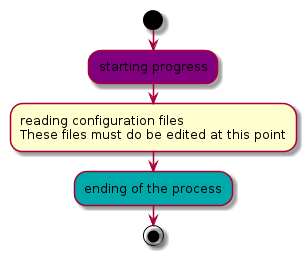
颜色(Color)
为活动元素指定背景色可以直接在活动开始标记 : 前加上颜色描述符:
#+BEGIN_SRC plantuml :file ../img/plantuml-quickstart-ab8.png
  start
  #purple:starting progress;
  :reading configuration files
  These files must do be edited at this point;
  #00AAAA:ending of the process;
  stop
#+END_SRC
完整示例(Complete Example)
#+BEGIN_SRC plantuml :file ../img/plantuml-quickstart-ab9.png
  start
  :ClickServlet.handleRequest();
  :new page;
  if (Page.onSecurityCheck) then (true)
    :(Page.onInit();
    if (isForward?) then (no)
      :Process controls;
      if (continue processing?) then (no)
        stop
      endif

      if (isPost?) then (yes)
        :Page.onPost();
      else (no)
        :Page.onGet();
      endif
      :Page.onRender();
    endif
  else (false)
  endif

  if (do redirect?) then (yes)
    :redirect process;
  else
    if (do forward?) then (yes)
      :Forward request;
    else (no)
      :Render page template;
    endif
  endif

  stop
#+END_SRC


 浙公网安备 33010602011771号