CMU数据库(15-445)Lab3- QUERY EXECUTION
Lab3 - QUERY EXECUTION
实验三是添加对在数据库系统中执行查询的支持。您将实现负责获取查询计划节点并执行它们的executor。您将创建执行下列操作的executor
- Access Methods: Sequential Scans, Index Scans (with your B+Tree from Project #2)
- Modifications: Inserts, Updates, Deletes
- Miscellaneous: Nested Loop Joins, Index Nested Loop Joins, Aggregation, Limit/Offset
拓展阅读following a select statement through the PostgreSQL internals
Task1 - 热身任务
数据库维护一个内部目录来跟踪关于数据库的元数据。例如,目录用于回答存在哪些表以及表的位置。更多细节请参见Lecture #04 - Database Storage (Part II).
你需要修改src/include/catalog/catalog.h允许DBMS添加新表到数据库中,并使用名称或内部对象标识符(table_oid_t)检索它们。你将实现以下方法
CreateTable(Transaction *txn, const std::string &table_name, const Schema &schema)GetTable(const std::string &table_name)GetTable(table_oid_t table_oid)
您还需要支持向目录添加索引(基于项目#2 Project #2))。与table_oid_t类似,索引oid t是索引的唯一对象标识符。您将实现以下方法
CreateIndex(txn, index_name, table_name, schema, key_schema key_attrs, keysize)GetIndex(const std::string &index_name, const std::string &table_name)GetIndex(index_oid_t index_oid),GetTableIndexes(const std::string &table_name)
第一个任务官网给的评价是简单。
1.1 添加新表
其实就围绕这table的构造函数和源代码给的数据结构设计就好了
这里要维护好两个hash表
- table_name --- table_id
- Table_id --- unique_ptr
 TableMetadata *CreateTable(Transaction *txn, const std::string &table_name, const Schema &schema) {
    BUSTUB_ASSERT(names_.count(table_name) == 0, "Table names should be unique!");
    auto table_id = next_table_oid_++;
    TableHeap *_table = new TableHeap(bpm_, lock_manager_,
                                          log_manager_, txn);
    names_[table_name] = table_id;
    auto new_table = new TableMetadata(schema, table_name, static_cast<std::unique_ptr<TableHeap>>(_table),table_id);
    tables_[table_id] = static_cast<std::unique_ptr<TableMetadata>>(new_table);
    return new_table;
  }
剩下的两个get函数就是简单的hash表操作。由于Andy教授不提倡share代码。这里就简单附上一个实现,剩下的另一个基本没差
TableMetadata *GetTable(const std::string &table_name) {
  if (names_.count(table_name) == 0) {
    throw std::out_of_range(table_name);
  }
  table_oid_t id = names_[table_name];
  if (tables_[id] != 0) {
    return tables_[id].get();
  }
  return 0;
}
1.2 添加索引
这里要注意一点我们添加的索引。是基于我们lab2实现过的b+树索引。
-
这里注意我们的
index_Info函数需要一个Index的unique_ptr这里我们需要new一个BPlusTreeIndex传入。 -
我们要对当前表中所有tuple加上index
-
这里也需要维护好两个hash表
  template <class KeyType, class ValueType, class KeyComparator>
  IndexInfo *CreateIndex(Transaction *txn, const std::string &index_name, const std::string &table_name,
                         const Schema &schema, const Schema &key_schema, const std::vector<uint32_t> &key_attrs,
                         size_t keysize) {
    auto index_id = next_index_oid_++;
    auto index_me = new IndexMetadata(index_name, table_name, &schema, key_attrs);
    std::unique_ptr<Index> BPlusTree_Index(new BPlusTreeIndex<KeyType, ValueType, KeyComparator>(index_me, bpm_));
    IndexInfo *new_index =
        new IndexInfo(key_schema, index_name, std::move(BPlusTree_Index), index_id, table_name, keysize);
    indexes_[index_id] =  static_cast<std::unique_ptr<IndexInfo>>(new_index);
    index_names_[table_name].insert(std::unordered_map<std::string, index_oid_t>::value_type (index_name, index_id));
    auto table = GetTable(table_name)->table_.get();
    // add index for every tuple
    for (auto it = table->Begin(txn); it != table->End(); ++it) {
      new_index->index_->InsertEntry(it->KeyFromTuple(schema, key_schema, key_attrs), it->GetRid(), txn);
    }
    return new_index;
  }
最后的get操作还是一样的。附上一个实现
 IndexInfo *GetIndex(const std::string &index_name, const std::string &table_name) {
    if (index_names_.count(table_name) == 0) {
      throw std::out_of_range(table_name);
    }
    index_oid_t index_id = index_names_[table_name][index_name];
    return indexes_[index_id].get();
  }

可以通过cmu给出的对于catalog的test。这个测试文件就是线上评测用的测试文件。
Task2 - EXECUTORS
在第二个任务中,您将实现执行程序以进行顺序扫描,插入,哈希联接和聚合。 对于每种查询计划运算符类型,都有一个相应的executor对象,该对象实现Init和Next方法。 Init方法用于设置有关操作调用的内部状态(例如,检索要扫描的对应表)。 Next方法提供了迭代器接口,该接口在每次调用时返回一个元组(如果没有更多的元组,则返回null)。
你需要修改下面的文件来完成这一任务。
src/include/execution/executors/seq_scan_executor.hsrc/include/execution/executors/index_scan_executor.hsrc/include/execution/executors/insert_executor.hsrc/include/execution/executors/update_executor.hsrc/include/execution/executors/delete_executor.hsrc/include/execution/executors/nested_loop_join_executor.hsrc/include/execution/executors/nested_index_join_executor.hsrc/include/execution/executors/aggregation_executor.hsrc/include/execution/executors/limit_executor.h
我们假设执行器在整个项目中都是单线程的。您还可以根据需要随意添加私有函数和类成员。
我们提供了ExecutionEngine(src / include / execution / execution_engine.h)作为帮助类。 它将输入的查询计划转换为查询执行程序,并执行直到收集所有结果。 您将需要修改ExecutionEngine以捕获执行程序引发的任何异常。
若要了解如何在查询执行期间创建excutors,请参阅ExecutorFactory(src / include / execution / executor_factory.h)帮助程序类。 此外,每个执行程序都有一个ExecutorContext(src / include / execution / executor_context.h)作为执行上下文环境。
SEQUENTIAL SCANS
顺序扫描遍历一个表并每次返回一个元组。顺序扫描由SeqScanPlanNode指定。plan节点指定要迭代的表。节点还可以包含一个predicate;如果一个元组不满足predicate,则跳过它。
提示:您需要使用顺序扫描中的predicate来判断。特别需要注意的是AbstractExpression::Evaluate。会返回Value。需要使用GetAs<bool>变成bool类型。
实现
这个实验其实并不难。重点就是实现之前要先梳理一下整个系统的一些设计模式。
以这一行为例利用了工厂设计模式
auto executor = ExecutorFactory::CreateExecutor(exec_ctx, plan);
整个顺序扫描的思路非常简单。就是从头开始遍历整个表的所有tuple。找到满足要求的tuple。并将tuple中的满足要求的value和outSchema组合成新的tuple存入result就ok。
这里注意由于要进行遍历。所以要引入TableIterator。
这里附上最重要的Init实现。由于要遍历表的所有tuple。所以理应有一个table_info。同时要遍历整个表所以我们需要一个迭代器
void SeqScanExecutor::Init() {
  table_heap_ = exec_ctx_->GetCatalog()->GetTable(plan_->GetTableOid())->table_.get();
  iter = table_heap_->Begin(exec_ctx_->GetTransaction());
}
另一个实现就是一个tuple(其实就是一行)中的元素并不一定都是我们想要的。所以要有一个从tuple中获取和ouSchema中对应列的元素的函数这里就叫它getValuesFromTuple
std::vector<Value> SeqScanExecutor::getValuesFromTuple(const Tuple *tuple, const Schema *schema) {
  std::vector<Value> res;
  for (const Column &col : schema->GetColumns()) {
    Value val = tuple.GetValue(schema, schema->GetColIdx(col.GetName()));
    res.push_back(val);
  }
  return res;
}
INDEX SCANS
就是利用加了索引的顺序扫描。
实现
这个基本和上面的类似。只不过利用了索引
   index_key = tuple_.KeyFromTuple(table_info->schema_, index_info->key_schema_, index_info->index_->GetKeyAttrs());
   index_Expression->Evaluate(&index_key, &table_info->schema_).GetAs<bool>()
INSERT
插入将元组添加到表中。插入由InsertPlanNode指定。有两种类型的插入:1. 直接插入(只有插入语句),2. 非直接插入(从子语句中获取要插入的值)。例如INSERT INTO empty_table2 SELECT colA, colB FROM test_1 WHERE colA > 500需要先执行后面的select语句在进行insert。
实现
- 先判断一下是否只有一个plan。
- 如果是的话则非常简单的插入就好了
if (is_rawInsert && num_inserted < num_values) {
  bool inserted = table_info->table_->InsertTuple(Tuple(raw_vals[num_inserted], &table_info->schema_), rid, exec_ctx_->GetTransaction());
  BUSTUB_ASSERT(inserted, "Sequential insertion cannot fail");
  for (auto index : table_Indexs) {
    index->index_->InsertEntry(Tuple(raw_vals[num_inserted], &table_info->schema_), *rid, exec_ctx_->GetTransaction());
  }
  num_inserted++;
  return true;
}
- 否则的话则需要先执行后面的子
plan
注意对于insert只能有一个子plan。这样就无需关注子plan的顺序问题
先执行子查询语句
 execution_engine_ = std::make_unique<ExecutionEngine>(GetExecutorContext()->GetBufferPoolManager(), GetExecutorContext()->GetTransactionManager(),
                                                          GetExecutorContext()->GetCatalog());
    auto pNode = plan_->GetChildPlan();
    execution_engine_->Execute(pNode, &result_set,GetExecutorContext()->GetTransaction(),GetExecutorContext());
然后在进行插入
这里注意插入的时候我们value是直接从子计划获得的result_set中获取
bool inserted = table_info->table_->InsertTuple(*result_set.begin(), rid, exec_ctx_->GetTransaction());
BUSTUB_ASSERT(inserted, "Sequential insertion cannot fail");
for (auto index : table_Indexs) {
  index->index_->InsertEntry(*result_set.begin(), *rid, exec_ctx_->GetTransaction());
}
result_set.erase(result_set.begin());
return true;
UPDATE
Update修改指定表中的现有元组并更新其索引。UpdatePlanNode可以利用SeqScanPlanNode或IndexScanPlanNode来提供进行更新的目标元组如
- 先向
empty_table2表中插入数据 - 然后修改
colA的值
INSERT INTO empty_table2 SELECT colA, colA FROM test_1 WHERE colA < 50
UPDATE empty_table2 SET colA = colA+10 WHERE colA < 50
实现
这里也是附上比较重要的next函数实现
bool UpdateExecutor::Next([[maybe_unused]] Tuple *tuple, RID *rid) {
  if (child_executor_->Next(tuple, rid)) {
    *tuple = GenerateUpdatedTuple(*tuple);
    return table_info_->table_.get()->UpdateTuple(*tuple, *rid, txn);
  }

  return false;
}
Delete
delete的逻辑都是非常简单的。就是找到满足要求的tuple,然后将其删除。这里还要注意出了删除tuple还要删除对应的index
实现
std::vector<RID> rids;
index->index_->ScanKey(key, &rids, txn);
table_info_->table_->MarkDelete(rids[0], txn);
index->index_->DeleteEntry(key, key.GetRid(), txn);
JOIN
join操作用于将两个子执行语句的结果组合在一起。在这个任务中你需要实现两种形式的join操作一种是基本的join另外一种是基于索引的join操作
实现
1. 基本join操作
这个实现非常简单,就是二重循环。对于外查询中的每一个元素在内表中进行遍历看一下是否有相等的。
SELECT test_1.colA, test_1.colB, test_2.col1, test_2.col3 FROM test_1 JOIN test_2 ON test_1.colA = test_2.col1 AND test_1.colA < 50
比如对于上面这个语句。我们要先把后面的select语句执行完。然后就是一个二重循环
  const Schema *left_schema = left_executor_->GetOutputSchema();
  const Schema *right_schema = right_executor_->GetOutputSchema();
  for (const auto &p1 : left_tuples) {
    for (const auto &p2 : right_tuples) {
      Tuple left_tuple = p1;
      Tuple right_tuple = p2;
      if (plan_->Predicate()->EvaluateJoin(&left_tuple, left_schema, &right_tuple, right_schema).GetAs<bool>()) {
        std::vector<Value> left_values = getValuesFromTuple(&left_tuple, left_schema);
        std::vector<Value> right_values = getValuesFromTuple(&right_tuple, right_schema);
        left_values.insert(left_values.end(), right_values.begin(), right_values.end());
        res.emplace_back(left_values, plan_->OutputSchema());
      }
    }
  }
2. 利用index的join操作
主要有两个注意点。获得key_tuple和在index中利用key_tuple找到rid
    Tuple key_tuple =
        outer_tuple.KeyFromTuple(*outer_table_schema, *index_key_schema, inner_index_->index_->GetKeyAttrs());
    inner_index_->index_->ScanKey(key_tuple, &rids, exec_ctx_->GetTransaction());
别的基本逻辑和上面的类似了不能贴太多代码啊。
AGGREGATION
聚合用于将来自单个子执行器的多个元组结果组合为单个元组。在这个项目中,我们要求您实现COUNT、SUM、MIN和MAX。
我们为您提供了一个SimpleAggregationHashTable。我们强烈建议您使用这个哈希表。
实现
SimpleAggregationHashTable这个hash表提供了一系列操作。下面我们依次来看一下。
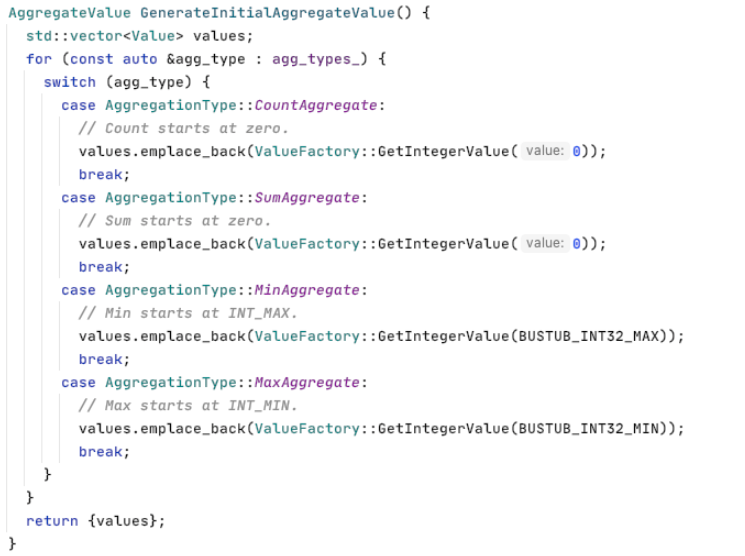
1.为聚合操作提供不同的初始值
可以发现这个函数为count和sum操作提供的初始值为0。而为求最小值操作提供的初始值是32位的最大值。max函数则提供了32位的最小值。这都是符合我们思维的
2. 这个函数主要是为了构建一个迭代器方便后面的having group by操作
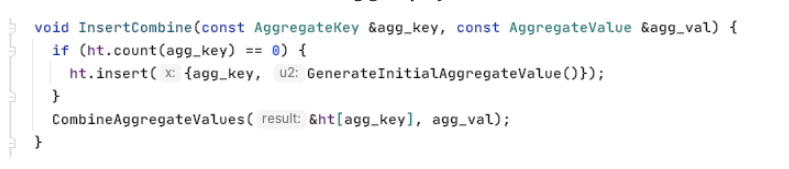
3. 帮你实现聚合操作的函数

注意这里的hash表。就是groupby操作用的
std::unordered_map<AggregateKey, AggregateValue> ht{};
它的key就是group by操作的列。这样就可以实现去重操作。嗯设计的真不错
因此整个代码的核心就在Init函数对于这个hash表和迭代器的构建
void AggregationExecutor::Init() {
  auto childE = child_.get();
  {
    childE->Init();
    try {
      Tuple tuple;
      RID rid;
      while (childE->Next(&tuple, &rid)) {
        aht_.InsertCombine(MakeKey(&tuple), MakeVal(&tuple));
      }
    } catch (Exception &e) {
      throw "you met error";
    }
    aht_iterator_ = aht_.Begin();
  }
}
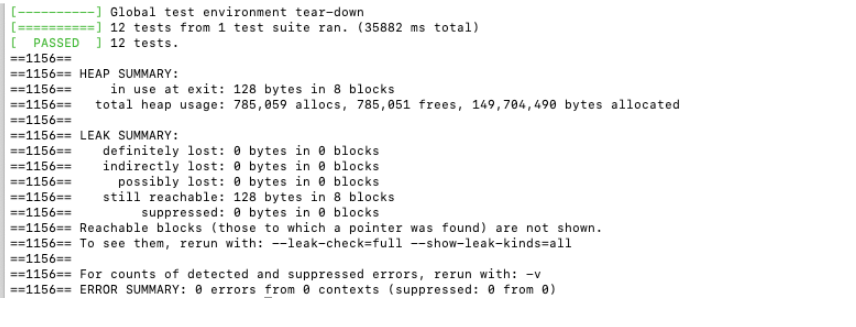
无内鬼通过啦。
后面就是把之前的笔记补一下。然后开始看最后一个project的课。然后最后一个实验了加油。所以的都搞完之后准备整理一个对这个项目的整理(后面面试用)

 浙公网安备 33010602011771号