OpenCV | 基于最细长轮廓自动校正旋转图片
总体思路如下:通过获得较为具有参考性的地物信息,通过校正地物的朝向来校正整个图片
地物信息的获得
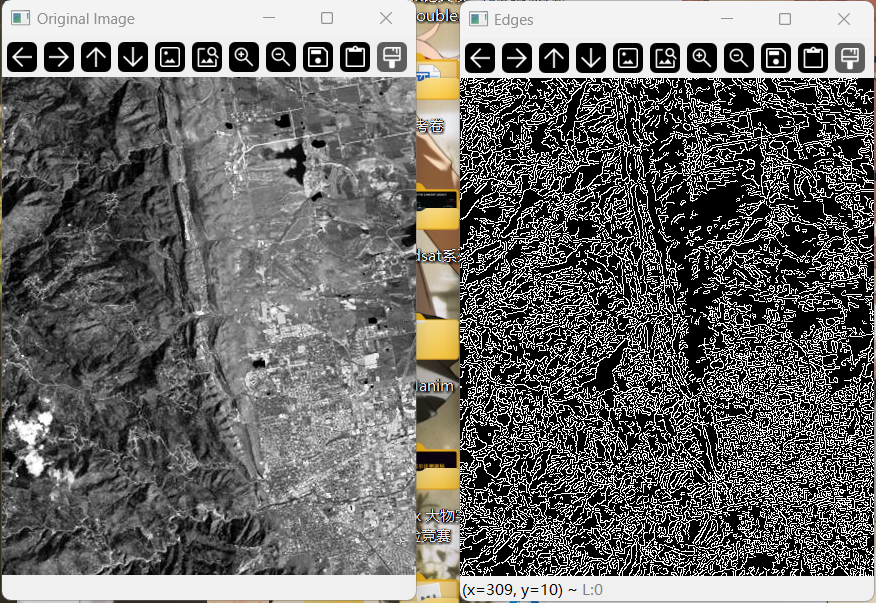
我首先通过cv2.Canny()函数获取图像的边缘信息,但边缘杂乱无章,无法获取有标志性地物的信息,因此应该先对原图像进行预处理
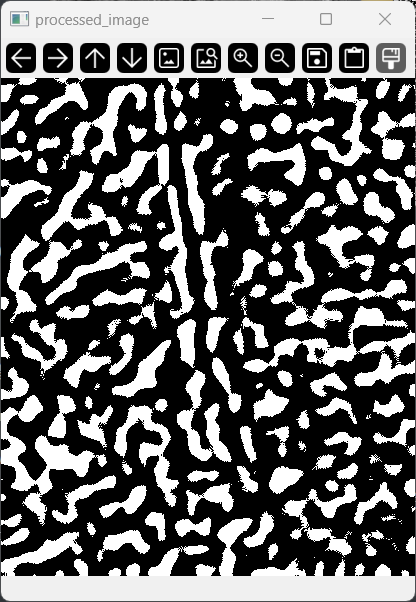
预处理 preprocess_image()
预处理分为4歩:
- 原图像转换为灰度图像
cv2.cvtColor() - 高斯模糊去噪
cv2.GaussianBlur() - 自适应阈值二值化
cv2.adaptiveThreshold() - 根据黑白像素的多少(根据多少来判断确实草率,但是我还写不出来判断整体形状的连续性的代码)来选择是否进行反相,让不连续的地物轮廓值为255白色
cv2.bitwise_not()
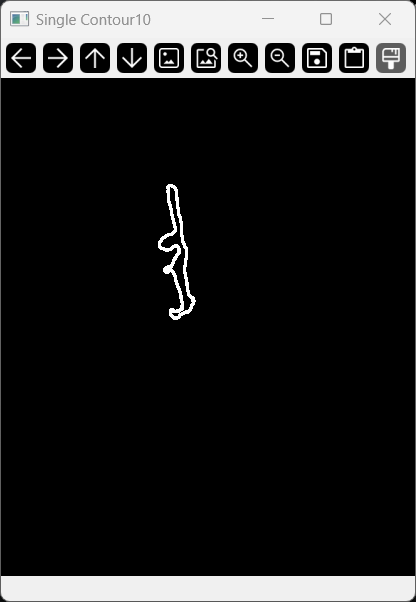
筛选参考地物
利用cv2.findContours 函数在二值化处理后的图像中找到所有轮廓,其中使用 cv2.CHAIN_APPROX_SIMPLE 会去除多余的点,只保留轮廓的关键点,可以算作第二层降噪
我粗略的定义更“细长” (长宽比更大) 的轮廓更适宜被作为参考形状,因此我遍历所有轮廓,并使用cv2.minAreaRect(contour)来获得最小外接矩形,通过计算长宽比并不断比较最终得到长宽比值最大的轮廓,利用外接矩形的信息可以获取到此矩形的倾斜角度 (rect列表的第3个参数)
下图为最终筛选出的轮廓:
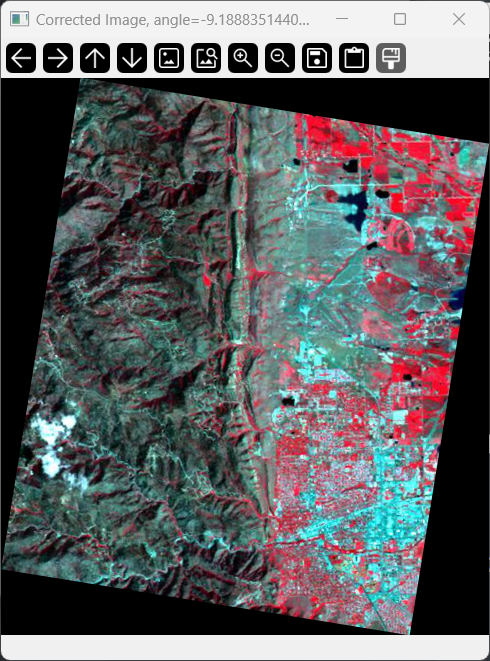
得到倾斜角度后,可以利用在之前写过的旋转函数 rotate_image(),直接将倾斜角度引入并旋转原始图像,即可对倾斜图像进行几何校正,如下图(图像标题显示了具体旋转的角度):
以上
代码
import cv2
import numpy as np


def preprocess_image(image):
    # 转换为灰度图像
    gray = cv2.cvtColor(image, cv2.COLOR_BGR2GRAY)

    # 高斯模糊去噪
    blurred = cv2.GaussianBlur(gray, (33, 33), 0)

    # 自适应阈值二值化
    binary = cv2.adaptiveThreshold(blurred, 255, cv2.ADAPTIVE_THRESH_GAUSSIAN_C,
                                   cv2.THRESH_BINARY_INV, 31, 2)

    # 如果黑色像素多于白色像素,反相图像
    black_pixels = np.sum(binary == 255)
    white_pixels = np.sum(binary == 0)
    if white_pixels < black_pixels:
        binary = cv2.bitwise_not(binary)

    return binary


def rotate_image(image_path, angle):
    image = cv2.imread(image_path)
    height, width = image.shape[:2]

    # 旋转后的尺寸
    rad_angle = np.deg2rad(angle)
    new_width = int(abs(width * np.cos(rad_angle)) + abs(height * np.sin(rad_angle)))
    new_height = int(abs(width * np.sin(rad_angle)) + abs(height * np.cos(rad_angle)))

    # 旋转矩阵
    rotation_matrix = cv2.getRotationMatrix2D((width // 2, height // 2), angle, 1)

    # 调整旋转矩阵,将图像放到中心
    rotation_matrix[0, 2] += (new_width - width) / 2
    rotation_matrix[1, 2] += (new_height - height) / 2

    rotated_image = cv2.warpAffine(image, rotation_matrix, (new_width, new_height))

    return rotated_image


def correct_image_skew(image_path):
    image = cv2.imread(image_path)
    processed_image = preprocess_image(image)
    cv2.imshow('processed_image', processed_image)

    # 找到所有的轮廓
    contours, _ = cv2.findContours(processed_image, cv2.RETR_EXTERNAL, cv2.CHAIN_APPROX_SIMPLE)

    slimmest_ratio = 0
    slimmest_rect = None
    slimmest_angle = 0
    i = 0

    for contour in contours:
        if len(contour) < 5:
            continue
        else:
            # 计算最小外接矩形
            rect = cv2.minAreaRect(contour)
            box = cv2.boxPoints(rect)
            box = np.int32(box)

            # 计算矩形的宽和高
            width = rect[1][0]
            height = rect[1][1]

            # 计算长宽比
            if height == 0:
                ratio = 0
            else:
                ratio = max(width, height) / min(width, height)

            print(ratio)
            # 检查是否是最“细长”的
            if ratio > slimmest_ratio:
                slimmest_ratio = ratio
                slimmest_rect = rect
                slimmest_angle = rect[2]  # 获取倾斜角度
                print(f"slimmest_angle = {slimmest_angle}")

                i += 1
                print(f"contour{i} = {contour}")
                # 初始化一个空白图像
                contour_img = np.zeros((image.shape[0], image.shape[1], 3), dtype=np.uint8)
                # 绘制单个轮廓
                cv2.drawContours(contour_img, [contour.reshape((-1, 1, 2))], -1, (255, 255, 255), 2)
                # 显示图像
                cv2.imshow(f'Single Contour{i}', contour_img)

    corrected_image = rotate_image(image_path, slimmest_angle - 90)

    return corrected_image, slimmest_angle


if __name__ == '__main__':
    corrected, correct_angle = correct_image_skew(r'bldr_tm.jpg')
    cv2.imshow(f'Corrected Image, angle={correct_angle - 90}', corrected)
    cv2.waitKey(0)
    cv2.destroyAllWindows()

 浙公网安备 33010602011771号