2020系统综合实践 树莓派上操作OpenCV实现人脸识别
目录
(1) 在树莓派中安装opencv库
参考教程:关于opencv的编译安装,可以参考 Raspbian Stretch: Install OpenCV 3 + Python on your Raspberry Pi
python2的opencv上节课就配置完毕
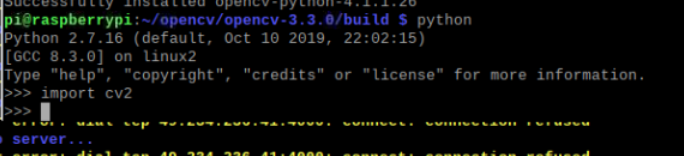
接下来配置python3的opencv
-
安装numpy(树莓派python3自带)
sudo pip3 install numpy -
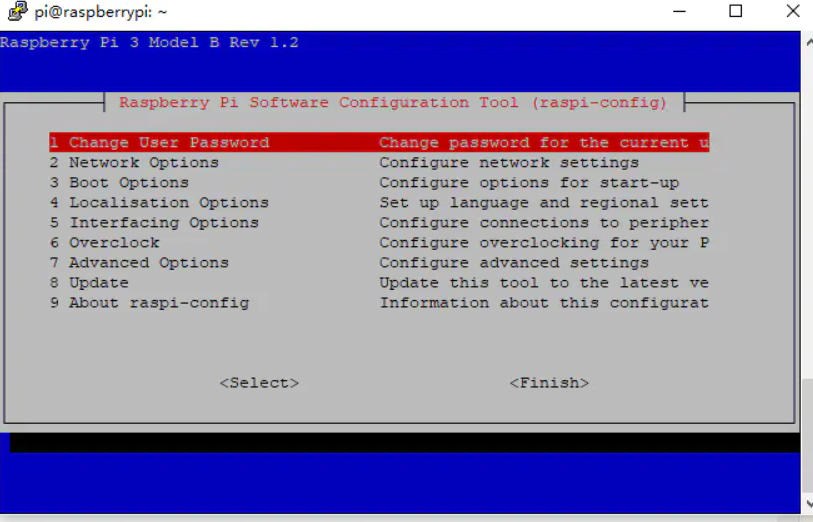
扩大TF卡的空间(上次实验做过)
sudo raspi-config
-
开始为OpenCV安装做准备,配置所需的库(一次一行)
sudo apt-get install build-essential git cmake pkg-config -y
sudo apt-get install libjpeg8-dev -y
sudo apt-get install libtiff5-dev -y
sudo apt-get install libjasper-dev -y
sudo apt-get install libpng12-dev -y
sudo apt-get install libavcodec-dev libavformat-dev libswscale-dev libv4l-dev -y
sudo apt-get install libgtk2.0-dev -y
sudo apt-get install libatlas-base-dev gfortran -y
下载Opencv3.3.0
wget https://github.com/Itseez/opencv/archive/3.3.0.zip
wget https://github.com/Itseez/opencv_contrib/archive/3.3.0.zip
解压后在opencv-3.3.0文件夹里创建build文件夹,然后在命令行里
面cd到此文件夹
cd opencv-3.4.0 mkdir build cd build -
开始cmake
cmake -D CMAKE_BUILD_TYPE=RELEASE \
-D CMAKE_INSTALL_PREFIX=/usr/local \
-D INSTALL_C_EXAMPLES=ON \
-D INSTALL_PYTHON_EXAMPLES=ON \
-D OPENCV_EXTRA_MODULES_PATH=/home/pi/opencv/opencv_contrib-3.3.0/modules  \
-D BUILD_EXAMPLES=ON \
-D WITH_LIBV4L=ON \
-D PYTHON3_EXECUTABLE=/usr/bin/python3.7 \
-D PYTHON_INCLUDE_DIR=/usr/include/python3.7 \
-D PYTHON_LIBRARY=/usr/lib/arm-linux-gnueabihf/libpython3.7m.so \
-D PYTHON3_NUMPY_INCLUDE_DIRS=/usr/lib/python3/dist-packages/numpy/core/include \
..
注意OPENCV_EXTRA_MODULES_PATH后跟的路径为自己解压后的路径,注意python版本。 -
开始编译
make && sudo make install -
出错
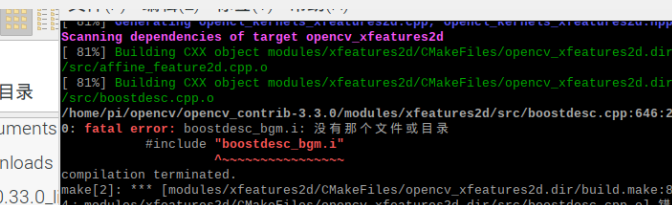
装了这么久失败了,一怒之下直接pip3 install opencv-python
成功!
(2) 使用opencv和python控制树莓派的摄像头
参考教程:还是可以参考Accessing the Raspberry Pi Camera with OpenCV and Python
跑通教程的示例代码(有可能要调整里面的参数)
-
下面这个是第6次实验中我已经完成过了的
通过摄像头实时拍摄查看视频
#opencvtest.py
import cv2
import datetime
cap = cv2.VideoCapture(0)
print(cap.get(cv2.CAP_PROP_FRAME_WIDTH))
print(cap.get(cv2.CAP_PROP_FRAME_HEIGHT))
#cap.set(3, 3000)
#cap.set(4, 3000)
#print(cap.get(3))
#print(cap.get(4))
while(cap.isOpened()):
    ret, frame = cap.read()
    if ret == True:

       font = cv2.FONT_HERSHEY_SIMPLEX
       text = 'Width: '+ str(cap.get(3)) + ' Height:' + str(cap.get(4))
       datet = str(datetime.datetime.now())
       frame = cv2.putText(frame, text, (10, 50), font, 1,
                           (255, 255, 255), 2, cv2.LINE_AA)
       frame = cv2.putText(frame, datet, (10, 100), font, 1,
                           (255, 255, 255), 2, cv2.LINE_AA)
       cv2.imshow('frame', frame)

       if cv2.waitKey(1) & 0xFF == ord('q'):
         break
    else:
        break

cap.release()
cv2.destroyAllWindows()

(3) 利用树莓派的摄像头实现人脸识别
- 参考资料------树莓派实现简单的人脸识别
- 安装face_recognition库的命令。
pip install dlib
pip install face_recognition
- 安装dlib的速度还好,但是安装face_recognition一直超时,因为国内的源没有对应的.whl文件,所以我选择了直接从网上下载进行安装,文件如下。

- 用xftp向树莓派传递这个文件,因为之前我们已经做了内网穿透,外网也可以连入树莓派。

- 安装下载好的文件。
python -m pip install face_recognition_models-0.3.0-py2.py3-none-any.whl
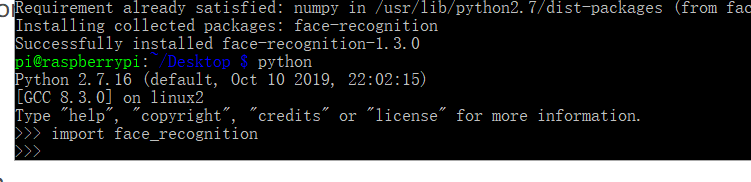
- 之后再次执行pip install face_recognition,就可以很快完成安装了。

- 如图,表明已经安装成功。
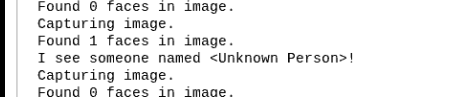
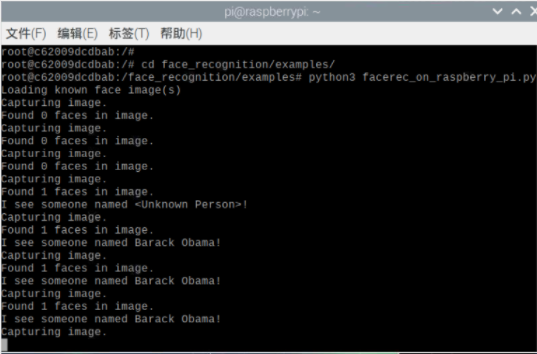
- 接下来进行两个测试,第一个facerec_on_raspberry_pi.py,该程序会检测人脸,如果检测到人脸会在终端显示出来,如果检测到奥巴马的人脸还会显示奥巴马的名字。这里用的是python3,因为2.7会报错,需要重新安装一些库。
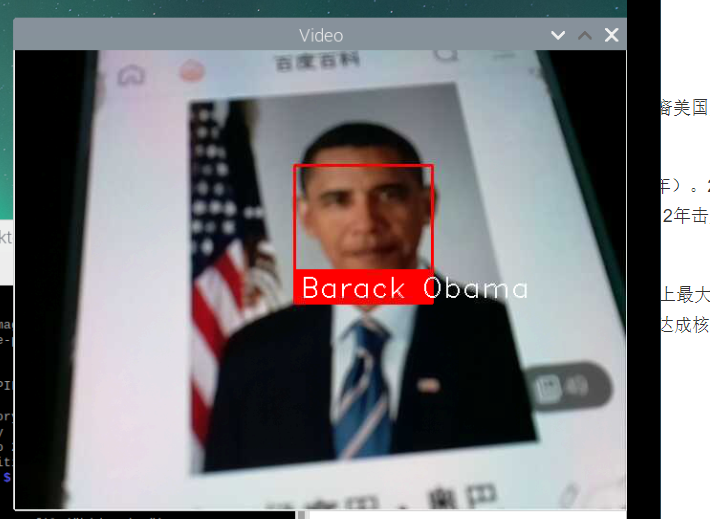
- 第二个facerec_from_webcam_faster.py,该程序会显示摄像头实时拍摄的画面,如果检测到人脸会有一个方框显示,该程序能特别的识别出奥巴马和拜登的人脸。

(4)结合微服务的进阶任务
参考资料
①docker的安装与配置
-
安装docker
直接使用sudo curl -sSL https://get.docker.com | sh安装docker即可 -
设置docker
# Add pi to Docker group
sudo usermod pi -aG docker

# config cgroup for Docker
echo Adding " cgroup_enable=cpuset cgroup_enable=memory" to /boot/cmdline.txt
sudo cp /boot/cmdline.txt /boot/cmdline_backup.txt
# if you encounter problems, try changing cgroup_memory=1 to cgroup_enable=memory.
orig="$(head -n1 /boot/cmdline.txt) cgroup_enable=cpuset cgroup_memory=1"
echo $orig | sudo tee /boot/cmdline.txt

sudo reboot
②facerec_on_raspberry_pi
- 下载示例镜像并开启容器
docker run -it \
--name face_recognition \
--device /dev/vchiq \
registry.cn-hangzhou.aliyuncs.com/denverdino/face_recognition \
bash
-
代码说明
- 其包含了face_recognition 的完整开发环境和示例应用
- 将摄像头设备
/dev/vchiq挂载到容器内部,这样就可以让容器中的应用来拍摄照片和视频。 - 可以利用 docker cp 命令,向容器中拷贝文件
-
应用示例代码facerec_from_raspberry_faster.py
在上一步中我们已经进入了容器中,现在我们进入代码存放目录
cd face_recognition/examples/
可以看到示例代码:
# This is a demo of running face recognition on a Raspberry Pi.
# This program will print out the names of anyone it recognizes to the console.

# To run this, you need a Raspberry Pi 2 (or greater) with face_recognition and
# the picamera[array] module installed.
# You can follow this installation instructions to get your RPi set up:
# https://gist.github.com/ageitgey/1ac8dbe8572f3f533df6269dab35df65

import face_recognition
import picamera
import numpy as np

# Get a reference to the Raspberry Pi camera.
# If this fails, make sure you have a camera connected to the RPi and that you
# enabled your camera in raspi-config and rebooted first.
camera = picamera.PiCamera()
camera.resolution = (320, 240)
output = np.empty((240, 320, 3), dtype=np.uint8)

# Load a sample picture and learn how to recognize it.
print("Loading known face image(s)")
obama_image = face_recognition.load_image_file("obama_small.jpg")
obama_face_encoding = face_recognition.face_encodings(obama_image)[0]

# Initialize some variables
face_locations = []
face_encodings = []

while True:
    print("Capturing image.")
    # Grab a single frame of video from the RPi camera as a numpy array
    camera.capture(output, format="rgb")

    # Find all the faces and face encodings in the current frame of video
    face_locations = face_recognition.face_locations(output)
    print("Found {} faces in image.".format(len(face_locations)))
    face_encodings = face_recognition.face_encodings(output, face_locations)

    # Loop over each face found in the frame to see if it's someone we know.
    for face_encoding in face_encodings:
        # See if the face is a match for the known face(s)
        match = face_recognition.compare_faces([obama_face_encoding], face_encoding)
        name = "<Unknown Person>"

        if match[0]:
            name = "Barack Obama"

        print("I see someone named {}!".format(name))
- 运行
python3 facerec_on_raspberry_pi.py
结果:
③facerec_from_webcam_faster
- 应用示例代码facerec_from_webcam_faster.py
令人很窒息的是,face_recognition并没有安装opencv,而安装opencv实在是太麻烦了,so...只能去都出docker hub上看看有没有现成的,但是没有真正满足需求的,最后找到了一个有opencv的镜像

- 权限分配
# 允许所有用户访问显示接口,在树莓派拥有者端操作比较方便
xhost +
- 创建容器
docker run -it --rm \ # 可交互,用完即删
 --device=/dev/video0 \ # 摄像头
 -e DISPLAY=unix$DISPLAY \ # 修改环境变量DISPLAY
 -v /tmp/.X11-unix:/tmp/.X11-unix \ # 共享本地unix端口
 -v /home/pi/Desktop/face-recognition:/face-recognition \ # 挂载目录
 demosense/raspberrypi3-opencv \
 bash
- 安装依赖
pip install picamera dlib face_recognition numpy
apt install x11-xserver-utils
- 测试代码`python facerec_from_webcam_faster.py`

**上一步的facerec_from_raspberry_faster.py用例也可以实现**

(4)小组协作
| 学号 | 姓名 | 任务 |
|---|---|---|
| 081700209 | 林郁昊 | docker环境的搭建与实现 |
| 111700312 | 胡浩楠 | 树莓派下的人脸识别 |
| 031701129 | 黄宇航 | 树莓派的环境搭建 |
| 说明:所列为主要负责任务,其实各个部分大家都有一定的参与度,遇到问题一起查资料解决 |
协作主要以qq群沟通为主,因为大家都能够通过内网穿透操作树莓派
协作照片:

遇到的问题
- 在下载安装opencv、face_recognition依赖时总是出错
解决方案:使用xshell和xftp工具,先在windows上下载好文件,在远端上传到树莓派上(还好之前把内网穿透弄好了,使得三人都能远端登录树莓派
- 在运行facerec_on_raspberry_pi.py程序时,会报错。

解决方案:因为之前用的是python2.7,有些函数没有,换成python3就可以正常运行。为此又把face_recognition重新在py3上安装一遍。

 浙公网安备 33010602011771号