

VueRouter爬坑第二篇-动态路由
VueRouter系列的文章示例编写时,项目是使用vue-cli脚手架搭建。
项目搭建的步骤和项目目录专门写了一篇文章:点击这里进行传送
后续VueRouter系列的文章的示例编写均基于该项目环境。
VueRouter系列文章链接
本篇文章完整代码
https://github.com/JEmbrace/VueRouter/tree/DynamicRoute
阅读目录
一.前言
二.动态路由配置
1.配置动态路由
2.配置动态路由映射到的组件
3.编写可跳转的URL
4.界面效果
5.多段路径参数
一.前言
// vue-router使用第一步:引入vue-router
import Vue from "vue"
import Router from "vue-router"

// vue-router使用第二步:组件注册到全局
Vue.use(Router)

// 第三步:定义路由配置
// 引入路由需要映射的组件
import Index from '@/components/Index.vue'
const routes = [
    {
        path: '/index',   // 匹配的URL
        component: Index  //映射的目标组件
    }
]

// 第四步:创建vue-router实例,传递前面定义的路由配置
const router = new Router({
    routes: routes
})

// 第五步:将vue-router实例使用export导出(供其他模块使用)
export default router
可以看到routes中配置的那一条路由path选项为'/index',那么能匹配到的url就只能是'/index',而在实际开发中的url可能会是多种多样的。
假如我们存在一个需求:多种路由需要同时匹配到同一个组件,那么这个时候就需要动态路由来解决这个问题。

二.动态路由配置
1.配置动态路由
 1 import Vue from "vue"
 2 import Router from "vue-router"
 3 Vue.use(Router)
 4
 5 // 引入路由需要映射的组件
 6 import Index from '@/components/Index.vue'
 7 const routes = [
 8     {
 9         path: '/index',  // 具体的路由
10         component: Index //映射的目标组件
11     },
12     //新增一条动态路由
13     {
14         path: '/pageContent/:id',   // 动态路由
15     }
16 ]
17 const router = new Router({
18     routes: routes
19 })
20
21 export default router
我们可以看到我们新增了一条路由配置,path设置为:'/pageContent/:id',其中冒号就表示路由中可变的部分,冒号后的id表示参数的内容。想这样的路由就可以匹配到像'pageContent/212310、'pageContent/212311'这样的url。
2.配置动态路由映射到的组件
<template>
    <div>
        <h1>这里是PageContent组件</h1>
        <h3>$routes.params = {{$route.params}}</h3>
        <h3>$routes.params.id = {{$route.params.id}}</h3>
    </div>
</template>
<script>
export default {
    name: 'PageContent'
}
</script>
备注:这里我们可能看到了$route.params这个写法,这块在官方文档中有介绍:动态路由设置的参数会被设置到$routes.params中。
我们为了在PageContent中区分模板是从不同的路由渲染出来的,所以使用了$routes.params获取到了动态路由的参数并展示在模板中上。
接来下给动态路由配置它映射的目标组件PageContent
E:\MyStudy\test\VueDemo\src\router\router.js
import Vue from "vue"
import Router from "vue-router"
Vue.use(Router)

// 引入路由需要映射的组件
import Index from '@/components/Index.vue'
import PageContent from '@/components/PageContent.vue'
const routes = [
    {
        path: '/index',  // 具体的路由
        component: Index //映射的目标组件
    },
    //新增一条动态路由
    {
        path: '/pageContent/:id',   // 动态路由
        component: PageContent  //动态路由映射的目标组件
    }
]

const router = new Router({
    routes: routes
})

export default router
3.编写可跳转的URL
<template>
  <div class="hello">
    <p>这里是HelloWorld组件</p>
    <!-- 可跳转的URL -->
    <router-link to="/index">点击这里渲染Index组件</router-link>

    <router-link to="/pageContent/212310">点击这里渲染pageContent组件</router-link>
    <router-link to="/pageContent/212311">点击这里也可以渲染pageContent组件</router-link>

    <!-- 使用下面的这个标签可以告诉vue-router将匹配到的组件渲染到这个位置 -->
    <router-view></router-view>
  </div>
</template>
<script>
export default {
  name: 'HelloWorld',
  data () {
    return {
      msg: 'Welcome to Your Vue.js App'
    }
  }
}
</script>

<!-- Add "scoped" attribute to limit CSS to this component only -->
<style scoped>
h1, h2 {
  font-weight: normal;
}
ul {
  list-style-type: none;
  padding: 0;
}
li {
  display: inline-block;
  margin: 0 10px;
}
a {
  color: #42b983;
}
</style>
4.界面效果

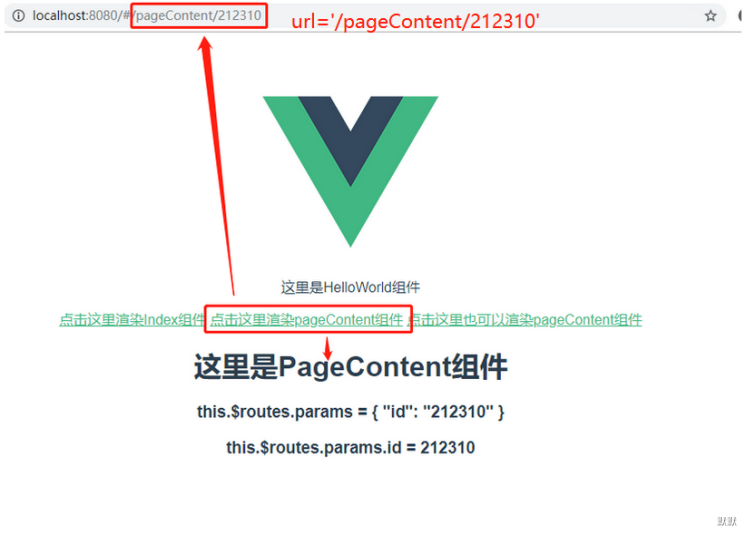

可以看到当url为:/pageContent/212310 时,成功的匹配渲染了PageContent组件,同时从$routes.params中获取动态路由中设置的id参数值:212310;
当url为:/pageContent/212311 时,也成功的匹配渲染了PageContent组件,同时从$routes.params中获取动态路由中设置的id参数值:212311
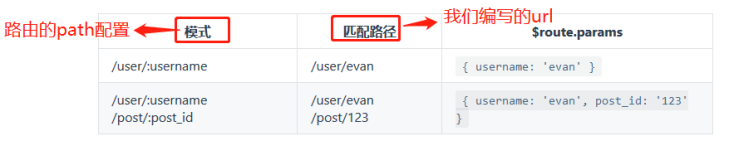
5.多路径参数
前面的实例中我们只设置了id一个参数,vue-router还支持多段的路径参数,这里也比较简单,我们就不写实例实践了,具体的配置方法如下(来自官网截图):


 浙公网安备 33010602011771号