八十六、车轮上的LBS(iOS端解决方案)
“吃穿住行”是生活的基本构成。拿“行”来说,从最早的人力车、马车到现今的高铁、飞机等,地上/下行驶着奔腾不息的公交、出租车、地铁乃至私家车。随着移动互联网不断渗透,涌现出一大批出行类软件。
出行类软件大概有以下几种:
打车类:滴滴打车、快的打车
专车类:滴滴专车、一号专车、神州专车
拼车类:嘀嗒拼车、51用车、天天用车
出行类用车乘客端的LBS部分,我们已经做好了实现方式。
我们的目标是:让天下没有难做的地图开发!
同时,源码已经开放,工程地址详见:https://github.com/hadesh/tripdemo
Step 1:定位+逆地理编码+Annotation,搞定前端展示
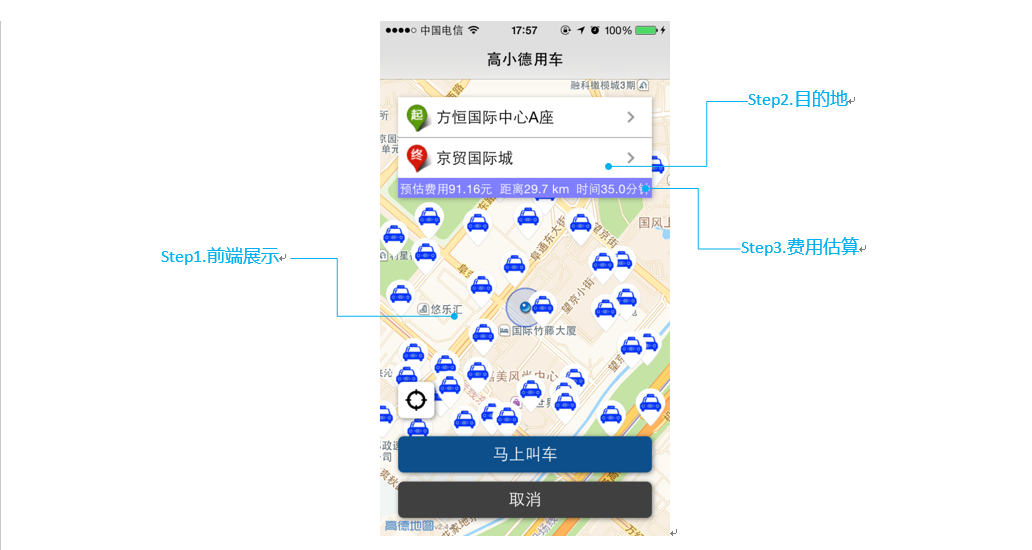
屏幕中间的小蓝点 显示当前位置用到了定位功能;位于顶部的输入框的起点信息 是根据定位位置进行逆地理编码查询,所返回的第一条POI的名称;地图上蓝色车标 是将附近的车主以Annotation展示。
定位

一句代码轻松搞定定位,只需开启定位即可(将MAMapView的showsUserLocation属性设置为YES)。
在ViewController中的viewDidAppear方法中开启定位的代码如下:
|
1
2
3
4
5
|
- (void)viewDidAppear:(BOOL)animated{ _mapView.delegate = self; _mapView.showsUserLocation = YES;//YES开启定位,NO关闭定位} |
为了获取定位点的经纬度坐标,需要在开启定位之前必须设置MAMapView的代理(_mapView.delegate),这里放到了viewDidAppear方法中的原因是:当3D地图复用的时候,可能代理会设置成其他的,所以要在显示的时候再设置回来。
定位回调中获取经纬度进行逆地理编码查询,定位回调代码如下:
|
1
2
3
4
|
- (void)mapView:(MAMapView *)mapView didUpdateUserLocation:(MAUserLocation *)userLocation updatingLocation:(BOOL)updatingLocation{ ……} |
逆地理编码
Demo中所有的搜索功能(如:逆地理编码、POI查询、路径规划等等,请参考:http://lbs.amap.com/api/ios-sdk/guide/amapsearch/)用block方式封装在了DDSearchManager中,这样可以避免在多处设置代理。
第一次定位和点击定位按钮,会进行逆地理编码查询,将查询出来的第一条POI作为起点。代码如下:
|
1
2
3
4
5
6
7
8
9
10
11
12
13
14
15
16
17
18
19
20
21
22
23
24
25
26
27
28
29
30
31
32
33
34
35
|
//逆地理编码查询- (void)searchReGeocodeWithCoordinate:(CLLocationCoordinate2D)coordinate{ //构造AMapReGeocodeSearchRequest对象,设置参数 AMapReGeocodeSearchRequest *regeo = [[AMapReGeocodeSearchRequest alloc] init]; regeo.location = [AMapGeoPoint locationWithLatitude:coordinate.latitude longitude:coordinate.longitude]; regeo.requireExtension = YES; __weak __typeof(&*self) weakSelf = self; [[DDSearchManager sharedInstance] searchForRequest:regeo completionBlock:^(id request, id response, NSError *error) { if (error) { NSLog(@"error :%@", error); } else { //逆地理编码回调结果 AMapReGeocodeSearchResponse * regeoResponse = response; if (regeoResponse.regeocode != nil) { if (regeoResponse.regeocode.pois.count > 0) { AMapPOI *poi = regeoResponse.regeocode.pois[0]; weakSelf.currentLocation.coordinate = CLLocationCoordinate2DMake(poi.location.latitude, poi.location.longitude); weakSelf.currentLocation.name = poi.name; weakSelf.currentLocation.address = poi.address; } …… } } }];} |
Annotation(显示附近车主)
Demo中在DDDriverManager中模拟了主车数据,您也可以自己传入自己的数据。
以Annotation显示附近车主的步骤如下:
a) 构造MAPointAnnotation,并MAMapview的addAnnoations方法添加到地图上。
|
1
2
3
4
5
6
7
8
9
10
11
12
13
14
15
16
17
18
19
20
21
22
23
24
25
26
27
28
29
30
31
32
33
34
35
36
37
38
39
40
41
|
- (void)searchDoneInMapRect:(MAMapRect)mapRect withDriversResult:(NSArray *)drivers timestamp:(NSTimeInterval)timestamp{ [_mapView removeAnnotations:_drivers]; NSMutableArray * currDrivers = [NSMutableArray arrayWithCapacity:[drivers count]]; [drivers enumerateObjectsUsingBlock:^(DDDriver * obj, NSUInteger idx, BOOL *stop) { MAPointAnnotation * driver = [[MAPointAnnotation alloc] init]; driver.coordinate = obj.coordinate; driver.title = obj.idInfo; [currDrivers addObject:driver]; }]; [_mapView addAnnotations:currDrivers]; _drivers = currDrivers;}b) 实现MAMapViewDelegate中viewForAnnotation回调,以 图标显示车主位置。代码如下:- (MAAnnotationView *)mapView:(MAMapView *)mapView viewForAnnotation:(id<maannotation>)annotation{ if ([annotation isKindOfClass:[MAPointAnnotation class]]) { static NSString *pointReuseIndetifier = @"driver"; MovingAnnotationView *annotationView = (MovingAnnotationView *)[mapView dequeueReusableAnnotationViewWithIdentifier:pointReuseIndetifier]; if (annotationView == nil) { annotationView = [[MovingAnnotationView alloc] initWithAnnotation:annotation reuseIdentifier:pointReuseIndetifier]; } UIImage *image = [UIImage imageNamed:@"icon_taxi"]; annotationView.image = image; //车主图标 annotationView.centerOffset = CGPointMake(0, -image.size.height / 2.0); annotationView.canShowCallout = YES;//可弹出气泡 return annotationView; } return nil;}</maannotation> |
Step 2 POI搜索,完成目的地选择(起点)
通过POI搜索,检索出目的地。同时,也可更改起点地址。

通过键盘输入一个字进行一次POI查询,并将返回的结果AMapPOI对象的name和address显示到TableView中。
|
1
2
3
4
5
6
7
8
9
10
11
12
13
14
15
16
17
18
19
20
21
22
23
24
25
26
27
28
29
30
31
32
33
34
35
36
37
38
39
40
41
42
|
- (void)searchTipsWithKey:(NSString *)key{ if (key.length == 0) { return; } //构造AMapPlaceSearchRequest对象,配置POI查询参数 AMapPlaceSearchRequest *request = [[AMapPlaceSearchRequest alloc] init]; request.requireExtension = YES; request.searchType = AMapSearchType_PlaceKeyword; request.keywords = key; if (self.city.length > 0) { request.city = @[self.city]; } __weak __typeof(&*self) weakSelf = self; [[DDSearchManager sharedInstance] searchForRequest:request completionBlock:^(id request, id response, NSError *error) { if (error) { NSLog(@"error :%@", error); } else { [weakSelf.locations removeAllObjects]; //POI查询回调结果 AMapPlaceSearchResponse *aResponse = (AMapPlaceSearchResponse *)response; [aResponse.pois enumerateObjectsUsingBlock:^(AMapPOI *obj, NSUInteger idx, BOOL *stop) { DDLocation *location = [[DDLocation alloc] init]; location.name = obj.name; location.coordinate = CLLocationCoordinate2DMake(obj.location.latitude, obj.location.longitude); location.address = obj.address; location.cityCode = obj.citycode; [weakSelf.locations addObject:location]; }]; [weakSelf.displayController.searchResultsTableView reloadData]; } }];} |
Step 3 路径规划,搞定费用估算
根据起点和终点,进行驾车路径规划,将返回的出租车费用作为估算费用。
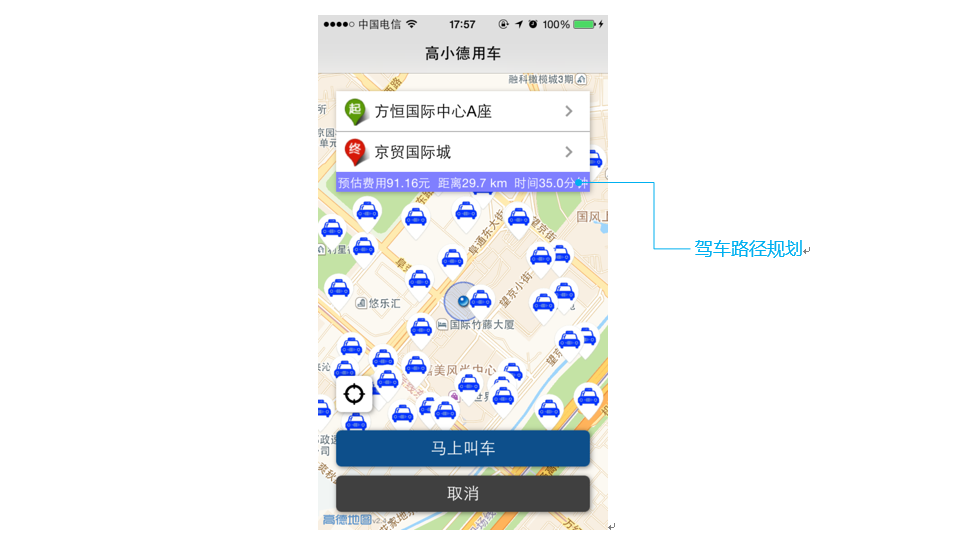
ViewController中requestPathInfo方法中进行驾车路径规划查询代码如下所示:
|
1
2
3
4
5
6
7
8
9
10
11
12
13
14
15
16
17
18
19
20
21
22
23
24
25
26
27
28
29
|
- (void)requestPathInfo{ //检索所需费用(发起驾车路径规划) AMapNavigationSearchRequest *navi = [[AMapNavigationSearchRequest alloc] init]; navi.searchType = AMapSearchType_NaviDrive; navi.requireExtension = YES; /* 出发点. */ navi.origin = [AMapGeoPoint locationWithLatitude:_currentLocation.coordinate.latitude longitude:_currentLocation.coordinate.longitude]; /* 目的地. */ navi.destination = [AMapGeoPoint locationWithLatitude:_destinationLocation.coordinate.latitude longitude:_destinationLocation.coordinate.longitude]; __weak __typeof(&*self) weakSelf = self; [[DDSearchManager sharedInstance] searchForRequest:navi completionBlock:^(id request, id response, NSError *error) { //路径规划回调结果 AMapNavigationSearchResponse * naviResponse = response; if (naviResponse.route == nil) { [weakSelf.locationView setInfo:@"获取路径失败"]; return; } AMapPath * path = [naviResponse.route.paths firstObject]; [weakSelf.locationView setInfo:[NSString stringWithFormat:@"预估费用%.2f元 距离%.1f km 时间%.1f分钟", naviResponse.route.taxiCost, path.distance / 1000.f, path.duration / 60.f, nil]]; }];} |
Step4 行驶距离测量,搞定通知最优车主
乘客发出用车请求后,需要对司机进行叫车信息派送,通过多点到单点的行驶距离测量 REST
API接口实现最优车主通知。该部分一般在服务端实现。行驶距离测量尚未对外开放,开发者可邮件api@autonavi.com发送申请,申请时请写明
产品、应用场景,待审批后即可开放权限使用。
接口使用场景说明:
行驶距离测量接口可用于出行类产品服务器端分单应用场景,提供从多个起点(司机)到一个终点(乘客)的路径规划计算,按照传入数据顺序返回每个起点到终点的行驶距离及行驶时间,开发者可根据自有业务数据同当前行驶距离/行驶时间相结合,进行业务派单及类似的需求实现。
调用代码(JAVA):
|
1
2
3
4
5
6
7
8
9
10
11
12
13
14
15
16
17
18
19
20
21
22
23
24
25
26
27
28
29
30
31
32
33
34
35
|
/** * 行驶距离测量 *@param key 用户key *@param origins 起始点 例如116.493381,39.978437,270 *@param key 终点 例如116.493441,39.978887 * */ public static void distance (String key , String origins , String destination){ url += key; url += "&origins=" + origins; url += "&destination=" + destination; HttpRequester request = new HttpRequester(); HttpRespons hr = null; try { hr = request.sendGet(url); //建立HTTP请求 } catch (IOException e) { e.printStackTrace(); } String content =hr.getContent(); //获取请求数据 if (null!=content) { JSONObject jsonData = JSONObject.fromObject(content); //数据解析 JSONArray resultArr = jsonData.optJSONArray("results"); if (resultArr != null) { int size = resultArr.size(); for (int i = 0; i < size; i++) { JSONObject result = resultArr.getJSONObject(i); String distance = result.optString("distance"); //行驶距离 String duration = result.optString("duration"); //行驶时间 System.out.println("distance="+distance+" duration="+duration); //开发者验证数据 } } } } |
posted on 2015-05-25 16:04 PerfectBody 阅读(283) 评论(0) 收藏 举报


 浙公网安备 33010602011771号