打造自定义 eslint
起因
在多人合作项目中, eslint 和 prettier 是不必能缺少的, 他能帮助你,统一规范某一事物, 某一个方法的使用
但是有时候也并不尽如人意, 有些规范官方包没提供, 但是我们也需要进行一定的规范, 这个时候靠人工 code review 是不可靠的了
所以我们需要的是自定义 eslint ,来规范我们的开发
原理
ast 语法树
其实 eslint 的原理就是依据于 ast 语法树, 关于他这一块 可以参阅我之前写的文章: babel 与 ast
初始化
首先我们需要创建一个仓库来存储我们的代码, 我取名为: @grewer/eslint-plugin-rn
使用指令来初始化项目:
npx -p yo -p generator-eslint yo eslint:plugin

在这我们可以在 package.json 修改我们的项目名称和配置, 比如我就将项目名改成这样:
eslint-plugin-rn => @grewer/eslint-plugin-rn
再执行 yarn 指令(或者 npm i) 下载我们需要的依赖
这时可以将 generator-eslint 放入项目的 devDependencies 中方便我们使用,
yarn add -D generator-eslint
到这为止项目的初始化正式完成
创建
将指令 npx yo eslint:plugin 放入 scripts 中:
{
  "scripts": {
    "test": "mocha tests --recursive",
+    "create:rule": "npx yo eslint:rule"
  }
}
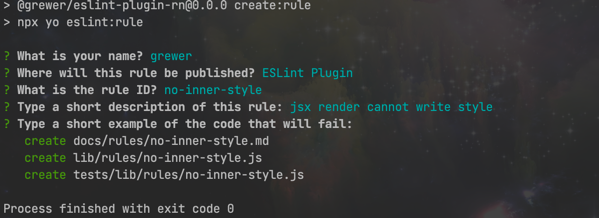
开始执行指令: yarn create:rule:
效果如图:
-
What is your name?作者名称, 填自己名字就行 -
Where will this rule be published? (Use arrow keys)选择哪个生成的文件都一样, 所以回车即可 -
What is the rule ID?rule 的名称, 如:no-inner-style -
Type a short description of this rule:随便填就行, 也可以直接回车 -
Type a short example of the code that will fail:失败的代码情况, 因为在终端里打比较麻烦, 直接回车跳过, 后面补充
创建完成后的文件目录:
├── README.md
├── docs
│   └── rules
│       └── no-inner-style.md
├── lib
│   ├── index.js
│   └── rules
│       └── no-inner-style.js
├── package.json
├── tests
│   └── lib
│       └── rules
│           └── no-inner-style.js
└── yarn.lock
例子
我们需要在 lib/rules/no-inner-style.js 文件中填写我们的逻辑
module.exports = {
    meta: {
        docs: {
            description: "jsx render cannot write style",
            category: "Fill me in",
            recommended: false
        },
        fixable: null,  // or "code" or "whitespace"
        schema: [
            // fill in your schema
        ]
    },
    create: function (context) {

        // variables should be defined here

        //----------------------------------------------------------------------
        // Helpers
        //----------------------------------------------------------------------

        // any helper functions should go here or else delete this section

        //----------------------------------------------------------------------
        // Public
        //----------------------------------------------------------------------

        return {

            // give me methods

        };
    }
};
首先要有一个思路, 我的目的是 render 中的 jsx 不能写行内样式, 我们要做的就是在 jsx 的属性中检测 style 这个属性是否存在, 他是否是一个 object 格式
当然也存在特殊情况, 比如 style 中的 width 会根据变量变化 {width:flag?100:0}, 或者动画方面的一些变化, 所以在判断的时候需要注意
那问题来了, 我们怎么寻找 jsx 中的 style 属性呢
这里我们需要一些工具了, 下面我推荐两个网址(他们的功能都是一样的)
工具的使用
首先我们需要两段符合场景的代码:
// 这就是特殊的情况, 这种情况下我们不会禁止行内样式
class TestView extends Component {
    render() {
        const mode = 'dark';
        return (
            <View style={{flex: 1, width: 200, color: mode === 'dark' ? '#000' : '#fff'}}>
            </View>
        )
    }
}

// 这是需要禁止的情况
class TestView extends Component {
    render() {
        const mode = 'dark';
        return (
            <View style={{flex: 1, width: 200}}>
            </View>
        )
    }
}
将需要禁止的情况放入, 上述的网站中(如果报错,需要修改配置, 使得他支持 jsx)
将鼠标光标放到 style 标签上, 如图:

通过网站的解析可以看到, style 在 ast 中的属性是叫 JSXAttribute
所以我们将它作为键, 添加方法:
module.exports = {
    meta: {
        // 省略, 不改变
    },
    create: function (context) {
        // 省略这里的注释
        return {
            // 将 JSXAttribute 作为键
            JSXAttribute: node => {
                // 注意 如果这里写不下去了, 可以直接跳到下一步(调试)中

                const propName = node.name && node.name.name;
                // console.log(propName)

                // 先判断 style 是否存在
                if (propName === 'style') {

                    // node.value.expression.type 这个路径, 在 ast 网站中可以快速找到, ObjectExpression也一样
                    // 意思是 当 style 的值是一个 Object 的时候, 抛出信息
                    if (node.value.expression.type === 'ObjectExpression') {

                        // context.report 的作用就是抛出信息, node参数 就是抛出信息的节点在那个位置
                        context.report({
                            node,
                            message: "不要使用行内样式",
                        });
                        // TODO 注意!  这里我们还没考虑特殊情况
                    }
                }
            }
        }
    }
};
到这一步我们已经抓到了 ast 的精髓所在了
调试&测试
这里我们就需要测试文件来调试我们的规则了, 打开文件 tests/lib/rules/no-inner-style.js:
"use strict";

var rule = require("../../../lib/rules/no-inner-style"),

    RuleTester = require("eslint").RuleTester;

var ruleTester = new RuleTester();
ruleTester.run("no-inner-style", rule, {

    valid: [
        // give me some code that won't trigger a warning
    ],

    // 先将我们刚刚的例子代码上到这里的 code 中
    invalid: [
        {
            code: `
            class TestView extends Component{
                render() {
                    const mode = 'dark';
                    return (
                        <View style={{flex:1, width: 200}} >
                        </View>
                    )
                }
            }
            `,
            errors: [{
                message: "不要使用行内样式",
            }]
        }
    ]
});
填充 code 和 errors 中的 message
在终端中使用 node 指令运行: node tests/lib/rules/no-inner-style.js
但是, 她会报出错误:
AssertionError [ERR_ASSERTION]: A fatal parsing error occurred: Parsing error: The keyword 'class' is reserved
原因是在于执行的环境问题
test 配置
在 tests/lib 中添加文件 config.js, 路径为(tests/lib/config.js)
const testConfig = {
    env: {
        es6: true
    },
    parserOptions: {
        ecmaFeatures: {
            jsx: true,

        },
        ecmaVersion: 2021,
        sourceType: 'module',
    },
}

module.exports = {
    testConfig
}
在 tests/lib/rules/no-inner-style.js 中引入和使用:
var rule = require("../../../lib/rules/no-inner-style"),

    RuleTester = require("eslint").RuleTester;

// 引入
const {testConfig} = require("../config.js");

// 使用
var ruleTester = new RuleTester(testConfig);
ruleTester.run("no-inner-style", rule, {

    valid: [],
    invalid: [
        {
            // 因为没变化所以此处省略
        }
    ]
});
到此, 我们再度执行指令: node tests/lib/rules/no-inner-style.js
如果验证成功(即 context.report 抛出的 message 和 测试用例中的 message相等) 就不会有任何返回信息
如果验证失败则会打印出原因
添加特殊情况
之前我们就说到了 style 的特殊情况, 在这种有变量的情况下, 我们是不会再抛出错误信息的
现在将代码复制到测试用例文件中的 valid 中:
var rule = require("../../../lib/rules/no-inner-style"),

    RuleTester = require("eslint").RuleTester;

// 引入
const {testConfig} = require("../config.js");

// 使用
var ruleTester = new RuleTester(testConfig);
ruleTester.run("no-inner-style", rule, {

    valid: [
        `
        class TestView extends Component {
            render() {
                const mode = 'dark';
                return (
                    <View style={{flex: 1, width: 200, color: mode === 'dark' ? '#000' : '#fff'}}>
                    </View>
                )
            }
        }
        `
    ],
    invalid: [
        {
            // 因为没变化所以此处省略
        }
    ]
});
这时候我们再执行指令: node tests/lib/rules/no-inner-style.js 就会发现报错了, 当然这是我们已经预料到的特殊情况:
AssertionError [ERR_ASSERTION]: Should have no errors but had 1: [
  {
    ruleId: 'no-inner-style',
    severity: 1,
    message: '不要使用行内样式',
    line: 6,
    column: 27,
    nodeType: 'JSXAttribute',
    endLine: 6,
    endColumn: 98
  }
]
这时候再来修改我们的规则文件 lib/rules/no-inner-style.js :
module.exports = {
    meta: {
        // 省略没有变化的内容
    },
    create: function (context) {
        return {
            JSXAttribute: node => {
                const propName = node.name && node.name.name;
                if (propName === 'style') {
                    // 可以通过执行  `node tests/lib/rules/no-inner-style.js` 和 console 来调试当前程序
                    // console.log(node.value.expression)
                    if (node.value.expression.type === 'ObjectExpression') {
                        // const arr = node.value.expression.properties
                        // 如果 style 中有表达式, 则不判断
                        for (let i = 0, len = arr.length; i < len; i++) {
                            // ConditionalExpression当然是可以在 ast 网站中找到, 也可以通过 console 慢慢调试出来
                            if (arr[i].value.type === 'ConditionalExpression') {
                                // 如果有表达式则直接返回, 不抛出任何信息
                                return
                            }
                        }
                        context.report({
                            node,
                            message: "不要使用行内样式",
                        });
                    }
                }
            }
        }

    }
};
再度执行指令, 可以发现正常通过了
再添加一些函数的组件, 扩大测试范围, 保证我们的规则万无一失, 这部分可以看我结尾的仓库, 文章里就不赘述了
测试工具
在我们项目中初始化的时候, 他内置了测试工具 mocha, 我们可以直接运行:
yarn test
// 或者
npm run test
如果项目中报错
sh: mocha: command not found
可以使用这个指令:"test": "node_modules/.bin/mocha tests --recursive",替代之前的旧指令
它可以测试 tests 文件中的所有事例, 当然调试也可以, 只要你不嫌他麻烦
文档
在我们使用指令新建规则的时候, 他还有一个新建文件就是文档文件: docs/rules/no-inner-style.md
在此文件中, 我们可以详细写一下需要注意的事项, 有些待填写区域可以删除
    # jsx render cannot write style (no-inner-style)

    ## Rule Details

    Examples of **incorrect** code for this rule:

    ```js

    function TestView(){
        return (
            <View style={{flex:1, width: 200}} >
            </View>
        )
    }
    ```

    Examples of **correct** code for this rule:

    ```js

    function TestView() {
        const mode = 'dark';
        return (
            <View style={{flex: 1, width: 200, color: mode === 'dark' ? '#000' : '#fff'}}>
            </View>
        )
    }
    ```

    ## When Not To Use It

    规范项目的行内样式, 如果不需要可以关闭
并且同样地需要更新下 README.md 文档
项目集成
现在的项目可以直接就发布了
在我的项目发布之后, 可以看到他的全名是: @grewer/eslint-plugin-rn
在主项目中添加之后, package.json 这样加入:
  "eslintConfig": {
    "extends": [
      // 省略
    ],
+    "plugins": ["@grewer/rn"], // 将我们的插件插入这边
    "rules": {
        // 编写规则的危险等级
+      "@grewer/rn/no-inner-style": 1
    },
    "env": {
      "react-native/react-native": true
    }
  },
在 eslint 中, 规则的值可以是以下值之一:
"off"或0- 关闭规则"warn"或1- 开启规则,使用警告级别的错误:warn(不会导致程序退出)"error"或2- 开启规则,使用错误级别的错误:error(当被触发的时候,程序会退出)
当然上述配置在 .eslintrc 文件中也一样配置
假如你的插件全名没有前缀(scoped), 则是这样添加:
(假如插件全名是: eslint-plugin-rn)
{
  "plugins": [
    "rn"
  ],
  "rules": {
    "rn/rule-name": 2
  }
}
就需要这样添加, 差距也就是一个前缀
注意
在更改 eslint 配置之后, 想要起效,需要重启下 eslint
比如在 webstorm 中, 需要打开配置中的 eslint 模块, 显示 Disabled Eslint, 选择 ok 关闭之后
再度打开该模块回复原状, 当然重启编辑器也是可以解决的
规则默认值
问题来临: 当我们的规则越来越多的时候, 我们每次将插件接入项目中, 都需要添加 rules 这个属性.
这里我们就需要优化下了
在项目中我们需要写上默认值, 一种方案是可以直接写:
在 lib/index.js 文件中修改 module.exports
-module.exports.rules = requireIndex(__dirname + '/rules')

+module.exports = {
+    rules: requireIndex(__dirname + '/rules'),
+    configs: {
+        recommended: {
+            plugins: ["@grewer/rn"],
+            rules: {
+                "@grewer/rn/no-inner-style": 1
+            },
+        }
+    }
+}
当然主项目中 eslint 的配置也需要做出修改:
{
  "eslintConfig": {
    "extends": [
      "xxx 之前另外的 config",
+      "plugin:@grewer/rn/recommended"
    ],
-    "plugins": ["@grewer/rn"], // 删除 "@grewer/rn"
-    "rules": {
-        "@grewer/rn/no-inner-style": 1
-    },// 删除, 但是我们也可以加上, 来覆盖默认值
    "env": {
      "react-native/react-native": true
    }
  }
}
当然, 因为规则的增多, 在 lib/index.js 文件中直接写也是比较麻烦的, 我们可以新建一个脚本来自动新增规则的默认值:
在根目录下创建文件 create.js
const requireIndex = require("requireindex");
const fs = require('fs')

const pluginName = '@grewer/rn'

const rules = requireIndex(__dirname + "/lib/rules")

const keys = Object.keys(rules)

const defaultLevel = keys.map(key => {
    // 这里可以进行更加详细的判断
    return `'${pluginName}/${key}': 1`
})


const data = `
const requireIndex = require("requireindex");

module.exports = {
    rules: requireIndex('./rules'),
    configs:{
        recommended: {
          plugins: ['${pluginName}'],
          rules: {
            ${defaultLevel.join(',')}
          },
        }
    }
}`


fs.writeFileSync('./lib/index.js', data, 'utf8')
运行脚本: node create.js
这样生成的 lib/index.js 文件是这个样子的:
const requireIndex = require("requireindex");

module.exports = {
    rules: requireIndex('./rules'),
    configs:{
        recommended: {
          plugins: ['@grewer/rn'],
          rules: {
            '@grewer/rn/no-inner-style': 1
          },
        }
    }
}
更进一步优化
现在项目依赖于 requireindex 这个库, 有许多插件库都不依赖于这个库, 这个时候我们也需要略微优化下:
修改 package.json:
{
  "dependencies": {
    // 原来 requireindex 的位置, 删除
-     "requireindex": "~1.1.0",
  },
  "devDependencies": {
+    "requireindex": "~1.1.0", // 现在的位置
    "eslint": "^7.1.0",
    "generator-eslint": "^2.0.0",
    "mocha": "^8.3.0"
  },
}
修改刚刚的 create.js 脚本:
    const requireIndex = require("requireindex");
    const fs = require('fs')

    const pluginName = '@grewer/rn'

    const rules = requireIndex(__dirname + "/lib/rules")

    const keys = Object.keys(rules)

    const defaultLevel = keys.map(key => {
        // 这里可以进行更加详细的判断
        return `'${pluginName}/${key}': 1`
    })


+    const temp = keys.map(key => {
+        return `'${key}': require('./lib/rules/${key}.js')`
+    })


    const data = `
-    const requireIndex = require("requireindex");

    module.exports = {
        rules:{
+             ${temp.join(',')}
        },
        configs:{
            recommended: {
              plugins: ['${pluginName}'],
              rules: {
                ${defaultLevel.join(',')}
              },
            }
        }
    }`


    fs.writeFileSync('./lib/index.js', data, 'utf8')
运行之后的文件:
module.exports = {
    rules:{
         'no-inner-style': require('./rules/no-inner-style.js')
    },
    configs:{
        recommended: {
          plugins: ['@grewer/rn'],
          rules: {
            '@grewer/rn/no-inner-style': 1
          },
        }
    }
}
现在的插件更 pure 了, 只依赖于 node
最后修改我们的发包指令:
{
    "scripts": {
        "test": "node_modules/.bin/mocha tests --recursive",
        "create:rule": "npx yo eslint:rule",
-       "pub": "npm publish",
+       "pub": "node create.js && npm publish",
    },
}
结语
本文介绍了 eslint 插件, 从项目创建到插件创建,再到发包最后是优化
在团队里,为了我们会议的决定,共识能够落实到项目中去, eslint 插件是必不可少的
本项目中创建的 eslint 插件库: https://github.com/Grewer/eslint-plugin-rn

 浙公网安备 33010602011771号