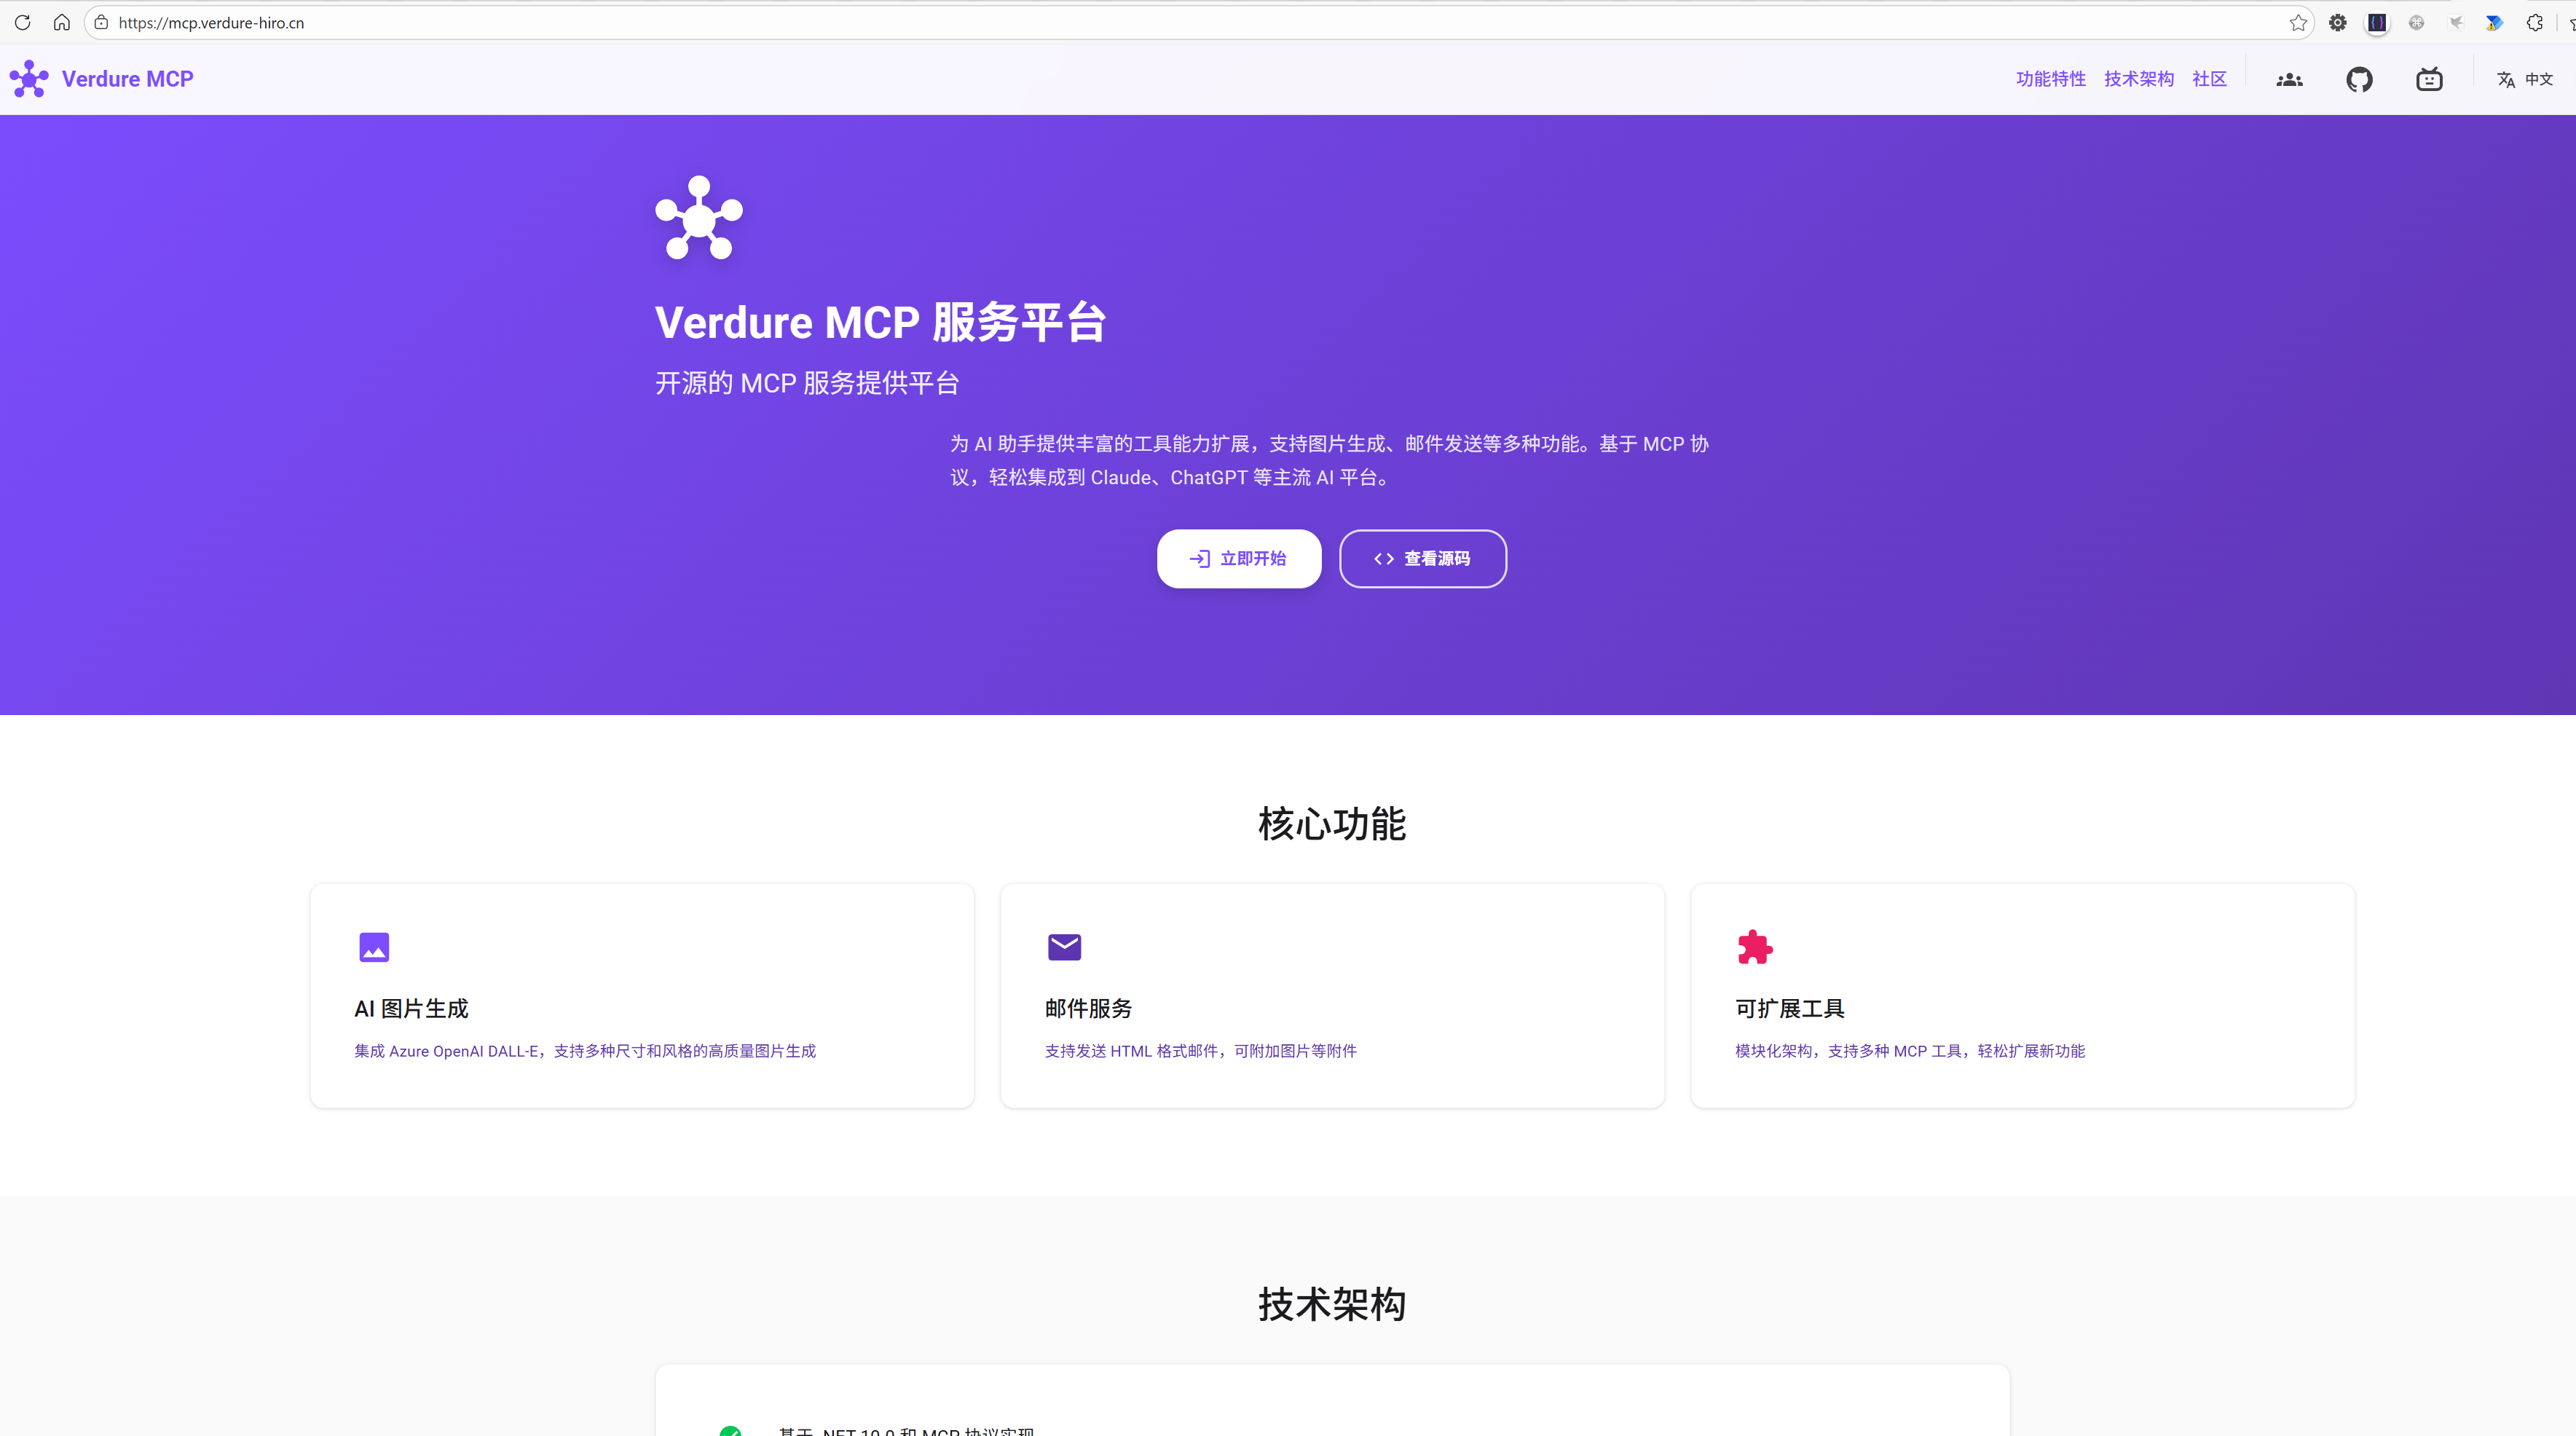
将SignalR移植到Esp32—让小智设备无缝连接.NET功能拓展MCP服务
前言
这段时间迷上了手搓Esp32的小智聊天机器人,也用.NET为小智AI开发了一些MCP转接平台和MCP服务。小智ESP32本身就具备MCP能力,可以调用本地MCP工具和服务端MCP工具,并将结果返回给设备,这个功能一直都有。
如果你有手搓Esp32的硬件玩具打算,可以关注我的B站账号(绿荫阿广)https://space.bilibili.com/25228512
带你手搓玩具。
小智原本这套架构有个局限性:MCP工具执行完之后,只能同步返回结果或者通过异步邮件通知,设备无法被动接收服务端的消息。比如我想让服务端主动给设备推送一张图片、播放一段语音、或者发送一个文本通知,在之前的架构下是做不到的。
所以我就决定改造小智客户端,集成SignalR实时通信框架。这次改造的核心价值是:通过SignalR消息通道,让设备可以接收各种类型的消息(声音、图片、文本通知),服务端的MCP工具执行成功后,可以根据用户ID推送数据到对应的用户通道。
整个改造涉及SignalR C++客户端的集成、JWT Token认证、扫码登录(基于ESP32本地MCP工具实现)、以及服务端消息推送逻辑。客户端代码都是C++实现的,不过现在AI辅助编程很强大,帮我节省了大量时间。

问题解答
Q: 为什么选择SignalR而不是直接用WebSocket?
A: 起初我确实考虑过直接用WebSocket,但SignalR提供了很多开箱即用的功能:
- Hub抽象:服务端可以轻松实现群组管理,按用户ID推送消息,比如
Clients.Group($"Users:{userId}").SendAsync("Notification", message) - 消息路由:不需要自己写消息分发逻辑,SignalR的Hub方法调用和事件推送已经很完善了
- 类型化调用:相比原始WebSocket的字符串消息,SignalR提供了类似RPC的调用体验,代码更清晰
虽然ESP32没有现成的SignalR库,但我找到了微软官方的C++ SignalR客户端(半成品),将它与ESP32的WebSocket组件整合后,就能用上SignalR的这些特性了。至于SignalR自带的重连机制,我没用,小智有自己的循环重连逻辑,更可控一些。
Q: 改造的核心价值是什么?解决了什么问题?
A: 改造前,ESP32的MCP工具调用完成后,只能通过两种方式通知:
- 同步返回:工具执行结果直接返回给调用方
- 异步邮件:通过邮件发送执行结果
这两种方式都无法满足实时推送的需求。比如我想让服务端在生图完成后立即推送图片给设备显示,或者播放一段语音提示,之前的架构做不到。
改造后,通过SignalR建立了一条服务端到设备的实时消息通道:
- 服务端的MCP工具执行成功后,可以调用
_hubContext.Clients.Group($"Users:{userId}").SendAsync("ShowImage", imageData)将图片推送给设备 - 设备通过SignalR的事件监听接收消息:
connection->on("ShowImage", [](const std::vector<signalr::value>& args) { ... }) - 支持推送任意类型的数据:文本、图片(Base64)、语音URL、JSON通知等
这才是这次改造的核心价值:让设备具备被动接收服务端消息的能力,而不仅仅是主动调用和同步返回。
Q: 扫码登录是怎么实现的?
A: 扫码登录功能是基于ESP32本地MCP工具实现的,这是小智的固有功能,我只是进行了拓展:
- 设备启动时检查是否有JWT Token
- 如果没有Token,调用本地MCP工具
display_qrcode在屏幕上显示二维码 - 二维码内容包含设备ID和服务端地址:
https://mcp-server.com/device-login?deviceId=xxx - 用户用手机扫码,完成授权。
- 设备获取Token后保存到NVS(Non-Volatile Storage),下次启动直接使用
这样就实现了设备的快速认证,用户体验很好。扫码认证的服务端是使用开源的keycloak做的,对接了设备认证类型。

名词解释
核心概念
-
SignalR:微软提供的实时通信框架,封装了WebSocket、Server‑Sent Events和长轮询等传输方式,支持Hub模型、自动重连与消息序列化。适合实现双向、低延迟的实时消息系统。将它移植到嵌入式设备时需考虑客户端实现的体积、内存消耗与线程模型。
-
Hub(集线器):SignalR的核心抽象,类似于MVC中的Controller。服务端通过Hub定义方法供客户端调用,客户端也可以注册事件监听服务端推送。例如
ChatHub.SendMessage(user, message)就是一个典型的Hub方法。 -
MCP(Model Context Protocol):一种基于JSON-RPC 2.0的协议,用于定义客户端和服务端之间的工具调用规范。在IoT场景中,设备可以作为MCP Server暴露能力(如重启、显示图片),而云端服务作为MCP Client调用这些能力。
-
JSON-RPC 2.0:一种轻量级的远程过程调用协议,使用JSON编码。MCP协议基于此标准,定义了
initialize、tools/list、tools/call等方法。每个请求必须包含jsonrpc: "2.0"、method、id字段。
ESP32相关
-
FreeRTOS:一个开源、轻量级的实时操作系统内核,常用于微控制器平台(如ESP32)。提供任务调度、优先级、互斥锁、信号量、队列、软件定时器等实时特性,便于在资源受限设备上实现并发与确定性行为。使用时需注意堆栈大小、中断安全和任务优先级设计。
-
ESP32 PSRAM:ESP32可选的外部伪静态RAM(Pseudo-SRAM),用于扩展设备可用内存(常见4MB/8MB/16MB)。适合存放大对象、图像缓存、网络缓冲和动态分配数据。在ESP-IDF中需启用并正确配置,分配时也可使用不同的堆区域(如
heap_caps_malloc(size, MALLOC_CAP_SPIRAM))来控制放置与性能/DMA限制。 -
WebSocket:一种基于TCP的全双工通信协议,通过HTTP握手升级建立连接。SignalR默认优先使用WebSocket作为传输层,在ESP32上通过
esp_websocket_client组件实现。需要注意的是ESP32的WebSocket客户端不支持自动重连,需要在应用层实现。
认证相关
-
Bearer Token:一种HTTP认证方案,将Token放在Authorization头中:
Authorization: Bearer <token>。在SignalR中,通常将Token作为查询参数传递:/hub?access_token=YOUR_TOKEN -
JWT(JSON Web Token):一种开放标准(RFC 7512),用于在各方之间安全地传输信息。在Verdure MCP中,使用Keycloak签发的JWT进行用户认证,Token中包含用户ID、角色、过期时间等Claim信息。
-
API Token:一种简单的认证方式,后续连接时携带此Token验证身份。Verdure MCP同时支持API Token和JWT两种方式。
核心技术架构
整个改造的架构可以用一张图说明:
┌──────────────────────┐                          ┌──────────────────────┐
│   .NET MCP Service   │                          │   ESP32 Device       │
│   (Verdure MCP)      │◄─────SignalR Hub────────►│   (小智客户端)       │
│                      │                          │                      │
│  ┌────────────────┐  │  ① JWT Token认证         │  ┌────────────────┐  │
│  │  DeviceHub.cs  │  │◄─────────────────────────│  │  扫码登录      │  │
│  │                │  │                          │  │  (本地MCP工具) │  │
│  │ OnConnected    │  │                          │  └────────────────┘  │
│  │ (验证Token)    │  │                          │          ↓           │
│  └────────────────┘  │  ② 建立连接               │  ┌────────────────┐  │
│          ↓           │◄─────────────────────────│  │ SignalR Client │  │
│  ┌────────────────┐  │                          │  │ - connection   │  │
│  │  群组管理      │  │                          │  │ - on() events  │  │
│  │ Users:{userId} │  │                          │  └────────────────┘  │
│  └────────────────┘  │                          │                      │
│          ↓           │                          │                      │
│  ┌────────────────┐  │  ③ MCP工具执行后推送     │  ┌────────────────┐  │
│  │  消息推送      │  │─────────────────────────►│  │ 消息接收处理   │  │
│  │ SendAsync()    │  │  ShowImage(imageData)    │  │ - 显示图片     │  │
│  │                │  │  PlayAudio(audioUrl)     │  │ - 播放语音     │  │
│  │                │  │  Notification(text)      │  │ - 显示通知     │  │
│  └────────────────┘  │                          │  └────────────────┘  │
└──────────────────────┘                          └──────────────────────┘
关键流程:
- 扫码登录:设备启动后,如果没有Token,调用本地MCP工具显示二维码,用户扫码后获取JWT Token
- 建立连接:携带JWT Token连接SignalR Hub,服务端验证后加入用户群组
Users:{userId} - 消息推送:服务端MCP工具执行完成后,通过SignalR将结果推送给设备
_hubContext.Clients.Group($"Users:{userId}").SendAsync("ShowImage", imageData)- 设备监听事件并处理:
connection->on("ShowImage", handler)
这套架构的核心价值就是让服务端可以主动推送消息给设备,而不仅仅是等待设备轮询或同步返回。
开发环境准备
ESP32开发环境(VS Code方式)
最简单的方式是使用VS Code的ESP-IDF插件:
-
安装VS Code和插件
- 下载安装 Visual Studio Code
- 安装扩展:
Espressif IDF(搜索esp-idf)
-
配置ESP-IDF
- 按
F1打开命令面板,输入ESP-IDF: Configure ESP-IDF Extension - 选择
Express快速配置 - 选择ESP-IDF版本(推荐v5.1或更高)
- 等待安装完成(会自动下载工具链、Python环境等)
- 按
-
创建/打开项目
F1→ESP-IDF: Show Examples Projects- 或直接打开 esp-signalr-example 项目文件夹
-
编译和烧录
- 点击底部状态栏的
Build、Flash、Monitor按钮 - 或按快捷键:
Ctrl+E B(编译)、Ctrl+E F(烧录)
- 点击底部状态栏的
这种方式比命令行简单很多,适合.NET开发者快速上手ESP32开发。
.NET开发环境
服务端使用.NET 10开发:
# Windows: 下载安装器 https://dotnet.microsoft.com/download/dotnet/10.0

# 验证安装
dotnet --version  # 应该输出 10.0.x
核心代码实现
本章节将代码分为示例代码和实际整合代码两个部分进行讲解:
- 示例代码:用于理解核心概念的简化版本,便于学习和快速上手
- 实际整合代码:生产环境中的完整实现,包含完善的错误处理、状态管理等
关于示例仓库
为了帮助开发者快速上手ESP32的SignalR集成,我创建了一个完整的示例仓库:
🔗 仓库地址:https://github.com/maker-community/esp-signalr-example
📦 仓库结构:
esp-signalr-example/
├── main/                    # ESP32 C++客户端代码
│   ├── main.cpp            # 主程序(WiFi连接、SignalR初始化)
│   └── CMakeLists.txt      # ESP-IDF构建配置
├── signalr-server/         # .NET C# 服务端代码
│   ├── Program.cs          # ASP.NET Core服务器配置
│   ├── ChatHub.cs          # SignalR Hub实现
│   └── signalr-server.csproj
├── docs/                   # 文档
│   ├── QUICKSTART.md       # 5分钟快速开始指南
│   ├── TEST_SERVER_SETUP.md # 测试服务器详细设置
│   └── TROUBLESHOOTING.md  # 常见问题排查
└── README.md               # 项目说明
✨ 主要特性:
-
开箱即用的服务器:
- 基于ASP.NET Core和SignalR构建
- 支持消息广播
- 完整的连接管理和日志输出
- 提供RESTful API用于设备控制
-
简化的ESP32客户端:
- 使用Microsoft官方的C++ SignalR客户端库移植版
- 通过menuconfig配置WiFi和服务器地址
- 演示消息发送/接收、传感器数据上报
- 清晰的日志输出和错误处理
🚀 快速开始示例(5分钟运行):
# 1. 克隆仓库
git clone https://github.com/maker-community/esp-signalr-example.git
cd esp-signalr-example

# 2. 启动服务器(需要.NET 9.0+)
cd signalr-server
dotnet run --urls "http://+:5000" 这个运行可以用ip访问
# 服务器运行在: http://0.0.0.0:5000/chatHub

# 3. 配置并烧录ESP32
cd ../
idf.py menuconfig
# 配置WiFi SSID、密码和服务器地址
idf.py build flash monitor
esp32的配置如下:
📊 运行效果:
服务器输出:
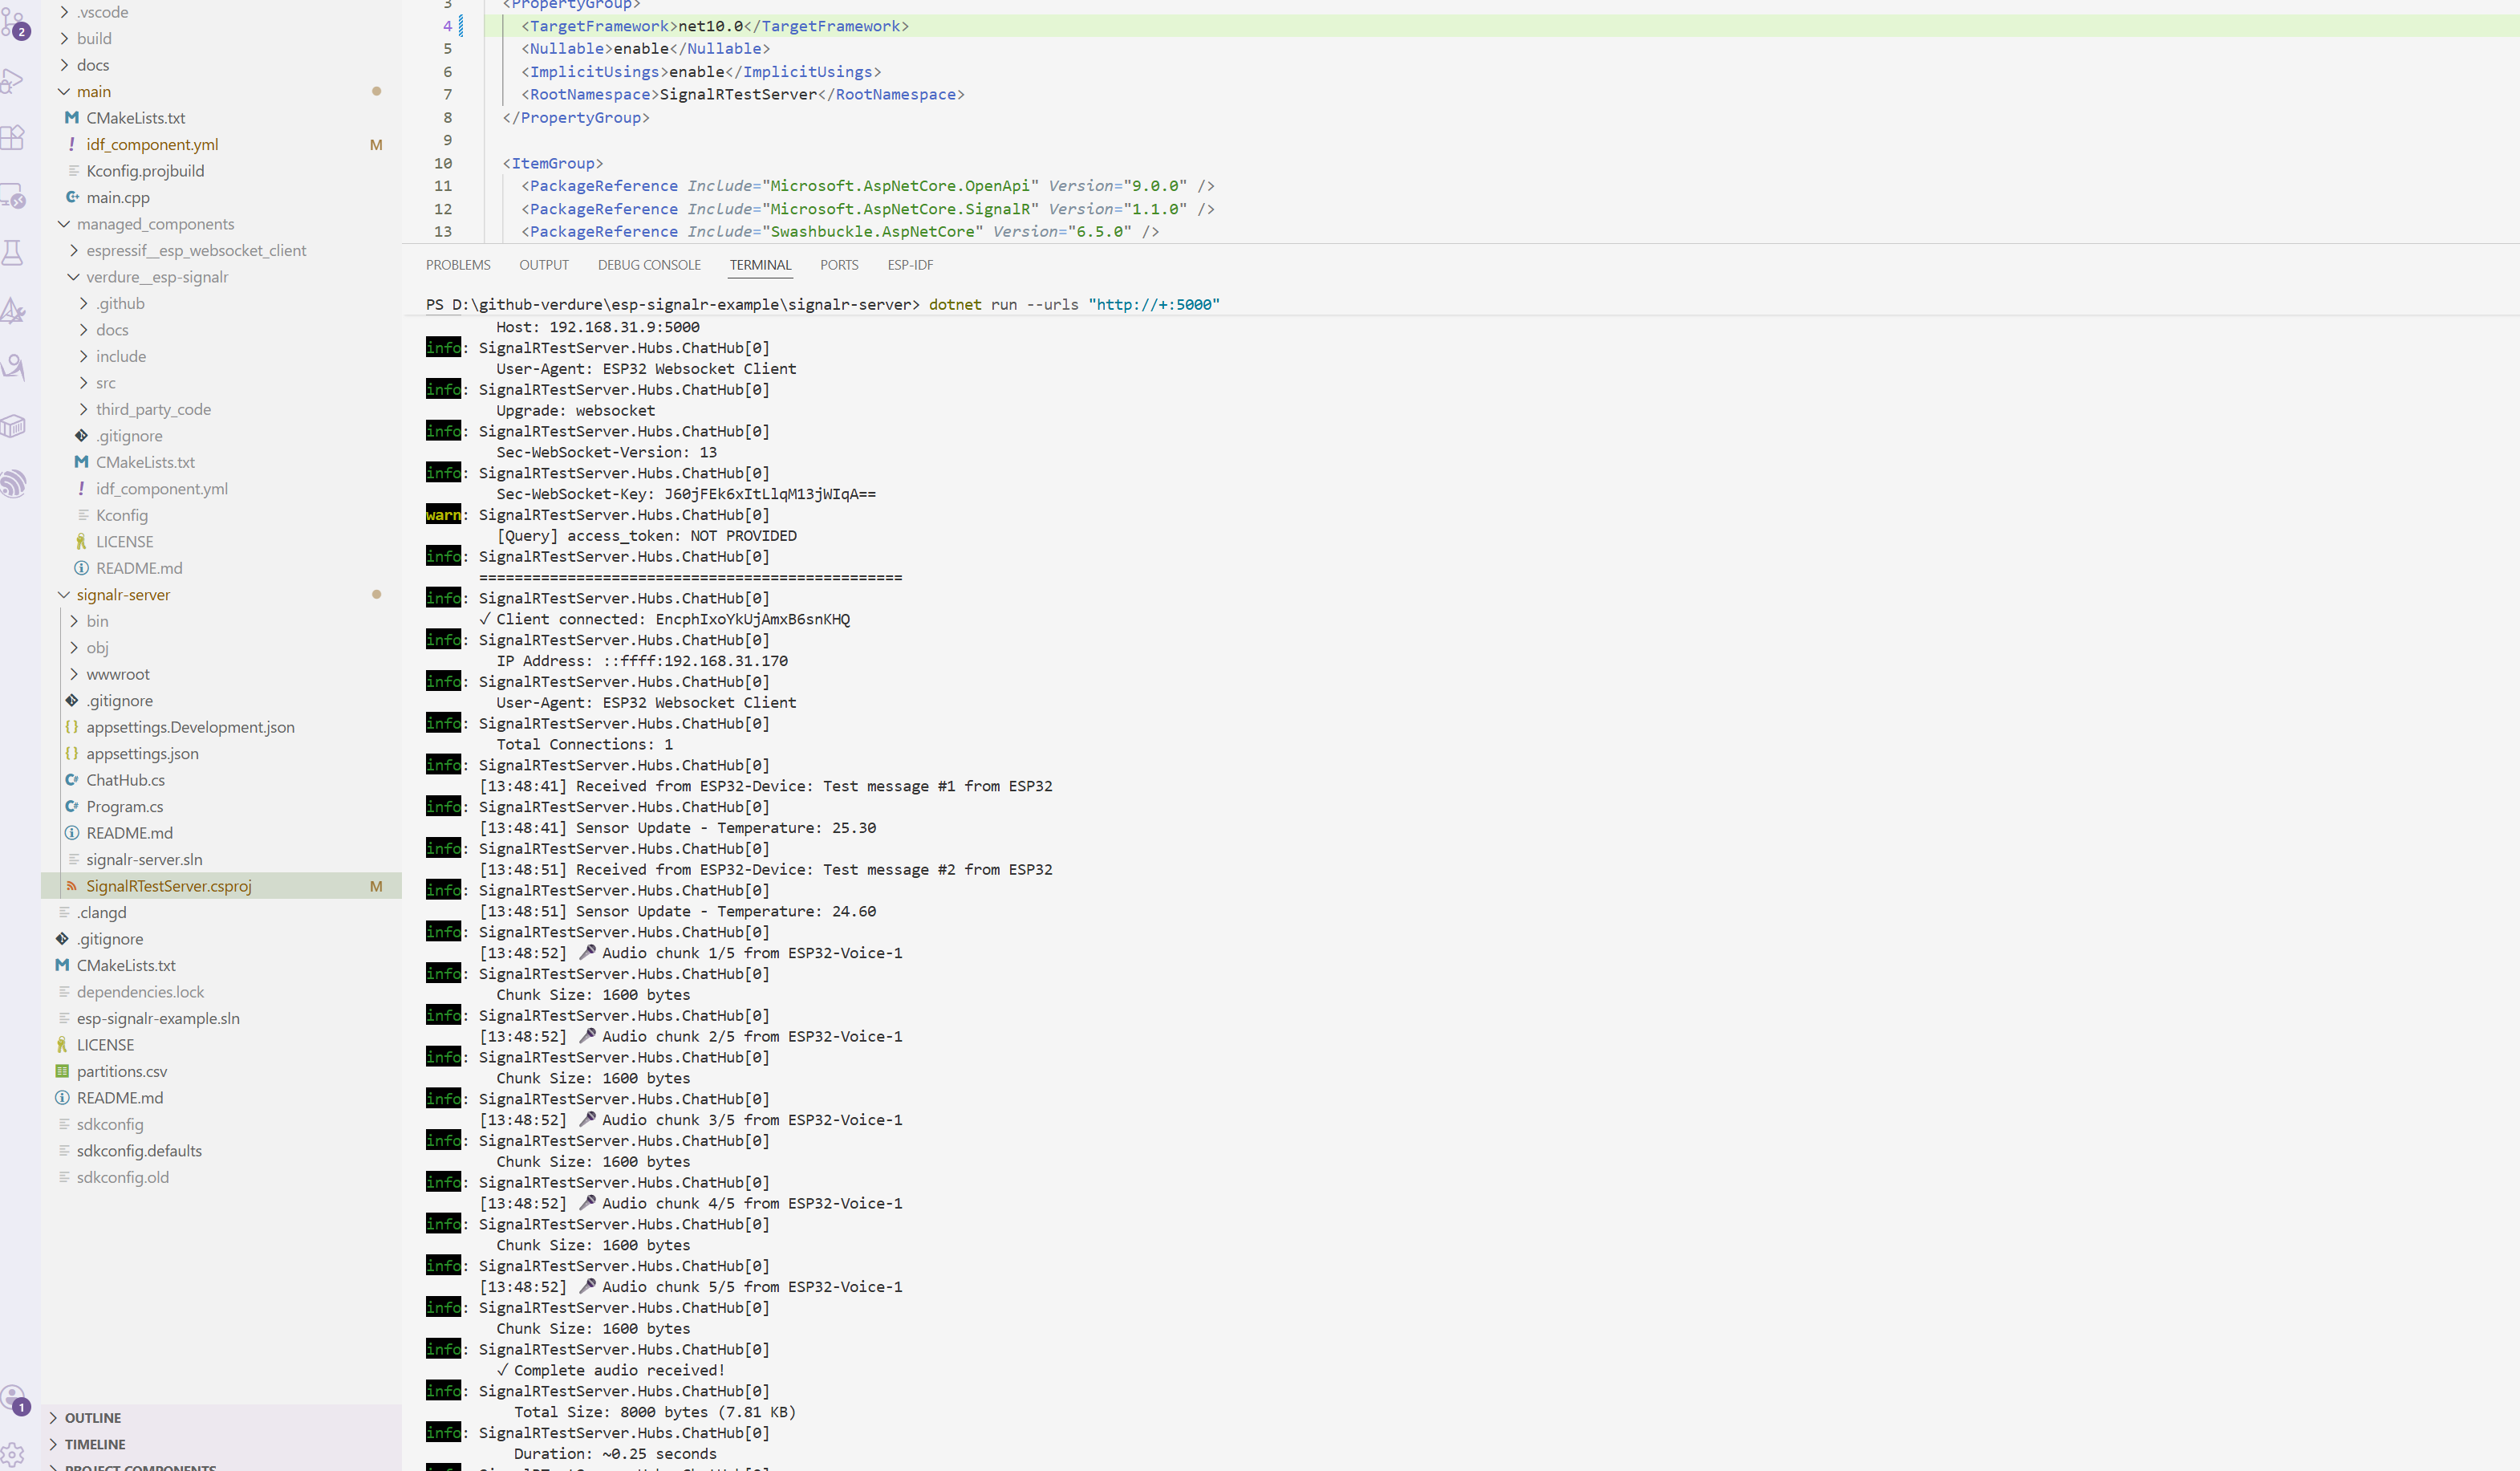
✓ Client connected: abc123
  IP Address: 192.168.1.100
  Total Connections: 1

[10:30:25] Received from ESP32-Device: Test message #1 from ESP32
[10:30:35] Sensor Update - Temperature: 25.50
ESP32串口输出:
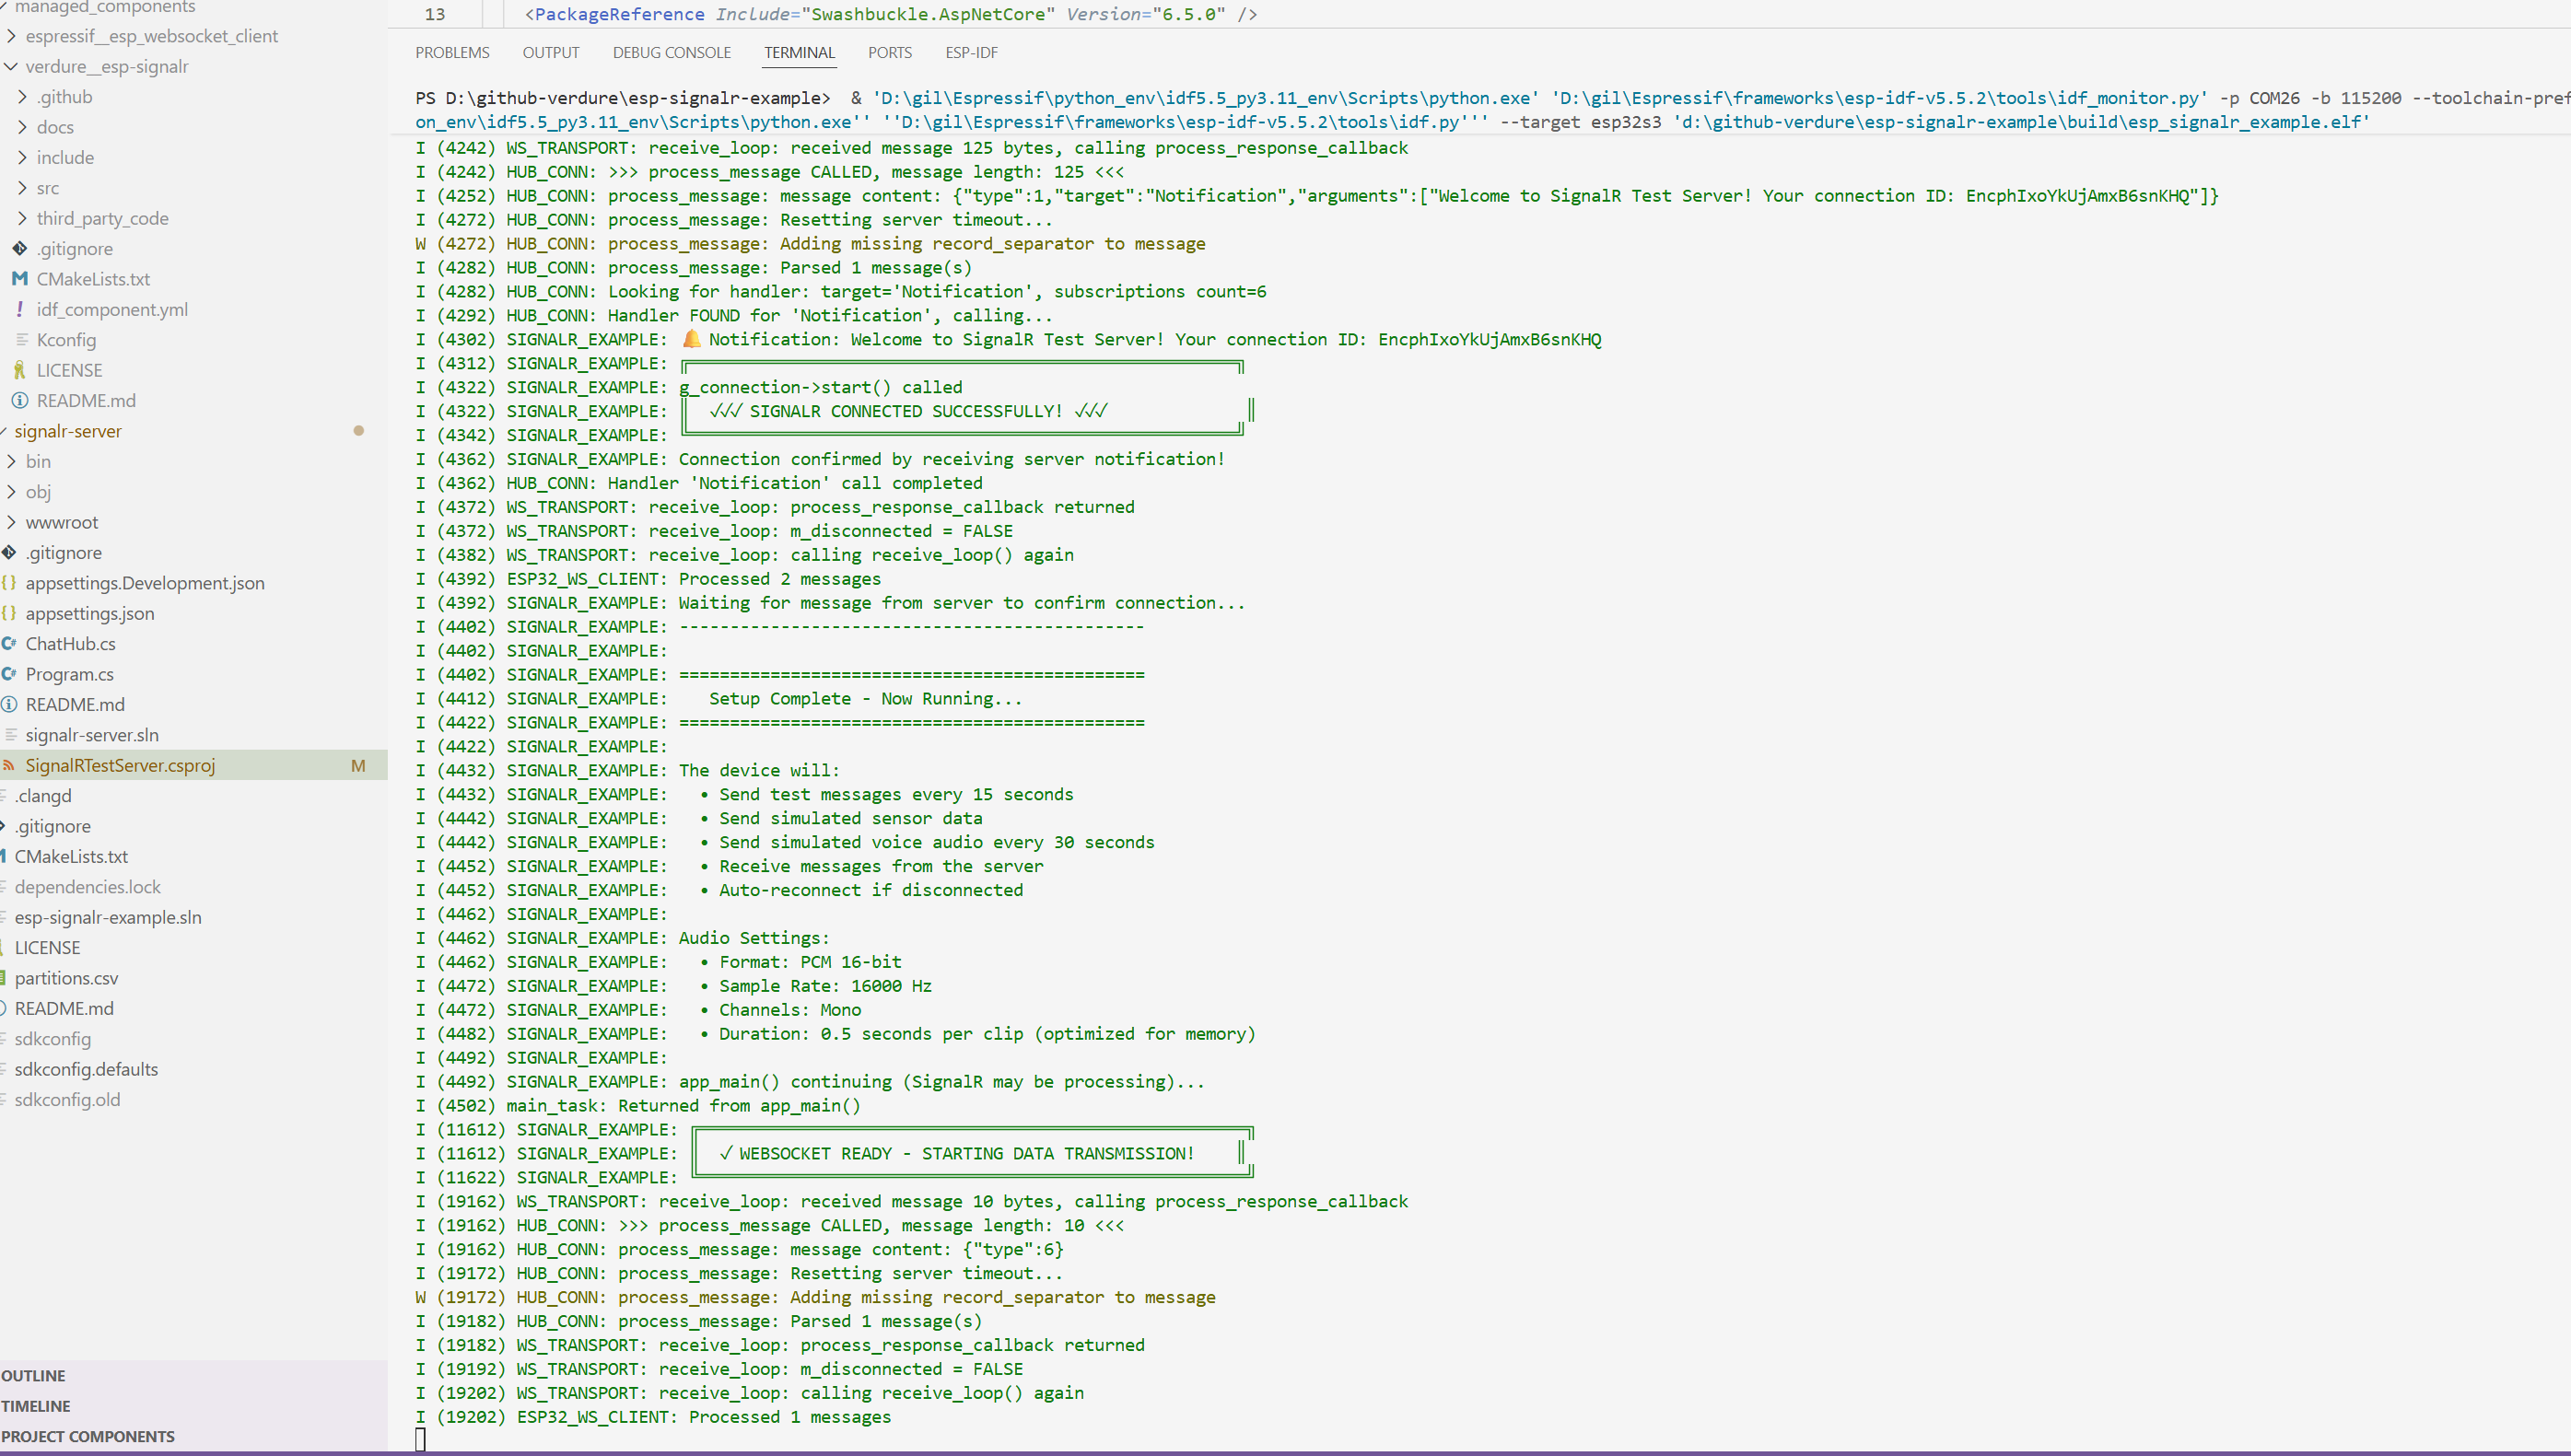
I (3520) SIGNALR_EXAMPLE: ✓✓✓ Connected to SignalR Hub! ✓✓✓
I (3525) SIGNALR_EXAMPLE: 🔔 Notification: Welcome!
I (14640) S
🎯 示例仓库的价值:
- 学习路径清晰:从简单的连接到复杂的数据传输,循序渐进
- 可直接运行:不需要依赖外部服务,本地即可测试完整流程
- 代码注释详细:关键部分都有中英文注释说明
- 易于扩展:基于这个示例可以快速开发自己的应用
接下来的 5.1 节将基于这个示例仓库的代码进行讲解。
5.1 示例代码(教学简化版)
说明:以下代码来自开源示例仓库 esp-signalr-example,经过精简突出核心概念,方便理解SignalR与ESP32集成的基本原理。完整代码请参考仓库源码。
5.1.1 服务端:SignalR Hub基础实现
这是服务端的核心代码,实现了连接管理、消息广播和设备状态跟踪:
ChatHub.cs - Hub核心实现:
using Microsoft.AspNetCore.SignalR;

public class ChatHub : Hub
{
    private readonly ILogger<ChatHub> _logger;
    private static int _connectionCount = 0;

    // 存储连接的设备信息
    private static readonly Dictionary<string, DeviceInfo> _connectedDevices = new();
    private static readonly object _devicesLock = new();

    public ChatHub(ILogger<ChatHub> logger)
    {
        _logger = logger;
    }

    /// <summary>
    /// 处理来自ESP32的消息
    /// </summary>
    public async Task SendMessage(string user, string message)
    {
        _logger.LogInformation("[{Time}] Received from {User}: {Message}",
            DateTime.Now.ToString("HH:mm:ss"), user, message);

        // 广播到所有连接的客户端
        await Clients.All.SendAsync("ReceiveMessage", user, message);
    }

    /// <summary>
    /// 处理传感器数据更新
    /// </summary>
    public async Task UpdateSensor(string sensorId, double value)
    {
        _logger.LogInformation("[{Time}] Sensor Update - {SensorId}: {Value:F2}",
            DateTime.Now.ToString("HH:mm:ss"), sensorId, value);

        // 广播传感器数据到所有客户端
        await Clients.All.SendAsync("UpdateSensorData", sensorId, value);
    }

    /// <summary>
    /// 处理ESP32状态更新
    /// </summary>
    public async Task UpdateDeviceStatus(string deviceId, string status, int freeHeap)
    {
        _logger.LogInformation("[{Time}] Device Status - {DeviceId}: {Status}, Free Heap: {FreeHeap} bytes",
            DateTime.Now.ToString("HH:mm:ss"), deviceId, status, freeHeap);

        await Clients.All.SendAsync("DeviceStatusUpdate", deviceId, status, freeHeap);
    }

    /// <summary>
    /// 客户端连接时触发
    /// </summary>
    public override async Task OnConnectedAsync()
    {
        Interlocked.Increment(ref _connectionCount);

        var connectionId = Context.ConnectionId;
        var httpContext = Context.GetHttpContext();
        var ipAddress = httpContext?.Connection.RemoteIpAddress?.ToString();
        var userAgent = httpContext?.Request.Headers["User-Agent"].ToString();

        // 保存设备信息
        lock (_devicesLock)
        {
            _connectedDevices[connectionId] = new DeviceInfo
            {
                ConnectionId = connectionId,
                IpAddress = ipAddress,
                UserAgent = userAgent,
                ConnectedAt = DateTime.UtcNow
            };
        }

        _logger.LogInformation("✓ Client connected: {ConnectionId}", connectionId);
        _logger.LogInformation("  IP Address: {IpAddress}", ipAddress);
        _logger.LogInformation("  Total Connections: {Count}", _connectionCount);

        await base.OnConnectedAsync();

        // 发送欢迎消息(ESP32通过此消息确认连接成功)
        await Clients.Caller.SendAsync("Notification",
            "Welcome to SignalR Test Server!");
    }

    /// <summary>
    /// 客户端断开时触发
    /// </summary>
    public override async Task OnDisconnectedAsync(Exception? exception)
    {
        Interlocked.Decrement(ref _connectionCount);

        var connectionId = Context.ConnectionId;

        // 移除设备信息
        lock (_devicesLock)
        {
            _connectedDevices.Remove(connectionId);
        }

        _logger.LogInformation("✗ Client disconnected: {ConnectionId}", connectionId);
        if (exception != null)
        {
            _logger.LogWarning("  Disconnection reason: {Message}", exception.Message);
        }
        _logger.LogInformation("  Remaining Connections: {Count}", _connectionCount);

        await base.OnDisconnectedAsync(exception);
    }
}

/// <summary>
/// 设备连接信息
/// </summary>
public class DeviceInfo
{
    public string ConnectionId { get; set; } = "";
    public string? IpAddress { get; set; }
    public string? UserAgent { get; set; }
    public DateTime ConnectedAt { get; set; }
}
Program.cs - SignalR服务配置:
var builder = WebApplication.CreateBuilder(args);

// 添加SignalR服务
builder.Services.AddSignalR(options =>
{
    options.EnableDetailedErrors = true;  // 开发环境启用
    options.ClientTimeoutInterval = TimeSpan.FromSeconds(30);  // 客户端超时
    options.KeepAliveInterval = TimeSpan.FromSeconds(15);  // 心跳间隔
});

// 添加CORS支持(允许ESP32跨域连接)
builder.Services.AddCors(options =>
{
    options.AddDefaultPolicy(policy =>
    {
        policy.AllowAnyOrigin()
              .AllowAnyHeader()
              .AllowAnyMethod();
    });
});

var app = builder.Build();

app.UseCors();
app.MapHub<ChatHub>("/chatHub");

// 监听所有网络接口(重要:局域网内ESP32能访问)
app.Urls.Add("http://0.0.0.0:5000");

Console.WriteLine("SignalR Server: http://0.0.0.0:5000/chatHub");
app.Run();
关键点说明:
- 连接确认机制:服务器在
OnConnectedAsync中发送Notification消息,ESP32收到此消息才认为连接成功 - 消息广播:使用
Clients.All.SendAsync()向所有连接的客户端广播消息 - 连接跟踪:使用静态字典
_connectedDevices跟踪所有连接的设备信息
5.1.2 服务端:设备控制API(通过SignalR推送消息)
示例仓库提供了完整的设备控制API,演示如何通过SignalR向ESP32推送各种类型的消息:
Program.cs - 设备控制API端点:
// ============================================================================
// 设备控制 API - 用于向设备发送 CustomMessage
// ============================================================================

// 获取所有连接的设备
app.MapGet("/api/device/connections", () =>
{
    return Results.Ok(ChatHub.ConnectedDevices);
})
.WithName("GetConnections")
.WithDescription("获取所有连接的设备列表");

// 发送通知
app.MapPost("/api/device/notification", async (
    NotificationRequest request,
    IHubContext<ChatHub> hubContext,
    ILogger<Program> logger) =>
{
    var message = new
    {
        action = "notification",
        title = request.Title ?? "通知",
        content = request.Content ?? "",
        emotion = request.Emotion ?? "bell",
        sound = request.Sound ?? "popup"
    };

    await SendCustomMessage(hubContext, logger, request.ConnectionId, message);
    return Results.Ok(new { success = true, message = "Notification sent" });
})
.WithDescription("发送通知到设备 (sound: popup/success/vibration/exclamation/low_battery/none)");

// 发送图片
app.MapPost("/api/device/image", async (
    ImageRequest request,
    IHubContext<ChatHub> hubContext,
    ILogger<Program> logger) =>
{
    var message = new
    {
        action = "image",
        url = request.Url
    };

    await SendCustomMessage(hubContext, logger, request.ConnectionId, message);
    return Results.Ok(new { success = true, message = "Image sent" });
})
.WithDescription("发送图片URL到设备显示 (支持JPG/PNG, 最大1MB)");

// 发送音频
app.MapPost("/api/device/audio", async (
    AudioRequest request,
    IHubContext<ChatHub> hubContext,
    ILogger<Program> logger) =>
{
    var message = new
    {
        action = "audio",
        url = request.Url
    };

    await SendCustomMessage(hubContext, logger, request.ConnectionId, message);
    return Results.Ok(new { success = true, message = "Audio sent" });
})
.WithDescription("发送音频URL到设备播放 (OGG格式, 最大512KB)");

// 发送命令
app.MapPost("/api/device/command", async (
    CommandRequest request,
    IHubContext<ChatHub> hubContext,
    ILogger<Program> logger) =>
{
    var message = new
    {
        action = "command",
        command = request.Command
    };

    await SendCustomMessage(hubContext, logger, request.ConnectionId, message);
    return Results.Ok(new { success = true, message = "Command sent" });
})
.WithDescription("发送命令到设备 (command: reboot/wake/listen/stop)");

// 显示二维码
app.MapPost("/api/device/qrcode", async (
    QRCodeRequest request,
    IHubContext<ChatHub> hubContext,
    ILogger<Program> logger) =>
{
    var message = new
    {
        action = "qrcode",
        content = request.Content,
        title = request.Title ?? "扫码"
    };

    await SendCustomMessage(hubContext, logger, request.ConnectionId, message);
    return Results.Ok(new { success = true, message = "QRCode sent" });
})
.WithDescription("显示二维码到设备屏幕");

// 辅助方法:发送 CustomMessage
async Task SendCustomMessage(
    IHubContext<ChatHub> hubContext,
    ILogger<Program> logger,
    string? connectionId,
    object message)
{
    var json = JsonSerializer.Serialize(message);
    logger.LogInformation("📤 Sending CustomMessage to {Target}: {Message}",
        string.IsNullOrEmpty(connectionId) ? "ALL" : connectionId, json);

    if (string.IsNullOrEmpty(connectionId))
    {
        // 发送给所有连接的设备
        await hubContext.Clients.All.SendAsync("CustomMessage", json);
    }
    else
    {
        // 发送给指定连接
        await hubContext.Clients.Client(connectionId).SendAsync("CustomMessage", json);
    }
}

// ============================================================================
// 请求模型
// ============================================================================

record NotificationRequest
{
    public string? ConnectionId { get; init; }
    public string? Title { get; init; }
    public string Content { get; init; } = "";
    public string? Emotion { get; init; }
    public string? Sound { get; init; }
}

record ImageRequest
{
    public string? ConnectionId { get; init; }
    public string Url { get; init; } = "";
}

record AudioRequest
{
    public string? ConnectionId { get; init; }
    public string Url { get; init; } = "";
}

record CommandRequest
{
    public string? ConnectionId { get; init; }
    public string Command { get; init; } = "";
}

record QRCodeRequest
{
    public string? ConnectionId { get; init; }
    public string Content { get; init; } = "";
    public string? Title { get; init; }
}
关键点说明:
- IHubContext注入:使用
IHubContext<ChatHub>在非Hub类中发送SignalR消息 - 消息格式:使用JSON格式的
CustomMessage事件,包含action字段标识消息类型 - 定向推送:
Clients.All.SendAsync()- 广播给所有连接的设备Clients.Client(connectionId).SendAsync()- 发送给指定设备Clients.Group(groupName).SendAsync()- 发送给群组(如Users:{userId})
- RESTful API设计:提供HTTP端点控制设备,便于其他服务调用
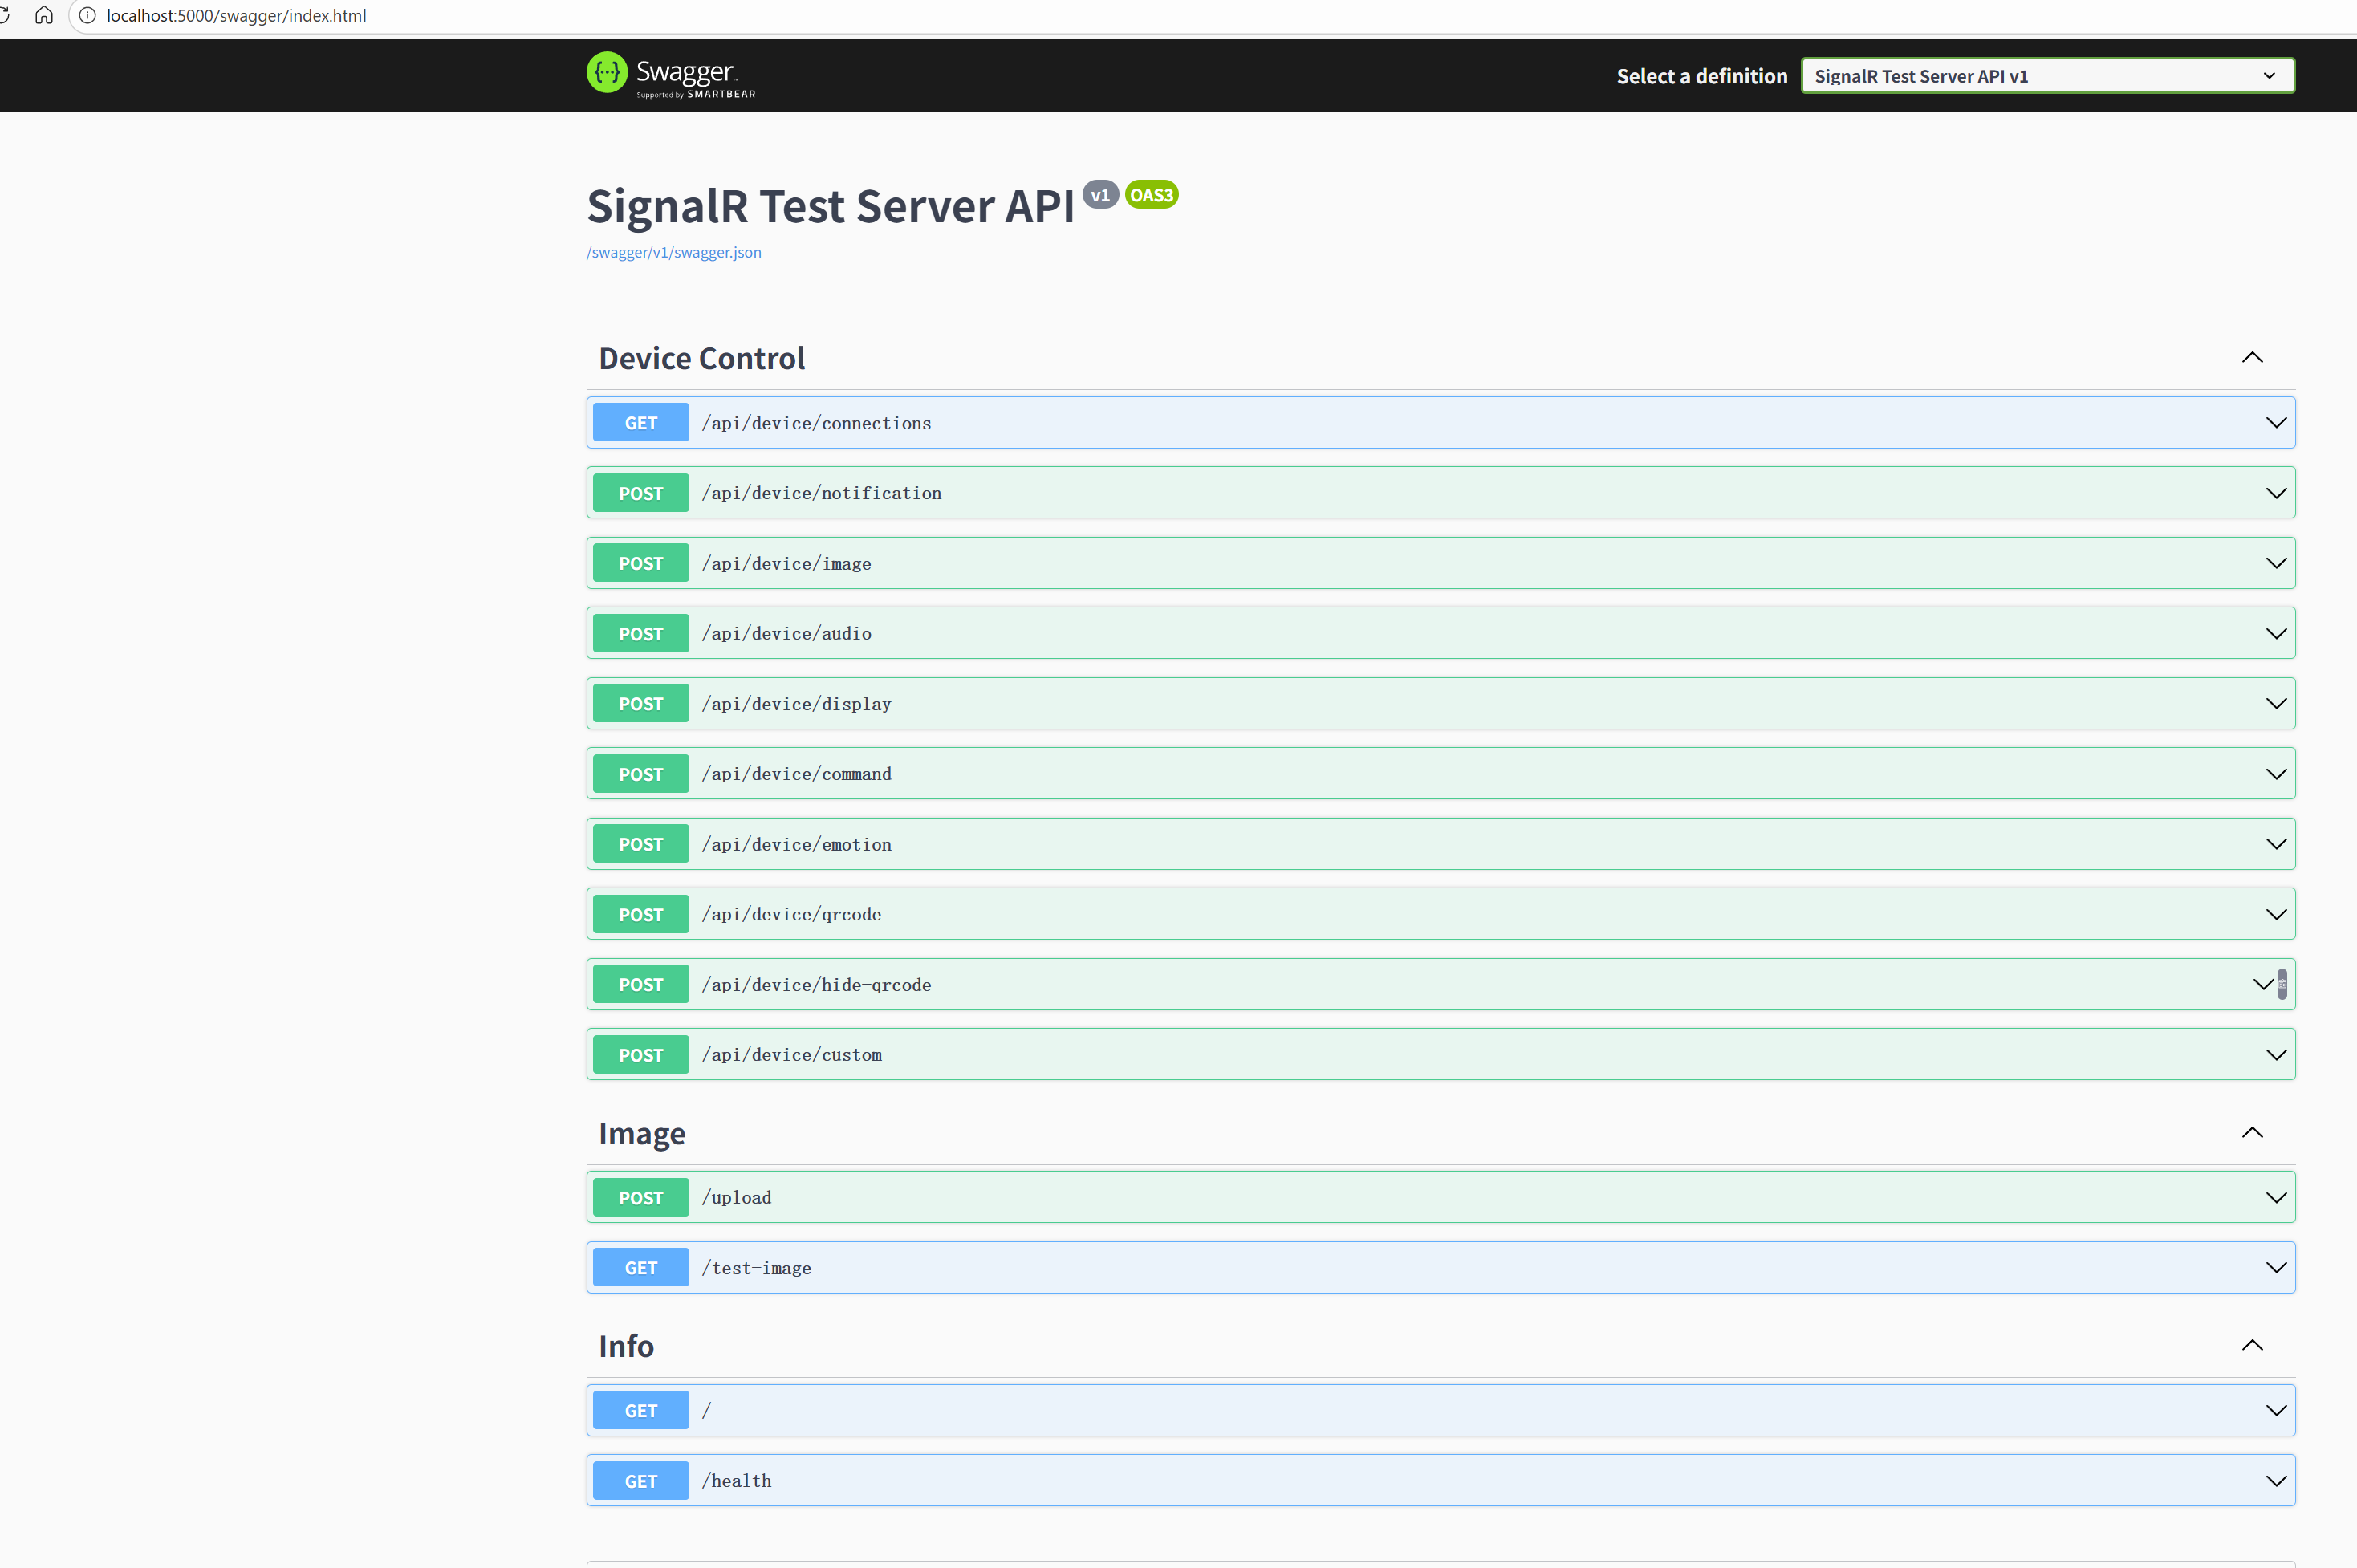
服务端的接口图片如下可以直接操作测试:
5.1.3 客户端(ESP32):连接SignalR并接收消息
这是ESP32端的核心代码,演示如何连接SignalR Hub并接收各种类型的消息:
main.cpp - SignalR连接与消息处理:
#include <stdio.h>
#include <memory>
#include "freertos/FreeRTOS.h"
#include "freertos/task.h"
#include "esp_system.h"
#include "esp_log.h"
#include "nvs_flash.h"

#include "hub_connection_builder.h"
#include "esp32_websocket_client.h"
#include "esp32_http_client.h"

// =============================================================================
// 配置项(通过menuconfig设置)
// =============================================================================

#define WIFI_SSID      CONFIG_EXAMPLE_WIFI_SSID
#define WIFI_PASSWORD  CONFIG_EXAMPLE_WIFI_PASSWORD
#define SIGNALR_HUB_URL CONFIG_EXAMPLE_SIGNALR_HUB_URL

static const char* TAG = "SIGNALR_EXAMPLE";

// SignalR连接对象
static std::unique_ptr<signalr::hub_connection> g_connection;
static bool g_is_connected = false;

// =============================================================================
// 消息处理器
// =============================================================================

/**
 * 处理服务器发送的消息
 */
static void on_receive_message(const std::vector<signalr::value>& args)
{
    ESP_LOGI(TAG, "==============================================");
    ESP_LOGI(TAG, "📩 Message received from server:");

    if (args.size() >= 2) {
        std::string user = args[0].as_string();
        std::string message = args[1].as_string();

        ESP_LOGI(TAG, "   From: %s", user.c_str());
        ESP_LOGI(TAG, "   Text: %s", message.c_str());
    } else if (args.size() == 1) {
        ESP_LOGI(TAG, "   Message: %s", args[0].as_string().c_str());
    }

    ESP_LOGI(TAG, "==============================================");
}

/**
 * 处理通知消息(连接确认)
 */
static void on_notification(const std::vector<signalr::value>& args)
{
    if (args.empty()) return;

    std::string notification = args[0].as_string();
    ESP_LOGI(TAG, "🔔 Notification: %s", notification.c_str());

    // 通过Notification消息确认连接成功
    if (!g_is_connected) {
        g_is_connected = true;
        ESP_LOGI(TAG, "==============================================");
        ESP_LOGI(TAG, "✓✓✓ Connected to SignalR Hub! ✓✓✓");
        ESP_LOGI(TAG, "==============================================");
    }
}

/**
 * 处理传感器数据更新
 */
static void on_sensor_update(const std::vector<signalr::value>& args)
{
    if (args.size() < 2) return;

    std::string sensor_id = args[0].as_string();
    double value = args[1].as_double();

    ESP_LOGI(TAG, "📊 Sensor Update: %s = %.2f", sensor_id.c_str(), value);
}

/**
 * 处理设备状态更新
 */
static void on_device_status(const std::vector<signalr::value>& args)
{
    if (args.size() < 3) return;

    std::string device_id = args[0].as_string();
    std::string status = args[1].as_string();
    int free_heap = static_cast<int>(args[2].as_double());

    ESP_LOGI(TAG, "📱 Device Status: %s - %s (Free Heap: %d bytes)",
             device_id.c_str(), status.c_str(), free_heap);
}

// =============================================================================
// SignalR连接管理
// =============================================================================

/**
 * 初始化SignalR连接
 */
static void init_signalr(void)
{
    ESP_LOGI(TAG, "Initializing SignalR connection to: %s", SIGNALR_HUB_URL);

    try {
        // 创建hub_connection(使用make_unique)
        g_connection = std::make_unique<signalr::hub_connection>(
            signalr::hub_connection_builder::create(SIGNALR_HUB_URL)
                .with_websocket_factory([](const signalr::signalr_client_config& config) {
                    return std::make_shared<signalr::esp32_websocket_client>(config);
                })
                .with_http_client_factory([](const signalr::signalr_client_config& config) {
                    return std::make_shared<signalr::esp32_http_client>(config);
                })
                .with_automatic_reconnect()  // 启用自动重连
                .skip_negotiation(true)      // 跳过协商,直接WebSocket
                .build());

        ESP_LOGI(TAG, "✓ SignalR connection object created");

    } catch (const std::exception& e) {
        ESP_LOGE(TAG, "Failed to create SignalR connection: %s", e.what());
    }
}

/**
 * 注册消息处理器
 */
static void setup_message_handlers(void)
{
    if (!g_connection) {
        ESP_LOGE(TAG, "Connection not initialized");
        return;
    }

    // 注册 "ReceiveMessage" 事件
    g_connection->on("ReceiveMessage", on_receive_message);
    ESP_LOGI(TAG, "✓ Registered handler: ReceiveMessage");

    // 注册 "Notification" 事件(用于连接确认)
    g_connection->on("Notification", on_notification);
    ESP_LOGI(TAG, "✓ Registered handler: Notification");

    // 注册 "UpdateSensorData" 事件
    g_connection->on("UpdateSensorData", on_sensor_update);
    ESP_LOGI(TAG, "✓ Registered handler: UpdateSensorData");

    // 注册 "DeviceStatusUpdate" 事件
    g_connection->on("DeviceStatusUpdate", on_device_status);
    ESP_LOGI(TAG, "✓ Registered handler: DeviceStatusUpdate");
}

/**
 * 启动SignalR连接
 */
static void start_signalr_connection(void)
{
    if (!g_connection) {
        ESP_LOGE(TAG, "Connection not initialized");
        return;
    }

    ESP_LOGI(TAG, "Starting SignalR connection...");

    try {
        // 启动连接(异步)
        g_connection->start([](std::exception_ptr exception) {
            if (exception) {
                ESP_LOGE(TAG, "Connection failed in callback");
            } else {
                ESP_LOGI(TAG, "Connection started successfully");
            }
        });

        ESP_LOGI(TAG, "Waiting for Notification message to confirm connection...");

    } catch (const std::exception& e) {
        ESP_LOGE(TAG, "Exception starting connection: %s", e.what());
    }
}

// =============================================================================
// 测试任务:定期发送消息
// =============================================================================

static void signalr_test_task(void* param)
{
    int message_count = 1;

    while (true) {
        // 等待10秒
        vTaskDelay(pdMS_TO_TICKS(10000));

        // 检查连接状态
        if (!g_connection || !g_is_connected) {
            ESP_LOGW(TAG, "Not connected, skipping message send");
            continue;
        }

        // 发送消息到服务器
        std::string message = "Test message #" + std::to_string(message_count++) + " from ESP32";

        ESP_LOGI(TAG, "📤 Sending message...");
        ESP_LOGI(TAG, "   User: ESP32-Device");
        ESP_LOGI(TAG, "   Message: %s", message.c_str());

        try {
            std::vector<signalr::value> args;
            args.push_back(signalr::value("ESP32-Device"));
            args.push_back(signalr::value(message));

            // 调用服务器的 SendMessage 方法
            g_connection->invoke("SendMessage", args,
                [](const signalr::value& result, std::exception_ptr exception) {
                    if (exception) {
                        ESP_LOGE(TAG, "✗ Failed to send message");
                    } else {
                        ESP_LOGI(TAG, "✓ Message sent successfully!");
                    }
                });

        } catch (const std::exception& e) {
            ESP_LOGE(TAG, "Exception sending message: %s", e.what());
        }
    }
}

// =============================================================================
// 主程序
// =============================================================================

extern "C" void app_main(void)
{
    ESP_LOGI(TAG, "========================================");
    ESP_LOGI(TAG, " ESP32 SignalR Client Test Example");
    ESP_LOGI(TAG, "========================================");

    // 1. 初始化WiFi(省略WiFi连接代码,参考完整示例)
    // wifi_init_sta();

    // 2. 初始化SignalR连接对象
    ESP_LOGI(TAG, "Step 1: Initializing SignalR...");
    init_signalr();

    // 3. 注册消息处理器
    ESP_LOGI(TAG, "Step 2: Setting up message handlers...");
    setup_message_handlers();

    // 4. 启动连接
    ESP_LOGI(TAG, "Step 3: Starting connection...");
    start_signalr_connection();

    // 5. 创建测试任务(定期发送消息)
    ESP_LOGI(TAG, "Step 4: Creating test task...");
    xTaskCreate(signalr_test_task, "signalr_test", 8192, NULL, 5, NULL);

    ESP_LOGI(TAG, "Setup complete. Check logs for connection status.");
}
关键点说明:
- 连接创建:使用
hub_connection_builder构建连接,配置WebSocket客户端工厂 - 跳过协商:
skip_negotiation(true)直接使用WebSocket,提高连接速度 - 消息处理器注册:使用
connection->on("EventName", handler)注册事件监听器 - 连接确认:通过接收
Notification消息判断连接成功(服务器在OnConnectedAsync中发送) - 调用服务器方法:使用
invoke()调用Hub方法,如SendMessage
完整运行流程:
1. WiFi连接成功
   ↓
2. 创建SignalR连接对象
   ↓
3. 注册消息处理器(ReceiveMessage、Notification等)
   ↓
4. 调用 connection->start() 启动连接
   ↓
5. 等待服务器发送 Notification 消息
   ↓
6. 收到 Notification,标记连接成功
   ↓
7. 定期调用 invoke("SendMessage") 发送消息
   ↓
8. 接收服务器广播的消息,触发对应处理器
示例输出:
I (3480) SIGNALR_EXAMPLE: ✓ Registered handler: ReceiveMessage
I (3485) SIGNALR_EXAMPLE: ✓ Registered handler: Notification
I (3490) SIGNALR_EXAMPLE: Starting SignalR connection...
I (4520) SIGNALR_EXAMPLE: ==============================================
I (4520) SIGNALR_EXAMPLE: ✓✓✓ Connected to SignalR Hub! ✓✓✓
I (4525) SIGNALR_EXAMPLE: ==============================================
I (4530) SIGNALR_EXAMPLE: 🔔 Notification: Welcome to SignalR!
I (14530) SIGNALR_EXAMPLE: 📤 Sending message...
I (14640) SIGNALR_EXAMPLE: ✓ Message sent successfully!
I (14650) SIGNALR_EXAMPLE: 📩 Message received from server:
I (14655) SIGNALR_EXAMPLE:    From: ESP32-Device
I (14660) SIGNALR_EXAMPLE:    Text: Test message #1 from ESP32
5.2 实际整合代码(生产环境完整实现)
说明:以下代码来自小智AI项目的实际生产代码,包含了完整的错误处理、状态管理、JWT认证和自动重连机制。
实际项目代码分为三个主要仓库:
5.2.1 小智ESP32设备代码
仓库地址:
- 主仓库:https://github.com/maker-community/xiaozhi-esp32
- SignalR集成分支:
signalr和signalr-update-audio - 完整示例工程:esp-signalr-example
注意:SignalR功能主要在
signalr和signalr-update-audio两个分支中实现,这两个分支都是SignalR集成相关的开发分支。
核心文件:
main/signalr_client.cc/main/signalr_client.h- SignalR客户端核心实现main/application.cc/main/application.h- 主应用程序逻辑和状态管理main/protocols/websocket_protocol.cc- WebSocket协议实现main/protocols/mqtt_protocol.cc- MQTT协议实现main/mcp_server.cc- MCP服务器实现
实际实现特点:
与示例代码相比,生产环境实现增加了:
-
完整的生命周期管理
- 连接建立、断开重连、资源清理
- 设备状态机管理(空闲、连接中、监听、说话等)
-
协议版本支持
- 支持WebSocket和MQTT两种传输协议
- 协议层抽象,易于扩展新协议
-
音频流处理
- 实时音频数据的编码、传输和接收
- 音频分块传输(重要!)- 解决大数据传输导致连接断开的问题
- 支持Opus编解码
-
MCP工具集成
- 完整的MCP Server实现
- 工具注册、调用和响应机制
- 支持异步工具执行
-
SignalR客户端封装
- 完整的连接生命周期管理
- JWT Token认证
- 自动重连机制(指数退避)
- 设备注册和心跳保持
- 自定义消息处理
SignalR客户端核心实现 (signalr_client.cc)
这是整个SignalR集成的核心代码,封装了所有与SignalR通信相关的逻辑。
完整代码:signalr_client.cc (850行)
关键实现要点:
1. 单例模式管理 - 全局唯一实例
SignalRClient& SignalRClient::GetInstance() {
    static SignalRClient instance;
    return instance;
}
2. JWT Token认证 - 通过Query String传递
bool SignalRClient::Initialize(const std::string& hub_url, const std::string& token) {
    // 🔐 Build URL with token as query parameter (ASP.NET Core SignalR standard method)
    std::string final_hub_url = hub_url;
    if (!token.empty()) {
        ESP_LOGI(TAG, "========== SignalR Token Authentication ==========");

        // Remove "Bearer " prefix if present
        std::string token_value = token;
        if (token_value.find("Bearer ") == 0) {
            token_value = token_value.substr(7);
        }

        // Append token to URL
        final_hub_url += "?access_token=" + token_value;
    }

    // Create hub connection builder
    auto builder = signalr::hub_connection_builder::create(final_hub_url);

    // Set WebSocket factory (使用ESP32的WebSocket实现)
    builder.with_websocket_factory([](const signalr::signalr_client_config& config) {
        auto client = std::make_shared<signalr::esp32_websocket_client>(config);
        return client;
    });

    // Skip negotiation (direct WebSocket connection)
    builder.skip_negotiation(true);

    // Build connection
    connection_ = std::make_unique<signalr::hub_connection>(builder.build());
}
3. 超时和心跳配置
signalr::signalr_client_config cfg;
cfg.set_server_timeout(std::chrono::seconds(60));     // server expects 60s idle
cfg.set_keepalive_interval(std::chrono::seconds(15)); // send ping every 15s
cfg.set_handshake_timeout(std::chrono::seconds(5));   // short handshake timeout

// IMPORTANT: Disable library's auto-reconnect! It has race condition bugs
cfg.enable_auto_reconnect(false);
connection_->set_client_config(cfg);
4. 连接确认和自动注册
// Register Notification handler to confirm connection
connection_->on("Notification", [this](const std::vector<signalr::value>& args) {
    if (args.empty()) return;

    std::string message = args[0].as_string();
    ESP_LOGI(TAG, "🔔 Notification from server: %s", message.c_str());

    if (!connection_confirmed_) {
        connection_confirmed_ = true;
        ESP_LOGI(TAG, "✓✓✓ SIGNALR CONNECTION CONFIRMED BY SERVER! ✓✓✓");

        // 🔄 Auto-register device info after connection confirmed
        std::string mac_address = DeviceInfo::GetMacAddress();
        std::string metadata = DeviceInfo::BuildMetadataJson();

        RegisterDevice(mac_address, "", metadata, [](bool success, const std::string& result) {
            if (success) {
                ESP_LOGI(TAG, "✅ Device auto-registration successful");
            }
        });
    }
});
5. 自定义消息处理
connection_->on("CustomMessage", [this](const std::vector<signalr::value>& args) {
    if (args.empty()) return;

    try {
        std::string json_str = args[0].as_string();
        ESP_LOGI(TAG, "📨 Received CustomMessage: %s", json_str.c_str());

        auto root = cJSON_Parse(json_str.c_str());
        if (root) {
            if (on_custom_message_) {
                on_custom_message_(root);  // 调用用户设置的回调
            }
            cJSON_Delete(root);
        }
    } catch (const std::exception& e) {
        ESP_LOGE(TAG, "Exception handling CustomMessage: %s", e.what());
    }
});
6. 自动重连机制 - 使用PSRAM栈的后台任务
void SignalRClient::StartReconnectTask() {
    ESP_LOGI(TAG, "Starting SignalR reconnect background task (PSRAM stack)...");
    reconnect_task_running_.store(true, std::memory_order_release);

    // Allocate task stack from PSRAM (reusable)
    reconnect_task_stack_ = (StackType_t*)heap_caps_malloc(
        RECONNECT_TASK_STACK_SIZE, MALLOC_CAP_SPIRAM);

    // Create task with static allocation (stack in PSRAM)
    reconnect_task_handle_ = xTaskCreateStatic(
        ReconnectTaskEntry, "signalr_reconn",
        RECONNECT_TASK_STACK_SIZE / sizeof(StackType_t),
        this, 2, reconnect_task_stack_, reconnect_task_buffer_
    );
}

void SignalRClient::ReconnectTaskLoop() {
    while (reconnect_task_running_.load(std::memory_order_acquire)) {
        vTaskDelay(pdMS_TO_TICKS(1000));

        if (!reconnect_requested_.load() || IsConnected()) {
            continue;
        }

        // Apply exponential backoff
        ESP_LOGI(TAG, "Attempting connection (backoff=%dms)...", reconnect_backoff_ms_);

        if (Connect() && IsConnected()) {
            reconnect_backoff_ms_ = 1000;  // Reset backoff on success
        } else {
            vTaskDelay(pdMS_TO_TICKS(reconnect_backoff_ms_));
            reconnect_backoff_ms_ = std::min(reconnect_backoff_ms_ * 2,
                MAX_RECONNECT_BACKOFF_MS);  // Exponential backoff
        }
    }
}
7. 设备注册和心跳
void SignalRClient::RegisterDevice(
    const std::string& mac_address,
    const std::string& device_token,
    const std::string& metadata,
    std::function<void(bool, const std::string&)> callback) {

    if (!IsConnected()) {
        if (callback) callback(false, "Not connected");
        return;
    }

    std::vector<signalr::value> args;
    args.push_back(signalr::value(mac_address));
    args.push_back(signalr::value(device_token));
    args.push_back(signalr::value(metadata));

    connection_->invoke("RegisterDevice", args,
        [callback](const signalr::value& result, std::exception_ptr ex) {
            if (ex) {
                if (callback) callback(false, "Registration failed");
            } else {
                if (callback) callback(true, "Registration sent");
            }
        });
}

void SignalRClient::SendHeartbeat(
    std::function<void(bool, const std::string&)> callback) {

    if (!IsConnected()) {
        if (callback) callback(false, "Not connected");
        return;
    }

    std::vector<signalr::value> args;
    connection_->invoke("Heartbeat", args,
        [callback](const signalr::value& result, std::exception_ptr ex) {
            if (!ex) {
                ESP_LOGD(TAG, "💓 Heartbeat sent");
                if (callback) callback(true, "Success");
            }
        });
}
SignalR客户端类定义 (signalr_client.h):
class SignalRClient {
public:
    static SignalRClient& GetInstance();

    // 连接管理
    bool Initialize(const std::string& hub_url, const std::string& token);
    bool Connect();
    void Disconnect();
    void Reset();
    void RequestReconnect();

    // 状态查询
    bool IsInitialized() const;
    bool IsConnecting() const;
    bool IsConnected() const;
    std::string GetConnectionState() const;

    // 回调设置
    void OnCustomMessage(std::function<void(const cJSON*)> callback);
    void OnDeviceRegistered(std::function<void(const cJSON*)> callback);

    // Hub方法调用
    void RegisterDevice(const std::string& mac_address,
                       const std::string& device_token,
                       const std::string& metadata,
                       std::function<void(bool, const std::string&)> callback);
    void SendHeartbeat(std::function<void(bool, const std::string&)> callback);
    void InvokeHubMethod(const std::string& method_name,
                        const std::string& args_json,
                        std::function<void(bool, const std::string&)> callback);

private:
    SignalRClient();
    ~SignalRClient();

    std::unique_ptr<signalr::hub_connection> connection_;
    std::string hub_url_;
    std::string token_;
    bool initialized_ = false;
    bool connection_confirmed_ = false;
    std::atomic<bool> reconnect_requested_{false};

    // 回调函数
    std::function<void(const cJSON*)> on_custom_message_;
    std::function<void(const cJSON*)> on_device_registered_;

    // 重连任务
    TaskHandle_t reconnect_task_handle_ = nullptr;
    int reconnect_backoff_ms_ = 1000;
};
使用示例:
// 在主应用中使用SignalR客户端
void Application::InitializeSignalR() {
    auto& client = SignalRClient::GetInstance();

    // 设置消息回调
    client.OnCustomMessage([this](const cJSON* json) {
        ESP_LOGI(TAG, "Received message from server");
        HandleServerMessage(json);
    });

    // 初始化并连接
    std::string hub_url = "wss://your-server.com/devicehub";
    std::string token = GetJwtToken();  // 从NVS读取或扫码获取

    if (client.Initialize(hub_url, token)) {
        if (client.Connect()) {
            client.RequestReconnect();  // 启动自动重连任务
        }
    }
}
Application层集成代码
核心代码片段 (application.cc):
void Application::HandleSignalRMessage(const std::string& message) {
    ESP_LOGI(TAG, "Handling SignalR message: %s", message.c_str());

    auto root = cJSON_Parse(message.c_str());
    if (!root) {
        ESP_LOGE(TAG, "Failed to parse SignalR message JSON");
        return;
    }

    auto display = Board::GetInstance().GetDisplay();

    // Check message action/type
    auto action = cJSON_GetObjectItem(root, "action");
    if (cJSON_IsString(action)) {
        if (strcmp(action->valuestring, "notification") == 0) {
            // Handle notification
            // JSON: {"action":"notification", "title":"标题", "content":"内容", "emotion":"bell", "sound":"popup"}
            auto title = cJSON_GetObjectItem(root, "title");
            auto content = cJSON_GetObjectItem(root, "content");
            auto emotion = cJSON_GetObjectItem(root, "emotion");
            auto sound = cJSON_GetObjectItem(root, "sound");

            const char* title_str = cJSON_IsString(title) ? title->valuestring : Lang::Strings::INFO;
            const char* content_str = cJSON_IsString(content) ? content->valuestring : "";
            const char* emotion_str = cJSON_IsString(emotion) ? emotion->valuestring : "bell";

            // Select sound based on "sound" field
            std::string_view sound_view = Lang::Sounds::OGG_POPUP;
            if (cJSON_IsString(sound)) {
                if (strcmp(sound->valuestring, "success") == 0) {
                    sound_view = Lang::Sounds::OGG_SUCCESS;
                } else if (strcmp(sound->valuestring, "vibration") == 0) {
                    sound_view = Lang::Sounds::OGG_VIBRATION;
                } else if (strcmp(sound->valuestring, "exclamation") == 0) {
                    sound_view = Lang::Sounds::OGG_EXCLAMATION;
                } else if (strcmp(sound->valuestring, "low_battery") == 0) {
                    sound_view = Lang::Sounds::OGG_LOW_BATTERY;
                } else if (strcmp(sound->valuestring, "none") == 0) {
                    sound_view = "";
                }
                // default: popup
            }

            Alert(title_str, content_str, emotion_str, sound_view);

        } else if (strcmp(action->valuestring, "command") == 0) {
            // Handle command
            // JSON: {"action":"command", "command":"reboot|wake|listen|stop"}
            auto cmd = cJSON_GetObjectItem(root, "command");
            if (cJSON_IsString(cmd)) {
                if (strcmp(cmd->valuestring, "reboot") == 0) {
                    Reboot();
                } else if (strcmp(cmd->valuestring, "wake") == 0) {
                    // Trigger wake word detection
                    xEventGroupSetBits(event_group_, MAIN_EVENT_WAKE_WORD_DETECTED);
                } else if (strcmp(cmd->valuestring, "listen") == 0) {
                    StartListening();
                } else if (strcmp(cmd->valuestring, "stop") == 0) {
                    StopListening();
                } else {
                    ESP_LOGW(TAG, "Unknown SignalR command: %s", cmd->valuestring);
                }
            }

        } else if (strcmp(action->valuestring, "display") == 0) {
            // Display custom content
            // JSON: {"action":"display", "content":"文本内容", "role":"system"}
            auto content = cJSON_GetObjectItem(root, "content");
            auto role = cJSON_GetObjectItem(root, "role");
            const char* role_str = cJSON_IsString(role) ? role->valuestring : "system";
            if (cJSON_IsString(content)) {
                display->SetChatMessage(role_str, content->valuestring);
            }

        } else if (strcmp(action->valuestring, "emotion") == 0) {
            // Change emotion/expression
            // JSON: {"action":"emotion", "emotion":"happy"}
            auto emotion = cJSON_GetObjectItem(root, "emotion");
            if (cJSON_IsString(emotion)) {
                display->SetEmotion(emotion->valuestring);
            }

        } else if (strcmp(action->valuestring, "image") == 0) {
            // Display image from URL
            // JSON: {"action":"image", "url":"https://example.com/image.jpg"}
            auto url = cJSON_GetObjectItem(root, "url");
            if (cJSON_IsString(url)) {
                HandleSignalRImageMessage(url->valuestring);
            } else {
                ESP_LOGW(TAG, "Image action requires 'url' field");
            }

        } else if (strcmp(action->valuestring, "audio") == 0) {
            // Play audio from URL (OGG format)
            // JSON: {"action":"audio", "url":"https://example.com/sound.ogg"}
            auto url = cJSON_GetObjectItem(root, "url");
            if (cJSON_IsString(url)) {
                HandleSignalRAudioMessage(url->valuestring);
            } else {
                ESP_LOGW(TAG, "Audio action requires 'url' field");
            }

        } else if (strcmp(action->valuestring, "qrcode") == 0) {
            // Show QR code
            // JSON: {"action":"qrcode", "data":"https://...", "title":"标题", "subtitle":"副标题"}
            auto data = cJSON_GetObjectItem(root, "data");
            auto title = cJSON_GetObjectItem(root, "title");
            auto subtitle = cJSON_GetObjectItem(root, "subtitle");
            if (cJSON_IsString(data)) {
                const char* title_str = cJSON_IsString(title) ? title->valuestring : nullptr;
                const char* subtitle_str = cJSON_IsString(subtitle) ? subtitle->valuestring : nullptr;
                display->ShowQRCode(data->valuestring, title_str, subtitle_str);
            } else {
                ESP_LOGW(TAG, "QRCode action requires 'data' field");
            }

        } else if (strcmp(action->valuestring, "hide_qrcode") == 0) {
            // Hide QR code
            // JSON: {"action":"hide_qrcode"}
            display->HideQRCode();

        } else {
            // Default: display as system message
            char* display_str = cJSON_Print(root);
            if (display_str) {
                display->SetChatMessage("system", display_str);
                cJSON_free(display_str);
            }
        }
    } else {
        // No action specified, display raw message
        char* display_str = cJSON_Print(root);
        if (display_str) {
            display->SetChatMessage("system", display_str);
            cJSON_free(display_str);
        }
    }

    cJSON_Delete(root);
}
完整的Application类功能:
- ✅ 设备状态管理 (状态机)
- ✅ 网络事件处理 (连接/断开)
- ✅ 音频服务集成 (编解码、流处理)
- ✅ 唤醒词检测
- ✅ 协议层抽象 (WebSocket/MQTT)
- ✅ MCP消息路由
- ✅ 错误处理和恢复
- ✅ 资源管理和清理
- ✅ 线程安全的消息调度
5.2.2 MCP服务器代码 (verdure-mcp)
仓库地址:verdure-mcp
目录结构:
src/Verdure.Mcp.Server/
├── Hubs/
│   └── DeviceHub.cs          # SignalR Hub实现
├── Tools/
│   ├── MusicTool.cs          # 音乐播放控制
│   ├── EmailTool.cs          # 邮件发送
│   ├── WeatherTool.cs        # 天气查询
│   └── SmartHomeTool.cs      # 智能家居控制
├── Services/
│   ├── DeviceService.cs      # 设备管理服务
│   ├── McpExecutor.cs        # MCP工具执行器
│   └── TokenService.cs       # JWT令牌服务
└── Models/
    ├── DeviceConnection.cs   # 设备连接记录
    ├── DeviceInfo.cs         # 设备信息
    └── McpToolLog.cs         # 工具调用日志
DeviceHub完整实现 (Hubs/DeviceHub.cs):
生产环境的DeviceHub实际实现特点:
- ✅ 数据库持久化 (Entity Framework Core + PostgreSQL)
- ✅ 设备注册和状态跟踪
- ✅ 用户和设备分组管理
- ✅ 心跳检测
- ✅ 双重认证 (JWT + API Token)
- ✅ 完善的异常处理和日志
using Microsoft.AspNetCore.SignalR;
using Verdure.Mcp.Infrastructure.Database;
using Verdure.Mcp.Infrastructure.Services;

namespace Verdure.Mcp.Server.Hubs;

/// <summary>
/// 设备连接Hub - 处理ESP32等IoT设备的SignalR连接
/// </summary>
public class DeviceHub : Hub
{
    private readonly McpDbContext _dbContext;
    private readonly ITokenValidationService _tokenValidationService;
    private readonly ILogger<DeviceHub> _logger;

    public DeviceHub(
        McpDbContext dbContext,
        ITokenValidationService tokenValidationService,
        ILogger<DeviceHub> logger)
    {
        _dbContext = dbContext;
        _tokenValidationService = tokenValidationService;
        _logger = logger;
    }

    /// <summary>
    /// 设备连接 - 支持JWT和API Token双重认证
    /// </summary>
    public override async Task OnConnectedAsync()
    {
        try
        {
            var httpContext = Context.GetHttpContext();
            if (httpContext == null)
            {
                _logger.LogWarning("HttpContext is null");
                Context.Abort();
                return;
            }

            // 从查询参数获取token
            var token = httpContext.Request.Query["access_token"].ToString();
            if (string.IsNullOrEmpty(token))
            {
                _logger.LogWarning("Connection attempt without token");
                Context.Abort();
                return;
            }

            // 验证token - 支持JWT和API Token
            var validationResult = await _tokenValidationService.ValidateTokenAsync(token);
            if (!validationResult.IsValid)
            {
                _logger.LogWarning("Invalid token: {Reason}", validationResult.FailureReason);
                Context.Abort();
                return;
            }

            var userId = validationResult.UserId;
            if (string.IsNullOrEmpty(userId))
            {
                _logger.LogWarning("Token valid but userId is missing");
                Context.Abort();
                return;
            }

            // 将连接加入用户组 (格式: Users:{userId})
            await Groups.AddToGroupAsync(Context.ConnectionId, $"Users:{userId}");

            _logger.LogInformation(
                "Device connected: ConnectionId={ConnectionId}, UserId={UserId}",
                Context.ConnectionId, userId);

            // 发送欢迎通知
            await Clients.Caller.SendAsync("Notification",
                $"Welcome! Connected to Verdure MCP Server at {DateTime.UtcNow:yyyy-MM-dd HH:mm:ss}");

            await base.OnConnectedAsync();
        }
        catch (Exception ex)
        {
            _logger.LogError(ex, "Error in OnConnectedAsync");
            Context.Abort();
        }
    }

    /// <summary>
    /// 设备断开连接
    /// </summary>
    public override async Task OnDisconnectedAsync(Exception? exception)
    {
        if (exception != null)
        {
            _logger.LogWarning(exception,
                "Device disconnected with error: ConnectionId={ConnectionId}",
                Context.ConnectionId);
        }
        else
        {
            _logger.LogInformation(
                "Device disconnected normally: ConnectionId={ConnectionId}",
                Context.ConnectionId);
        }

        await base.OnDisconnectedAsync(exception);
    }

    /// <summary>
    /// 设备注册 - 保存设备MAC地址和元数据
    /// </summary>
    public async Task RegisterDevice(string macAddress, string deviceToken, string metadata)
    {
        try
        {
            var userId = Context.Items["UserId"]?.ToString();
            if (string.IsNullOrEmpty(userId))
            {
                _logger.LogWarning("RegisterDevice called without userId");
                return;
            }

            _logger.LogInformation(
                "Device registration: UserId={UserId}, MAC={MacAddress}, Metadata={Metadata}",
                userId, macAddress, metadata);

            // 将设备加入设备组 (格式: Device:{macAddress})
            await Groups.AddToGroupAsync(Context.ConnectionId, $"Device:{macAddress}");

            // 保存设备信息到数据库
            var existingDevice = await _dbContext.Devices
                .FirstOrDefaultAsync(d => d.MacAddress == macAddress);

            if (existingDevice != null)
            {
                existingDevice.LastSeenAt = DateTime.UtcNow;
                existingDevice.Metadata = metadata;
                existingDevice.IsOnline = true;
            }
            else
            {
                _dbContext.Devices.Add(new Device
                {
                    MacAddress = macAddress,
                    UserId = userId,
                    Metadata = metadata,
                    IsOnline = true,
                    CreatedAt = DateTime.UtcNow,
                    LastSeenAt = DateTime.UtcNow
                });
            }

            await _dbContext.SaveChangesAsync();

            // 确认注册成功
            await Clients.Caller.SendAsync("Notification",
                $"Device registered successfully: {macAddress}");
        }
        catch (Exception ex)
        {
            _logger.LogError(ex, "Error in RegisterDevice");
        }
    }

    /// <summary>
    /// 心跳保持
    /// </summary>
    public async Task Heartbeat()
    {
        _logger.LogDebug("Heartbeat from ConnectionId={ConnectionId}", Context.ConnectionId);

        // 更新最后活跃时间
        // 注意:实际代码中可以根据ConnectionId查找设备并更新LastSeenAt
        await Task.CompletedTask;
    }
}
实际的MCP工具实现 (不使用基类):
在verdure-mcp中,MCP工具不继承任何基类,而是:
- 使用
[McpServerToolType]特性标记 - 通过依赖注入获取
IDevicePushService服务 - 使用
IDevicePushService的方法推送消息给设备
DevicePushService接口 (Infrastructure/Services/DevicePushService.cs):
namespace Verdure.Mcp.Infrastructure.Services;

/// <summary>
/// 设备推送服务接口
/// </summary>
public interface IDevicePushService
{
    /// <summary>
    /// 向用户的所有设备发送消息
    /// </summary>
    Task SendToUserAsync(string userId, string method, object message,
        CancellationToken cancellationToken = default);

    /// <summary>
    /// 向指定设备发送消息
    /// </summary>
    Task SendToDeviceAsync(string deviceId, string method, object message,
        CancellationToken cancellationToken = default);

    /// <summary>
    /// 发送自定义消息 (xiaozhi协议格式)
    /// </summary>
    Task SendCustomMessageAsync(string userId, object message,
        CancellationToken cancellationToken = default);

    /// <summary>
    /// 发送通知消息
    /// </summary>
    Task SendNotificationAsync(string userId, string notificationMessage,
        CancellationToken cancellationToken = default);
}
DevicePushService实现 (Server/Services/DevicePushServiceImpl.cs):
using Microsoft.AspNetCore.SignalR;
using Verdure.Mcp.Server.Hubs;
using Verdure.Mcp.Infrastructure.Services;
using System.Text.Json;

namespace Verdure.Mcp.Server.Services;

public class DevicePushServiceImpl : IDevicePushService
{
    private readonly IHubContext<DeviceHub> _hubContext;
    private readonly ILogger<DevicePushServiceImpl> _logger;

    public DevicePushServiceImpl(
        IHubContext<DeviceHub> hubContext,
        ILogger<DevicePushServiceImpl> logger)
    {
        _hubContext = hubContext;
        _logger = logger;
    }

    public async Task SendToUserAsync(string userId, string method, object message,
        CancellationToken cancellationToken = default)
    {
        var groupName = $"Users:{userId}";
        await _hubContext.Clients.Group(groupName)
            .SendAsync(method, message, cancellationToken);

        _logger.LogInformation("Sent {Method} to user {UserId}", method, userId);
    }

    public async Task SendToDeviceAsync(string deviceId, string method, object message,
        CancellationToken cancellationToken = default)
    {
        var groupName = $"Device:{deviceId}";
        await _hubContext.Clients.Group(groupName)
            .SendAsync(method, message, cancellationToken);

        _logger.LogInformation("Sent {Method} to device {DeviceId}", method, deviceId);
    }

    public async Task SendCustomMessageAsync(string userId, object message,
        CancellationToken cancellationToken = default)
    {
        var groupName = $"Users:{userId}";

        // 重要!ESP32客户端期望接收JSON字符串,而不是对象
        var jsonString = JsonSerializer.Serialize(message);

        await _hubContext.Clients.Group(groupName)
            .SendAsync("CustomMessage", jsonString, cancellationToken);

        _logger.LogInformation("Sent CustomMessage to user {UserId}: {Message}",
            userId, jsonString);
    }

    public async Task SendNotificationAsync(string userId, string notificationMessage,
        CancellationToken cancellationToken = default)
    {
        var groupName = $"Users:{userId}";
        await _hubContext.Clients.Group(groupName)
            .SendAsync("Notification", notificationMessage, cancellationToken);

        _logger.LogInformation("Sent notification to user {UserId}: {Message}",
            userId, notificationMessage);
    }
}
音乐播放工具实际实现 (Tools/MusicTool.cs):
using System;
using System.ComponentModel;
using System.IO;
using System.Linq;
using System.Threading;
using System.Threading.Tasks;
using Microsoft.AspNetCore.Hosting;
using Microsoft.AspNetCore.Http;
using Microsoft.Extensions.Logging;
using Microsoft.Extensions.Options;
using Verdure.Mcp.Server.Settings;
using ModelContextProtocol.Server;
using Verdure.Mcp.Infrastructure.Services;
using Verdure.Mcp.Server.Services;
using Hangfire;

namespace Verdure.Mcp.Server.Tools;

/// <summary>
/// MCP Tool to pick a random audio file from wwwroot and push its URL to device(s).
/// </summary>
[McpServerToolType]
public class MusicTool
{
    private readonly IHttpContextAccessor _httpContextAccessor;
    private readonly IWebHostEnvironment _env;
    private readonly IDevicePushService _devicePushService;
    private readonly ILogger<MusicTool> _logger;
    private readonly IBackgroundJobClient _backgroundJobClient;
    private readonly ImageStorageSettings _imageStorageSettings;

    public MusicTool(
        IHttpContextAccessor httpContextAccessor,
        IWebHostEnvironment env,
        IDevicePushService devicePushService,
        ILogger<MusicTool> logger,
        IBackgroundJobClient backgroundJobClient,
        IOptions<ImageStorageSettings>? imageSettings = null)
    {
        _httpContextAccessor = httpContextAccessor;
        _env = env;
        _devicePushService = devicePushService;
        _logger = logger;
        _backgroundJobClient = backgroundJobClient;
        _imageStorageSettings = imageSettings?.Value ?? new ImageStorageSettings();
    }

    /// <summary>
    /// Select a random audio file from the `wwwroot/audio` folder and push it to the user
    /// identified by the `X-User-Id` request header.
    /// The pushed message follows the same shape as used in `test-send-message.ps1` (action = "audio", url = "...").
    /// </summary>
    [McpServerTool(Name = "play_random_music")]
    [Description("Plays a random audio file from wwwroot/audio by pushing an audio message to the user's devices")]
    public async Task<MusicResponse> PlayRandomMusic(CancellationToken cancellationToken = default)
    {
        try
        {
            var httpContext = _httpContextAccessor.HttpContext;
            var effectiveUserId = httpContext?.Request.Headers["X-User-Id"].FirstOrDefault();
            if (string.IsNullOrEmpty(effectiveUserId))
            {
                _logger.LogWarning("No userId provided and X-User-Id header is missing");
                return new MusicResponse { Success = false, Message = "Missing userId or X-User-Id header" };
            }

            var webRoot = _env.WebRootPath ?? _env.ContentRootPath;
            var folder = "audios";
            var audioFolder = Path.Combine(webRoot, folder);

            if (!Directory.Exists(audioFolder))
            {
                _logger.LogWarning("Audio folder does not exist: {AudioFolder}", audioFolder);
                return new MusicResponse { Success = false, Message = $"Audio folder not found: {folder}" };
            }

            // Find audio files (ogg, mp3) and pick a random one
            var files = Directory.GetFiles(audioFolder)
                .Where(f => f.EndsWith('.' + "ogg") || f.EndsWith('.' + "mp3") || f.EndsWith('.' + "wav"))
                .ToArray();

            if (files.Length == 0)
            {
                _logger.LogWarning("No audio files found in {AudioFolder}", audioFolder);
                return new MusicResponse { Success = false, Message = "No audio files found" };
            }

            var rnd = new Random();
            var chosen = files[rnd.Next(files.Length)];
            var fileName = Path.GetFileName(chosen);

            string url;
            // Prefer configured ImageStorage BaseUrl (keeps image and audio base URL consistent)
            if (!string.IsNullOrWhiteSpace(_imageStorageSettings.BaseUrl))
            {
                var cfgBase = _imageStorageSettings.BaseUrl.TrimEnd('/');
                url = $"{cfgBase}/{folder}/{Uri.EscapeDataString(fileName)}";
            }
            else
            {
                var req = httpContext?.Request;
                var hostBase = req != null ? $"{req.Scheme}://{req.Host.Value}" : string.Empty;
                url = string.IsNullOrEmpty(hostBase)
                    ? $"/{folder}/{Uri.EscapeDataString(fileName)}"
                    : $"{hostBase}/{folder}/{Uri.EscapeDataString(fileName)}";
            }

            var title = Path.GetFileNameWithoutExtension(fileName);

            var message = new
            {
                action = "audio",
                url,
                title
            };

            // Schedule push as a delayed background job so device can play result first.
            try
            {

                var jobDelay = TimeSpan.FromSeconds(5);

                _logger.LogInformation("Scheduling audio push to user {UserId} after {Delay}s: {Url}",
                    effectiveUserId, jobDelay.TotalSeconds, url);

                _backgroundJobClient.Schedule<MusicPushBackgroundJob>(
                    job => job.ExecuteAsync(effectiveUserId, url, title, CancellationToken.None),
                    jobDelay);

                return new MusicResponse { Success = true, Message = "Audio scheduled", Url = url, FileName = fileName };
            }
            catch (Exception ex)
            {
                _logger.LogError(ex, "Failed to schedule audio push for user {UserId}", effectiveUserId);
                return new MusicResponse { Success = false, Message = ex.Message };
            }
        }
        catch (Exception ex)
        {
            _logger.LogError(ex, "Failed to play random music");
            return new MusicResponse { Success = false, Message = ex.Message };
        }
    }
}

public class MusicResponse
{
    public bool Success { get; set; }
    public required string Message { get; set; }
    public string? Url { get; set; }
    public string? FileName { get; set; }
}
延迟推送后台任务 (Tools/MusicPushBackgroundJob.cs):
using Verdure.Mcp.Infrastructure.Services;
using Verdure.Mcp.Server.Services;

namespace Verdure.Mcp.Server.Tools;

/// <summary>
/// Background job to push music/audio messages to user devices after a delay.
/// </summary>
public class MusicPushBackgroundJob
{
    private readonly IDevicePushService _devicePushService;
    private readonly ILogger<MusicPushBackgroundJob> _logger;

    public MusicPushBackgroundJob(IDevicePushService devicePushService, ILogger<MusicPushBackgroundJob> logger)
    {
        _devicePushService = devicePushService;
        _logger = logger;
    }

    public async Task ExecuteAsync(string userId, string url, string title, CancellationToken cancellationToken)
    {
        _logger.LogInformation("Executing MusicPushBackgroundJob: user={UserId}, url={Url}", userId, url);

        var message = new
        {
            action = "audio",
            url,
            title
        };

        try
        {
            await _devicePushService.SendCustomMessageAsync(userId, message, cancellationToken);
            _logger.LogInformation("Music pushed to user {UserId}", userId);
        }
        catch (Exception ex)
        {
            _logger.LogError(ex, "Failed to push music to user {UserId}", userId);
        }
    }
}
5.2.3 图片生成工具实现示例
仓库地址:verdure-mcp - GenerateImageTool
这个工具展示了如何生成图片并推送到设备:
using System.ComponentModel;
using System.Net;
using Hangfire;
using Microsoft.EntityFrameworkCore;
using ModelContextProtocol.Server;
using Verdure.Mcp.Domain.Entities;
using Verdure.Mcp.Domain.Enums;
using Verdure.Mcp.Infrastructure.Data;
using Verdure.Mcp.Infrastructure.Services;
using Verdure.Mcp.Server.Services;

namespace Verdure.Mcp.Server.Tools;

/// <summary>
/// 使用 Azure OpenAI DALL-E 生成图片的 MCP 工具
/// </summary>
[McpServerToolType]
public class GenerateImageTool
{
    private readonly IImageGenerationService _imageGenerationService;
    private readonly IEmailService _emailService;
    private readonly McpDbContext _dbContext;
    private readonly IBackgroundJobClient _backgroundJobClient;
    private readonly IHttpContextAccessor _httpContextAccessor;
    private readonly IImageStorageService _imageStorageService;
    private readonly IDevicePushService _devicePushService;
    private readonly ILogger<GenerateImageTool> _logger;

    public GenerateImageTool(
        IImageGenerationService imageGenerationService,
        IEmailService emailService,
        McpDbContext dbContext,
        IBackgroundJobClient backgroundJobClient,
        IHttpContextAccessor httpContextAccessor,
        IImageStorageService imageStorageService,
        IDevicePushService devicePushService,
        ILogger<GenerateImageTool> logger)
    {
        _imageGenerationService = imageGenerationService;
        _emailService = emailService;
        _dbContext = dbContext;
        _backgroundJobClient = backgroundJobClient;
        _httpContextAccessor = httpContextAccessor;
        _imageStorageService = imageStorageService;
        _devicePushService = devicePushService;
        _logger = logger;
    }

    /// <summary>
    /// 使用 Azure OpenAI DALL-E 根据提示词生成图片。
    /// 如果提供邮箱地址,会将生成的图片发送到指定邮箱。
    /// 如果请求头中包含用户信息(X-User-Email 和 X-User-Id),任务将异步运行。
    /// </summary>
    /// <param name="prompt">描述要生成图片的文本提示词</param>
    /// <param name="size">图片尺寸:"1024x1024"、"1792x1024" 或 "1024x1792",默认为 "1024x1024"</param>
    /// <param name="quality">图片质量:"standard" 或 "hd",默认为 "standard"</param>
    /// <param name="style">图片风格:"vivid" 或 "natural",默认为 "vivid"</param>
    /// <param name="cancellationToken"></param>
    /// <returns>包含任务信息和图片数据的 JSON 对象(同步模式下)</returns>
    [McpServerTool(Name = "generate_image")]
    [Description("使用 DALL-E 模型,根据文本提示词生成图片。支持邮件通知和异步处理。")]
    public async Task<ImageGenerationResponse> GenerateImage(
        [Description("描述要生成图片的文本提示词")] string prompt,
        [Description("图片尺寸:'1024x1024'、'1792x1024' 或 '1024x1792',默认为 '1024x1024'")] string? size = null,
        [Description("图片质量:'standard' 或 'hd',默认为 'standard'")] string? quality = null,
        [Description("图片风格:'vivid' 或 'natural',默认为 'vivid'")] string? style = null,
        CancellationToken cancellationToken = default)
    {
        var httpContext = _httpContextAccessor.HttpContext;

        // 从请求头提取邮箱地址 (X-User-Email)
        var email = httpContext?.Request.Headers["X-User-Email"].FirstOrDefault();

        // 从请求头提取用户 ID (X-User-Id)
        var userId = httpContext?.Request.Headers["X-User-Id"].FirstOrDefault();

        _logger.LogInformation("收到图片生成请求。提示词: {Prompt}, 邮箱: {Email}, 用户ID: {UserId}",
            prompt, email ?? "无", userId ?? "无");

        // 创建任务记录
        var task = new ImageGenerationTask
        {
            Id = Guid.NewGuid(),
            Prompt = prompt,
            Size = size ?? "1024x1024",
            Quality = quality ?? "standard",
            Style = style ?? "vivid",
            Status = ImageTaskStatus.Pending,
            Email = email,
            UserId = userId,
            CreatedAt = DateTime.UtcNow
        };

        _dbContext.ImageGenerationTasks.Add(task);
        await _dbContext.SaveChangesAsync(cancellationToken);

        // 如果存在用户信息(X-User-Email 和 X-User-Id),使用 Hangfire 异步处理
        if (!string.IsNullOrEmpty(email) && !string.IsNullOrEmpty(userId))
        {
            _logger.LogInformation("检测到用户信息,使用异步处理任务 {TaskId}", task.Id);

            var jobId = _backgroundJobClient.Enqueue<ImageGenerationBackgroundJob>(
                job => job.ExecuteAsync(task.Id, CancellationToken.None));

            task.HangfireJobId = jobId;
            task.Status = ImageTaskStatus.Processing;
            await _dbContext.SaveChangesAsync(cancellationToken);

            return new ImageGenerationResponse
            {
                TaskId = task.Id,
                Status = "处理中",
                Message = "图片生成任务已加入队列。如果您提供了邮箱地址,稍后会收到生成结果。",
                IsAsync = true
            };
        }
        else
        {
            // 同步处理
            _logger.LogInformation("未检测到完整用户信息,使用同步处理任务 {TaskId}", task.Id);

            task.Status = ImageTaskStatus.Processing;
            await _dbContext.SaveChangesAsync(cancellationToken);

            try
            {
                var result = await _imageGenerationService.GenerateImageAsync(
                    prompt, size, quality, style, cancellationToken);

                if (result.Success)
                {
                    task.Status = ImageTaskStatus.Completed;
                    task.ImageData = result.ImageBase64;
                    task.CompletedAt = DateTime.UtcNow;
                    task.UpdatedAt = DateTime.UtcNow;

                    // 保存图片到本地文件系统(PNG + JPEG)
                    ImageStorageResult? storageResult = null;
                    if (!string.IsNullOrEmpty(result.ImageBase64))
                    {
                        try
                        {
                            storageResult = await _imageStorageService.SaveImageAsync(
                                result.ImageBase64,
                                task.Id,
                                cancellationToken);
                            task.ImageUrl = storageResult.PngUrl; // 数据库保存 PNG URL
                            _logger.LogInformation(
                                "图片已保存 - PNG: {PngUrl}, JPEG: {JpegUrl}, 压缩率: {CompressionRatio:F1}%",
                                storageResult.PngUrl, storageResult.JpegUrl, storageResult.CompressionRatio);
                        }
                        catch (Exception ex)
                        {
                            _logger.LogError(ex, "保存图片到本地失败,任务 {TaskId}", task.Id);
                            // 即使保存失败,仍然继续流程
                        }
                    }

                    await _dbContext.SaveChangesAsync(cancellationToken);

                    // 如果提供了邮箱,发送邮件
                    if (!string.IsNullOrEmpty(email) && !string.IsNullOrEmpty(result.ImageBase64))
                    {
                        try
                        {
                            var imageBytes = Convert.FromBase64String(result.ImageBase64);
                            var encodedPrompt = WebUtility.HtmlEncode(prompt);
                            var encodedRevisedPrompt = WebUtility.HtmlEncode(result.RevisedPrompt ?? "无");
                            await _emailService.SendImageEmailAsync(
                                email,
                                "您的图片已生成",
                                $"<h1>您的图片已成功生成!</h1><p>提示词:{encodedPrompt}</p><p>修订后的提示词:{encodedRevisedPrompt}</p>",
                                imageBytes,
                                $"image_{task.Id}.png",
                                cancellationToken);

                            task.EmailSent = true;
                            await _dbContext.SaveChangesAsync(cancellationToken);
                        }
                        catch (Exception ex)
                        {
                            _logger.LogError(ex, "发送邮件失败,任务 {TaskId}", task.Id);
                        }
                    }

                    // 如果有用户 ID,推送到用户设备(使用 JPEG 版本,符合 xiaozhi 协议)
                    if (!string.IsNullOrEmpty(userId) && storageResult != null)
                    {
                        try
                        {
                            // 1. 先发送通知消息
                            var notificationMessage = new
                            {
                                action = "notification",
                                title = "图片生成完成",
                                content = $"您的图片已生成:{prompt.Substring(0, Math.Min(30, prompt.Length))}...",
                                emotion = "happy",
                                sound = "success"
                            };
                            await _devicePushService.SendCustomMessageAsync(userId, notificationMessage, cancellationToken);

                            // 2. 再发送图片消息(ESP32 期望的格式 - xiaozhi 协议)
                            var imageMessage = new
                            {
                                action = "image",
                                url = storageResult.JpegUrl,  // 使用 JPEG URL(体积小)
                                // 扩展信息(可选,ESP32 可以忽略)
                                taskId = task.Id.ToString(),
                                pngUrl = storageResult.PngUrl,
                                prompt = prompt,
                                jpegSize = storageResult.JpegSize,
                                timestamp = DateTime.UtcNow
                            };

                            await _devicePushService.SendCustomMessageAsync(userId, imageMessage, cancellationToken);
                            _logger.LogInformation(
                                "已推送图片到用户 {UserId} 的设备,任务 {TaskId},JPEG URL: {JpegUrl} ({JpegSize} bytes)",
                                userId, task.Id, storageResult.JpegUrl, storageResult.JpegSize);
                        }
                        catch (Exception ex)
                        {
                            _logger.LogError(ex, "推送消息到设备失败,用户 {UserId},任务 {TaskId}", userId, task.Id);
                        }
                    }

                    // 同步模式:返回 PNG URL(完整质量)
                    return new ImageGenerationResponse
                    {
                        TaskId = task.Id,
                        Status = "已完成",
                        Message = "图片生成成功",
                        ImageUrl = storageResult?.PngUrl ?? result.ImageUrl,
                        RevisedPrompt = result.RevisedPrompt,
                        IsAsync = false
                    };
                }
                else
                {
                    task.Status = ImageTaskStatus.Failed;
                    task.ErrorMessage = result.ErrorMessage;
                    task.UpdatedAt = DateTime.UtcNow;
                    await _dbContext.SaveChangesAsync(cancellationToken);

                    return new ImageGenerationResponse
                    {
                        TaskId = task.Id,
                        Status = "失败",
                        Message = result.ErrorMessage ?? "图片生成失败",
                        IsAsync = false
                    };
                }
            }
            catch (Exception ex)
            {
                _logger.LogError(ex, "同步生成图片时出错,任务 {TaskId}", task.Id);

                task.Status = ImageTaskStatus.Failed;
                task.ErrorMessage = ex.Message;
                task.UpdatedAt = DateTime.UtcNow;
                await _dbContext.SaveChangesAsync(cancellationToken);

                return new ImageGenerationResponse
                {
                    TaskId = task.Id,
                    Status = "失败",
                    Message = ex.Message,
                    IsAsync = false
                };
            }
        }
    }

    /// <summary>
    /// 获取图片生成任务的状态
    /// </summary>
    /// <param name="taskId">要查询的任务 ID</param>
    /// <returns>任务状态和结果(如果已完成)</returns>
    [McpServerTool(Name = "get_image_task_status")]
    [Description("获取图片生成任务的状态")]
    public async Task<ImageGenerationResponse> GetImageTaskStatus(
        [Description("要查询的任务 ID")] string taskId,
        CancellationToken cancellationToken = default)
    {
        if (!Guid.TryParse(taskId, out var id))
        {
            return new ImageGenerationResponse
            {
                Status = "错误",
                Message = "任务 ID 格式无效"
            };
        }

        var task = await _dbContext.ImageGenerationTasks.FindAsync(new object[] { id }, cancellationToken);

        if (task == null)
        {
            return new ImageGenerationResponse
            {
                Status = "错误",
                Message = "未找到任务"
            };
        }

        return new ImageGenerationResponse
        {
            TaskId = task.Id,
            Status = task.Status.ToString().ToLowerInvariant(),
            Message = task.ErrorMessage ?? GetStatusMessage(task.Status),
            ImageBase64 = task.ImageData,
            ImageUrl = task.ImageUrl,
            IsAsync = !string.IsNullOrEmpty(task.HangfireJobId)
        };
    }

    private static string GetStatusMessage(ImageTaskStatus status)
    {
        return status switch
        {
            ImageTaskStatus.Pending => "任务等待中",
            ImageTaskStatus.Processing => "任务处理中",
            ImageTaskStatus.Completed => "图片生成成功",
            ImageTaskStatus.Failed => "图片生成失败",
            ImageTaskStatus.Cancelled => "任务已取消",
            _ => "未知状态"
        };
    }
}

/// <summary>
/// 图片生成响应模型
/// </summary>
public class ImageGenerationResponse
{
    public Guid? TaskId { get; set; }
    public required string Status { get; set; }
    public string? Message { get; set; }
    public string? ImageBase64 { get; set; }
    public string? ImageUrl { get; set; }
    public string? RevisedPrompt { get; set; }
    public bool IsAsync { get; set; }
}
实际项目特点:
-
双模式支持:
- 同步模式:立即生成并返回结果
- 异步模式:使用Hangfire后台任务,完成后通过邮件通知
-
多渠道推送:
- 通过SignalR推送到设备(CustomMessage)
- 通过邮件发送链接
-
图片存储:
- 同时保存PNG和JPEG两种格式
- 存储到Azure Blob Storage或本地文件系统
-
完整的错误处理和日志记录
获取完整代码:
-
🔧 ESP32设备端 (小智完整实现):
https://github.com/maker-community/xiaozhi-esp32- SignalR集成分支:
signalr和signalr-update-audio
- SignalR集成分支:
-
🔧 ESP32示例工程 (包含完整的SignalR集成示例):
https://github.com/maker-community/esp-signalr-example -
🔧 SignalR C++客户端库:
https://github.com/maker-community/esp-signalr
https://github.com/maker-community/esp-signalr-example
实际使用场景示例
场景1:AI生图后推送到设备
用户通过小智对话:"帮我生成一张猫咪的图片"
- 对话发送到.NET MCP服务
- MCP服务调用API生成图片
- 生成完成后,后台任务调用hub发送消息
- 服务端通过SignalR推送图片给该用户的所有设备
- ESP32设备接收到
自定义消息事件,下载并显示在屏幕上
场景2:播放音乐
用户通过语音说想要播放音乐,mcp被触发,随机选择音乐url推送到设备
- 对话发送到.NET MCP服务
- 服务端通过SignalR推送音乐给该用户的所有设备
- ESP32设备接收到
自定义消息事件,下载并播放语音
内存优化经验分享
说明:本章节内容对于在ESP32上运行SignalR客户端非常重要,这些都是实践中总结出的经验。
在ESP32上集成SignalR确实遇到了内存问题,分享一些优化经验:
1. 使用PSRAM存储大对象
// 为图片数据分配PSRAM内存
void* imageBuffer = heap_caps_malloc(imageSize, MALLOC_CAP_SPIRAM);
if (imageBuffer == NULL) {
    // 降级到内部RAM
    imageBuffer = malloc(imageSize);
}
在VS Code的menuconfig中启用PSRAM:
F1→ESP-IDF: SDK Configuration editorComponent config→ESP32-specific→Support for external, SPI-connected RAM
2. 减少JSON序列化次数
// 错误做法:频繁创建/销毁cJSON对象
for (int i = 0; i < 100; i++) {
    cJSON* root = cJSON_Parse(jsonString);
    // 处理...
    cJSON_Delete(root);  // 产生内存碎片
}

// 正确做法:复用对象
cJSON* root = cJSON_Parse(jsonString);
for (int i = 0; i < 100; i++) {
    // 处理...
}
cJSON_Delete(root);
3. 增加任务栈大小
SignalR的回调嵌套较深,需要增加栈:
在menuconfig中:Component config → ESP32-specific → Main task stack size → 设置为8192
或在代码中:
xTaskCreatePinnedToCore(
    signalr_task,
    "signalr",
    8192,  // 栈大小(字节)
    NULL,
    5,     // 优先级
    NULL,
    1      // CPU核心
);
总结与感悟
通过这次SignalR移植和集成的实践,我深刻体会到:
-
选对框架很重要:SignalR的群组管理、消息路由等特性,省去了大量基础设施代码。如果从头手写WebSocket,这些功能得花几周时间。
-
内存管理是嵌入式永恒的主题:ESP32的RAM限制让我对每一个malloc都格外小心。合理使用PSRAM、避免内存碎片、及时释放资源,这些在PC上不用care的问题,在嵌入式上都是坑。
-
AI辅助编程真香:这次项目中,SignalR C++客户端的移植、消息处理等大量代码都是借助AI生成的。虽然生成的代码需要调试和优化,但确实大幅提高了开发效率。
-
消息推送解决实际问题:之前MCP工具只能同步返回结果,现在通过SignalR,服务端可以主动推送图片、语音、通知给设备,用户体验提升明显。
-
.NET生态的强大:SignalR、EF Core、JWT认证……微软这套生态真的很完善。作为.NET开发者,能用熟悉的技术栈快速搭建生产级服务。
这个项目还有很多优化空间,比如:
- WebSocket Binary Protocol替代JSON减少带宽
- 引入Redis存储群组信息,支持服务端横向扩展
- 继续完善代码质量,让库能够被更多的人关注和参与,希望有更多的人来实际使用和优化。
但作为一个初步能用的方案,已经足够支撑小智机器人的功能扩展了。后续我会继续完善这套架构,欢迎大家一起探讨和贡献代码!
希望这篇文章能给大家在.NET IoT开发、SignalR实时通信方面带来一些启发。如果有问题欢迎在评论区讨论,让我们一起探索.NET在IoT领域的更多可能性!
手搓ESP32小机器人
如果你有手搓Esp32的硬件打算,可以关注我的B站账号(绿荫阿广)
https://space.bilibili.com/25228512

项目地址
ESP32相关
-
SignalR C++客户端库:
https://github.com/maker-community/esp-signalr -
小智ESP32完整实现 (signalr-update-audio分支):
https://github.com/maker-community/xiaozhi-esp32 -
ESP32 SignalR完整示例工程 (包含音频分块、设备控制API等):
https://github.com/maker-community/esp-signalr-example
.NET服务端
- Verdure MCP服务 (包含完整的Hub、Tools、Services实现):
https://github.com/maker-community/verdure-mcp - 小智mcp转接平台:
- https://github.com/maker-community/verdure-mcp-for-xiaozhi
参考资料
- SignalR Client C++ (微软官方):
https://github.com/aspnet/SignalR-Client-Cpp - SignalR Client C# nanoframework:
https://github.com/nanoframework/nanoFramework.SignalR.Client
参考文档
- ASP.NET Core SignalR 官方文档
- SignalR Hub 协议规范
- ESP-IDF 编程指南
- VS Code ESP-IDF 插件
- JWT 认证最佳实践
- Keycloak 认证集成指南
本文首发于个人技术博客,转载请注明出处。如果对.NET IoT开发、SignalR实时通信感兴趣,欢迎关注我的博客获取更多技术分享!

 浙公网安备 33010602011771号