win10 下用 conda 创建 python 虚拟环境
动机
1. 由于不同项目需要的环境需求不同,要使不同项目都能在同一台电脑上正常运行,需要多个环境共存且互不影响;
2. 可以优雅地解决恼人的 cuda 版本问题:
以往的经典做法是在物理机上安装多个版本的 cuda,通过修改环境变量的方式实现 cuda 的版本切换,为此我开发过一个方便 cuda 版本切换的小工具:
而自从使用了 conda,就不需要在物理机层面上安装和切换 cuda 版本了,只要创建多个虚拟环境,为每个环境安装所需要的 cuda 版本,虚拟环境可以随用随建,环境之间可以灵活切换,想丢弃的时候可以随时删除,不会搞乱自己的电脑环境!
conda 与 pip 关系
使用 conda 可创建多个环境,每个环境里对应一个版本的 python 及其配套的 pip,关系图如下:
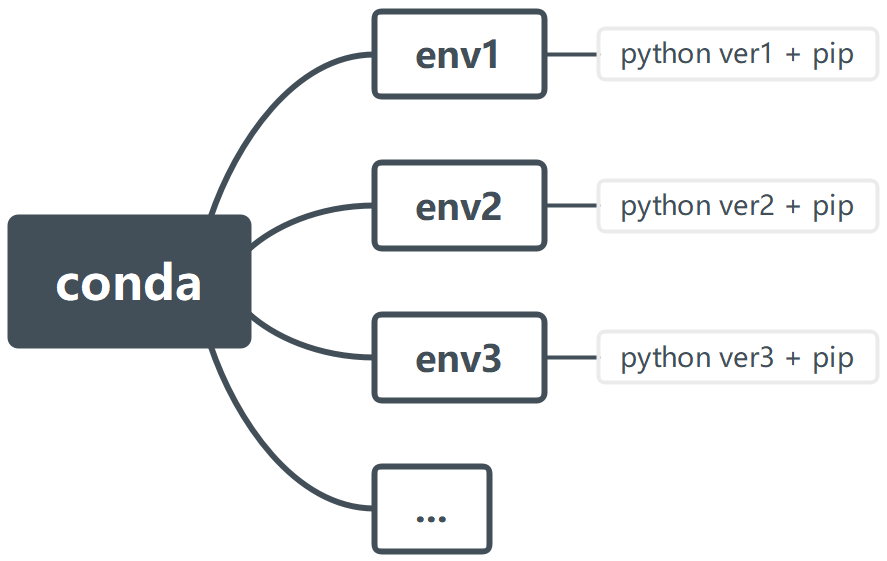
因此安装了 conda 后,创建环境时会自带 python,在物理机上安装 python 的步骤都省了。
conda 安装
推荐使用轻量级的 miniconda,安装完成后重启所有终端后方可使用 conda 命令。
创建环境命令
例如创建一个名为 env1 的 python3.8 虚拟环境:
conda create -n env1 python=3.8
切换到名为 env1 的环境:
conda activate env1
在 env1 环境下安装 pytorch + cuda 套装,推荐使用 pytorch 官网的命令,例如安装 cuda11.3 套装:
conda install pytorch==1.12.1 torchvision==0.13.1 torchaudio==0.12.1 cudatoolkit=11.3 -c pytorch
在目前的环境下还可以运行 pip install,例如安装 matplotlib
pip install matplotlib
可以使用如下命令查看此环境下所有安装的包
conda list输出例子:
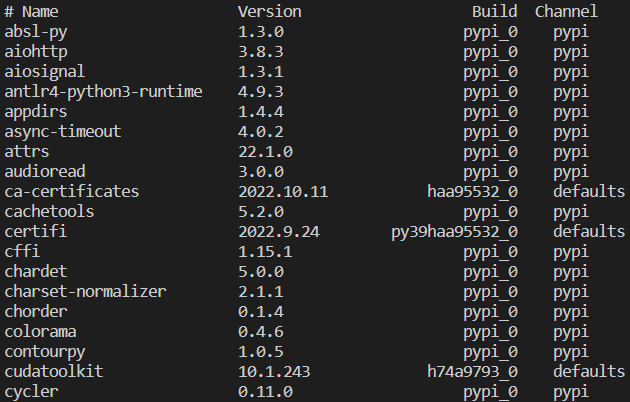
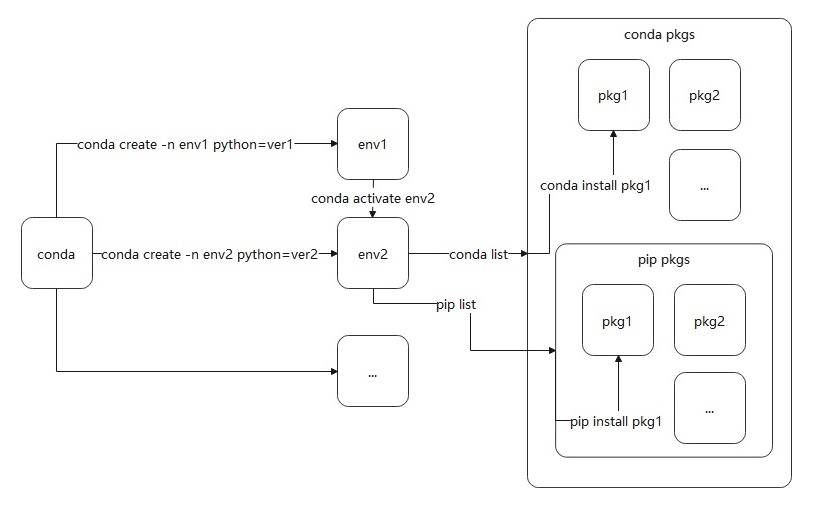
其中 pypi 渠道的包是通过 pip install 安装的,defaults 渠道的包是通过 conda install 安装的,整体命令行逻辑结构图如下:
删除环境:
conda remove -n env1 --all
修改 conda 安装镜像源
用记事本打开如下文件:
C:\Users\%username%\.condarc将其 channels 至 custom_channels 部分内容替换成如下文本后保存:
channels:
  - defaults
  - conda-forge
show_channel_urls: true
default_channels:
  - https://mirrors.tuna.tsinghua.edu.cn/anaconda/pkgs/main
  - https://mirrors.tuna.tsinghua.edu.cn/anaconda/pkgs/r
  - https://mirrors.tuna.tsinghua.edu.cn/anaconda/pkgs/msys2
  - http://mirrors.tuna.tsinghua.edu.cn/anaconda/cloud/pytorch
custom_channels:
  conda-forge: https://mirrors.tuna.tsinghua.edu.cn/anaconda/cloud
  msys2: https://mirrors.tuna.tsinghua.edu.cn/anaconda/cloud
  bioconda: https://mirrors.tuna.tsinghua.edu.cn/anaconda/cloud
  menpo: https://mirrors.tuna.tsinghua.edu.cn/anaconda/cloud
  pytorch: https://mirrors.tuna.tsinghua.edu.cn/anaconda/cloud
  pytorch-lts: https://mirrors.tuna.tsinghua.edu.cn/anaconda/cloud
  simpleitk: https://mirrors.tuna.tsinghua.edu.cn/anaconda/cloud
重启终端后生效。
修改全局 pip 安装镜像源
在如下路径新建一个文件夹:
mkdir "C:\Users\%username%\pip"进入该路径新建一个记事本文件,粘贴进如下内容并保存:
[global]
index-url=https://pypi.tuna.tsinghua.edu.cn/simple
extra-index-url=https://mirror.nju.edu.cn/pytorch/whl/cu118
    https://mirror.nju.edu.cn/pytorch/whl/cu124
    https://mirror.nju.edu.cn/pytorch/whl/cu126
    https://mirror.nju.edu.cn/pytorch/whl/cu128
    https://mirror.nju.edu.cn/pytorch/whl/cu129
    https://mirrors.aliyun.com/pypi/simple
find-links=https://mirrors.aliyun.com/pytorch-wheels/cu118
    https://mirrors.aliyun.com/pytorch-wheels/cu124
    https://mirrors.aliyun.com/pytorch-wheels/cu126
    https://mirrors.aliyun.com/pytorch-wheels/cu128
    https://mirrors.aliyun.com/pytorch-wheels/cu129
[install]
trusted-host=http://mirrors.aliyun.com
将该记事本文件重命名为 pip.ini,重启所有终端后生效。
VSCode 中切换 conda 环境
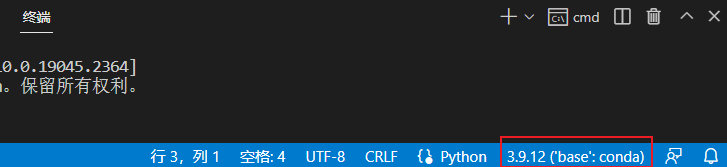
用 vscode 打开一个 python 项目中的某个 .py 文件,点击如图右下角的位置可切换 conda 环境:
激活 conda 镜像若报下面错误:
CommandNotFoundError: Your shell has not been properly configured to use 'conda activate'.
If using 'conda activate' from a batch script, change your
invocation to 'CALL conda.bat activate'.

To initialize your shell, run

    $ conda init <SHELL_NAME>

Currently supported shells are:
  - bash
  - cmd.exe
  - fish
  - tcsh
  - xonsh
  - zsh
  - powershell

See 'conda init --help' for more information and options.

IMPORTANT: You may need to close and restart your shell after running 'conda init'.
则参考如下博客: visual studio code怎么设置默认终端为cmd 或者按如下简便方法操作:
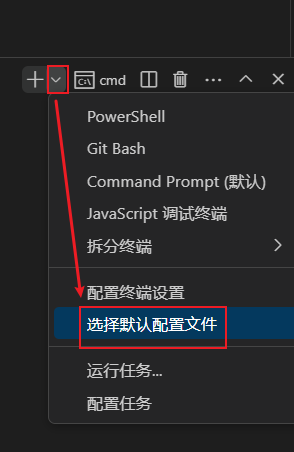
然后选择 cmd

其它常见错误解决方案外链
PackagesNotFoundError: The following packages are not available from current channels的解决办法

 浙公网安备 33010602011771号