keepalived高可用
目录
- keepalived高可用
- 基本概述
- vrrp协议
- 部署keepalived服务
- keepalived-抢占式和非抢占式
- 配置非抢占式
- 配置抢占式
- keepalived-脑裂
- 脚本探测nginx是否存在
一.keepalived高可用
1.基本概述
什么是高可用
一般是指2台机器启动着完全相同的业务系统,当有一台机器down机了,另外一台服务器就能快速的接管,对于访问的用户是无感知的。

高可用通常使用什么软件?
硬件通常使用F5软件通常使用keepalived
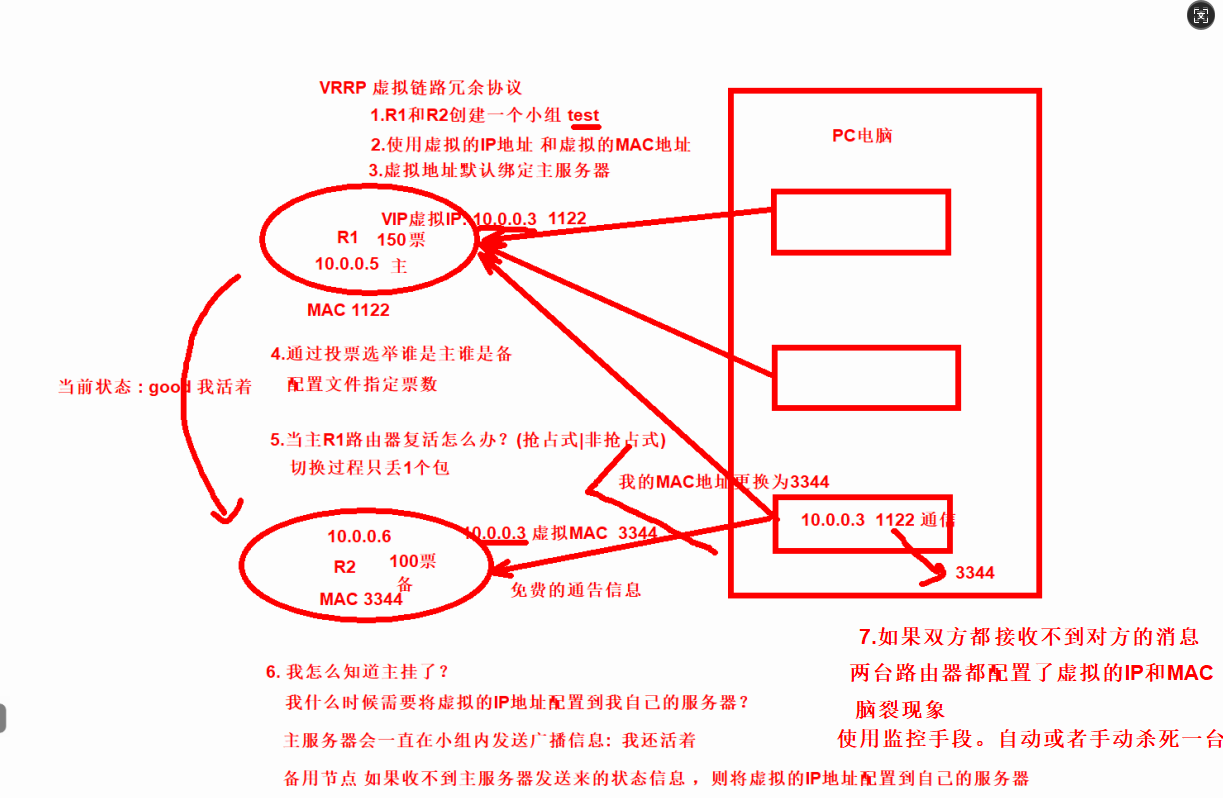
2.vrrp协议
keepalived是如何实现高可用的?
keepalived软件是基于VRRP协议实现的,VRRP虚拟路由冗余协议,主要用于解决单点故障问题

VRRP是如何诞生的,原理又是什么?
比如公司的网络是通过网关进行上网的,那么如果该路由器故障了,网关无法转发报文了,此时所有人都无法上网了,怎么办?
3.部署keepalived服务
扩展一台LB02-10.0.0.6 负载均衡的备用服务器
克隆服务器
修改IP地址
远程连接


global_defs {  #全局配置
    router_id lb02 #标识身份->名称
}
vrrp_instance VI_1 {
    state BACKUP #标识角色状态 MASTER--主机
    interface ens33 #网卡绑定接口
    virtual_router_id 50 #虚拟路由id 组
    priority 100 #优先级 选举
    advert_int 1 #监测间隔时间
    authentication {  #认证
        auth_type PASS  #认证方式
        auth_pass 1111  #认证密码
    }
    virtual_ipaddress {
        10.0.0.3  #虚拟的VIP地址
    }
}

#使用 keepalived -t 进行语法检查
keepalived -t -f /etc/keepalived/keepalived.conf
-t:测试模式,检查配置文件的语法并退出(不实际运行服务)。
-f:指定配置文件路径(默认路径是 /etc/keepalived/keepalived.conf,可省略)

[root@lb01 ~]#keepalived -t
Segmentation fault (core dumped)
3.1 安装nginx
[root@lb02 ~]#scp 10.0.0.5:/etc/yum.repos.d/nginx.repo /etc/yum.repos.d/

[root@lb02 ~]#yum -y install nginx

将LB01的数据同步到LB02
[root@lb02 ~]#rsync -avz --delete  10.0.0.5:/etc/nginx/ /etc/nginx/

windows修改hosts文件解析到lb02
10.0.0.6 wp.oldboy.com
3.2 LB01安装keepalived
[root@lb01 ~]#yum -y install keepalived
3.3 配置keepalived
[root@lb01 ~]#cat /etc/keepalived/keepalived.conf
global_defs {
    router_id lb01
    }

vrrp_instance VI_1 {
    state MASTER
    interface ens33
    virtual_router_id 50
    priority 150
    advert_int 1
    authentication {
        auth_type PASS
        auth_pass 1111
    }
    virtual_ipaddress {
        10.0.0.3
    }
}

[root@lb01 ~]#keepalived -t
Segmentation fault (core dumped)
3.4 启动服务
[root@lb01 ~]#systemctl start keepalived
[root@lb01 ~]#systemctl enable keepalived
3.5 LB02部署keepalived
1.安装keepalived
[root@lb02 ~]#yum -y install keepalived

2.配置keepalived 备用服务器
[root@lb02 ~]#cat /etc/keepalived/keepalived.conf
global_defs {
    router_id lb02
}

vrrp_instance VI_1 {
    state BACKUP
    interface ens33
    virtual_router_id 50
    priority 100
    advert_int 1
    authentication {
        auth_type PASS
        auth_pass 1111
    }
    virtual_ipaddress {
        10.0.0.3
    }
}

[root@lb02 ~]#keepalived -t
Segmentation fault (core dumped)

3.启动服务
[root@lb02 ~]#systemctl start keepalived
[root@lb02 ~]#systemctl enable keepalived
二.keepalived-抢占式和非抢占式
两个节点都启动
#由于节点1的优先级高于节点2,所以VIP在节点1上面
[root@lb01 ~]#ip a |grep 10.0.0.3
    inet 10.0.0.3/32 scope global ens33


关闭节点1的keepalived
[root@lbo1~]#systemctl stop keepalived
#节点2联系不上节点1,主动接管VIP
[root@lb02 ~]#ip a |grep 10.0.0.3
    inet 10.0.0.3/32 scope global ens33

此时重新启动Master上的keepalived,会发现VIP被强行抢占
[root@lb01 ~]#systemctl start keepalived
[root@lb01 ~]#ip a |grep 10.0.0.3
    inet 10.0.0.3/32 scope global ens33
1.配置非抢占式
1.两个节点的state都必须配置为BACKUP
2.两个节点都必须加上配置nopreempt
3.其中一个节点的优先级必须要高于另外一个节点的优先级
4.两台服务器的角色状态启用nopreempt后,必须修改角色状态统一为BACKUP,唯一的区分就是优先级。

1.修改LB01配置文件
[root@lb01 ~]#cat /etc/keepalived/keepalived.conf
global_defs {
    router_id lb01
    }

vrrp_instance VI_1 {
    state BACKUP
    interface ens33
    virtual_router_id 50
    priority 150
    nopreempt #不抢占
    advert_int 1
    authentication {
        auth_type PASS
        auth_pass 1111
    }
    virtual_ipaddress {
        10.0.0.3
    }
}

[root@lb01 ~]#keepalived -t
Segmentation fault (core dumped)

2.重启生效
[root@lb01 ~]#systemctl restart keepalived

---------------------------------------------------------
LB02配置
[root@lb02 ~]#cat /etc/keepalived/keepalived.conf
global_defs {
    router_id lb02
}

vrrp_instance VI_1 {
    state BACKUP
    interface ens33
    virtual_router_id 50
    priority 100
    nopreempt  #不抢占
    advert_int 1
    authentication {
        auth_type PASS
        auth_pass 1111
    }
    virtual_ipaddress {
        10.0.0.3
    }
}

[root@lb02 ~]#systemctl restart keepalived

通过windows的arp去验证,是否会切换MAC地址
#查看VIP在节点1上面
[root@lb01 ~]#ip a |grep 10.0.0.3
    inet 10.0.0.3/32 scope global ens33

#windows查看Mac地址---》本地xshell
[d:\~]$ ping wp.oldboy.com

正在 Ping php.oldboy.com [10.0.0.3] 具有 32 字节的数据:
来自 10.0.0.3 的回复: 字节=32 时间=1ms TTL=64
来自 10.0.0.3 的回复: 字节=32 时间<1ms TTL=64
来自 10.0.0.3 的回复: 字节=32 时间<1ms TTL=64
来自 10.0.0.3 的回复: 字节=32 时间<1ms TTL=64
#查看mac地址
[d:\~]$ arp -a
接口: 10.0.0.1 --- 0x4
  Internet 地址         物理地址              类型
  10.0.0.3              00-0c-29-79-df-49     动态
  10.0.0.5              00-0c-29-79-df-49     动态
  10.0.0.6              00-0c-29-c8-70-89     动态
  10.0.0.7              00-0c-29-e9-72-bd     动态


#将节点1的keepalived停掉
[root@lb01 ~]#systemctl stop keepalived

#节点2接管VIP
[root@lb02 ~]#ip a|grep 10.0.0.3
    inet 10.0.0.3/32 scope global ens33

#再次查看mac地址
[d:\~]$ arp -a

接口: 10.0.0.1 --- 0x4
  Internet 地址         物理地址              类型
  10.0.0.3              00-0c-29-c8-70-89     动态
  10.0.0.5              00-0c-29-79-df-49     动态
  10.0.0.6              00-0c-29-c8-70-89     动态
  10.0.0.7              00-0c-29-e9-72-bd     动态
2.配置抢占式
LB01配置
[root@lb01 ~]#cat /etc/keepalived/keepalived.conf
global_defs {
    router_id lb01
    }

vrrp_instance VI_1 {
    state MASTER
    interface ens33
    virtual_router_id 50
    priority 150
    advert_int 1
    authentication {
        auth_type PASS
        auth_pass 1111
    }
    virtual_ipaddress {
        10.0.0.3
    }
}
[root@lb01 ~]#keepalived -t
Segmentation fault (core dumped)


需要重启生效
[root@lb01 ~]#systemctl restart keepalived


LB02配置
[root@lb02 ~]#cat /etc/keepalived/keepalived.conf
global_defs {
    router_id lb02
}

vrrp_instance VI_1 {
    state BACKUP
    interface ens33
    virtual_router_id 50
    priority 100
    advert_int 1
    authentication {
        auth_type PASS
        auth_pass 1111
    }
    virtual_ipaddress {
        10.0.0.3
    }
}
[root@lb02 ~]#keepalived -t
Segmentation fault (core dumped)

重启生效
[root@lb02 ~]#systemctl restart keepalived

#LB01抢占回来
[root@lb01 ~]#ip a|grep 10.0.0.3
    inet 10.0.0.3/32 scope global ens33
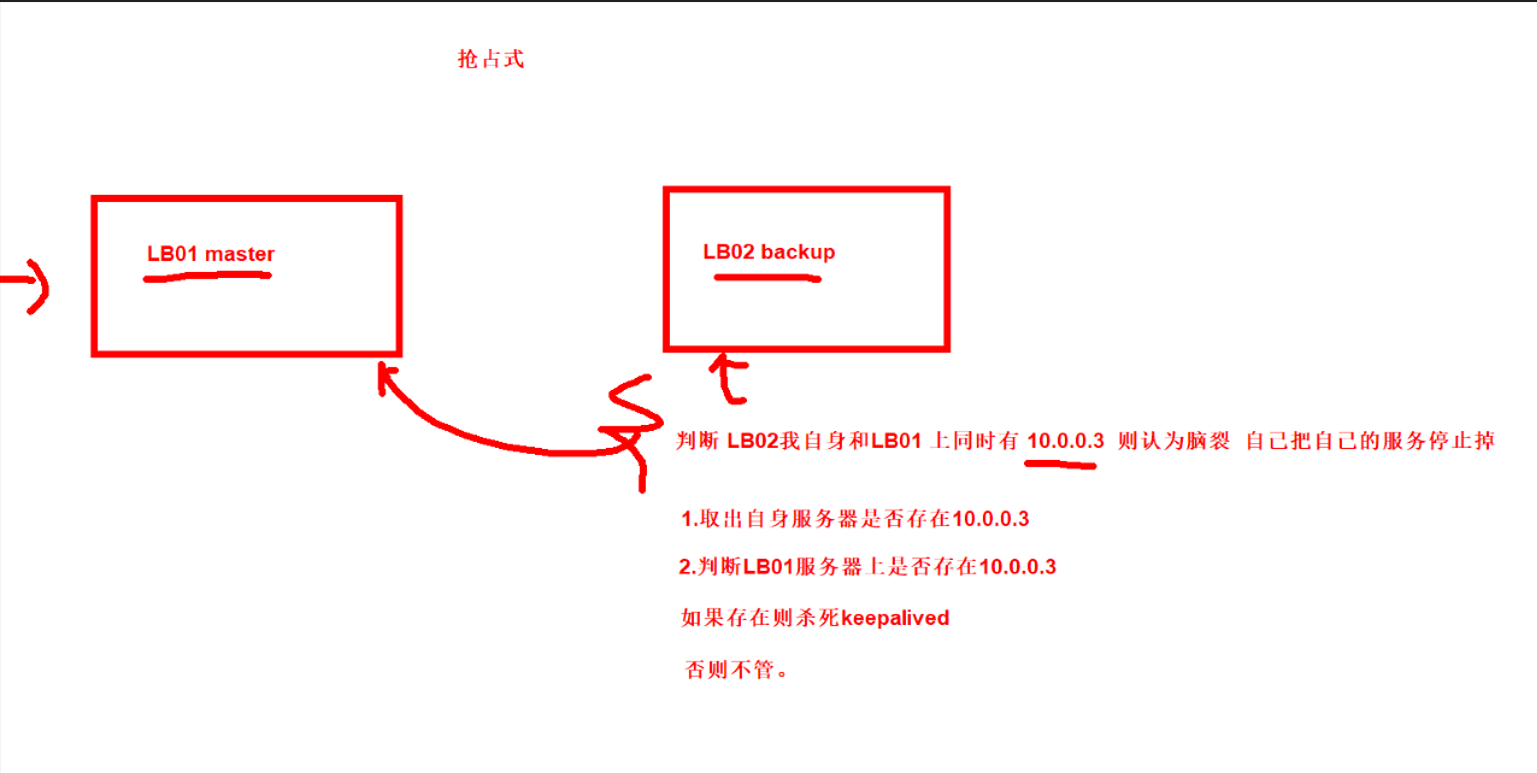
3.keepalived-脑裂
#基于抢占式
由于某些原因,导致两台keepalived高可用服务器在指定时间内,无法检测到对方的发送的信息,各自去的资源及服务的所有权,而此时的两台高可用服务器又都还活着。
面试题:脑裂故障原因
1.服务器网线松动等网络故障
2.服务器硬件故障发生损坏现象而崩溃
3.主备都开启firewalld防火墙
如果开启了防火墙,默认拒绝80和443的访问,只允许了SSH远程连接服务22端口放行80和443端口
[root@lb02 ~]#systemctl start firewalld #默认允许22端口
#脑裂现象
开启防火墙阻止LB01发送信息,LB02认为自己可以当老大
[root@lb02 ~]#ip a |grep 10.0.0.3
inet 10.0.0.3/32 scope global ens33
[root@lb01 ~]#ip a |grep 10.0.0.3
inet 10.0.0.3/32 scope global ens33
LB01和LB02
[root@lb01 ~]#firewall-cmd --permanent --add-port=80/tcp
success
[root@lb01 ~]#firewall-cmd --permanent --add-port=443/tcp
success
[root@lb01 ~]#firewall-cmd --reload
success
#LB01和LB02同时开启防火墙
[root@lb01 ~]#systemctl start firewalld
[root@lb02 ~]#systemctl start firewalld
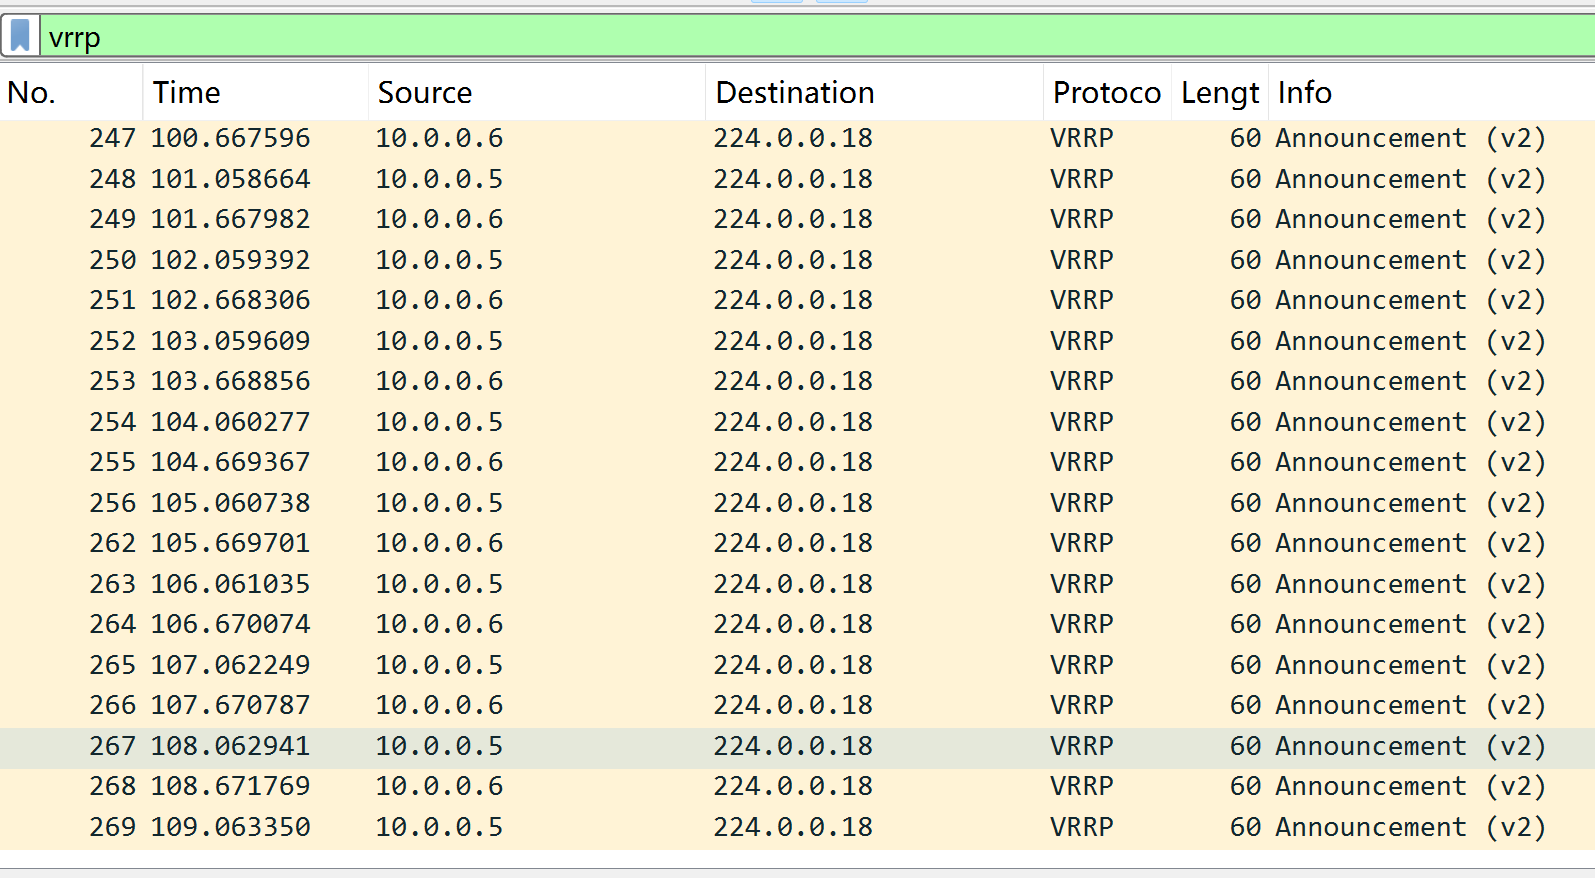
fireshark抓包发现LB01和LB02持续发送广播信息
# 解决脑裂的方法:
手动停止其中一台keepalived
LB02出现脑裂则自动杀死当前的keepalived服务(必须为抢占式)

1.LB02生成密钥对和LB01做免密钥的配置
[root@lb02 ~]#ssh-keygen
[root@lb02 ~]#ssh-copy-id 10.0.0.5

2.脚本
[root@lb02 ~]#mkdir /sh
[root@lb02 /sh]#cat test.sh
#1.探测本机是否存在10.0.0.3 lb02变量的值要么1 要么是0 存在为1 不存在为0
lb02=`ip a|grep 10.0.0.3|wc -l`

#2.探测lb01是否存在10.0.0.3
lb01=`ssh 10.0.0.5 "ip a|grep 10.0.0.3|wc -l"`

#3.判断两台如果同时存在10.0.0.3则关闭本机的keepalived
[ $lb01 -eq 1 -a $lb02 -eq 1 ] && systemctl stop keepalived


#增加执行x权限
[root@lb01 ~]#chmod +x test.sh

3.开启lb02的防火墙测试脚本是否执行成功

[root@lb02 ~]# systemctl start firewalld

[root@lb01 ~]#ip a |grep 10.0.0.3
    inet 10.0.0.3/32 scope global ens33
[root@lb02 ~]#ip a |grep 10.0.0.3
    inet 10.0.0.3/32 scope global ens33


[root@lb02 ~]# sh test.sh
查看LB02是否杀死了keepalived
[root@lb02 /sh]#ip a |grep 10.0.0.3
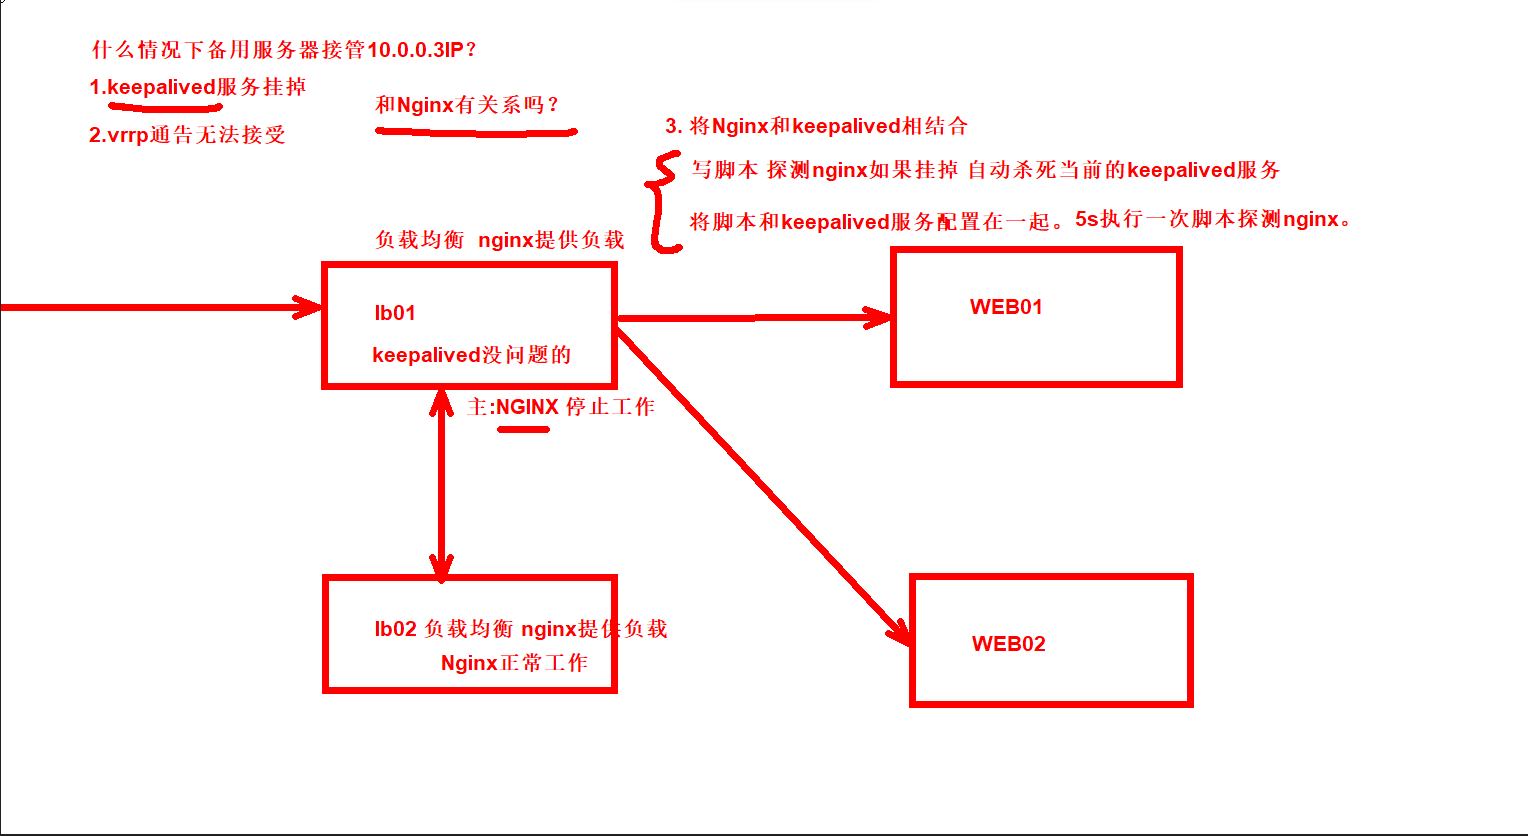
4.脚本探测nginx是否存在
如果lb01的nginx挂掉,不会自动将vip漂移到备用服务器。必须keepalived挂掉,vip才会漂移所以我们要写一个脚本检测lb01的nginx服务是否存在,如果nginx停止工作,那么要将keepalived服务停止,让VIP地址漂移到LB02备用服务器持续工作。
4.1 写脚本探测nginx
需求:检测lb01的nginx服务是否存在

如果lb01的nginx挂掉,不会自动将vip漂移到备用服务器。必须keepalived挂掉,vip才会漂移所以我们要写一个脚本检测lb01的nginx服务是否存在,如果nginx停止工作,那么要将keepalived服务停止,让VIP地址漂移到LB02备用服务器持续工作。


[root@lb01 ~]#cat /sh/check.sh
#!/bin/sh
#通过进程取出nginx的存活状态 如果为0说明nginx挂掉,如果不为0说明在运行
ng=`ps axu|grep nginx|grep -v grep|wc -l`

#判断如果ng为0,先尝试重启nginx
if [ $ng -eq 0 ];then
   # 重启nginx服务
   systemctl restart nginx &>/dev/null
   sleep 2
   ng=`ps axu|grep nginx|grep -v grep|wc -l`
   [ $ng -eq 0 ] && systemctl stop keepalived
fi

#增加执行x权限
[root@lb01 ~]#ll /sh/check.sh
-rwxr-xr-x 1 root root 374 Apr 18 19:35 /sh/check.sh

------------------------------------------------------------------

[root@lb01~]#vim check_web.sh
#!/bin/sh

ng=$(ps -C nginx --no-headerlwc -l)

#1.判断Nginx是否存活,如果不存活则尝试启动Nginx
if [ $ng -eq 0 ];then
systemctl start nginx
sleep 3

#2.等待3秒后再次获取一次Nginx状态
ng=$(ps -C nginx--no-header|wc -l)

#3.再次进行判断,如Nginx还不存活则停止Keepalived,让地址进行漂移,并退出脚本
   if [ $ng -eq 0 ];then
      systemctl stop keepalived
   fi
fi
4.2 将脚本将keepalived结合
[root@lb01 /sh]#cat /etc/keepalived/keepalived.conf
global_defs {
    router_id lb01
    }

vrrp_script check_web {
    script "/sh/check.sh"
    interval 3
}

vrrp_instance VI_1 {
    state MASTER
    interface ens33
    virtual_router_id 50
    priority 150
    advert_int 1
    authentication {
        auth_type PASS
        auth_pass 1111
    }
    virtual_ipaddress {
        10.0.0.3
    }

    track_script {
         check_web
         }
}

[root@lb01 /sh]#systemctl stop nginx

[root@lb01 ~]#systemctl restart keepalived
[root@lb02 /sh]#ip a |grep 10.0.0.3
[root@lb01 /sh]#sh check.sh

 浙公网安备 33010602011771号