Linux系统优化
Linux系统优化
一.YUM仓库优化
YUM仓库是什么?
通过yum仓库下载安装软件,类似手机的应用商店。 类似windows下载软件网站。
centos系统默认的仓库地址是在国外.需要将仓库地址修改为国内的仓库。
yum仓库
默认仓库国内服务器
路径:/etc/yum.repos.d/xx.repo
Ubuntu仓库
/etc/apt/
了解当前系统通过哪个仓库安装的软件方法:
1.yum reploist
2.yum -y install wget
为Kylin系统配置扩展仓库epel
将Ubuntu系统配置为国内仓库
必会:kylin安装配置扩展仓库epel
将Ubuntu默认的仓库修改为阿里云
国内YUM仓库:
1.阿里源
https://developer.aliyun.com/mirror/
2.清华源
https://mirrors.tuna.tsinghua.edu.cn/
3.重庆大学源
4.华为源
5.腾讯源
扩展的仓库地址epel: 经常使用的软件在基础仓库中没有,所以安装一个扩展的仓库
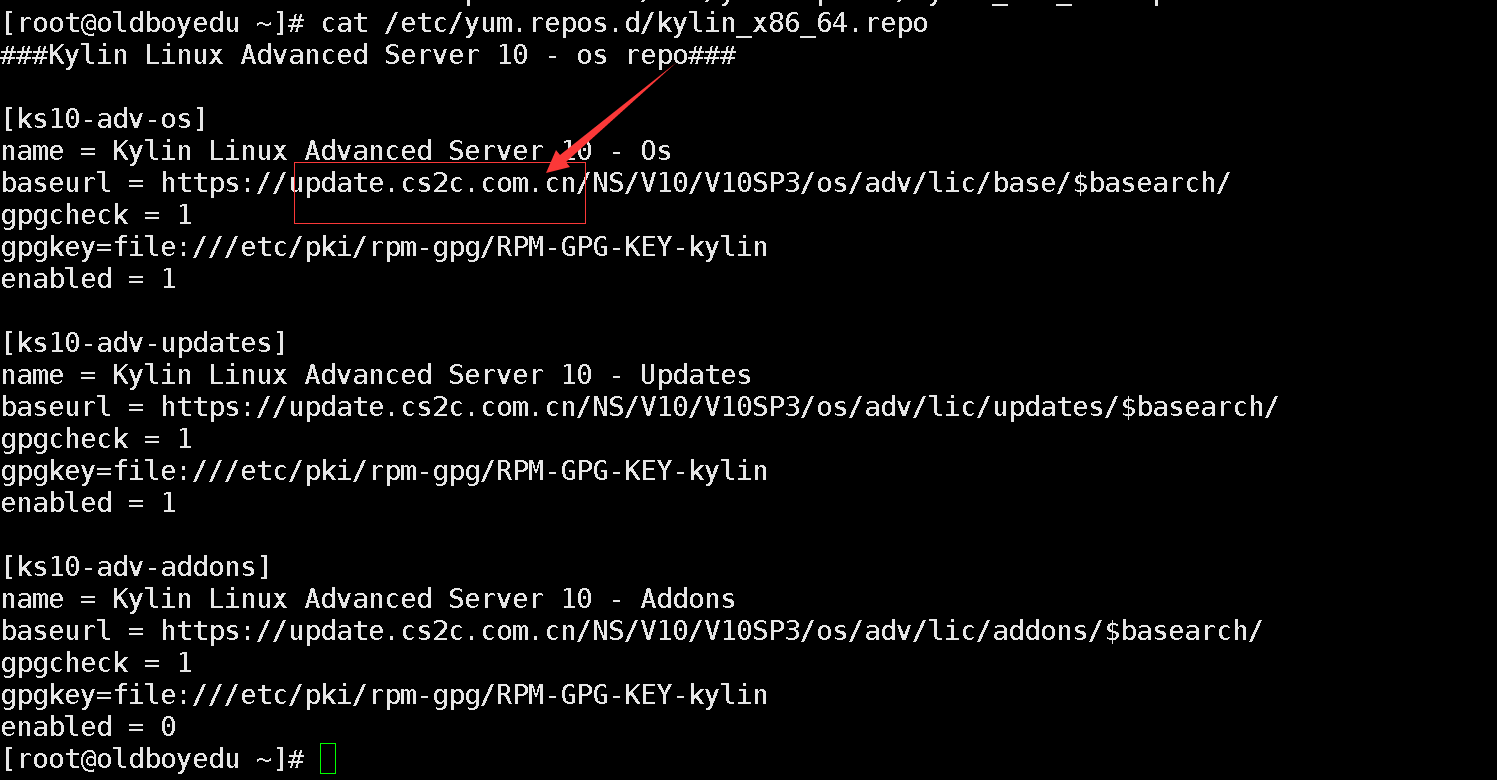
[root@study ~]# ll /etc/yum.repos.d/
total 4
-rw-r--r-- 1 root root 701 Sep 8 2022 kylin_x86_64.repo
1.默认仓库地址
1.1 查看Kylin默认仓库地址
[root@study ~]# ll /etc/yum.repos.d/
 total 4
 -rw-r--r-- 1 root root 701 Sep  8  2022 kylin_x86_64.repo

# 判断IP地址的归属
[root@study ~]# ping update.cs2c.com.cn
PING aitqzjav.slt.sched.tdnsv8.com (101.72.251.68) 56(84) bytes of data.
64 bytes from 101.72.251.68 (101.72.251.68): icmp_seq=1 ttl=128 time=6.85 ms
 64 bytes from 101.72.251.68 (101.72.251.68): icmp_seq=2 ttl=128 time=5.82 ms
 64 bytes from 101.72.251.68 (101.72.251.68): icmp_seq=3 ttl=128 time=5.96 ms
拿到仓库对应的IP地址 101.72.251.68
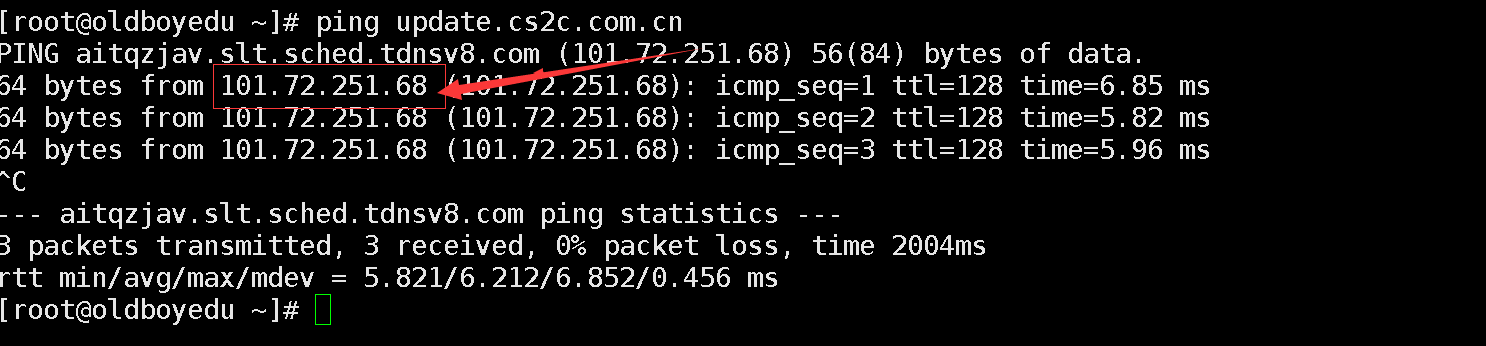
浏览器打开ip138.com,确认IP地址归属

1.2 查看Ubuntu默认仓库地址
root@study-inb:~# ll /etc/apt/sources.list
-rw-r--r-- 1 root root 2403 Mar 6 14:39 /etc/apt/sources.list
# 判断IP地址归属
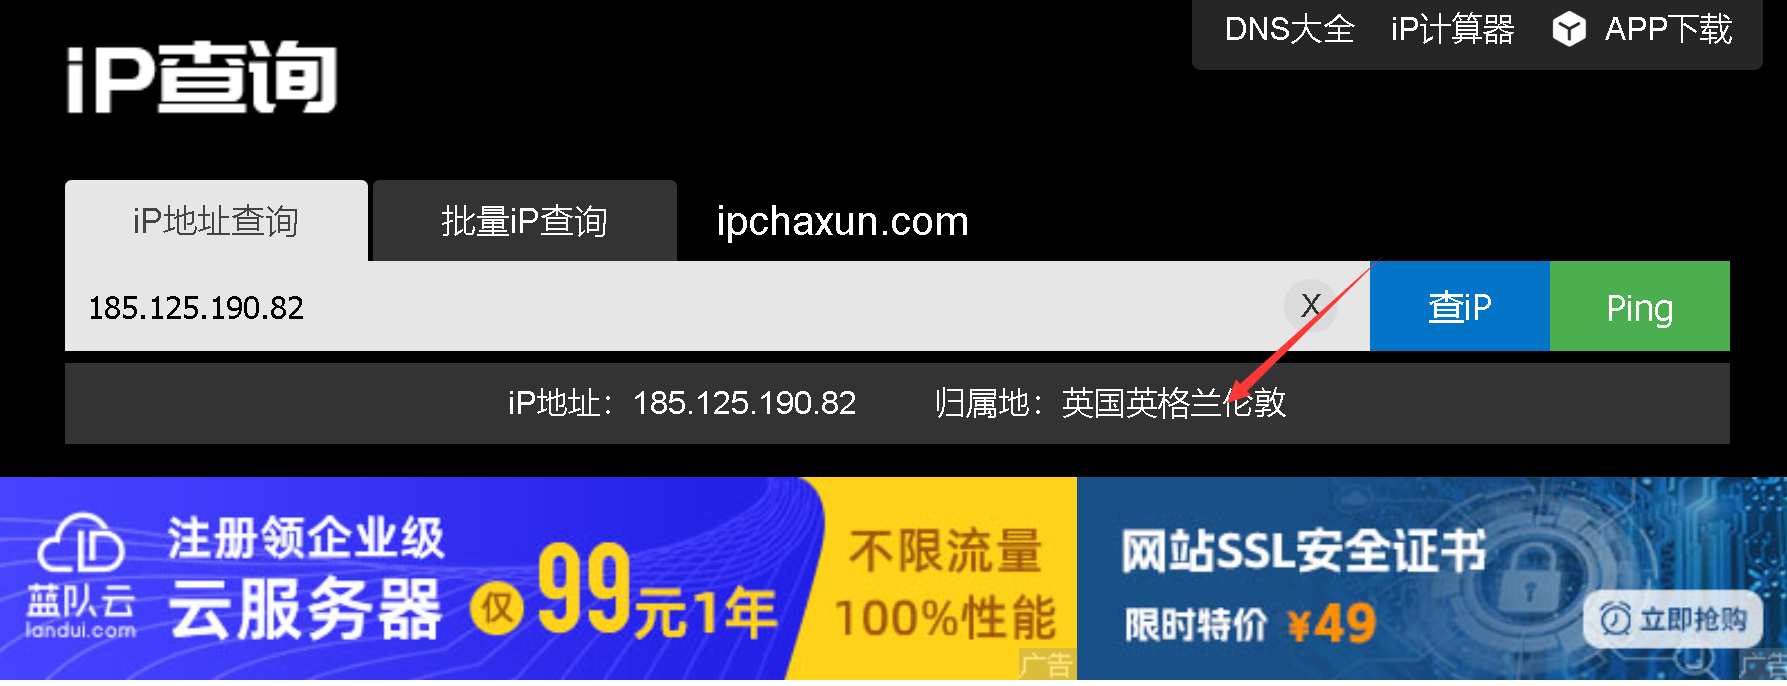
root@study-inb:~# ping archive.ubuntu.com
PING archive.ubuntu.com (185.125.190.82) 56(84) bytes of data.
64 bytes from ubuntu-mirror-2.ps5.canonical.com (185.125.190.82): icmp_seq=1 ttl=128 time=283 ms
64 bytes from ubuntu-mirror-2.ps5.canonical.com (185.125.190.82): icmp_seq=2 ttl=128 time=283 ms
^Z
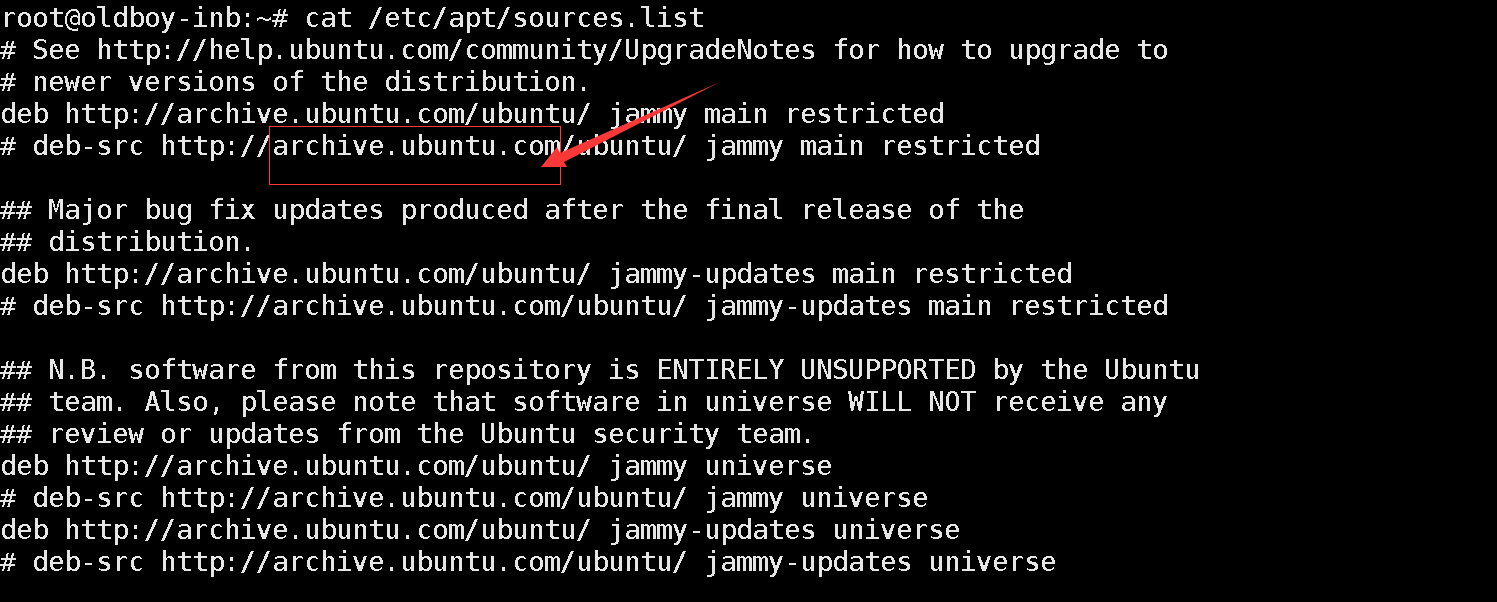
拿到仓库对应的IP地址 185.125.190.82

浏览器打开 ip138.com,确认IP地址归属
2.Kylin系统安装扩展仓库epel
[root@study ~]# wget -O /etc/yum.repos.d/epel.repo https://mirrors.aliyun.com/repo/epel-7.repo
--2025-03-07 16:26:08-- https://mirrors.aliyun.com/repo/epel-7.repo
Resolving mirrors.aliyun.com (mirrors.aliyun.com)... 116.196.141.241, 218.24.90.187, 218.24.90.146, ...
Connecting to mirrors.aliyun.com (mirrors.aliyun.com)|116.196.141.241|:443... connected.
HTTP request sent, awaiting response... 200 OK
Length: 664 [application/octet-stream]
Saving to: ‘/etc/yum.repos.d/epel.repo’
/etc/yum.repos.d/epel.r 100%[============================>] 664 --.-KB/s in 0s
2025-03-07 16:26:08 (19.1 MB/s) - ‘/etc/yum.repos.d/epel.repo’ saved [664/664]
# 查看epel是否安装成功
[root@study ~]# yum repolist
repo id repo name
epel Extra Packages for Enterprise Linux 7 - x86_64
ks10-adv-os Kylin Linux Advanced Server 10 - Os
ks10-adv-updates Kylin Linux Advanced Server 10 - Updates
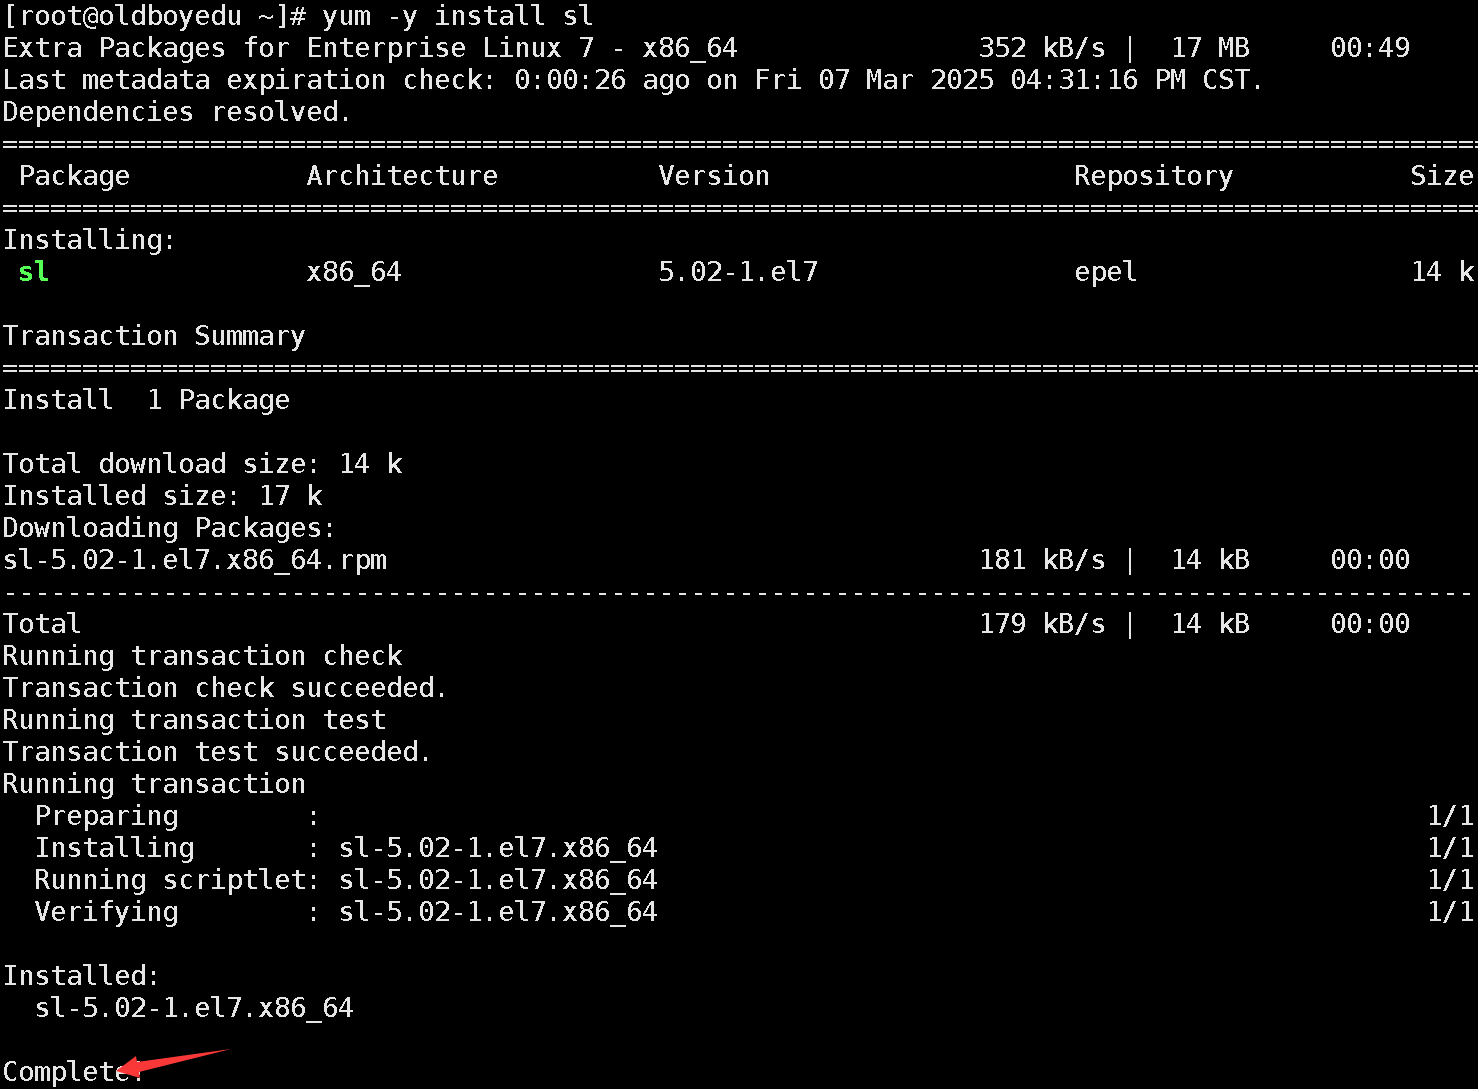
# sl命令只能通过扩展仓库才可以安装。
[root@study ~]# yum -y install sl
3.Kylin系统配置本地仓库
# 创建iso存放目录和挂载目录
mkdir -p /mnt/{iso,cdrom}

# 上传iso镜像
[root@study ~]# cd /opt/ios/
[root@study ios]# ll
总用量 4471596
-rw-r--r-- 1 root root 4578914304  6月 27 09:02 Kylin-Server-V10-SP3-General-Release-2303-X86_64.iso

# 挂载iso镜像到/mnt/cdrom下
mv /mnt/iso/Kylin-Server-V10-SP3-General-Release-2303-X86_64.iso KylinV10-SP3-General-Release.iso /mnt/iso/KylinV10-SP3-GR.iso

mount -o loop /mnt/iso/KylinV10-SP3-GR.iso /mnt/cdrom

# 创建repo文件并放到/etc/yum.repos.d/目录
mv /etc/yum.repos.d/kylin_x86_64.repo /etc/yum.repos.d/kylin_x86_64.repo.bak
cat >/etc/yum.repos.d/kylin_x86_64.repo<<EOF
###Kylin Linux Advanced Server 10 - os repo###

[ks10-adv-os]
name=Kylin Linux Advanced Server 10 - os
baseurl=file:///mnt/cdrom
gpgcheck=0
enabled=1
EOF

# 开机自动挂载
[root@study etc]# tail -1 /etc/fstab
/mnt/iso/KylinV10-SP3-GR.iso  /mnt/cdrom	iso9660 defaults     0 0
4.Ubuntu系统修改YUM仓库
4.1 切换到root用户
study@study-inb:~$ sudo su - root
[sudo] password for study:  #输入用户密码1
root@study-inb:~#
4.2 备份默认仓库
root@study-inb:~# ll /etc/apt
 total 44
 drwxr-xr-x  9 root root 4096 Mar  6 14:38 ./
 drwxr-xr-x 96 root root 4096 Mar  6 06:41 ../
 drwxr-xr-x  2 root root 4096 Feb 16  2024 apt.conf.d/
 drwxr-xr-x  2 root root 4096 Apr  8  2022 auth.conf.d/
 drwxr-xr-x  2 root root 4096 Apr  8  2022 keyrings/
 drwxr-xr-x  2 root root 4096 Feb 16  2024 preferences.d/
 drwxr-xr-x  2 root root 4096 Feb 16  2024 preferences.d.save/
 -rw-r--r--  1 root root 2403 Mar  6 14:39 sources.list   #系统默认仓库
 -rw-r--r--  1 root root 2403 Feb 16  2024 sources.list.curtin.old
 drwxr-xr-x  2 root root 4096 Apr  8  2022 sources.list.d/
 drwxr-xr-x  2 root root 4096 Feb 16  2024 trusted.gpg.d/

 root@study-inb:~# cp /etc/apt/sources.list /tmp/
 root@study-inb:~# ll /tmp/sources.list
 -rw-r--r-- 1 root root 2403 Mar  7 08:46 /tmp/sources.list
4.3 编辑配置文件
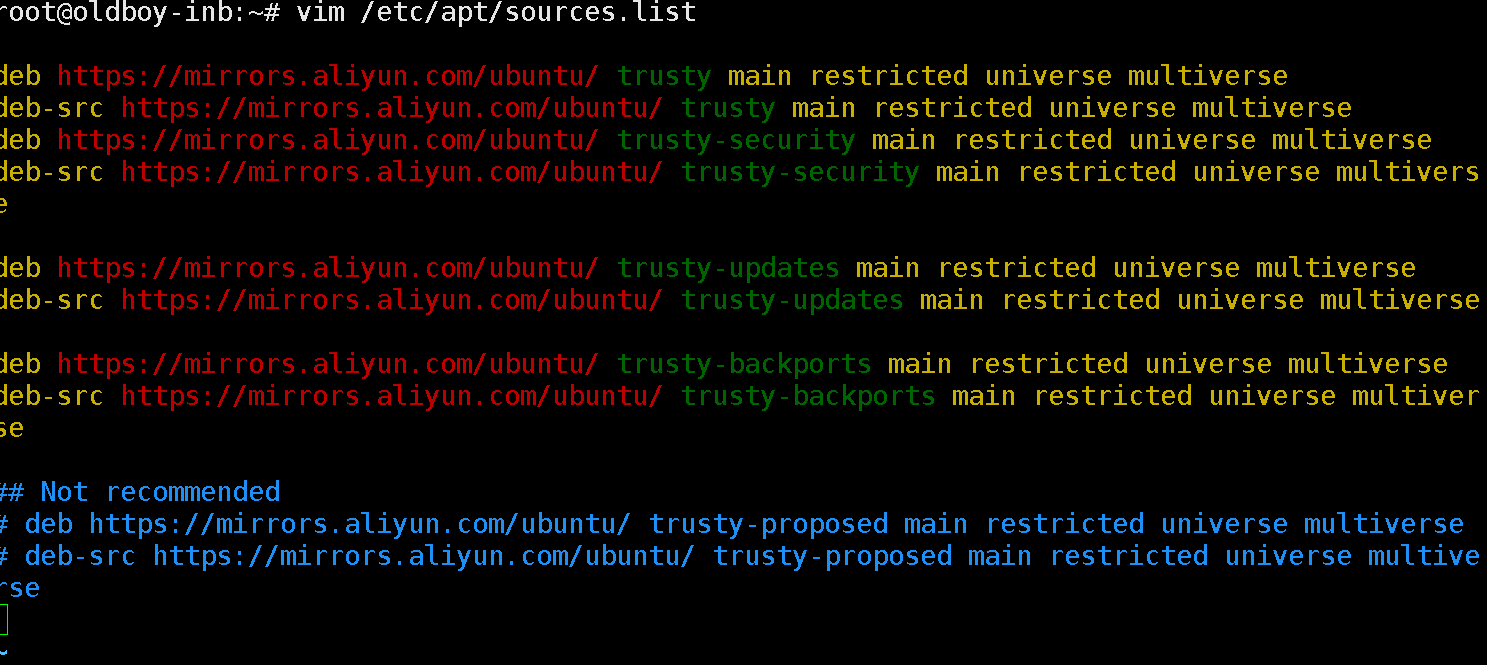
root@study-inb:~# vim /etc/apt/sources.list
#进入编辑,使用dG删除所有内容后粘贴一下内容(注意进入编辑模式后粘贴)
 deb https://mirrors.aliyun.com/ubuntu/ jammy main restricted universe multiverse
 deb-src https://mirrors.aliyun.com/ubuntu/ jammy main restricted universe multiverse

 deb https://mirrors.aliyun.com/ubuntu/ jammy-security main restricted universe multiverse
 deb-src https://mirrors.aliyun.com/ubuntu/ jammy-security main restricted universe multiverse

 deb https://mirrors.aliyun.com/ubuntu/ jammy-updates main restricted universe multiverse
 deb-src https://mirrors.aliyun.com/ubuntu/ jammy-updates main restricted universe multiverse

 # deb https://mirrors.aliyun.com/ubuntu/ jammy-proposed main restricted universe multiverse
 # deb-src https://mirrors.aliyun.com/ubuntu/ jammy-proposed main restricted universe multiverse

 deb https://mirrors.aliyun.com/ubuntu/ jammy-backports main restricted universe multiverse
 deb-src https://mirrors.aliyun.com/ubuntu/ jammy-backports main restricted universe multiverse
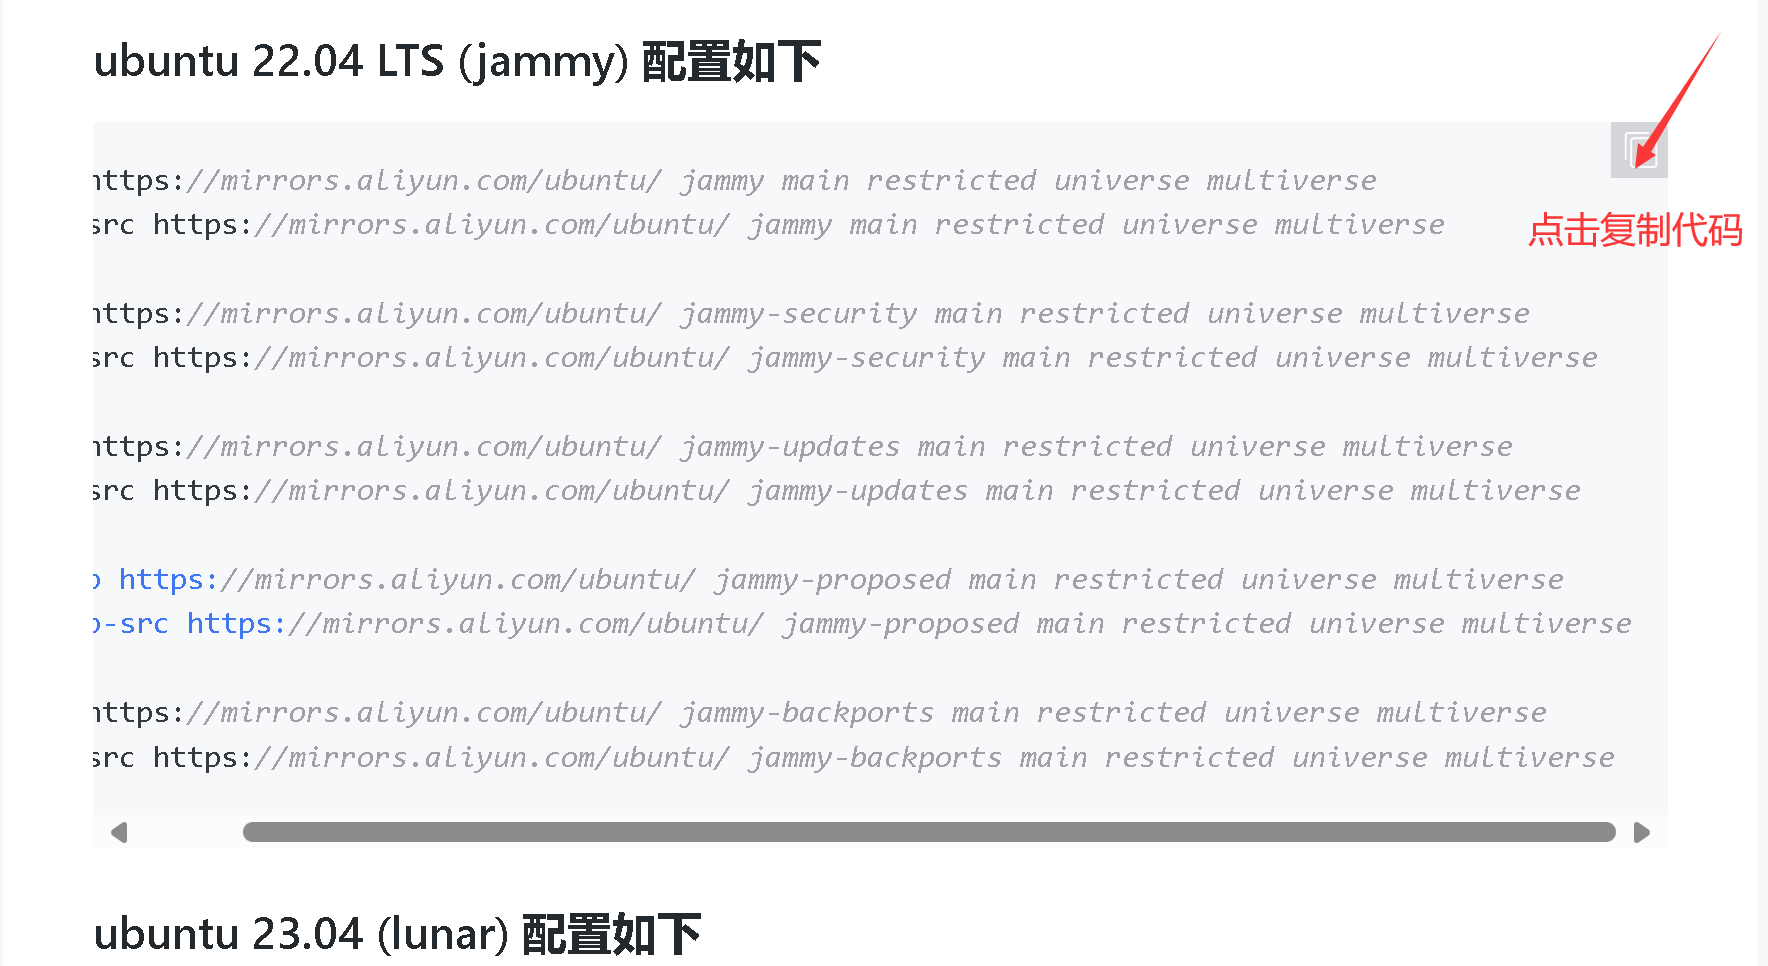
注意:查看操作系统版本,进入阿里官网找到对应版本
study@study-inb:~$ cat /etc/os-release
PRETTY_NAME="Ubuntu 22.04.4 LTS"
NAME="Ubuntu"
VERSION_ID="22.04"
VERSION="22.04.4 LTS (Jammy Jellyfish)"
VERSION_CODENAME=jammy
ID=ubuntu
ID_LIKE=debian
HOME_URL="https://www.ubuntu.com/"
SUPPORT_URL="https://help.ubuntu.com/"
BUG_REPORT_URL="https://bugs.launchpad.net/ubuntu/"
PRIVACY_POLICY_URL="https://www.ubuntu.com/legal/terms-and-policies/privacy-policy"
UBUNTU_CODENAME=jammy
4.4 执行更新命令
root@studyinb:~# apt update	#更新仓库

# 查看当前系统默认的YUM仓库
root@studyinb:~# apt-cache policy
Package files:
  100 /var/lib/dpkg/status
      release a=now
  100 https://mirrors.aliyun.com/ubuntu jammy-backports/universe amd64 Packages
      release v=22.04,o=Ubuntu,a=jammy-backports,n=jammy,l=Ubuntu,c=universe,b=amd64
      origin mirrors.aliyun.com
...
...
...
二.优化防火墙
1.centos系统和kylin系统防火墙的名称相同:firewalld
2.ubt系统防火墙名称:ufw

什么是防火墙?
过滤网络流量。限制、允许流量。

什么情况下开启防火墙?
服务器有公网的情况下开启防火墙。网站业务 游戏业务 APP业务。

什么情况下关闭防火墙?
服务器没有公网情况下关闭防火墙。测试服务器 虚拟机,公司内部服务器。
业务流量大的情况下需要关闭firewalld。用户数量过载。
开启硬件防火墙。
1.systemctl语法格式
 systemctl 动作 服务名称
 动作:
     start  启动
     stop   停止
     restart 重启
     reload  重新加载
     enabled 开机自动运行
     disable 开机禁止启动
     status  查看服务状态
2.Kylin防火墙
2.1 退出防火墙并查看防火墙状态是否关闭
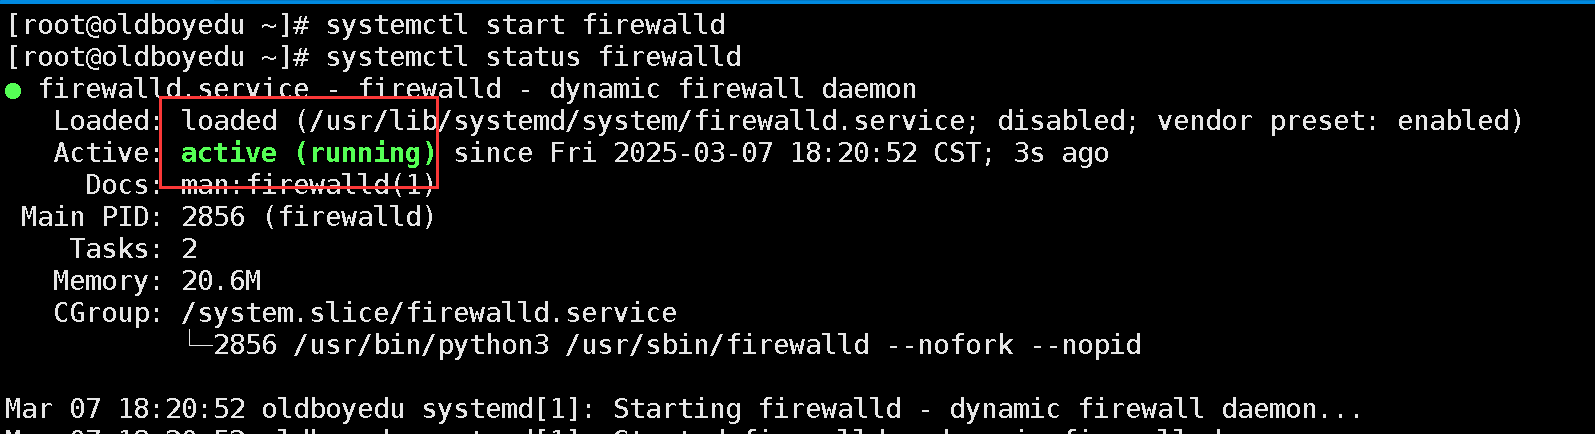
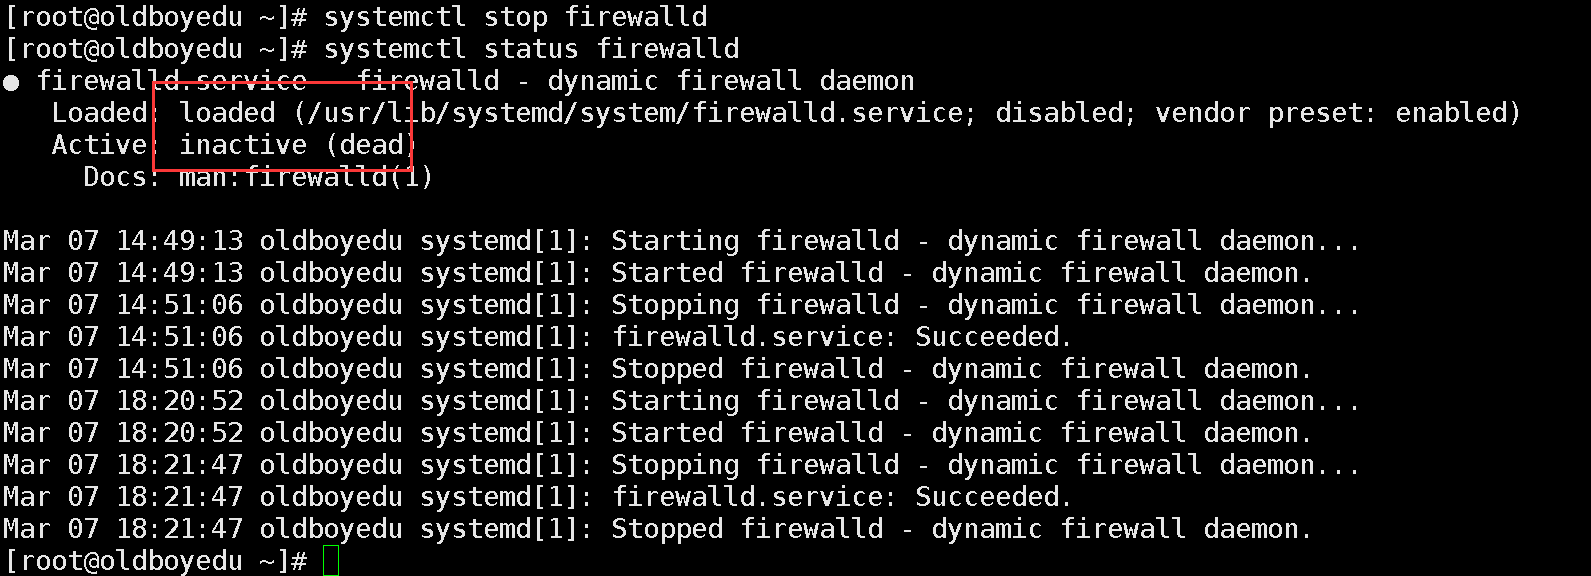
 [root@study ~]# systemctl stop firewalld
 [root@study ~]# systemctl start firewalld
 [root@study ~]# systemctl status firewalld
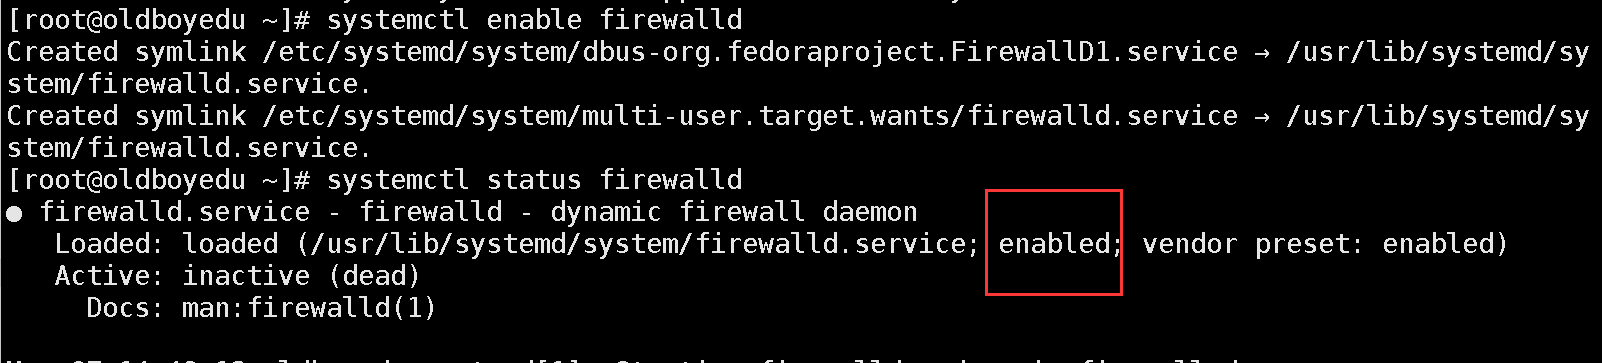
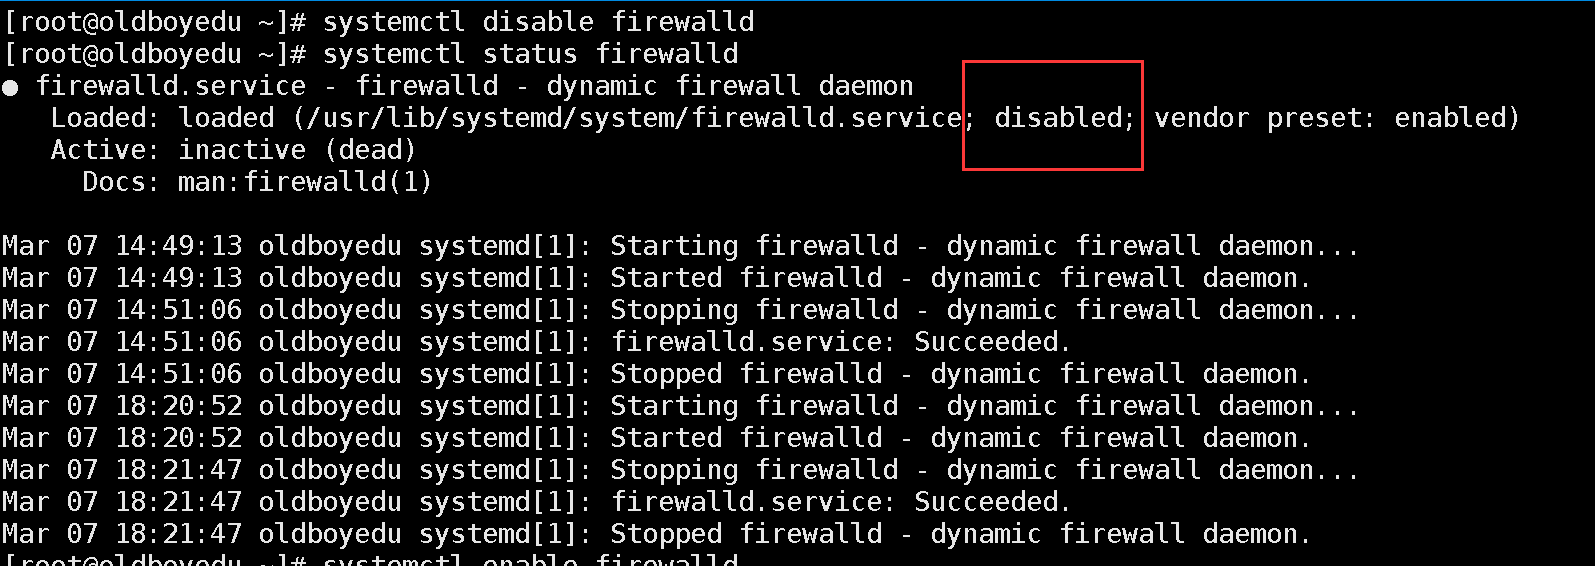
2.2 开机禁止启动防火墙
 [root@study ~]# systemctl enable firewalld
 [root@study ~]# systemctl disable firewalld
 [root@study ~]# systemctl status firewalld
3.Ubuntu防火墙
3.1 切换到root用户
study@study-inb:~$ sudo su - root
[sudo] password for study:  #输入用户密码
root@study-inb:~#
3.2 退出防火墙
root@study-inb:~# systemctl stop ufw
root@study-inb:~# systemctl status ufw
○ ufw.service - Uncomplicated firewall
     Loaded: loaded (/lib/systemd/system/ufw.service; disabled; vendor preset: enabled)
     Active: inactive (dead)
       Docs: man:ufw(8)
3.3 禁止开机自动启动
root@study-inb:~# systemctl disable ufw
Synchronizing state of ufw.service with SysV service script with /lib/systemd/systemd-sysv-install.
Executing: /lib/systemd/systemd-sysv-install disable ufw
三.字符集优化
字符集:不同国家的文字在系统中的表现方式
UTF-8:万国码
GBK:国标码

字符集得的配置文件:Kylin系统默认的是中文。
[root@study ~]# cat /etc/locale.conf
LANG="zh_CN.UTF-8"
1.Kylin系统
1.1 查看默认的字符集
[root@study ~]# echo $LANG
en_US.UTF-8
1.2 临时修改字符集
[root@study ~]# LANG=en_US.UTF-8
[root@study ~]# echo $LANG
en_US.UTF-8
1.3 永久修改字符集
方法1:
1.3.1 修改配置文件
[root@study ~]# vim /etc/locale.conf
[root@study ~]# echo $LANG
en_US.UTF-8
方法2:
1.3.2 使用命令设置语言
[root@study ~]# localectl set-locale LANG=en_US.UTF-8
[root@study ~]# echo $LANG
en_US.UTF-8
1.3.3 使配置文件生效的方法
方法1:
重新连接Xshell生效
方法2:
#使用命令source 文件名称  使变量直接生效
[root@study ~]# source /etc/locale.conf
[root@study ~]# echo /$LANG
/en_US.UTF-8
2.Ubuntu系统
2.1查看默认的字符集
root@study-inb:~# echo $LANG
en_US.UTF-8
2.2 临时修改字符集
root@study-inb:~# LANG=zh_CN.UTF-8
root@study-inb:~# echo $LANG
zh_CN.UTF-8
2.3 永久修改字符集
方法1:
2.3.1 修改配置文件
# 配置文件/etc/default/locale
root@study-inb:~# LANG=zh_CN.UTF-8
root@study-inb:~# echo $LANG
zh_CN.UTF-8
方法2:
2.3.2 设置语言(默认英文)
root@study-inb:~# localectl set-locale LANG=en_US.UTF-8
root@study-inb:~# source /etc/default/locale
root@study-inb:~# echo $LANG
en_US.UTF-8
四.时间同步
企业服务器必须保证时间正确的,如果不正确导致业务出现问
题。
硬件时间  服务器硬件 BIOS
系统时间  windows系统 linux系统时间
时间: 我们可以看懂的时间  2025-03-07-11-32-21
时间戳: 1741319636
1.Kylin系统
1.1 查看系统时间
[root@study ~]# date
Sun Feb 12 00:01:27 CST 2023
#按照以下格式输出
[root@study ~]# date +%F-%H-%M-%S
2023-02-12-00-02-40

[root@test tmp]# date +%F_%H:%M:%S
2025-03-09_22:51:43

Linux时间格式	描述
# %F直接显示年月日
# %H	小时(00…23)
# %M	分钟(00…59)
# %S	秒(00…61)
%I	小时(01…12)
%k	小时(0…23)
%l	小时(1…12)
%p	显示本地 AM 或 PM
%r	直接显示时间 (12 小时时制,格式为 hh:mm:ss [AP]M)
%s	从 1970 年 1 月 1 日 00:00:00 UTC 到当前为为止的秒数
%N	表示纳秒数,9 位数字,例如 “123456789”
%T	直接显示时间 (24 小时制显示时:分:秒)
1.2 修改系统时间
[root@study ~]# date -s 20070725
Wed Jul 25 00:00:00 CST 2007
1.3 系统时间同步
[root@study ~]# ntpdate ntp1.aliyun.com
-bash: /usr/sbin/ntpdate: No such file or directory
# 如果当前系统时间不正确,不让我们下载安装软件,需要手动配置大概的正确时间,再安装软件
[root@study ~]# date -s "20250307 20:28:20"
Fri Mar  7 20:28:20 CST 2025
[root@study ~]# yum -y install ntpdate

完成后执行以下命令同步时间
[root@study ~]# ntpdate ntp1.aliyun.com
 7 Mar 20:32:43 ntpdate[3783]: step time server 223.4.249.80 offset +34.453921 sec
[root@study ~]# date
Fri Mar  7 20:32:48 CST 2025
1.4 硬件时间
#注意硬件时间必须和系统时间保持一致
#查看硬件时间
[root@study ~]# clock
2025-03-07 20:56:15.226494+08:00
[root@study ~]# hwclock -w
[root@study ~]# clock
2025-03-07 20:57:06.383963+08:00
2.Ubuntu系统
2.1 查看系统时间
root@study-inb:~# date
Fri Mar  7 09:01:04 PM CST 2025
2.2 修改时区
root@study-inb:~# timedatectl set-timezone Asia/Shanghai
root@study-inb:~# date
Fri Mar  7 08:37:20 PM CST 2025
# 修改为24⼩时
echo "LC_TIME=en_DK.UTF-8" | sudo tee -a /etc/default/locale
source /etc/default/locale

# 时区配置文件位置
root@study-inb:~# cat /etc/timezone
Asia/Shanghai
2.3 硬件时间
# 注意硬件时间必须和系统时间保持一致
hwclock --systohc  # 将系统时间同步到硬件时间
root@study-inb:~# timedatectl
               Local time: Fri 2025-03-07 20:52:00 CST
           Universal time: Fri 2025-03-07 12:52:00 UTC
                 RTC time: Fri 2025-03-07 12:52:00   	#硬件时间
                Time zone: Asia/Shanghai (CST, +0800)
System clock synchronized: yes
              NTP service: active
          RTC in local TZ: no
五.软件安装
1.Kylin系统
2.1 yum软件安装
特点:
 	1.类似在手机应用商店点击下载安装
	2.自动解决依赖问题(在PC电脑上玩手游,必须安装手游模拟器)
 	3.类似去饭店吃饭 鱼香肉丝。
	4.必须可以连网

yum安装语法结构:
 yum -y install  wget 			# 安装wget命令
 yum -y install wget lrzsz tree # 安装多个命令
 yum -y remove  wget  			# 卸载wget命令
 yum -y remove wget tree lrzsz  # 卸载多个命令
 yum repolist     				# 查看yum仓库信息
 yum list						# 查看仓库中可用的软件
 yum -y reinstall 				# 覆盖安装
 yum search 或 yum provides      # 查看属于哪个软件
 yum -y localinstall x.rpm       # 可以自动解决依赖问题
 yum search 或 yum provides      # 查看某个命令属于哪个软件 百度
 yum clean all	# 清理YUM仓库缓存: 在无法安装软件尝试清理
 yum makecache  # 生成新的缓存

 yum -y --downloaddir=/opt/ --downloadonly install wget  # 前提wget没有安装过。


# 查看某个命令属于哪个包
方法1.通过yum自带的参数搜索。了解
[root@study ~]#yum provides rz
[root@study ~]#yum search rz
# 安装的时候注意全名或者不带版本号都可以
[root@study ~]#yum -y install net-tools 2.0-0.54.ky10.x86_64
或者直接不带版本号信息
[root@study ~]#yum -y install net-tools

方法2.百度一下你就知道
# 查看仓库信息:
[root@test ~]#yum repolist
repo id                                    repo name
epel                                       Extra Packages for Enterprise Linux 7 - x86_64
ks10-adv-os                                Kylin Linux Advanced Server 10 - Os
ks10-adv-updates                           Kylin Linux Advanced Server 10 - Updates

# 清理YUM仓库缓存: 在无法安装软件尝试清理
[root@test ~]#yum clean all
21 files removed

# 查看仓库中可用的软件: 类似查看手机软件商店里都有哪些软件
[root@study ~]#yum list

# 覆盖安装软件,在命令无法正常使用,无法卸载时,可以使用reinstall尝试覆盖安装
[root@study ~]#yum -y reinstall wget

案例1.安装wget命令
[root@test ~]#yum -y install wget
Last metadata expiration check: 12:59:22 ago on Tue 11 Mar 2025 03:07:32 AM CST.
Dependencies resolved.
====================================================================================================================
 软件包名称			平台				版本号				哪个仓库		  大小
 Package          Architecture        Version         Repository        Size
====================================================================================================================
Installing:
 wget              x86_64           1.20.3-6.ky10    ks10-adv-updates      643 k
Installing dependencies: # 安装的依赖包
 libmetalink       x86_64           0.1.3-8.ky10       ks10-adv-os          27k

Transaction Summary
====================================================================================================================
Install  2 Packages
....
....
Installed:
  libmetalink-0.1.3-8.ky10.x86_64    wget-1.20.3-6.ky10.x86_64
Complete!

Is this ok [y/N]: y|Y|YES|yes 继续安装  n|N|no|NO 取消安装。

案例2.安装多个命令
[root@test ~]#yum -y install wget lrzsz
[root@test ~]#yum -y install wget
Last metadata expiration check: 0:00:15 ago on Tue 11 Mar 2025 04:26:54 PM CST.
Package wget-1.20.3-6.ky10.x86_64 is already installed.
# wget包已经安装过

案例3.安装rz和sz命令
rz # 将windows上的文件上传到linux系统,简单方法鼠标拖拽
   # 安装某些命令软件时,命令提示在仓库中找不到

原因:
1.安装的命令名称或者软件包的名不正确
2.仓库中确实没有这个命令
3.安装的命令属于其他的包
4.一个包包含了多个命令

举例: rz 和sz命令属于 lrzsz包里的命令

# 注意不能上传空文件到linux系统
[root@test ~]#yum -y install rz
Last metadata expiration check: 0:03:44 ago on Tue 11 Mar 2025 04:26:54 PM CST.
No match for argument: rz
Error: Unable to find a match: rz
[root@test ~]#yum -y install sz
Last metadata expiration check: 0:04:17 ago on Tue 11 Mar 2025 04:26:54 PM CST.
No match for argument: sz
Error: Unable to find a match: sz

02.yum软件卸载
root@test ~]#yum -y remove wget
Dependencies resolved.
====================================================================================================================
 Package                   Architecture         Version                       Repository                       Size
====================================================================================================================
Removing:
 wget                      x86_64               1.20.3-6.ky10                 @ks10-adv-updates               2.9 M
Removing unused dependencies:
 libmetalink               x86_64               0.1.3-8.ky10                  @anaconda                        68 k

Transaction Summary
====================================================================================================================
Remove  2 Packages

Freed space: 2.9 M # 安装后的大小
....
....
Removed:
  libmetalink-0.1.3-8.ky10.x86_64                             wget-1.20.3-6.ky10.x86_64
Complete!

案例1.卸载多个命令
yum -y remove wget tree lrzsz   # 卸载多个命令

案例2.yum只下载软件,但是不安装
# 注意下载的软件使用yum必须联网
--downloaddir=/opt/
--downloadonly

# 注意要下载软件包,软件不能存在,必须卸载后,才能执行
[root@study ~]#yum -y --downloaddir=/opt/ --downloadonly install wget
root@study ~]#ll /opt/
 total 672-rw-r--r-- 1 root root  27188 Mar 11 10:45
libmetalink-0.1.3-8.ky10.x86_64.rpm-rw-r--r-- 1 root root 658912 Mar 11 10:45
wget-1.20.3-6.ky10.x86_64.rpm
2.2 rpm软件安装
特点:
 1.类似windows下载软件.exe,然后安装
 2.先下载.rpm包,在安装
 3.无法解决依赖问题,手动依赖
 4.类似吃饭点速冻水饺.买锅 买勺子 碗 酱油醋 辣椒 蒜 筷子
 5.仓库中默认已经存在,下载后上传到无法连网的服务器上进行安装
 6.默认仓库中软件不存在,需要到第三方软件官网下载软件安装(服务)
 7.操作系统安装过程中使用的rpm包的方式安装的

语法结构:
 		rpm -ivh  包名称 xx.rpm
 		-i		#安装软件 不能省略
 		-v		#显示过程
 		-h		#显示进度
 		-e		#卸载软件 或者使用yum -y remove
 		-qa		#查看系统已经安装过的软件
 		-ql		#查看安装了哪些软件的文件  rpm -ql wget
 		-qc		#查看服务配置文件的位

案例1.安装wget软件包
[root@test ~]#rpm -ivh wget-1.20.3-6.ky10.x86_64.rpm
Verifying...                          ################################# [100%]
Preparing...                          ################################# [100%]
Updating / installing...
   1:wget-1.20.3-6.ky10               ################################# [100%]

 案例2.进入光驱的目录下安装软件
# 相对路径安装
[root@study ~]#cd /mnt/Packages/
[root@study /mnt/Packages]#
[root@study /mnt/Packages]#rpm -ivh zstd
devel-1.4.5-1.ky10.x86_64.rpm
 Verifying...
################################# [100%]
 Preparing...
################################# [100%]
 Updating / installing...
 1:zstd-devel-1.4.5-1.ky10
################################# [100%]

# 使用绝对路径安装
[root@study ~]#rpm -ivh
/mnt/Packages/zstd-devel-1.4.5
1.ky10.x86_64.rpm
 Verifying...
################################# [100%]
 Preparing...
################################# [100%]
 Updating / installing...
 1:zstd-devel-1.4.5-1.ky10
################################# [100%]

案例3.卸载wget命令
# 用yum或者rpm安装的软件都可以使用yum或者rpm进行卸载。
方法1.rpm方式卸载
[root@study ~]#rpm -e wget
方法2.yum方式卸载
[root@study ~]#yum -y remove wget

案例4.查看某个软件是否安装
[root@test ~]#rpm -qa wget
wget-1.20.3-6.ky10.x86_64	# 有结果说明已经安装
[root@test ~]#rpm -qa wget  # 啥都不显示说明没有安装

案例5.查看多个软件是否安装
[root@test ~]#rpm -qa wget lrzsz
wget-1.20.3-6.ky10.x86_64
lrzsz-0.12.20-46.ky10.x86_64

案例6.查看软件安装后的所有文件 了解
[root@test ~]#rpm -ql wget
/etc/wgetrc
/usr/bin/wget
/usr/share/doc/wget
/usr/share/doc/wget/AUTHORS
...
...

案例7.只显示安装命令或者服务的配置文件所在位置 了解
[root@test ~]#rpm -qc wget lrzsz
/etc/wgetrc
2.3 小结
软件安装
yum安装 必须可以上网,自动解决依赖
yum -y install 包名称 包名称 # 不知道包名称查百度
yum -y remove  包名称 包名称 # 卸载软件包
yum -y clean all # 清理yum缓存
yum repolist     # 查看YUM仓库
yum -y --downloaddir=/opt/ --downloadonly install wget #前提wget没有安装过。
yum -y localinstall x.rpm # 可以自动解决依赖问题。
yum -y reinstall # 覆盖安装
yum provides     # 查看属于哪个软件
yum search       # 查看属于哪个软件
yum -y --downloaddir=/opt/ --downloadonly install wget  # 前提wget没有安装过。

rpm 手动解决依赖
		rpm -ivh xx.rpm  # 安装rpm包
		-ivh     # 一起使用 安装软件显示进度
		-qa wget # 查看wget是否安装
		-e  wget # 卸载软件
		-ql      # 查看安装了哪些文件 了解
		-qc      # 查看配置文件位置   了解
2.Ubunt系统
2.1 apt软件安装
apt安装语法结构:
 apt -y install  wget 			    # 安装wget命令
 apt -y install wget lrzsz tree # 安装多个命令
 apt -y remove  wget  			    # 卸载wget命令
 apt -y remove wget tree lrzsz  # 卸载多个命令
 apt list						            # 查看仓库中可用的软件
 apt -y reinstall 				      # 覆盖安装
 apt search 或 yum provides     # 查看属于哪个软件
 apt -y localinstall x.deb      # 可以自动解决依赖问题
 apt search 或 yum provides     # 查看属于哪个软件
 apt clean all	# 清理YUM仓库缓存: 在无法安装软件尝试清理
2.1.1 安装软件
root@studyinb:~# apt -y install wget
apt -y install tree vim wget lrzsz net-tools unzip nmap telnet bc expect
2.1.2 卸载软件
root@studyinb:~# apt -y remove wget
2.2 dpkg软件安装
# 查找特定软件包的位置
root@studyinb:~# dpkg -L wget
/etc
/etc/wgetrc


dpkg -i xx.deb        # -i install
dpkg -r xx.deb        # -r remove
2.3 配置root用户登录
1.更新软件源
sudo su - root
apt update
[root@study ~]# apt -y install gdm3 net-tools iputils-ping


2.修改"gdm-password"配置文件
vim /etc/pam.d/gdm-password
...
# auth  required        pam_succeed_if.so user != root quiet_success

3.修改"gdm-autologin"配置文件
vim /etc/pam.d/gdm-autologin
...
# auth  required        pam_succeed_if.so user != root quiet_success

4.修改sshd服务的配置文件
vim /etc/ssh/sshd_config
...
# 允许 root 用户直接通过 SSH 登录服务器
PermitRootLogin yes
# 允许使用密码进行 SSH 认证(而非仅密钥认证)
PasswordAuthentication yes

5.重启sshd服务
systemctl restart sshd


6.配置root的密码
passwd root
2.4 网卡名称修改为eth0
# 查看当前网卡信息
[root@yangyi ~]# ip a
1: lo: <LOOPBACK,UP,LOWER_UP> mtu 65536 qdisc noqueue state UNKNOWN group default qlen 1000
    link/loopback 00:00:00:00:00:00 brd 00:00:00:00:00:00
    inet 127.0.0.1/8 scope host lo
       valid_lft forever preferred_lft forever
    inet6 ::1/128 scope host
       valid_lft forever preferred_lft forever
2: ens33: <BROADCAST,MULTICAST,UP,LOWER_UP> mtu 1500 qdisc fq_codel state UP group default qlen 1000
    link/ether 00:0c:29:dc:d7:ae brd ff:ff:ff:ff:ff:ff
    altname enp2s1
    inet 10.0.0.200/24 brd 10.0.0.255 scope global ens33
       valid_lft forever preferred_lft forever
    inet6 fe80::20c:29ff:fedc:d7ae/64 scope link
       valid_lft forever preferred_lft forever

# 修改 GRUB 内核参数
[root@yangyi ~]# vim /etc/default/grub
# If you change this file, run 'update-grub' afterwards to update
# /boot/grub/grub.cfg.
# For full documentation of the options in this file, see:
#   info -f grub -n 'Simple configuration'

GRUB_DEFAULT=0
GRUB_TIMEOUT_STYLE=hidden
GRUB_TIMEOUT=0
GRUB_DISTRIBUTOR=`lsb_release -i -s 2> /dev/null || echo Debian`
# GRUB_CMDLINE_LINUX_DEFAULT=""
# GRUB_CMDLINE_LINUX=""
GRUB_CMDLINE_LINUX="net.ifnames=0 biosdevname=0"
...

# 更新 GRUB 配置
[root@yangyi ~]# update-grub

# 修改网卡配置文件
[root@yangyi ~]# vim /etc/netplan/00-installer-config.yaml
# This is the network config written by 'subiquity'
network:
  ethernets:
# 原名称为 ens33,此处修改为 eth0
    eth0:
      dhcp4: false
      # dhcp4: true
      addresses:
        - 10.0.0.200/24
...
...

# 重启系统生效
[root@yangyi ~]# reboot

# 测试验证
[root@yangyi ~]# ip a
1: lo: <LOOPBACK,UP,LOWER_UP> mtu 65536 qdisc noqueue state UNKNOWN group default qlen 1000
    link/loopback 00:00:00:00:00:00 brd 00:00:00:00:00:00
    inet 127.0.0.1/8 scope host lo
       valid_lft forever preferred_lft forever
    inet6 ::1/128 scope host
       valid_lft forever preferred_lft forever
2: eth0: <BROADCAST,MULTICAST,UP,LOWER_UP> mtu 1500 qdisc fq_codel state UP group default qlen 1000
    link/ether 00:0c:29:dc:d7:ae brd ff:ff:ff:ff:ff:ff
    altname enp2s1
    altname ens33
    inet 10.0.0.200/24 brd 10.0.0.255 scope global eth0
       valid_lft forever preferred_lft forever
    inet6 fe80::20c:29ff:fedc:d7ae/64 scope link
       valid_lft forever preferred_lft forever
2.5 小结
Ubbunt系统
apt安装语法结构:
  apt -y install  wget 			# 安装wget命令
  apt -y install wget lrzsz tree # 安装多个命令
  apt -y remove  wget  			    # 卸载wget命令
  apt -y remove wget tree lrzsz  # 卸载多个命令
  apt list						      # 查看仓库中可用的软件
  apt -y reinstall 				# 覆盖安装
  apt search 或 yum provides     # 查看属于哪个软件
  apt -y localinstall x.deb      # 可以自动解决依赖问题
  apt search 或 yum provides     # 查看属于哪个软件
  apt clean all	# 清理YUM仓库缓存: 在无法安装软件尝试清理

dpkg -L wget # 查找特定软件包的位置
dpkg -i xx.deb        # -i install
dpkg -r xx.deb        # -r remove
六.命令提示符优化
1.kylin命令提示符优化
[root@study ~]#  # 命令提示符 命令解释器。
-bash-4.2$	 # 这个是真正的命令提示符的样子。相当于套了个皮套。

使过滤出的字符显示红色,将一下内容写入/etc/profile

alias grep='grep --color=auto'
alias egrep='egrep --color=auto'

-----------------------------优化1--------------------------------------------
# 颜色定义(使用变量,避免重复转义序列)
Red="\[\e[31;1m\]"
Green="\[\e[32;1m\]"
Yellow="\[\e[33;1m\]"
Blue="\[\e[34;1m\]"
NC="\[\e[0m\]"  # No Color

# 优化的PS1格式(合并颜色代码,增强可读性)
export PS1="[$Red\u@$Green\H$Red \w$Blue \A$NC]# "
[root@study ~ 11:00]# source /etc/profile
[root@study ~ 11:00]#


---------------------------------------优化2------------------------------------
# 颜色定义(使用变量,避免重复转义序列)
Red="\[\e[31;1m\]"
Green="\[\e[32;1m\]"
Yellow="\[\e[33;1m\]"
Blue="\[\e[34;1m\]"
NC="\[\e[0m\]"  # No Color

# 获取尾部目录(多级目录时只显示最后一级)
get_tail_dir() {
    if [ "$PWD" = "$HOME" ]; then
        echo "~"
    else
        echo "${PWD##*/}"  # 获取最后一级目录名
    fi
}

# 优化的PS1格式(使用尾部目录)
# 显示格式: [root@study ~ 11:13]#
# export PS1="[$Red\u@$Green\H$Red \$(get_tail_dir)$Blue \A$NC]# "
# 显示格式: [root@study ~ ]#
export PS1="[$Red\u@$Green\H$Red \$(get_tail_dir)$NC]# "


[root@study ~ 11:00]# source /etc/profile
[root@study ~ 11:00]#
[root@study ~ 11:13]# cd /etc/sysconfig/network-scripts/
2.ubt命令提示符优化
# 默认格式
root@study:~# echo $PS1
\[\e]0;\u@\h: \w\a\]${debian_chroot:+($debian_chroot)}\u@\h:\w\$

-------------------------------------------优化1--------------------------------------------------
# 定义颜色变量
RESET="\[\e[0m\]"
GREEN="\[\e[01;32m\]"
BLUE="\[\e[01;34m\]"
RED="\[\e[01;31m\]"

# 设置用户名颜色:root用户用红色,普通用户用绿色
if [[ $EUID -eq 0 ]]; then
    USER_COLOR="$RED"
else
    USER_COLOR="$BLUE"
fi

# 设置完整的PS1
PS1="[\[\e]0;\u@\h: \w\a\]${debian_chroot:+($debian_chroot)}${USER_COLOR}\u${RESET}@${GREEN}\h${RESET}  ${RED}\w${RESET}]\\\$ "

------------------------------------------------优化2--------------------------------------
[root@db01 ~ 11:24]#vim /etc/profile
Red="\[\e[31;1m\]"
Green="\[\e[32;1m\]"
Yellow="\[\e[33;1m\]"
Blue="\[\e[34;1m\]"
NC="\[\e[0m\]"
export PS1="[$Red\u$NC$Blue@$NC$Green\h$NC $Yellow\W$NC $Blue\A$NC]\\$"

[root@db01 ~ 11:24]#source /etc/profile

 浙公网安备 33010602011771号