python爬虫之request模块详解
requests模块
使用requests可以模拟浏览器的请求,比起之前用到的urllib,requests模块的api更加便捷(本质就是封装了urllib3)
注意:requests库发送请求将网页内容下载下来以后,并不会执行js代码,这需要我们自己分析目标站点然后发起新的request请求
官方文档:http://cn.python-requests.org/zh_CN/latest/
安装:pip3 install requests
requests模块的各种请求方式
源码构成如下
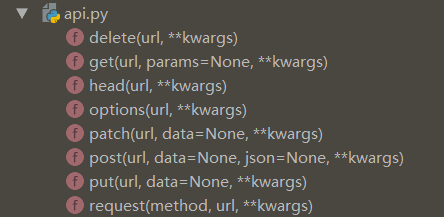
# 以上方法均是在此方法的基础上构建
|
1
|
requests.request(method, url,**kwargs) |
其中最常用的请求方式就是post和get请求,泵智商,post和get就是封装了request请求的请求方式
|
1
2
3
4
|
>>> r= requests.get('https://api.github.com/events')相当于requests,request(method='get','https://api.github.com/events')>>> r= requests.post('http://httpbin.org/post', data= {'key':'value'})相当于requests,request(method='post','https://api.github.com/events', data= {'key':'value'}) |
requests,request方法详解
request()源码
|
1
2
3
4
5
6
7
8
9
10
11
12
13
14
15
16
17
18
19
20
21
22
23
24
25
26
27
28
29
30
31
32
33
34
35
36
37
38
39
40
41
42
43
|
def request(method, url,**kwargs): """Constructs and sends a :class:`Request <Request>`. :param method: method for the new :class:`Request` object. :param url: URL for the new :class:`Request` object. :param params: (optional) Dictionary or bytes to be sent in the query string for the :class:`Request`. :param data: (optional) Dictionary or list of tuples ``[(key, value)]`` (will be form-encoded), bytes, or file-like object to send in the body of the :class:`Request`. :param json: (optional) json data to send in the body of the :class:`Request`. :param headers: (optional) Dictionary of HTTP Headers to send with the :class:`Request`. :param cookies: (optional) Dict or CookieJar object to send with the :class:`Request`. :param files: (optional) Dictionary of ``'name': file-like-objects`` (or ``{'name': file-tuple}``) for multipart encoding upload. ``file-tuple`` can be a 2-tuple ``('filename', fileobj)``, 3-tuple ``('filename', fileobj, 'content_type')`` or a 4-tuple ``('filename', fileobj, 'content_type', custom_headers)``, where ``'content-type'`` is a string defining the content type of the given file and ``custom_headers`` a dict-like object containing additional headers to add for the file. :param auth: (optional) Auth tuple to enable Basic/Digest/Custom HTTP Auth. :param timeout: (optional) How many seconds to wait for the server to send data before giving up, as a float, or a :ref:`(connect timeout, read timeout) <timeouts>` tuple. :type timeout: float or tuple :param allow_redirects: (optional) Boolean. Enable/disable GET/OPTIONS/POST/PUT/PATCH/DELETE/HEAD redirection. Defaults to ``True``. :type allow_redirects: bool :param proxies: (optional) Dictionary mapping protocol to the URL of the proxy. :param verify: (optional) Either a boolean, in which case it controls whether we verify the server's TLS certificate, or a string, in which case it must be a path to a CA bundle to use. Defaults to ``True``. :param stream: (optional) if ``False``, the response content will be immediately downloaded. :param cert: (optional) if String, path to ssl client cert file (.pem). If Tuple, ('cert', 'key') pair. :return: :class:`Response <Response>` object :rtype: requests.Response Usage:: >>> import requests >>> req = requests.request('GET', 'http://httpbin.org/get') <Response [200]> """ # By using the 'with' statement we are sure the session is closed, thus we # avoid leaving sockets open which can trigger a ResourceWarning in some # cases, and look like a memory leak in others. with sessions.Session() as session: return session.request(method=method, url=url,**kwargs) |
下面对源码中的各个属性进行分析
method和url
指名请求方式和请求路径
|
1
2
|
requests.request(method='get', url='http://127.0.0.1:8000/test/')requests.request(method='post', url='http://127.0.0.1:8000/test/') |
params
requests模块发送请求有data、json、params三种携带参数的方法。
params在get请求中使用,data、json在post请求中使用。
params可以接收的参数:
|
1
2
3
4
|
- 可以是字典- 可以是字符串字典字符串都会被自动编码发送到url- 可以是字节(必须是ascii编码以内) |
接收字典字符串都会被自动编码发送到url,如下
|
1
2
3
4
5
6
7
8
9
10
11
12
13
14
15
|
import requestswd='egon老师'pn=1response=requests.get('https://www.baidu.com/s', params={ 'wd':wd, 'pn':pn }, headers={ 'User-Agent':'Mozilla/5.0 (Windows NT 6.1; WOW64) AppleWebKit/537.36 (KHTML, like Gecko) Chrome/62.0.3202.75 Safari/537.36', })print(response.url)# 输出为:https://www.baidu.com/s?wd=egon%E8%80%81%E5%B8%88&pn=1# 可见url已被自动编码 |
上面代码相当于如下代码,params编码转换本质上是用urlencode
|
1
2
3
4
5
6
7
8
9
10
11
12
13
14
15
|
import requestsfrom urllib.parseimport urlencodewd='egon老师'encode_res=urlencode({'k':wd},encoding='utf-8')keyword=encode_res.split('=')[1]print(keyword)# 然后拼接成urlurl='https://www.baidu.com/s?wd=%s&pn=1' %keywordresponse=requests.get(url, headers={ 'User-Agent':'Mozilla/5.0 (Windows NT 6.1; WOW64) AppleWebKit/537.36 (KHTML, like Gecko) Chrome/62.0.3202.75 Safari/537.36', })print(response.url)# 输出为:https://www.baidu.com/s?wd=egon%E8%80%81%E5%B8%88&pn=1 |
还有一点注意的就是接收字节数据时,不能传非ASCII码外的字符,如下就是错误的
|
1
2
3
4
5
|
import requests# re = requests.request(method='get',# url='http://127.0.0.1:8000/test/',# params=bytes("k1=v1&k2=水电费&k3=v3&k3=vv3", encoding='utf8')) |
data
requests模块发送请求有data、json、params三种携带参数的方法。params在get请求中使用,data、json在post请求中使用。
data可以接收的参数为:字典,字符串,字节,文件对象,data和json两者的区别在于data的请求体为name=alex&age=18格式而json请求体为‘{'k1': 'v1', 'k2': '水电费'}’(字符串)
|
1
2
3
4
5
6
7
8
9
10
11
12
13
14
15
16
17
18
19
20
|
requests.request(method='POST', url='http://127.0.0.1:8000/test/', data={'k1':'v1','k2':'水电费'})requests.request(method='POST', url='http://127.0.0.1:8000/test/', data="k1=v1; k2=v2; k3=v3; k3=v4" )requests.request(method='POST', url='http://127.0.0.1:8000/test/', data="k1=v1;k2=v2;k3=v3;k3=v4", headers={'Content-Type':'application/x-www-form-urlencoded'} )requests.request(method='POST', url='http://127.0.0.1:8000/test/', data=open('data_file.py', mode='r', encoding='utf-8'), # 文件内容是:k1=v1;k2=v2;k3=v3;k3=v4 headers={'Content-Type':'application/x-www-form-urlencoded'} ) |
json
将json中对应的数据进行序列化成一个字符串,json.dumps(...)
然后发送到服务器端的body中,并且Content-Type是 {'Content-Type': 'application/json'}
标志:payload
|
1
2
3
|
requests.request(method='POST', url='http://127.0.0.1:8000/test/', json={'k1':'v1','k2':'水电费'}) |
headers
发送请求头到服务器
|
1
2
3
4
5
|
requests.request(method='POST', url='http://127.0.0.1:8000/test/', json={'k1':'v1','k2':'水电费'}, headers={'Content-Type':'application/x-www-form-urlencoded'} ) |
cookies
|
1
2
3
4
5
6
7
8
9
10
11
12
13
14
15
16
17
18
19
|
# 发送Cookie到服务器端requests.request(method='POST', url='http://127.0.0.1:8000/test/', data={'k1':'v1','k2':'v2'}, cookies={'cook1':'value1'}, )# 也可以使用CookieJar(字典形式就是在此基础上封装)from http.cookiejarimport CookieJarfrom http.cookiejarimport Cookieobj= CookieJar()obj.set_cookie(Cookie(version=0, name='c1', value='v1', port=None, domain='', path='/', secure=False, expires=None, discard=True, comment=None, comment_url=None, rest={'HttpOnly':None}, rfc2109=False, port_specified=False, domain_specified=False, domain_initial_dot=False, path_specified=False) )requests.request(method='POST', url='http://127.0.0.1:8000/test/', data={'k1':'v1','k2':'v2'}, cookies=obj) |
files
|
1
2
3
4
5
6
7
8
9
10
11
12
13
14
15
16
17
18
19
20
21
22
23
24
25
26
27
28
29
30
31
|
发送文件file_dict= { 'f1':open('readme','rb')}requests.request(method='POST', url='http://127.0.0.1:8000/test/', files=file_dict)发送文件,定制文件名file_dict= { 'f1': ('test.txt',open('readme','rb'))}requests.request(method='POST', url='http://127.0.0.1:8000/test/', files=file_dict)发送文件,定制文件名file_dict= { 'f1': ('test.txt',"hahsfaksfa9kasdjflaksdjf")}requests.request(method='POST', url='http://127.0.0.1:8000/test/', files=file_dict)发送文件,定制文件名file_dict= { 'f1': ('test.txt',"hahsfaksfa9kasdjflaksdjf",'application/text', {'k1':'0'})}requests.request(method='POST', url='http://127.0.0.1:8000/test/', files=file_dict) |
auth认证
解决浏览器的自带认证问题
认证设置:登陆网站是,弹出一个框,要求你输入用户名密码(与alter很类似),此时是无法获取html的,但本质原理是拼接成请求头发送
|
1
|
r.headers['Authorization']= _basic_auth_str(self.username,self.password) |
一般的网站都不用默认的加密方式,都是自己写,那么我们就需要按照网站的加密方式,自己写一个类似于_basic_auth_str的方法
得到加密字符串后添加到请求头:r.headers['Authorization'] =func('.....')

HTTPBasicAuth实际是向浏览器发一个带有Authorization:.................的请求
|
1
2
3
4
5
|
HTTPBasicAuthfrom requests.authimport HTTPBasicAuth, HTTPDigestAuthret= requests.get('https://api.github.com/user', auth=HTTPBasicAuth('wupeiqi','sdfasdfasdf'))print(ret.text) |
auth别的使用方式
|
1
2
3
4
5
6
7
|
# ret = requests.get('http://192.168.1.1',# auth=HTTPBasicAuth('admin', 'admin'))# ret.encoding = 'gbk'# print(ret.text)# ret = requests.get('http://httpbin.org/digest-auth/auth/user/pass', auth=HTTPDigestAuth('user', 'pass'))# print(ret) |
timeout
两种超时:float or tuple
timeout=0.1 #代表接收数据的超时时间
timeout=(0.1,0.2)#0.1代表链接超时 0.2代表接收数据的超时时间
|
1
2
3
|
import requestsrespone=requests.get('https://www.baidu.com', timeout=0.0001) |
redirects
|
1
2
|
ret= requests.get('http://127.0.0.1:8000/test/', allow_redirects=False)print(ret.text) |
proxies
代理设置
|
1
2
3
4
5
6
7
8
9
10
11
12
13
14
15
16
17
18
19
20
21
22
23
24
25
26
27
28
29
30
31
32
33
34
|
# 根据协议来确定发送请求时候的ip地址proxies= { "http":"61.172.249.96:80", "https":"http://61.185.219.126:3128",}# 根据接收请求的地址来确定用什么地址发送proxies= {'http://10.20.1.128':'http://10.10.1.10:5323'}ret= requests.get("http://www.proxy360.cn/Proxy", proxies=proxies)print(ret.headers)from requests.authimport HTTPProxyAuthproxyDict= { 'http':'77.75.105.165', 'https':'77.75.105.165'}auth= HTTPProxyAuth('username','mypassword')r= requests.get("http://www.google.com", proxies=proxyDict, auth=auth)print(r.text)#支持socks代理,安装:pip install requests[socks]import requestsproxies= { 'http':'socks5://user:pass@host:port', 'https':'socks5://user:pass@host:port'}respone=requests.get('https://www.12306.cn', proxies=proxies)print(respone.status_code) |
stream
|
1
2
3
4
5
6
7
8
9
|
ret= requests.get('http://127.0.0.1:8000/test/', stream=True)print(ret.content)ret.close()# from contextlib import closing# with closing(requests.get('http://httpbin.org/get', stream=True)) as r:# # 在此处理响应。# for i in r.iter_content():# print(i) |
session
|
1
2
3
4
5
6
7
8
9
10
11
12
13
14
15
16
17
18
19
20
21
22
|
import requestssession= requests.Session()### 1、首先登陆任何页面,获取cookiei1= session.get(url="http://dig.chouti.com/help/service")### 2、用户登陆,携带上一次的cookie,后台对cookie中的 gpsd 进行授权i2= session.post( url="http://dig.chouti.com/login", data={ 'phone':"8615131255089", 'password':"xxxxxx", 'oneMonth': "" })i3= session.post( url="http://dig.chouti.com/link/vote?linksId=8589623",)print(i3.text) |
编码问题
|
1
2
3
4
|
import requestsresponse=requests.get('http://www.autohome.com/news')# response.encoding='gbk' #汽车之家网站返回的页面内容为gb2312编码的,而requests的默认编码为ISO-8859-1,如果不设置成gbk则中文乱码print(response.text) |

 浙公网安备 33010602011771号