Swagger
笔记
spring-boot整合丝袜哥
1.导入依赖
<!-- https://mvnrepository.com/artifact/io.springfox/springfox-swagger2 -->
<dependency>
    <groupId>io.springfox</groupId>
    <artifactId>springfox-swagger2</artifactId>
    <version>2.9.2</version>
</dependency>
<!-- https://mvnrepository.com/artifact/io.springfox/springfox-swagger-ui -->
<dependency>
    <groupId>io.springfox</groupId>
    <artifactId>springfox-swagger-ui</artifactId>
    <version>2.9.2</version>
</dependency>
2.配置Swagger
@Configuration
@EnableSwagger2 //启用Swagger2
public class SwaggerConfig {
}
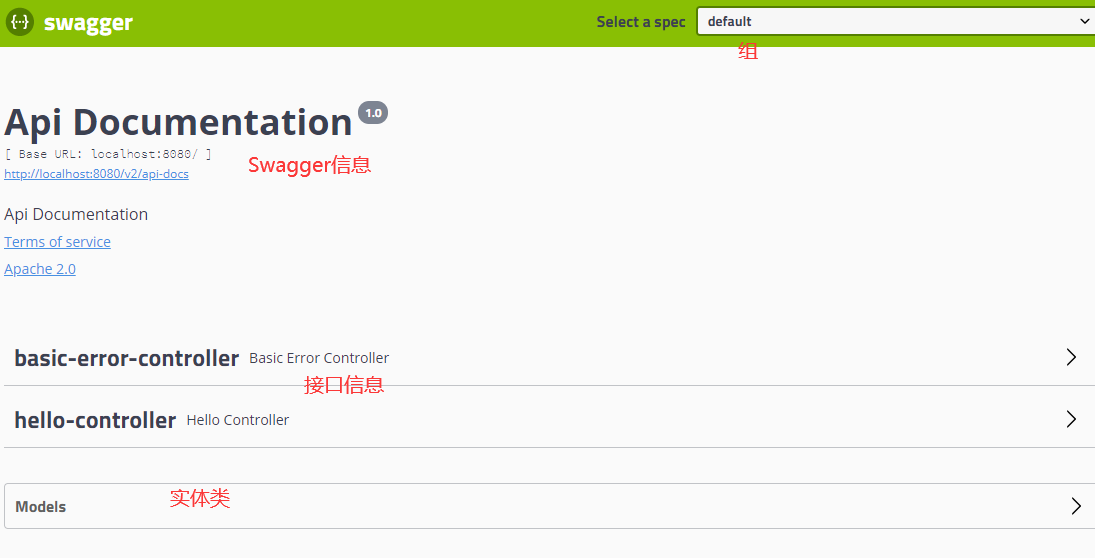
3.访问页面http://localhost:8080/swagger-ui.html

4.配置swagger信息
Swagger的bean实例Docket
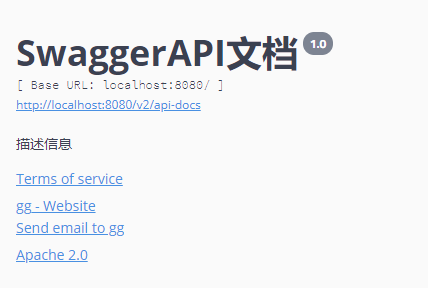
@Configuration
@EnableSwagger2 //启用Swagger2
public class SwaggerConfig {

    @Bean
    public Docket docket(){
        return new Docket(DocumentationType.SWAGGER_2)
                .apiInfo(apiInfo());
    }

    //配置Swagger信息apiInfo
//    @Bean
    private ApiInfo apiInfo(){
        Contact contact = new Contact("gg", "https://gitee.com/gg-study/ssm", "xxxxx@qq.com");
        return new ApiInfo("SwaggerAPI文档", "描述信息", "1.0", "https://gitee.com/gg-study/ssm",
                contact, "Apache 2.0", "http://www.apache.org/licenses/LICENSE-2.0",
                new ArrayList());
    }
Swagger配置
1.配置扫描接口
@Bean
public Docket docket(){
    return new Docket(DocumentationType.SWAGGER_2)
            .apiInfo(apiInfo())
            .select()
            //RequestHandlerSelectors:配置要扫描的接口
            //basePackage:指定要扫描的包
            //any:扫描全部
            //none:不扫描
            //withClassAnnotation:扫描类上的注解,参数是一个注解的反射对象
            //withMethodAnnotation:扫描方法上的注解
            .apis(RequestHandlerSelectors.basePackage("com.gg.swagger.controller"))
            //过滤
            .paths(PathSelectors.ant("/gg/**"))
            .build();
}
2.配置是否启动Swagger
@Bean
public Docket docket(){
    return new Docket(DocumentationType.SWAGGER_2)
            .apiInfo(apiInfo())
            //是否使用swagger
            .enable(false)
            .select()
😱 Could not render e, see the console.
设置生产环境不开启Swagger
application.properties
server.port=8080
spring.profiles.active=dev
#spring.profiles.active=pro
===========================
application-dev.properties
server.port=8081
===========================
application-pro.properties
server.port=8082


@Bean
public Docket docket(Environment environment){

    //设置要显示的Swagger环境
    Profiles profiles = Profiles.of("dev","test");

    //获取项目环境
    //通过environment.acceptsProfiles判断是否处在自己的设定环境当中
    boolean flag = environment.acceptsProfiles(profiles);

    return new Docket(DocumentationType.SWAGGER_2)
            .apiInfo(apiInfo())
            //是否使用swagger
            .enable(flag)
配置API文档的分组
@Bean
public Docket docket(){
    return new Docket(DocumentationType.SWAGGER_2)
            .apiInfo(apiInfo())
            .groupName("GG")
配置多个分组,多个Docket实例即可
@Bean
public Docket docket1(){
    return new Docket(DocumentationType.SWAGGER_2).groupName("new");
}


@Bean
public Docket docket2(){
    return new Docket(DocumentationType.SWAGGER_2).groupName("new1");
}


@Bean
public Docket docket3(){
    return new Docket(DocumentationType.SWAGGER_2).groupName("new2");
}


@Bean
public Docket docket(Environment environment){
实体类配置
1.编写实体类
2.编写controller
//只要我们的接口中,返回值存在实体类,他就会被扫描到Swagger
@PostMapping(value = "/user")
public User user(){
    return new User();
}
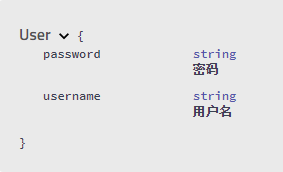
3.Swagger给实体类添加注释
@Api("用户实体类")
public class User {
    @ApiModelProperty("用户名")
    private String username;
    @ApiModelProperty("密码")
    private String password;
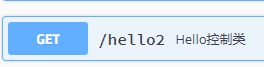
4.给controller添加注释
@ApiOperation("Hello控制类")
@GetMapping(value = "/hello2")
public String hello2(String username){
    return "hello"+username;
}
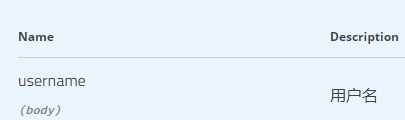
5.给参数添加注释
@ApiOperation("Hello控制类")
@GetMapping(value = "/hello2")
public String hello2(@ApiParam("用户名") String username){
    return "hello"+username;
}
6.利用Swagger测试接口
时间花在哪里,成就就在哪里

 浙公网安备 33010602011771号