SpringMVC
笔记
spring-mvc的优点
1.轻量级,简单易学
2.高效,基于请求响应的MVC框架
3.与Spring兼容性好,无缝结合
4.约定大于配置
5.功能强大:RESTful,数据验证,格式化,本地化,主题等
6.简介灵活
SpringMVC流程:
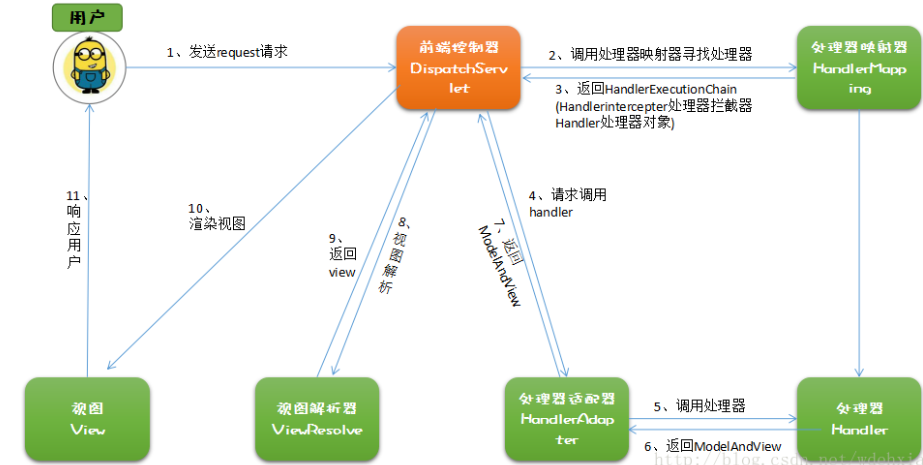
https://blog.csdn.net/wdehxiang/article/details/77619512
运行第一个SpringMVC项目
1.创建项目导入依赖


<dependencies>
        <dependency>
            <groupId>junit</groupId>
            <artifactId>junit</artifactId>
            <version>4.12</version>
            <scope>test</scope>
        </dependency>
        <dependency>
            <groupId>org.springframework</groupId>
            <artifactId>spring-webmvc</artifactId>
            <version>5.1.9.RELEASE</version>
        </dependency>
        <!-- https://mvnrepository.com/artifact/javax.servlet/javax.servlet-api -->
        <dependency>
            <groupId>javax.servlet</groupId>
            <artifactId>javax.servlet-api</artifactId>
            <version>3.1.0</version>
            <scope>provided</scope>
        </dependency>
        <dependency>
            <groupId>javax.servlet.jsp</groupId>
            <artifactId>jsp-api</artifactId>
            <version>2.2</version>
        </dependency>
        <dependency>
            <groupId>javax.servlet</groupId>
            <artifactId>jstl</artifactId>
            <version>1.2</version>
        </dependency>
    </dependencies>
2.在web.xml中配置DispatchServlet
<?xml version="1.0" encoding="UTF-8"?>
<web-app xmlns="http://xmlns.jcp.org/xml/ns/javaee"
         xmlns:xsi="http://www.w3.org/2001/XMLSchema-instance"
         xsi:schemaLocation="http://xmlns.jcp.org/xml/ns/javaee http://xmlns.jcp.org/xml/ns/javaee/web-app_4_0.xsd"
         version="4.0">

    <!--配置DispatcherServlet:这个是SpringMVC的核心,请求分发器,前端控制器-->
    <servlet>
        <servlet-name>Spring-mvc</servlet-name>
        <servlet-class>org.springframework.web.servlet.DispatcherServlet</servlet-class>
        <!--DispatcherServlet要绑定Spring文件-->
        <init-param>
            <param-name>contextConfigLocation</param-name>
            <param-value>classpath:Spring-mvc-servlet.xml</param-value>
        </init-param>
        <!--启动级别:1-->
        <load-on-startup>1</load-on-startup>
    </servlet>

    <!--
      在Spring MVC中   /  /*
      /  : 只匹配所有的请求,不会去匹配jsp页面
      /* : 匹配所有的请求,包括jsp页面
      -->
    <servlet-mapping>
        <servlet-name>Spring-mvc</servlet-name>
        <url-pattern>/</url-pattern>
    </servlet-mapping>
</web-app>
3.配置spring
<?xml version="1.0" encoding="UTF-8"?>
<beans xmlns="http://www.springframework.org/schema/beans"
       xmlns:xsi="http://www.w3.org/2001/XMLSchema-instance" xmlns:mvc="http://www.springframework.org/schema/mvc"
       xsi:schemaLocation="http://www.springframework.org/schema/beans http://www.springframework.org/schema/beans/spring-beans.xsd http://www.springframework.org/schema/mvc https://www.springframework.org/schema/mvc/spring-mvc.xsd">


    <!--1.处理器映射器HandlerMapper-->
    <bean class="org.springframework.web.servlet.handler.BeanNameUrlHandlerMapping"/>
    <!--2.处理器适配器HandlerAdapter-->
    <bean class="org.springframework.web.servlet.mvc.SimpleControllerHandlerAdapter"/>
    <!--3.视图解析器 模板引擎 Thymeleaf Freemarker -->
    <bean id="internalResourceViewResolver" class="org.springframework.web.servlet.view.InternalResourceViewResolver">
        <!--前缀-->
        <property name="prefix" value="/WEB-INF/jsp/"/>
        <!--后缀-->
        <property name="suffix" value=".jsp" />
    </bean>


</beans>
4.实现Controller接口(实现Controller接口的类就是一个Controller)
public class HelloController implements Controller {
    public ModelAndView handleRequest(HttpServletRequest httpServletRequest, HttpServletResponse httpServletResponse) throws Exception {
        ModelAndView mv = new ModelAndView();
        //业务代码
        mv.addObject("name","gg");
        //视图跳转
        mv.setViewName("test");
        return mv;
    }
}
5.在3的基础上添加映射路径
<!--BeanNameUrlHandlerMapping-->
<bean id="/hello" class="com.gg.controller.HelloController"/>
7.运行项目,访http://localhost:port/hello
使用注解实现spring-mvc
1.创建项目导入依赖
2.在web.xml中配置DispatchServlet
<?xml version="1.0" encoding="UTF-8"?>
<web-app xmlns="http://xmlns.jcp.org/xml/ns/javaee"
         xmlns:xsi="http://www.w3.org/2001/XMLSchema-instance"
         xsi:schemaLocation="http://xmlns.jcp.org/xml/ns/javaee http://xmlns.jcp.org/xml/ns/javaee/web-app_4_0.xsd"
         version="4.0">

    <servlet>
        <servlet-name>spring-05</servlet-name>
        <servlet-class>org.springframework.web.servlet.DispatcherServlet</servlet-class>
        <init-param>
            <param-name>contextConfigLocation</param-name>
            <param-value>classpath:spring-annoServlet.xml</param-value>
        </init-param>
        <load-on-startup>1</load-on-startup>
    </servlet>

    <servlet-mapping>
        <servlet-name>spring-05</servlet-name>
        <url-pattern>/</url-pattern>
    </servlet-mapping>

</web-app>
3.配置spring
<?xml version="1.0" encoding="UTF-8"?>
<beans xmlns="http://www.springframework.org/schema/beans"
       xmlns:xsi="http://www.w3.org/2001/XMLSchema-instance"
       xmlns:context="http://www.springframework.org/schema/context"
       xmlns:mvc="http://www.springframework.org/schema/mvc"
       xsi:schemaLocation="http://www.springframework.org/schema/beans
        http://www.springframework.org/schema/beans/spring-beans.xsd
         http://www.springframework.org/schema/context
          https://www.springframework.org/schema/context/spring-context.xsd
           http://www.springframework.org/schema/mvc
            https://www.springframework.org/schema/mvc/spring-mvc.xsd">


    <!--1.自动扫描包,让指定包下的注解生效,由IOC容器统一管理-->
    <context:component-scan base-package="com.gg.controller"/>


    <!--2.让Spring MVC不处理静态资源  .css .js .html .MP3 .....-->
    <mvc:default-servlet-handler/>
    <!--
       3.支持mvc注解驱动
            在spring中一般采用@RequestMapping注解来完成映射关系
            要想是@RequestMapper注解生效
            必须向上下文注册DefaultAnnoationHandlerMapper
            和一个AnnotationMethodHandlerAdapter实例
            这两个实例分别在类级别和方法级别处理
            而annotation-driven配置帮助我们自动完成上述两个实例的注入
    -->
    <mvc:annotation-driven/>

    <!--4.配置视图解析器-->
    <bean id="internalResourceViewResolver" class="org.springframework.web.servlet.view.InternalResourceViewResolver">
        <property name="prefix" value="/WEB-INF/jsp/"/>
        <property name="suffix" value=".jsp"/>
    </bean>


</beans>
4.编写controller
使用@Controller注解表示这是一个controller(后端控制器)
使用@RequestMapping("/xx")注解来配置映射路径[可用于类和方法上]
@Controller
@RequestMapping("/hello")    // 访问http://localhost:port/hello
public class HelloController {
//    @RequestMapping("/h1")    // 访问http://localhost:port/hello/h1
    public String hello(Model model){


        model.addAttribute("name","糊糊");


        //会被视图解析器处理  返回hello.jsp(为拼接的视图)
        return "hello";
    }
}
关于参数与RESTful风格
传统传参数xx/?a=x&b=x
@RequestMapping("/h1")
public String hello(int a,int b,Model model){
    int res = a+b;
    model.addAttribute("name","结果为:"+res);

    //会被视图解析器处理  返回hello.jsp(为拼接的视图)
    return "hello";
}

@RequestMapping("/h2")
public String hello1(Model model,int a,int b){
    int res = a+b;
    model.addAttribute("name","结果为:"+res);

    //会被视图解析器处理  返回hello.jsp(为拼接的视图)
    return "hello";
}
RESTful风格传递参数
//RESTful风格
@RequestMapping("/h3/{a}/{b}")
public String hello3(Model model, @PathVariable int a, @PathVariable int b){
    int res = a+b;
    model.addAttribute("name","结果为:"+res);
    //会被视图解析器处理  返回hello.jsp(为拼接的视图)
    return "hello";
}

//RESTful风格
@RequestMapping(value = "/h4/{a}/{b}",method = RequestMethod.POST)
public String hello4(Model model, @PathVariable int a, @PathVariable int b){
    int res = a+b;
    model.addAttribute("name","结果为:"+res);
    //会被视图解析器处理  返回hello.jsp(为拼接的视图)
    return "hello";
}

//RESTful风格
@PostMapping("/h5/{a}/{b}")
public String hello5(Model model, @PathVariable int a, @PathVariable int b){
    int res = a+b;
    model.addAttribute("name","结果为:"+res);
    //会被视图解析器处理  返回hello.jsp(为拼接的视图)
    return "hello";
}
spring mvc转发与重定向
 @RequestMapping("my")
    public String myTest(Model model){

        //无视图解析器 => 转发1
//        return "/WEB-INF/jsp/my.jsp";

        //无视图解析器 => 转发2
//        return "forward:/WEB-INF/jsp/my.jsp";

        //无视图解析器 => 重定向
//        return "redirect:/index.jsp";

        //有视图解析器 => 重定向
        return "redirect:/index.jsp";

        //有视图解析器 => 转发
        return "test";
    }
接收参数与数据回显
jsp提交表单
<h2 align="center">
    <form action="/form/t1" method="post">
        <input type="text" name="name">
        <input type="submit">
    </form>
</h2>
controller接收
@GetMapping("/t1")
public String test1(@RequestParam("u") String name, Model model){

    System.out.println("接收到的前端参数为:"+name);
    model.addAttribute("msg",name);

    return "test";
}

@GetMapping("/t2")
public String test2(User user){
    //自动寻找匹配的属性
    System.out.println(user);
    return "test";
}
响应json数据
方式1:在方法上使用@RequestMapping与@ResponseBody
@RequestMapping(value="/j1")
    @ResponseBody //不会走视图解析器,会直接返回一个字符串
    public String json1() throws JsonProcessingException {
        ObjectMapper mapper = new ObjectMapper();
        User user = new User(4,"小迪",15);
        String jsonStr = mapper.writeValueAsString(user);
        return jsonStr;
}
解决json乱码:
//原生态方式(每个方法都转码)
@RequestMapping(value="/j1",produces="application/json;charset=utf-8")
使用spring解决json乱码:
<mvc:annotation-driven>
    <mvc:message-converters>
        <bean class="org.springframework.http.converter.StringHttpMessageConverter">
            <constructor-arg value="UTF-8"/>
        </bean>
        <bean class="org.springframework.http.converter.json.MappingJackson2HttpMessageConverter">
            <property name="objectMapper">
                <bean class="org.springframework.http.converter.json.Jackson2ObjectMapperFactoryBean">
                    <property name="failOnEmptyBeans" value="false"/>
                </bean>
            </property>
        </bean>
    </mvc:message-converters>
</mvc:annotation-driven>
方式2:使用@RestController注释Controller类
@RestController //类里的方法全部返回字符串
public class UserController {
拦截器
继承HandlerInterceptor接口的就是一个拦截器
public class MyInterceptor implements HandlerInterceptor {

    //返回true,执行下一个(放行),执行下一个拦截器
    //返回false,拦截请求,不向下执行
    public boolean preHandle(HttpServletRequest request, HttpServletResponse response, Object handler) throws Exception {
        System.out.println("====处理前====");
//        return false;
        return true;
    }

    //
    public void postHandle(HttpServletRequest request, HttpServletResponse response, Object handler, ModelAndView modelAndView) throws Exception {
        System.out.println("====处理后====");
    }

    //
    public void afterCompletion(HttpServletRequest request, HttpServletResponse response, Object handler, Exception ex) throws Exception {
        System.out.println("====清理====");
    }
}
文件上传
spring.xml中配置文件上传
<!--配置文件上传-->
<bean id="multipartResolver" class="org.springframework.web.multipart.commons.CommonsMultipartResolver">
    <property name="defaultEncoding" value="utf-8"/>
    <property name="maxUploadSize" value="10485760"/>
    <property name="maxInMemorySize" value="40960"/>
</bean>
方式1:
@RequestMapping("/upload1")
public String upload1(@RequestParam("file") CommonsMultipartFile file, HttpServletRequest request) throws IOException {

    //获取文件名:file.getOriginalFilename()
    String filename = file.getOriginalFilename();

    if("".equals(filename)){
        return "redirect:/index.jsp";
    }

    System.out.println("上传文件名:" + filename);

    //上传文件路径保存设置
    String path = request.getServletContext().getRealPath("/upload");

    File realPath = new File(path);
    //如果路径不存在,创建一个
    if(!realPath.exists()){
        realPath.mkdir();
    }

    System.out.println("上传文件保存地址:" + realPath);
    InputStream in = file.getInputStream();
    FileOutputStream out = new FileOutputStream(new File(realPath, filename));

    //读取写出
    int len = 0;
    byte[] buffer = new byte[1024];
    while((len=in.read(buffer))!=-1){
        out.write(buffer,0,len);
        out.flush();
    }

    out.close();
    in.close();

    return "redirect:/index.jsp";
}
方式2:
@RequestMapping("/upload2")
public String upload2(@RequestParam("file1") CommonsMultipartFile file, HttpServletRequest request) throws IOException {

    //上传文件路径保存设置
    String path = request.getServletContext().getRealPath("/upload");
    File realPath = new File(path);
    //如果路径不存在,创建一个
    if(!realPath.exists()){
        realPath.mkdir();
    }

    System.out.println("上传文件保存地址:" + realPath);

    //使用
    file.transferTo(new File(realPath+"/"+file.getOriginalFilename()));
    return "redirect:/index.jsp";
}
注意点:
1.id="multipartResolver"这个配置不能改
2.表单需要添加属性: enctype="multipart/form-data"
3.文件上传的依赖
<dependency>
    <groupId>commons-fileupload</groupId>
    <artifactId>commons-fileupload</artifactId>
    <version>1.3.3</version>
</dependency>
时间花在哪里,成就就在哪里

 浙公网安备 33010602011771号