SynchronousQueue
在 Java 的并发编程中,不可绕过的话题便是通过线程池的方式多线程或异步地处理任务,在线程池中,一个核心的参数是有关阻塞队列的选择,当提交的任务数使得核心线程无法足量处理这些任务时,会将这些任务放入阻塞队列中,如果阻塞队列也不能容纳新加入的任务,则会考虑创建超过核心线程数的线程。在实际开发中,根据具体的处理任务选择合适的阻塞队列也是提高系统吞吐量的一个重要选项
一般来讲,对于通用配置的线程池,选择 LinkedBlockingQueue 作为线程池的阻塞队列是合适的(因为总是希望这个任务可以被执行)。但在某些场景下,如任务执行时间较短、任务数比较少、希望尽可能快地被执行,选择 SynchronousQueue 会是一个比较好的选择
实现原理
和 ReentrantLock 锁的实现类似,SynchronousQueue 也具备公平和非公平的两种实现模式。具体的算法依据 2004_DISC_dual_DS,在 SynchronousQueue 以 LIFO(后进先出)TransferStack 作为非公平模式的实现,FIFO(先进先出)TransferQueue 作为公平模式的实现。这两种模式的性能十分接近,区别在于公平模式的实现会提供更高的吞吐量,而非公平模式则会提供更好的线程局部性
对应的构造函数如下:
public class SynchronousQueue<E> extends AbstractQueue<E>
    implements BlockingQueue<E>, java.io.Serializable {

    private transient volatile Transferer<E> transferer;

    public SynchronousQueue() {
        this(false); // 默认是非公平模式
    }

    public SynchronousQueue(boolean fair) {
        transferer = fair ? new TransferQueue<E>() : new TransferStack<E>();
    }
}
和线程池执行任务主要相关的 BlockingQueue 接口为 offer、take 和 poll ,具体的实现如下:
public class SynchronousQueue<E> extends AbstractQueue<E>
    implements BlockingQueue<E>, java.io.Serializable {

    private transient volatile Transferer<E> transferer;

    public boolean offer(E e) {
        if (e == null) throw new NullPointerException();
        return transferer.transfer(e, true, 0) != null;
    }

    public E take() throws InterruptedException {
        E e = transferer.transfer(null, false, 0);
        if (e != null)
            return e;
        Thread.interrupted();
        throw new InterruptedException();
    }

    public E poll(long timeout, TimeUnit unit) throws InterruptedException {
        E e = transferer.transfer(null, true, unit.toNanos(timeout));
        if (e != null || !Thread.interrupted())
            return e;
        throw new InterruptedException();
    }
}
可以看到实际的操作最终都是委托给了 Transferer 的 transfer 方法,后续我们将继续分析 TransferQueue 和 TransferStack 的相关实现
LIFO 实现
在 SynchronousQueue 中 TransferStack 对 Transferer 的实现是非公平模式的,这也是默认的方式
TransferStack 对 transfer 的实现如下:
static final class TransferStack<E> extends Transferer<E> {

    E transfer(E e, boolean timed, long nanos) {
        /*
        	1. 确定当前的执行模式: offer 加入数据、take 或 poll 获取数据
        */
        SNode s = null; // constructed/reused as needed
        int mode = (e == null) ? REQUEST : DATA;

        for (;;) {
            SNode h = head;
            /*
            	2. 如果当前栈顶元素的模式与本次的模式相同,没有和它对应的请求,因此将它 push 到栈中
            */
            if (h == null || h.mode == mode) {  // empty or same-mode
                if (timed && nanos <= 0L) {     // can't wait
                    if (h != null && h.isCancelled())
                        casHead(h, h.next);     // pop cancelled node
                    else
                        return null;
                } else if (casHead(h, s = snode(s, e, h, mode))) {
                    SNode m = awaitFulfill(s, timed, nanos);
                    if (m == s) {               // wait was cancelled
                        clean(s);
                        return null;
                    }
                    if ((h = head) != null && h.next == s)
                        casHead(h, s.next);     // help s's fulfiller
                    return (E) ((mode == REQUEST) ? m.item : s.item);
                }
            }
            /*
            	3. 档期栈顶节点的模式与本次的模式对应,需要将本次的请求与栈顶的节点组合成一个 FULFILLING 状态的节点,并将它压入栈中,并返回匹配到的节点关联的数据(如果请求是 poll 或 take,返回原来 poll 的数据,否则返回 null)
            	注意: 这里返回的数据不一定是首次匹配到的节点的数据,因此还有其它的线程会协助完成这个操作
            */
            else if (!isFulfilling(h.mode)) { // try to fulfill
                if (h.isCancelled())            // already cancelled
                    casHead(h, h.next);         // pop and retry
                else if (casHead(h, s=snode(s, e, h, FULFILLING|mode))) {
                    for (;;) { // loop until matched or waiters disappear
                        SNode m = s.next;       // m is s's match
                        if (m == null) {        // all waiters are gone
                            casHead(s, null);   // pop fulfill node
                            s = null;           // use new node next time
                            break;              // restart main loop
                        }
                        SNode mn = m.next;
                        if (m.tryMatch(s)) {
                            casHead(s, mn);     // pop both s and m
                            return (E) ((mode == REQUEST) ? m.item : s.item);
                        } else                  // lost match
                            s.casNext(m, mn);   // help unlink
                    }
                }
            }
            /*
            	4. 走到这里说明有其它线程在执行匹配的操作,帮助其它线程完成这一操作
            */
            else {                            // help a fulfiller
                SNode m = h.next;               // m is h's match
                if (m == null)                  // waiter is gone
                    casHead(h, null);           // pop fulfilling node
                else {
                    SNode mn = m.next;
                    if (m.tryMatch(h))          // help match
                        casHead(h, mn);         // pop both h and m
                    else                        // lost match
                        h.casNext(m, mn);       // help unlink
                }
            }
        }
    }
}
主要分为以下几个步骤:
-
请求模式的判断
对
offer等添加数据的方法,可以看到,对transfer方法的首个参数就是实际需要加入的数据;而对于poll等获取数据的方法,首个参数为null在
TransferStack中定义了如下三种请求模式:节点模式 定义值 对应的二进制值 解释 REQUEST 0 000 未被匹配的消费者 DATA 1 001 未被匹配的生产者 FULFILLING 2 010 当前节点正在处理匹配 在
TransferStack中的节点,节点对象的定义如下: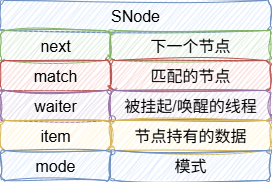
-
栈顶元素的判断
对本次的请求,判断栈顶元素的模式是否与本次请求的模式相对应,如果现有栈顶元素与请求的元素不对应,则直接加入栈中
SNode h = head; /* 此时栈为空或者栈顶元素与当前模式不对应 */ if (h == null || h.mode == mode) { // empty or same-mode // 超时和节点被取消的处理 if (timed && nanos <= 0L) { // can't wait if (h != null && h.isCancelled()) casHead(h, h.next); // pop cancelled node else return null; } /* 将本次的请求封装为 SNode,并将其加入栈中 */ else if (casHead(h, s = snode(s, e, h, mode))) { /* 将当前节点关联的线程进入自旋/阻塞状态,直到被其它对应的请求唤醒 */ SNode m = awaitFulfill(s, timed, nanos); /* 只有在被取消时,匹配的节点才和自身相等 */ if (m == s) { // wait was cancelled // 清理当前节点 clean(s); return null; } /* 走到这里说明当前的节点已经被其它线程消费了,因此需要弹出当前节点 注意: 节点被消费时会创建一个 fulfuling 节点,并加入栈中,因此弹出栈时需要弹出两个元素 */ if ((h = head) != null && h.next == s) casHead(h, s.next); // help s's fulfiller // 这里如果是获取数据的话,则需要返回原来放入数据节点的数据,否则返回当前节点的数据(null) return (E) ((mode == REQUEST) ? m.item : s.item); } }awaitFulfill挂起当前线程的方法实现:SNode awaitFulfill(SNode s, boolean timed, long nanos) { // 如果设置了超时时间,需要计算实际的到期时间 final long deadline = timed ? System.nanoTime() + nanos : 0L; Thread w = Thread.currentThread(); /* 判断当前的节点是否可以首先通过自旋的方式来等待对应的节点 根据 shouldSpin 的实现,只要栈顶元素为 null 或 当前节点,或者处于 fulflling 状态,则需要考虑自旋 */ int spins = shouldSpin(s) ? (timed ? MAX_TIMED_SPINS : MAX_UNTIMED_SPINS) : 0; for (;;) { // 线程被中断的响应处理 if (w.isInterrupted()) s.tryCancel(); SNode m = s.match; if (m != null) /* 走到这说明要么当前节点找到了对应的节点,要么被取消了 */ return m; if (timed) { // 达到最大超时时间的处理 nanos = deadline - System.nanoTime(); if (nanos <= 0L) { s.tryCancel(); continue; } } if (spins > 0) { // 自旋 Thread.onSpinWait(); spins = shouldSpin(s) ? (spins - 1) : 0; } /* 达到了最大自旋次数,需要考虑将当前线程设置为阻塞状态 如果当前节点的关联线程还没被关联,则首先将当前节点与当前线程进行关联 */ else if (s.waiter == null) s.waiter = w; // establish waiter so can park next iter /* 如果没有设置最大超时时间,则挂起当前线程,知道被唤醒或中断 */ else if (!timed) LockSupport.park(this); /* 设置了最大超时时间的处理 */ else if (nanos > SPIN_FOR_TIMEOUT_THRESHOLD) LockSupport.parkNanos(this, nanos); } }awaitFulfill方法的整体执行流程如下: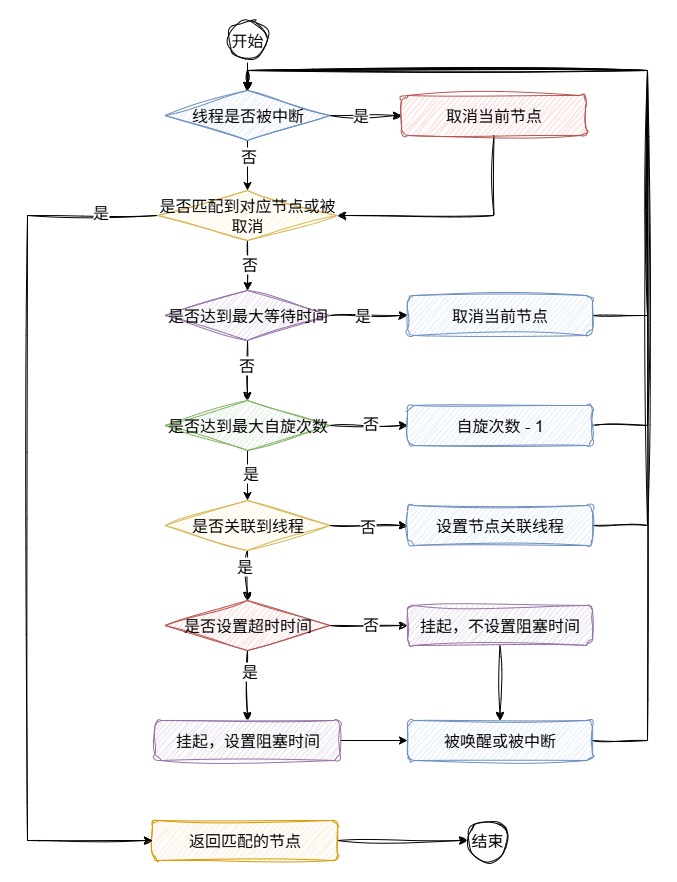
-
栈顶元素不处于
FULFLLING状态如果栈顶元素不处于
FULFLLING状态,则说明栈顶元素就是本次请求对应的节点,获取这个节点并返回它else if (!isFulfilling(h.mode)) { // try to fulfill // 栈顶节点被取消 if (h.isCancelled()) // already cancelled casHead(h, h.next); // pop and retry /* 将匹配的节点封装为一个 FULFILLING 节点,并压入栈中,表示此时正在处理节点的匹配 */ else if (casHead(h, s=snode(s, e, h, FULFILLING|mode))) { /* 通过 CAS 的方式,竞争获取当前请求模式对应的节点 */ for (;;) { // loop until matched or waiters disappear SNode m = s.next; // m is s's match if (m == null) { // all waiters are gone /* 走到这说明对应的节点已经都被其它线程消费了,只能再走一次外部循环来检查是否有其它对应的生产节点,如果没有的话,就只能将当前请求加入栈了 */ casHead(s, null); // pop fulfill node s = null; // use new node next time break; // restart main loop } SNode mn = m.next; if (m.tryMatch(s)) { /* 匹配成功,更新栈顶元素,同时返回匹配的节点数据 */ casHead(s, mn); // pop both s and m return (E) ((mode == REQUEST) ? m.item : s.item); } else // lost match // 匹配失败,说明被其它线程消费了,需要帮助取消这个后继节点 s.casNext(m, mn); // help unlink } } } -
栈顶元素处于
FULFLLING状态在这个状态下,说明有线程正在执行匹配动作,当前线程需要协助正在执行的线程完成这一动作
else { // help a fulfiller
    SNode m = h.next;               // m is h's match
    if (m == null)                  // waiter is gone
        casHead(h, null);           // pop fulfilling node
    else {
        SNode mn = m.next;

        /*
        	这里和匹配动作不同的一点是,这里只是帮助其它线程尽可能快地完成匹配任务,不能返回匹配结果,因此此时的执行线程和需要获取结果的线程并不一致,甚至需要的处理模式完全不一致
        	因此,这里在协助匹配完成后,是直接唤醒和正在匹配线程的对应节点的线程,后者在 awaitFulfill 方法执行后也会协助修改栈顶元素,最后返回与之匹配的节点数据(即正在匹配的线程的请求数据)
        */
        if (m.tryMatch(h))          // help match
            casHead(h, mn);         // pop both h and m
        else                        // lost match
            h.casNext(m, mn);       // help unlink
    }
}
FIFO 实现
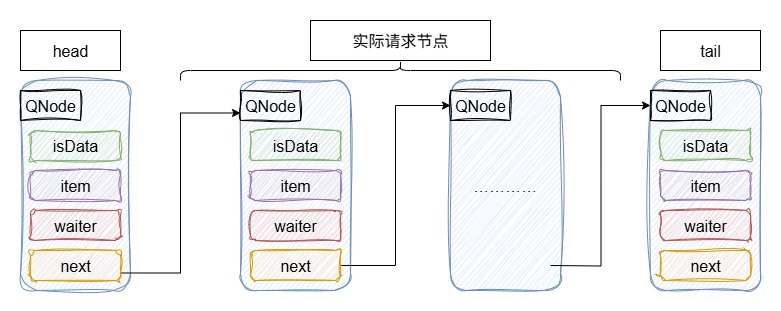
FIFO 是公平模式的具体实现,具体的实现类为 TransferQueue,实际存储的数据结构为单向链表,节点的定义如下:
static final class QNode {
    // 下一个节点的引用
    volatile QNode next;          // next node in queue
    /*
    	当前节点请求的数据,如果是 poll 等获取数据的请求,则为 null
    */
    volatile Object item;         // CAS'ed to or from null
    /*
    	当前持有这个节点的线程(被自旋或阻塞)
    */
    volatile Thread waiter;       // to control park/unpark

    /*
    	如果是获取数据的请求(poll),则为 false,如果是加入数据的请求(offer),则为 true
    */
    final boolean isData;
}
实际处理过程中的链表数据结构如下图所示:
对应 transfer 的实现如下:
E transfer(E e, boolean timed, long nanos) {
    /*
    	首先,判断本次的请求是加入数据还是获取数据
    */
    QNode s = null; // constructed/reused as needed
    boolean isData = (e != null);

    for (;;) {
        QNode t = tail;
        QNode h = head;

        /*
        	判断当前的 TransferQueue 对象属性是否已经全部初始化,这是因为对于内部节点对象的实例化可能会被重排序
        */
        if (t == null || h == null)         // saw uninitialized value
            continue;                       // spin

        /*
        	和上文 TransferStack 的实现类似,首先判断队列是否为空或者队尾的节点的模式与本次请求的模式是否一致
        	为空或模式一致说明现在没有与之对应的节点,需要加入队列并等待被后续消费线程唤醒
        */
        if (h == t || t.isData == isData) { // empty or same-mode
            QNode tn = t.next;
            /*
            	如果尾节点被修改了,则说明要么被消费了,要么添加了节点,需要重新检查
            */
            if (t != tail)                  // inconsistent read
                continue;

            /*
            	尾节点正在被修改,帮助它完成修改
            */
            if (tn != null) {               // lagging tail
                advanceTail(t, tn);
                continue;
            }

            /*
            	如果设置了超时时间,并且已经超时了,则直接返回 null
            */
            if (timed && nanos <= 0L)       // can't wait
                return null;


            /*
            	将本次请求封装为一个 QNode,并通过 CAS 的方式添加到队列尾部
            */
            if (s == null)
                s = new QNode(e, isData);
            if (!t.casNext(null, s))        // failed to link in
                continue;

            /*
            	修改尾部节点为本次加入的 QNode
            */
            advanceTail(t, s);              // swing tail and wait

            /*
            	和 TransferStack 的 awaitFulfill 方法类似,将当前请求的线程设置为自旋/阻塞状态,直到
            */
            Object x = awaitFulfill(s, e, timed, nanos);

            /*
            	节点被取消时,需清理这个节点
            */
            if (x == s) {                   // wait was cancelled
                clean(t, s);
                return null;
            }

            /*
            	当节点被移除时,会将节点的 next 设置为本身,这里的 isOffList 则会返回 true
            	如果当前节点没有其它线程协助移除,则需手动移除它
            */
            if (!s.isOffList()) {           // not already unlinked
                advanceHead(t, s);          // unlink if head
                if (x != null)              // and forget fields
                    s.item = s;
                s.waiter = null;
            }
            return (x != null) ? (E)x : e;

        }
        /*
        	队尾节点的模式与本次请求的模式对应,
        */
        else {                            // complementary-mode
            QNode m = h.next;               // node to fulfill
            if (t != tail || m == null || h != head)
                continue;                   // inconsistent read

            Object x = m.item;
            /*
            	isData == (x != null) 说明对应模式的节点已经被其它线程协助消费了(设置节点数据为 e)
            	x == m 说明已经被取消了
            	!m.casItem(x, e) 为 true 说明已经被其它线程协助修改了
            	以上几种情况都需要协助修改头节点
            */
            if (isData == (x != null) ||    // m already fulfilled
                x == m ||                   // m cancelled
                !m.casItem(x, e)) {         // lost CAS
                advanceHead(h, m);          // dequeue and retry
                continue;
            }

            /*
            	被本次线程协助消费了,修改头节点
            */
            advanceHead(h, m);              // successfully fulfilled
            LockSupport.unpark(m.waiter);
            return (x != null) ? (E)x : e;
        }
    }
}
从源码可以看到,当遇到对应模式的请求时,原有的请求消费依旧是公平的(取 head 节点的下一个消费)
和 TransferStack 的 clean 方法不同的是,TransferQueue 在清理需要移除的节点时,由于没有 FULFLLING 的机制来避免其它线程向队列添加元素,因此在 clean 时首先会将要删除节点的前驱节点标记为 "删除中" 状态,在第二次再 clean 时从该前驱节点开始移除后继节点:
void clean(QNode pred, QNode s) {
    s.waiter = null; // forget thread

    while (pred.next == s) { // Return early if already unlinked
        QNode h = head;
        QNode hn = h.next;   // Absorb cancelled first node as head

        /*
        	后继节点已经被取消了,可以安全地移除 head 地后继节点
        */
        if (hn != null && hn.isCancelled()) {
            advanceHead(h, hn);
            continue;
        }

        QNode t = tail;      // Ensure consistent read for tail
        /*
        	队列已经空了,退出清理方法
        */
        if (t == h)
            return;

        /*
        	如果当前正在加入节点,则需要等待加入节点的动作完成后才能进行清理
        */
        QNode tn = t.next;
        if (t != tail)
            continue;
        if (tn != null) {
            advanceTail(t, tn);
            continue;
        }

        if (s != t) {        // If not tail, try to unsplice
            QNode sn = s.next;
            /*
            	sn == s 说明 s 已经被移除,直接返回即可
            */
            if (sn == s || pred.casNext(s, sn))
                return;
        }

        /*
        	如果 s 现在没有被移除,那么需要将记录当前的前驱节点 pred 到 cleanMe 字段,后续再 clean 时从此前驱节点开始进行清理
        */
        QNode dp = cleanMe;
        if (dp != null) {    // Try unlinking previous cancelled node
            QNode d = dp.next;
            QNode dn;
            if (d == null ||               // d is gone or
                d == dp ||                 // d is off list or
                !d.isCancelled() ||        // d not cancelled or
                (d != t &&                 // d not tail and
                 (dn = d.next) != null &&  //   has successor
                 dn != d &&                //   that is on list
                 dp.casNext(d, dn)))       // d unspliced
                casCleanMe(dp, null);
            if (dp == pred)
                return;      // s is already saved node
        }
        /*
        	首次 clean,记录当前的前驱节点
        */
        else if (casCleanMe(null, pred))
            return;          // Postpone cleaning s
    }
}
具体使用
SynchronousQueue 一般适用于以下场景:
-
任务执行时间较短,因为
SynchronousQueue本身并不存储元素,因此可以减少在阻塞队列排队带来地时间损耗 -
生产者和消费者的处理速率相近,这意味这实际请求在
SynchronousQueue停留的时间会很短甚至不会停留,可以最大限度地利用SynchronousQueue的特点。反正,如果速率差异较大,会产生任务的堆积,就不太合适使用SynchronousQueue -
不希望触发拒绝策略,但这可能并不是
SynchronousQueue特有的优势 -
LIFO和FIFO的选择一般来讲,默认的
SynchronousQueue已经足够满足实际需求了。如果希望有更高的吞吐量,可以选用非公平的TransferStack,而如果希望任务能够按照先后顺序进行处理,则选用公平的TransferQueue
参考:
[1] https://mp.weixin.qq.com/s/q3fy1GT7CrpRrDZNxJPsOA
[2] https://www.cs.rochester.edu/u/scott/papers/2004_DISC_dual_DS.pdf

 浙公网安备 33010602011771号