Spring“家族”—— Spring Security框架学习
1. Spring Security框架入门
1.1简介
Spring Security是一个能够为基于Spring的企业应用系统提供声明式的安全访问控制解决方案的安全框架。它提供了一组可以再Spring应用上下文中配置的Bean,充分利用了Spring IOC(控制反转 ),DI(依赖注入)和AOP功能,为应用系统提供声明式的安全访问控制功能,减少了为企业系统安全控制编写大量重复代码的工作。与shiro框架的解决诶方案是一样的
1.2入门Demo
先创建项目,导入依赖
<dependency>
            <groupId>org.springframework.security</groupId>
            <artifactId>spring-security-web</artifactId>
            <version>4.1.0.RELEASE</version>
        </dependency>

        <dependency>
            <groupId>org.springframework.security</groupId>
            <artifactId>spring-security-config</artifactId>
            <version>4.1.0.RELEASE</version>
        </dependency>
配置web.xml
<context-param>
        <param-name>contextConfigLocation</param-name>
        <!-- 这其实就是spring的配置文件 -->
        <param-value>classpath:spring-security.xml</param-value>
     </context-param>
     <listener>
        <listener-class>
            org.springframework.web.context.ContextLoaderListener
        </listener-class>
     </listener>

     <!-- 过滤器 -->
     <filter>
         <!-- 这个名称是不能改的,是内置的 -->
        <filter-name>springSecurityFilterChain</filter-name>
        <!-- 这个类是一个过滤器代理类,将请求经过过滤器之后会自动的找到springSecurityFilterChain类 -->
        <filter-class>org.springframework.web.filter.DelegatingFilterProxy</filter-class>
     </filter>
     <filter-mapping>
        <filter-name>springSecurityFilterChain</filter-name>
        <url-pattern>/*</url-pattern>
     </filter-mapping>
配置spring-security.xml文件
<?xml version="1.0" encoding="UTF-8"?>
<beans:beans xmlns="http://www.springframework.org/schema/security"
    xmlns:beans="http://www.springframework.org/schema/beans" xmlns:xsi="http://www.w3.org/2001/XMLSchema-instance"
    xsi:schemaLocation="http://www.springframework.org/schema/beans http://www.springframework.org/schema/beans/spring-beans.xsd
                        http://www.springframework.org/schema/security http://www.springframework.org/schema/security/spring-security.xsd">

    <!-- 配置页面的拦截规则
         user-expression表示是否启用SPEL表达式,如果不配use-expression默认是true,那么access必须要写hasRole('ROLE_USER')
    -->
    <http use-expressions="false">
        <!-- 当前用户必须有ROLE_USER的角色,才可以访问根目录以及所属子目录资源
             acess配置必须是ROLE_开头
        -->
        <intercept-url pattern="/**" access="ROLE_USER"/>
        <!-- 开启表单登录功能,会自动的生成登录页面 -->
        <form-login/>
    </http>

    <!-- 认证管理器 -->
    <authentication-manager>
        <!-- 认证提供者 -->
        <authentication-provider>
            <user-service>
                <!-- 配置当前系统的用户
                     authorities表示当前用户使用哪个角色
                -->
                <user name="admin" password="123456" authorities="ROLE_USER"/>
            </user-service>
        </authentication-provider>
    </authentication-manager>


</beans:beans>
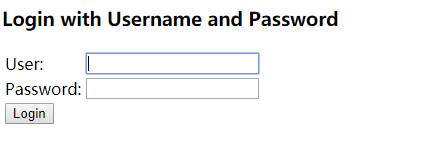
效果:这是默认的登录页
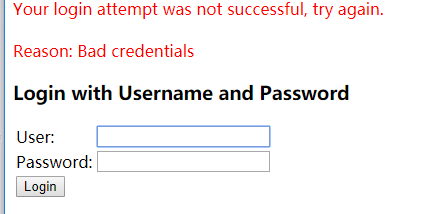
登录错误时:
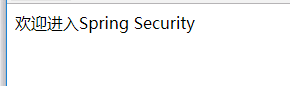
登录成功时:
2.自定义登录页
先新建两个页面分别是:login.html,error.html。
<title>登录</title>
</head>
<body>
    <!-- "/login"是spring security提供的地址,必须是post方式 -->
    <form action="/login" method="post">
        用户名:<input name="username"><br>
        密码:<input name="password"><br>
        <button>登录</button>
    </form>

</body>
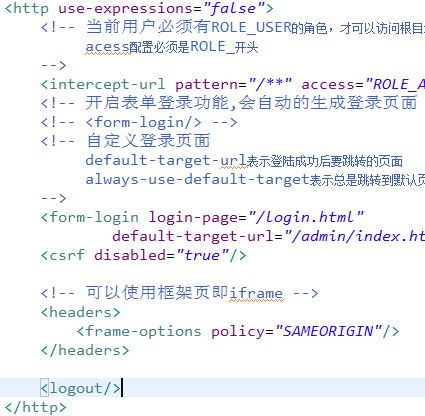
修改spring-security.xml文件
<!-- 设置页面不登录也可以访问 -->
    <http pattern="/login.html" security="none"></http>
    <http pattern="/error.html" security="none"></http>

    <!-- 配置页面的拦截规则
         user-expression表示是否启用SPEL表达式,如果不配use-expression默认是true,那么access必须要写hasRole('ROLE_USER')
    -->
    <http use-expressions="false">
        <!-- 当前用户必须有ROLE_USER的角色,才可以访问根目录以及所属子目录资源
             acess配置必须是ROLE_开头
        -->
        <intercept-url pattern="/**" access="ROLE_USER"/>
        <!-- 开启表单登录功能,会自动的生成登录页面 -->
        <!-- <form-login/> -->
        <!-- 自定义登录页面
             default-target-url表示登陆成功后要跳转的页面
        -->
        <form-login login-page="/login.html" default-target-url="/index.html" authentication-failure-url="/error.html"/>
        <csrf disabled="true"/>
    </http>

    <!-- 认证管理器 -->
    <authentication-manager>
        <!-- 认证提供者 -->
        <authentication-provider>
            <user-service>
                <!-- 配置当前系统的用户
                     authorities表示当前用户使用哪个角色
                -->
                <user name="admin" password="123456" authorities="ROLE_USER"/>
            </user-service>
        </authentication-provider>
    </authentication-manager>
这里有个csrf标签,如果不加的话,默认是false也就是开启的。如果是html就会出现下面错误

CSRF(Cross-site request forgery)跨站请求伪造,也被称为“One Click Attack”或者Session Riding,通常缩写为CSRF或者XSRF,是一种对网站的恶意利用。
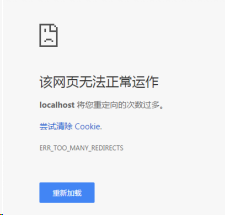
如果你没有设置登录页security="none" ,将会出现以下错误,因为登录页会被反复重定向
3.退出登录
直接在spring-security.xml中的http标签中添加<logout/>即可
前端代码:


 浙公网安备 33010602011771号