MVC - Controller和静态页面设计
引入Controller层
Controller负责调用多个Service完成一整个事务
在编写Controller方法时,需要注意:
- 仍然是先直接实例化Service对象,以后再进行控制反转的安排
- 由于得到的对象都是在Controller中进行完整包装的,所以在传入参数中需要包含一个Session,用于存储包装完成的对象
- 为了方便由后续DispatcherServlet总控所控制的页面重定向,Controller中每个方法的返回值最好都是一个字符串,用于向总控指明应该跳转到哪一个网页
编写
当前项目下,Controller类的功能安排仅有一个:用户登录,登陆成功后将此用户对象的UserDetail、friendList属性全部通过Service获取并装填,然后将对象保存
所以,Controller的代码如下:
public class UserController {
    private UserLoginService userLoginService= new UserLoginServiceImpl();
    private UserDetailService userDetailService = new UserDetailServiceImpl();
    public String login(String loginId, String pwd, HttpSession session) {
        UserLogin login = userLoginService.login(loginId, pwd);
        if(login != null) {
            //调用Service方法获取待填的信息
            List<UserLogin> friendList = userLoginService.getFriendList(login);
            UserDetail userDetail = userDetailService.getDetailById(login.getId());
            //将信息填入login对象
            login.setFriendList(friendList);
            login.setUserDetail(userDetail);
            //将login对象存入session中,以让其他类获取
            session.setAttribute("UserLogin",login);
            return "index";   //登陆成功,进入主页
        }
        return "login";   //登陆不成功,返回登录页
    }
}
测试
编写测试类:
public class UserControllerTest {
public static void main(String[] args) {
UserController userController = new UserController();
UserLogin a = userController.login("u03", "003"); //为了测试方便,去掉了Session的传入,并将返回值设置为UserLogin
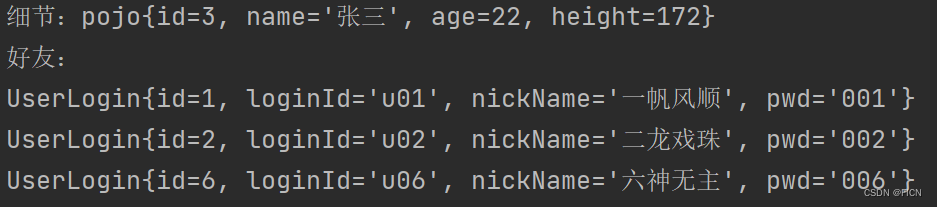
System.out.println("细节:"+a.getUserDetail());
List<UserLogin> list = a.getFriendList();
System.out.println("好友:");
for(UserLogin u : list) {
System.out.println(u);
}
}
}测试结果:
登录、主页前端编写
在编写HTML页面代码时,需要注意form表单中的action及其类型,以便以后被Filter捕获
首先,面向更广泛的标签样式,编写一个通用的common.css样式表:
body{
    margin:0;
    padding:0;
    background-color: bisque;
}
div{
    border: 0px solid red;
    position: relative;
    float: left;
}
table{
    border: 1px solid lightgray;
    border-collapse: collapse;
    line-height: 28px;
    width: 80%;
    margin-left: 10%;
    height: 100%;
}
table tr,table td,table th{
    align-content: center;
    border: 1px solid lightgray;
}
其次,针对login页面的各类元素,编写login.css样式表:
#div-1{
background-color: azure;
margin-top: 20px;
margin-left: 10%;
width: 80%;
height: 600px;
}
#div-2{
background-color: azure;
margin-top: 100px;
height: 400px;
margin-left: 20%;
width: 60%;
}
#div-3{
background-color: azure;
margin-top: 0px;
height: 300px;
width: 100%;
}
#login-text{
font-size: 30px;
text-align: center;
}
#submit-form{
width: 80%;
margin-left: 10%;
height: 100%;
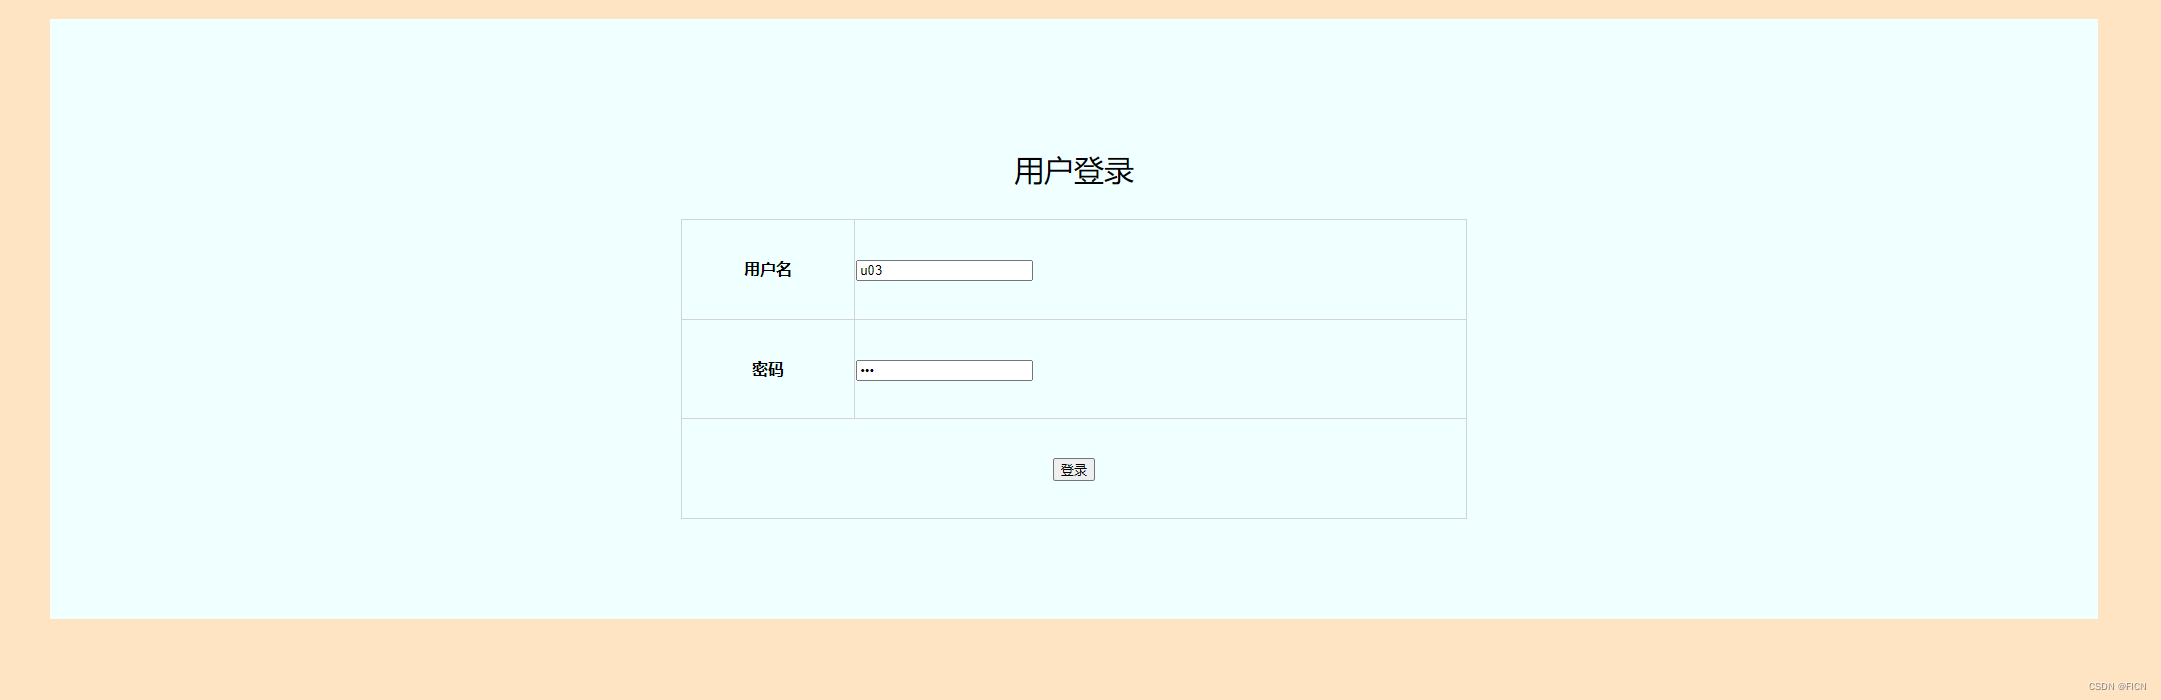
}最后,编写login页面:
<!--省略head部分-->
<body>
<div id="div-1">
    <div id="div-2">
        <p id="login-text">用户登录</p>
        <div id="div-3">
            <form id="submit-form" method="post" action="Login.do">
            <input type="hidden" name="operation" value="login">
                <table>
                    <tr>
                        <th>用户名</th>
                        <td><input type="text" value="u03"></td>
                    </tr>
                    <tr>
                        <th>密码</th>
                        <td><input type="password" value="003"></td>
                    </tr>
                    <tr>
                        <th colspan="2"><input type="submit" value="登录"></th>
                    </tr>
                </table>
            </form>
        </div>
    </div>
</div>
</body>在form中,指定了action为“Login.do”且method为“post”,在以后编写的Filter、DispatcherServlet中,将会对所有*.do的请求进行拦截,接着,POST提交的表单信息会被DispatcherServlet所解析:首先获取action的字段,为Login,然后去BeanMap(根据applicationContext.xml映射表构建)中获取相应的Controller实例,接着根据operation的值,在Controller中寻找同名方法,找到后,获取这个方法所需的所有参数,执行之
login页面:
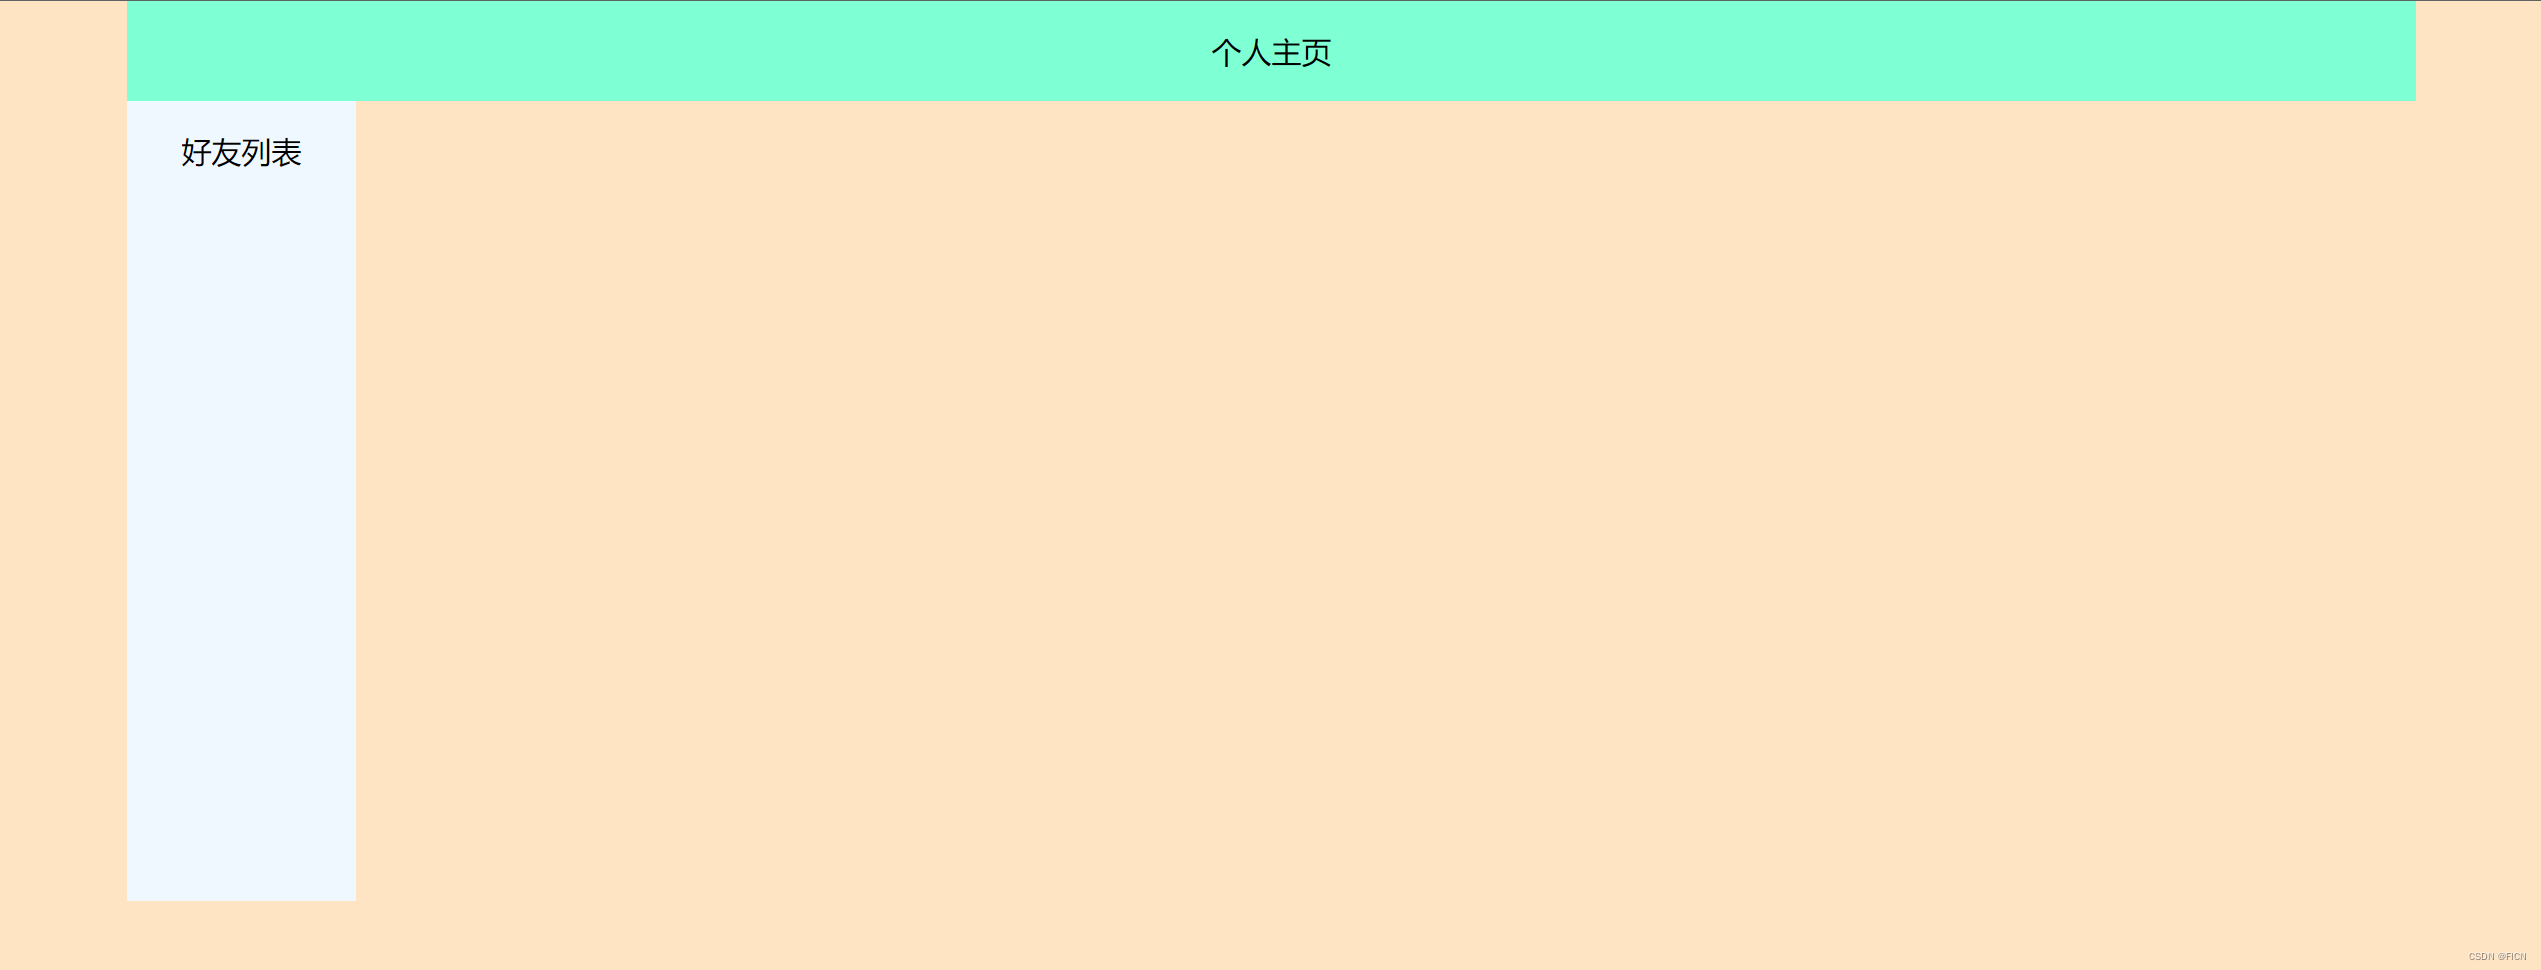
接着,根据盒子模型,设计index主页:
<body>
<div id="div-0">
    <div id="div-title">
        <p class="title">个人主页</p>
    </div>
    <div id="div-friends">
        <p class="title">好友列表</p>
    </div>
    <div id="div-main">

    </div>
</div>
</body>
index页面:
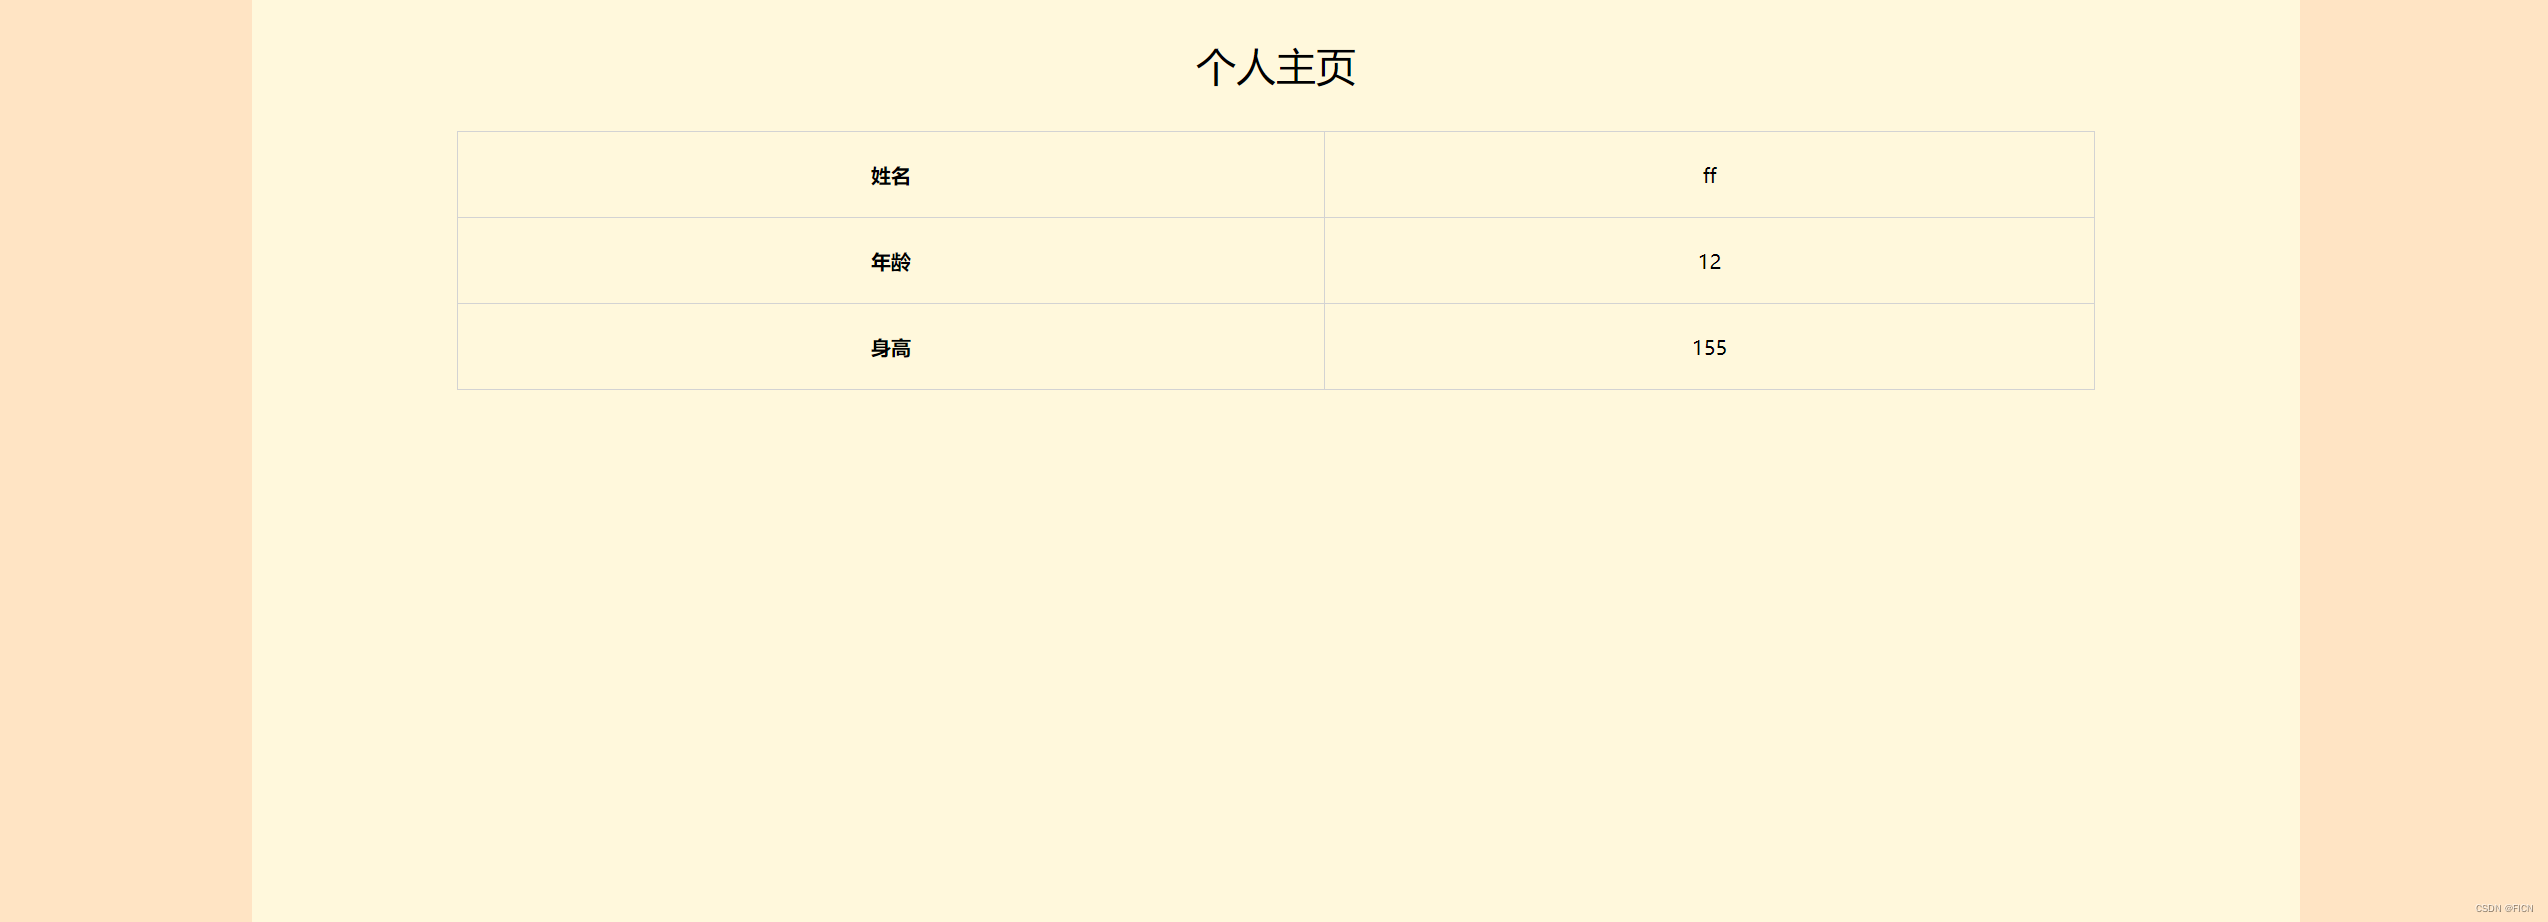
再制作一个私人信息页,用于显示本用户的各类信息:
<div id="div-0">
    <p class="title">个人主页</p>
    <div id="div-detail">
        <table>
            <tr>
                <th>姓名</th>
                <td>ff</td>
            </tr>
            <tr>
                <th>年龄</th>
                <td>12</td>
            </tr>
            <tr>
                <th>身高</th>
                <td>155</td>
            </tr>
        </table>
    </div>
</div>
私人信息页面:

 浙公网安备 33010602011771号