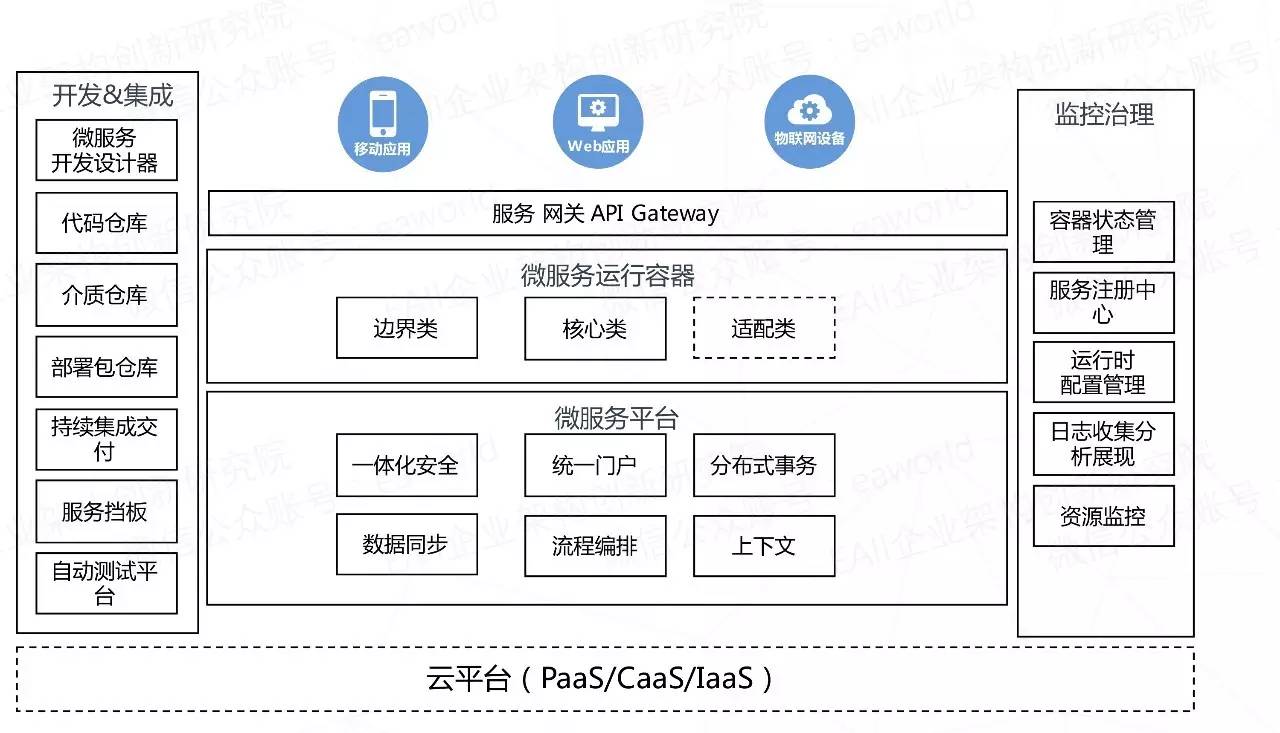
python 微服务方案
介绍
使用python做web开发面临的一个最大的问题就是性能,在解决C10K问题上显的有点吃力。有些异步框架Tornado、Twisted、Gevent 等就是为了解决性能问题。这些框架在性能上有些提升,但是也出现了各种古怪的问题难以解决。
在python3.6中,官方的异步协程库asyncio正式成为标准。在保留便捷性的同时对性能有了很大的提升,已经出现许多的异步框架使用asyncio。
使用较早的异步框架是aiohttp,它提供了server端和client端,对asyncio做了很好的封装。但是开发方式和最流行的微框架flask不同,flask开发简单,轻量,高效。正是结合这些优点, 以Sanic为基础,集成多个流行的库来搭建微服务。 Sanic框架是和Flask相似的异步协程框架,简单轻量,并且性能很高。本项目就是以Sanic为基础搭建的python微服务框架。(思想适用于其他语言)
微服务设计原则个人总结:

X 轴 :指的是水平复制,很好理解,就是讲单体系统多运行几个实例,做个集群加负载均衡的模式。
Z 轴 :是基于类似的数据分区,比如一个互联网打车应用突然或了,用户量激增,集群模式撑不住了,那就按照用户请求的地区进行数据分区,北京、上海、四川等多建几个集群。简单理解数据库拆分,比如分库分表
Y 轴 :就是我们所说的微服务的拆分模式,就是基于不同的业务拆分。
特点
- 使用sanic异步框架,简单,轻量,高效。
- 使用uvloop为核心引擎,使sanic在很多情况下单机并发甚至不亚于Golang。
- 使用asyncpg为数据库驱动,进行数据库连接,执行sql语句执行。
- 使用aiohttp为Client,对其他微服务进行访问。
- 使用peewee为ORM,但是只是用来做模型设计和migration。
- 使用opentracing为分布式追踪系统。
- 使用unittest做单元测试,并且使用mock来避免访问其他微服务。
- 使用swagger做API标准,能自动生成API文档。
服务端
使用sanic异步框架,有较高的性能,但是使用不当会造成blocking, 对于有IO请求的都要选用异步库。添加库要慎重。
sanic使用uvloop异步驱动,uvloop基于libuv使用Cython编写,性能比nodejs还要高。
功能说明:
启动前
-
-
async def before_srver_start(app, loop):
-
queue = asyncio.Queue()
-
app.queue = queue
-
loop.create_task(consume(queue, app.config.ZIPKIN_SERVER))
-
reporter = AioReporter(queue=queue)
-
tracer = BasicTracer(recorder=reporter)
-
tracer.register_required_propagators()
-
opentracing.tracer = tracer
-
app.db = await ConnectionPool(loop=loop).init(DB_CONFIG)
- 创建DB连接池
- 创建Client连接
- 创建queue, 消耗span,用于日志追踪
- 创建opentracing.tracer进行日志追踪
中间件
-
-
async def cros(request): -
if request.method == 'POST' or request.method == 'PUT': -
request['data'] = request.json -
span = before_request(request) -
request['span'] = span -
-
-
-
async def cors_res(request, response): -
span = request['span'] if 'span' in request else None -
if response is None: -
return response -
result = {'code': 0} -
if not isinstance(response, HTTPResponse): -
if isinstance(response, tuple) and len(response) == 2: -
result.update({ -
'data': response[0], -
'pagination': response[1] -
}) -
else: -
result.update({'data': response}) -
response = json(result) -
if span: -
span.set_tag('http.status_code', "200") -
if span: -
span.set_tag('component', request.app.name) -
span.finish() -
return response
- 创建span, 用于日志追踪
- 对response进行封装,统一格式
异常处理
对抛出的异常进行处理,返回统一格式
任务
创建task消费queue中对span,用于日志追踪
异步处理
由于使用的是异步框架,可以将一些IO请求并行处理
Example:
-
async def async_request(datas): -
# async handler request -
results = await asyncio.gather(*[data[2] for data in datas]) -
for index, obj in enumerate(results): -
data = datas[index] -
data[0][data[1]] = results[index] -
-
-
-
-
-
async def get_users_list(request, id): -
async with request.app.db.acquire(request) as cur: -
record = await cur.fetch( -
""" SELECT * FROM users WHERE id = $1 """, id) -
datas = [ -
[record, 'city_id', get_city_by_id(request, record['city_id'])] -
[record, 'role_id', get_role_by_id(request, record['role_id'])] -
] -
await async_request(datas) -
return record
get_city_by_id, get_role_by_id是并行处理。
相关连接
模型设计 & ORM
Peewee is a simple and small ORM. It has few (but expressive) concepts, making it easy to learn and intuitive to use。ORM使用peewee, 只是用来做模型设计和migration, 数据库操作使用asyncpg。
Example:
-
# models.py -
-
class Users(Model): -
id = PrimaryKeyField() -
create_time = DateTimeField(verbose_name='create time', -
default=datetime.datetime.utcnow) -
name = CharField(max_length=128, verbose_name="user's name") -
age = IntegerField(null=False, verbose_name="user's age") -
sex = CharField(max_length=32, verbose_name="user's sex") -
city_id = IntegerField(verbose_name='city for user', help_text=CityApi) -
role_id = IntegerField(verbose_name='role for user', help_text=RoleApi) -
-
class Meta: -
db_table = 'users' -
-
-
# migrations.py -
-
from sanic_ms.migrations import MigrationModel, info, db -
-
class UserMigration(MigrationModel): -
_model = Users -
-
# @info(version="v1") -
# def migrate_v1(self): -
# migrate(self.add_column('sex')) -
-
def migrations(): -
try: -
um = UserMigration() -
with db.transaction(): -
um.auto_migrate() -
print("Success Migration") -
except Exception as e: -
raise e -
-
if __name__ == '__main__': -
migrations()
- 运行命令 python migrations.py
- migrate_v1函数添加字段sex, 在BaseModel中要先添加name字段
- info装饰器会创建表migrate_record来记录migrate,version每个model中必须唯一,使用version来记录是否执行过,还可以记录author,datetime
- migrate函数必须以migrate_开头
相关连接
数据库操作
asyncpg is the fastest driver among common Python, NodeJS and Go implementations使用asyncpg为数据库驱动, 对数据库连接进行封装, 执行数据库操作。
不使用ORM做数据库操作,一个原因是性能,ORM会有性能的损耗,并且无法使用asyncpg高性能库。另一个是单个微服务是很简单的,表结构不会很复杂,简单的SQL语句就可以处理来,没必要引入ORM。使用peewee只是做模型设计
Example:
-
sql = "SELECT * FROM users WHERE name=$1"
-
name = "test"
-
async with request.app.db.acquire(request) as cur:
-
data = await cur.fetchrow(sql, name)
-
-
async with request.app.db.transaction(request) as cur:
-
data = await cur.fetchrow(sql, name)
- acquire() 函数为非事务, 对于只涉及到查询的使用非事务,可以提高查询效率
- tansaction() 函数为事务操作,对于增删改必须使用事务操作
- 传入request参数是为了获取到span,用于日志追踪
- TODO 数据库读写分离
相关连接
客户端
使用aiohttp中的client,对客户端进行了简单的封装,用于微服务之间访问。Don’t create a session per request. Most likely you need a session per application which performs all requests altogether.
A session contains a connection pool inside, connection reusage and keep-alives (both are on by default) may speed up total performance.
Example:
-
-
async def before_srver_start(app, loop): -
app.client = Client(loop, url='http://host:port') -
-
async def get_role_by_id(request, id): -
cli = request.app.client.cli(request) -
async with cli.get('/cities/{}'.format(id)) as res: -
return await res.json() -
-
-
async def before_server_stop(app, loop): -
app.client.close() -
对于访问不同的微服务可以创建多个不同的client,这样每个client都会keep-alives
日志 & 分布式追踪系统
装饰器logger
-
-
async def get_city_by_id(request, id):
-
cli = request.app.client.cli(request)
- type: 日志类型,如 method, route
- category: 日志类别,默认为app的name
- detail: 日志详细信息
- description: 日志描述,默认为函数的注释
- tracing: 日志追踪,默认为True
- level: 日志级别,默认为INFO
分布式追踪系统
- OpenTracing是以Dapper,Zipkin等分布式追踪系统为依据, 建立了统一的标准。
- Opentracing跟踪每一个请求,记录请求所经过的每一个微服务,以链条的方式串联起来,对分析微服务的性能瓶颈至关重要。
- 使用opentracing框架,但是在输出时转换成zipkin格式。 因为大多数分布式追踪系统考虑到性能问题,都是使用的thrift进行通信的,本着简单,Restful风格的精神,没有使用RPC通信。以日志的方式输出, 可以使用fluentd, logstash等日志收集再输入到Zipkin。Zipkin是支持HTTP输入的。
- 生成的span先无阻塞的放入queue中,在task中消费队列的span。后期可以添加上采样频率。
- 对于DB,Client都加上了tracing
相关连接
API接口
api文档使用swagger标准。
Example:
-
from sanic_ms import doc -
-
-
-
-
-
-
async def create_user(request): -
data = request['data'] -
async with request.app.db.transaction(request) as cur: -
record = await cur.fetchrow( -
""" INSERT INTO users(name, age, city_id, role_id) -
VALUES($1, $2, $3, $4, $5) -
RETURNING id -
""", data['name'], data['age'], data['city_id'], data['role_id'] -
) -
return {'id': record['id']}
- summary: api概要
- description: 详细描述
- consumes: request的body数据
- produces: response的返回数据
- tag: API标签
- 在consumes和produces中传入的参数可以是peewee的model,会解析model生成API数据, 在field字段的help_text参数来表示引用对象
- http://host:ip/openapi/spec.json 获取生成的json数据
相关连接
Response 数据
在返回时,不要返回sanic的response,直接返回原始数据,会在Middleware中对返回的数据进行处理,返回统一的格式,具体的格式可以[查看]
单元测试
单元测试使用unittest。 mock是自己创建了MockClient,因为unittest还没有asyncio的mock,并且sanic的测试接口也是发送request请求,所以比较麻烦. 后期可以使用pytest。
Example:
-
from sanic_ms.tests import APITestCase -
from server import app -
-
class TestCase(APITestCase): -
_app = app -
_blueprint = 'visit' -
-
def setUp(self): -
super(TestCase, self).setUp() -
self._mock.get('/cities/1', -
payload={'id': 1, 'name': 'shanghai'}) -
self._mock.get('/roles/1', -
payload={'id': 1, 'name': 'shanghai'}) -
-
def test_create_user(self): -
data = { -
'name': 'test', -
'age': 2, -
'city_id': 1, -
'role_id': 1, -
} -
res = self.client.create_user(data=data) -
body = ujson.loads(res.text) -
self.assertEqual(res.status, 200)
- 其中_blueprint为blueprint名称
- 在setUp函数中,使用_mock来注册mock信息, 这样就不会访问真实的服务器, payload为返回的body信息
- 使用client变量调用各个函数, data为body信息,params为路径的参数信息,其他参数是route的参数
代码覆盖
-
coverage erase
-
coverage run --source . -m sanic_ms tests
-
coverage xml -o reports/coverage.xml
-
coverage2clover -i reports/coverage.xml -o reports/clover.xml
-
coverage html -d reports
- coverage2colver 是将coverage.xml 转换成 clover.xml,bamboo需要的格式是clover的。
相关连接
异常处理
使用 app.error_handler = CustomHander() 对抛出的异常进行处理
Example:
-
from sanic_ms.exception import ServerError -
-
-
async def del_user(request, id): -
raise ServerError(error='内部错误',code=10500, message="msg")
- code: 错误码,无异常时为0,其余值都为异常
- message: 状态码信息
- error: 自定义错误信息
- status_code: http状态码,使用标准的http状态码
posted on 2019-07-04 21:15 ExplorerMan 阅读(14667) 评论(0) 收藏 举报


 浙公网安备 33010602011771号