

2019.10.18
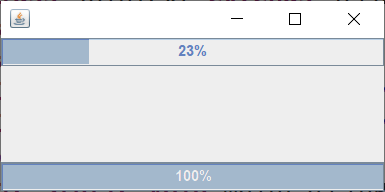
1、调试教材P335【例18.4】进度条线程的插入(join)。(20分)
代码:
package MyThread;

 import java.awt.BorderLayout;
 import javax.swing.JFrame;
 import javax.swing.JProgressBar;

public class JoinText extends JFrame{
	private Thread threadA;
	private Thread threadB;
	final JProgressBar progressBar=new JProgressBar();
	final JProgressBar progressBar2=new JProgressBar();
	int count=0;
	public static void main(String[] args) {
		init(new JoinText(),100,100);
	}
	public JoinText() {
		super();
		getContentPane().add(progressBar,BorderLayout.NORTH);
		getContentPane().add(progressBar2,BorderLayout.SOUTH);
		progressBar.setStringPainted(true);
		progressBar2.setStringPainted(true);
		threadA=new Thread(new Runnable() {
			int count=0;
			public void run() {
				while(true) {
					progressBar.setValue(++count);
					try {
						Thread.sleep(100);
						threadB.join();
					}catch(Exception e){
						e.printStackTrace();
					}
				}
			}
		});
		threadA.start();
		threadB=new Thread(new Runnable() {
			int count=0;
			public void run() {
				while(true) {
					progressBar2.setValue(++count);
					try {
						Thread.sleep(100);
					} catch (InterruptedException e) {
						// TODO 自动生成的 catch 块
						e.printStackTrace();
					}
					if(count==100) {
						break;
					}
				}
			}
		});
		threadB.start();
	}
	public static void init(JFrame frame,int width,int height) {
		frame.setDefaultCloseOperation(JFrame.EXIT_ON_CLOSE);
		frame.setSize(width, height);
		frame.setVisible(true);
	}
}
运行截图:
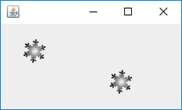
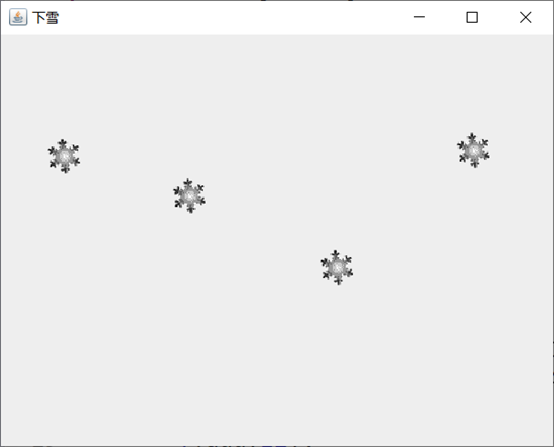
2、仿照教材P335【例18.4】,将教材P330【例18.2】改造成两个线程(定义匿名内部类的方式),效果是上下两个图标分别按照不同的速度滚动。(20分)
package MyThread;

import javax.swing.*;
public class MySnow {
	JFrame f;
	JLabel l1,l2,l3,l4;
	Icon i1,i2,i3,i4;
	public MySnow() {
		f=new JFrame("下雪");
		l1=new JLabel();
		l2=new JLabel();
		l3=new JLabel();
		l4=new JLabel();
		f.setVisible(true);
		f.setLayout(null);
		f.setDefaultCloseOperation(JFrame.EXIT_ON_CLOSE);
		f.setBounds(200, 200, 500, 400);
		f.add(l1);
		f.add(l2);
		f.add(l3);
		f.add(l4);
		l1.setBounds(40, 1, 45, 45);
		l2.setBounds(150, 1, 45, 45);
		l3.setBounds(280, 1, 45, 45);
		l4.setBounds(400, 1, 45, 45);
		i1=new ImageIcon("d:/图片/1.gif");
		i2=new ImageIcon("d:/图片/1.gif");
		i3=new ImageIcon("d:/图片/1.gif");
		i4=new ImageIcon("d:/图片/1.gif");
		l1.setIcon(i1);
		l2.setIcon(i2);
		l3.setIcon(i3);
		l4.setIcon(i4);

		Thread t1=new Thread(new Runnable() {
			public void run() {
				int i=0;
				while(true) {
					l1.setBounds(40, i, 45, 45);
					i=i+5;
					try {
						Thread.sleep(100);
					} catch (InterruptedException e) {
						e.printStackTrace();
					}
					if(i==360) {
						i=-45;
					}
				}
			}
		});t1.start();

		Thread t2=new Thread(new Runnable() {
			public void run() {
				int i=0;
				while(true) {
					l2.setBounds(150, i, 45, 45);
					i=i+8;
					try {
						Thread.sleep(150);
					} catch (InterruptedException e) {
						e.printStackTrace();
					}
					if(i==360) {
						i=-48;
					}
				}
			}
		});t2.start();

		Thread t3=new Thread(new Runnable() {
			public void run() {
				int i=0;
				while(true) {
					l3.setBounds(280, i, 45, 45);
					i=i+3;
					try {
						Thread.sleep(50);
					} catch (InterruptedException e) {
						e.printStackTrace();
					}
					if(i==360) {
						i=-45;
					}
				}
			}
		});t3.start();

		Thread t4=new Thread(new Runnable() {
			public void run() {
				int i=0;
				while(true) {
					l4.setBounds(400, i, 45, 45);
					i=i+10;
					try {
						Thread.sleep(200);
					} catch (InterruptedException e) {
						e.printStackTrace();
					}
					if(i==360) {
						i=-50;
					}
				}
			}
		});t4.start();

	}
	public static void main(String[] args) {
		new MySnow();
	}
}
运行截图:
3、调试教材P341【例18.8】火车站售票系统,体会多线程同时访问资源带来的冲突问题。并分别采用“同步块”和“同步方法”两种线程同步机制,改进原来的代码,即实现【例18.9】和【例18.10】。(30分)
代码:
package MyThread;

public class MyTrainSale implements Runnable{
	int num=10;
	public void run(){
		while(true){
			synchronized(""){
				if(num>0){
					try{
						Thread.sleep(1000);
					}catch(Exception e){
						e.printStackTrace();
					}
					System.out.println("tickets"+--num);
				}else {
					break;
				}
			}
		}
	}
	public static void main(String[] args){
		MyTrainSale t=new MyTrainSale();
		Thread tA=new Thread(t);
		Thread tB=new Thread(t);
		Thread tC=new Thread(t);
		Thread tD=new Thread(t);
		tA.start();
		tB.start();
		tC.start();
		tD.start();
	}
}
运行截图:

代码2:
package MyThread;

public class MyTrainSales implements Runnable{
	int num=10;
	public synchronized void doit(){
		if(num>0){
			try{
				Thread.sleep(10);
			}catch(Exception e){
				e.printStackTrace();
			}
			System.out.println("tickers"+--num);
		}
	}
	public void run(){
		while(true){
			doit();
		}
	}
	public static void main(String[]args){
		MyTrainSales t=new MyTrainSales();
		Thread tA=new Thread(t);
		Thread tB=new Thread(t);
		Thread tC=new Thread(t);
		Thread tD=new Thread(t);
		tA.start();
		tB.start();
		tC.start();
		tD.start();
	}
}
运行截图:

4、(30分)编写10个线程,第一个线程从1加到10,第二个线程从11加到20,…第十个线程从91加到100,最后把10个线程的结果相加。提示:
(1)定义类继承Thread;
(2)类成员变量:
①start:表示累加的起始值;
②summary:表示10个线程的累加和;
③run()方法:完成起始值开始的10个数累加;并将累加和计入总和。注意:中间和计入总和summary操作需要用同步块synchronized同步;
(3) main()中创建10个线程并启动,在显示10个线程和之前需要利用线程插队机制(join())保证所有线程全部工作完成。
package MyMenu;

public class MyThreadjoins extends Thread{
	private int start;
	static int summary;
	public MyThreadjoins(int start) {
		this.start=start;
	}
	public synchronized void add(int num) {
		summary=summary+num;
	}
	public void run() {
		int sum=0;
		for(int i=0;i<10;i++) {
			sum=i+start+sum;
		}
		add(sum);
	}
	public static void main(String[] args) throws Exception {
		Thread t[]=new Thread[10];
		for(int i=0;i<10;i++) {
			t[i]=new MyThreadjoins(i*10+1);
			t[i].start();
		}
		for(int i=0;i<10;i++) {
			t[i].join();
		}
		System.out.println(summary);
	}
}
运行截图:

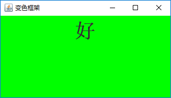
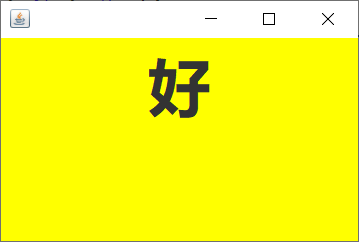
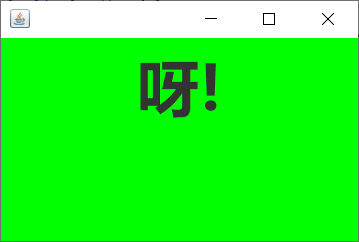
5、利用线程编写一个可以变换颜色的框架的程序。(附加题:20分)

代码:
package MyThread;

import java.awt.Color;
import java.awt.Font;

import javax.swing.*;
public class MyColor {
	JFrame f;
	JPanel p;
	JLabel l;
	String[]str= {"你","好","呀!"};
	Color[]color= {Color.RED,Color.YELLOW,Color.GREEN};
	public MyColor() {
		f=new JFrame();
		p=new JPanel();
		l=new JLabel();
		f.setVisible(true);
		f.setBounds(500, 300, 300, 200);
		f.add(p);
		p.add(l);
		l.setFont(new Font("微软雅黑",Font.BOLD,50));
		f.setDefaultCloseOperation(JFrame.EXIT_ON_CLOSE);

		Thread t=new Thread(new Runnable() {
			int i=0;
			public void run() {
				while(true) {
					p.setBackground(color[i]);
					l.setText(str[i]);
					try {
						Thread.sleep(500);
					} catch (InterruptedException e) {
						// TODO 自动生成的 catch 块
						e.printStackTrace();
					}
					i++;
					if(i==3) {
						i=0;
					}
				}
			}
		});t.start();

	}
	public static void main(String[] args) {
		new MyColor();
	}
}
运行截图:

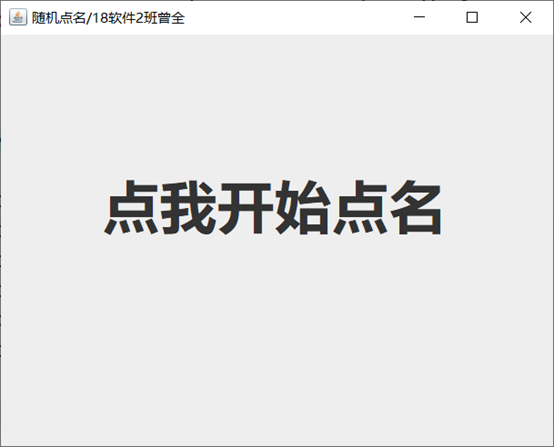
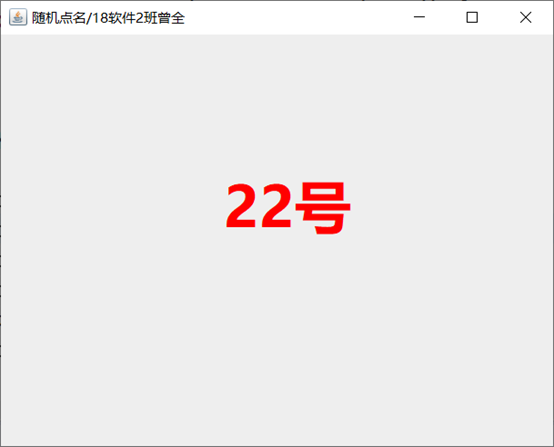
6、利用线程实现一个随机点名程序(附加题:30分)

代码:
package MyThread;

import java.awt.Color;
import java.awt.Font;
import java.awt.event.MouseAdapter;
import java.awt.event.MouseEvent;
import java.util.Random;
import javax.swing.*;
public class RandomNames {
	Random r=new Random();
	int temp,time,count;
	JFrame f;
	JLabel l;
	public RandomNames() {
		f=new JFrame("随机点名/18软件2班曾全");
		l=new JLabel("点我开始点名");
		f.setDefaultCloseOperation(JFrame.EXIT_ON_CLOSE);
		l.addMouseListener(new MouseAdapter() {
			public void mouseClicked(MouseEvent e) {
				if(e.getButton()==MouseEvent.BUTTON1) {
						new Thread(t).start();
				}
			}
		});
		f.setLayout(null);
		f.setVisible(true);
		l.setFont(new Font("微软雅黑",Font.BOLD,50));
		f.setBounds(400, 200, 500, 400);
		f.add(l);
		l.setBounds(90, -50, 500, 400);
	}

	public static void main(String[] args) {
		new RandomNames();
	}
		Thread t=new Thread(new Runnable() {
			public void run() {
			temp=r.nextInt(60)+1;
			time=(3+r.nextInt(4))*10;
			while(true) {
				l.setForeground(Color.BLACK);
				l.setText("       "+temp+"号");
				try {
					Thread.sleep(100);
					count++;
				} catch (InterruptedException e) {
					e.printStackTrace();
				}
				temp=r.nextInt(60)+1;
				if(time==count) {
					l.setForeground(Color.RED);
					count=0;
					break;
				}
			}
		}
	});
}
运行截图:

 浙公网安备 33010602011771号