
PowerShell设置_WSL_Ubuntu_Docker_镜像
Detector Backend
PowerShell 设置
如果 PowerShell 的执行策略限制了未签名脚本的运行,需要按以下步骤操作来更改策略:
-
以管理员身份打开 PowerShell。可以右键点击 PowerShell 快捷方式,选择“以管理员身份运行”。
-
输入以下命令来允许运行未签名的脚本:
Set-ExecutionPolicy RemoteSigned -Scope CurrentUserRemoteSigned允许本地脚本运行,而对下载的远程脚本要求数字签名。 -
系统会提示确认,输入 Y 并按 Enter 键确认。
-
激活虚拟环境:
& F:/detector1208/detector1208/.venv/Scripts/Activate.ps1
或者尝试删除并重新创建虚拟环境:
-
在 Windows PowerShell 中删除现有的虚拟环境文件夹:
Remove-Item -Recurse -Force .\.venv -
重新创建虚拟环境:
python -m venv .venv需要指定 python 版本进行虚拟环境创建的话:
# 指定版本为 Python3.12 py -3.12 -m venv .venv -
激活虚拟环境:
.\.venv\Scripts\activate命令提示符前出现 (
.venv),这表示虚拟环境已成功激活。 -
安装依赖:
pip install -r requirements.txt
Manual Installation Steps for Older Versions of WSL
官方指导文档: https://learn.microsoft.com/en-us/windows/wsl/install-manual
-
启用 WSL 和虚拟化功能:
dism.exe /online /enable-feature /featurename:Microsoft-Windows-Subsystem-Linux /all /norestart dism.exe /online /enable-feature /featurename:VirtualMachinePlatform /all /norestart -
启用 Hyper-V(如果尚未启用):
dism.exe /online /enable-feature /featurename:Microsoft-Hyper-V-All /all /norestart -
重启计算机(关键)
-
下载 Linux kernel 升级包:
x64 下载地址: https://wslstorestorage.blob.core.windows.net/wslblob/wsl_update_x64.msi
Double-click to run - you will be prompted for elevated permissions, select ‘yes’ to approve this installation.
-
Set WSL 2 as your default version
# 在 PowerShell 中 wsl --set-default-version 2 -
Downloading distributions
There are some scenarios in which you may not be able (or want) to, install WSL Linux distributions using the Microsoft Store. You may be running a Windows Server or Long-Term Servicing (LTSC) desktop OS SKU that doesn't support Microsoft Store, or your corporate network policies and/or admins do not permit Microsoft Store usage in your environment. In these cases, while WSL itself is available, you may need to download Linux distributions directly.
Ubuntu-22.04-LTS 下载链接: https://aka.ms/wslubuntu2204
This will cause the
<distro>.appx packages to download to a folder of your choosing. -
Installing the Appx package with Add-AppxPackage
# 在 PowerShell 中
Add-AppxPackage .\app_name.Appx
Once the Appx package has finished downloading, you can start running the new distribution by double-clicking the appx file.
WSL 使用方法
-
在 PowerShell 中启动 WSL:
wsl -
退出 WSL:
exit -
彻底退出所有 WSL:
wsl --shutdown -
检查分发版的版本是否已成功设置为 WSL 2:
wsl --list --verbose -
在初次运行 WSL (直接双击 appx 文件) 安装 Ubuntu 时可能会遇到无法创建用户的情况:
Installing, this may take a few minutes... 参考的对象类型不支持尝试的操作。
Please create a default UNIX user account. The username does not need to match your Windows username.
For more information visit: https://aka.ms/wslusers
Enter new UNIX username: YUAN 参考的对象类型不支持尝试的操作。
这是本机 VPN 和 WSL2 产生了冲突导致的,重置 winsock 即可:
# 在 PowerShell 中
netsh winsock reset
然后再次尝试双击 appx 文件启动,若看到如下结果,证明 Ubuntu 已经在 Windows 中通过 WSL 成功安装并运行了:
适用于 Linux 的 Windows 子系统现已在 Microsoft Store 中可用!
你可以通过运行“wsl.exe --update”或通过访问 https://aka.ms/wslstorepage 进行升级
从 Microsoft Store 安装 WSL 将可以更快地获取最新的 WSL 更新。 有关详细信息,请访问 https://aka.ms/wslstoreinfo

Welcome to Ubuntu 22.04.1 LTS (GNU/Linux 5.10.16.3-microsoft-standard-WSL2 x86_64)

* Documentation: https://help.ubuntu.com
* Management: https://landscape.canonical.com
* Support: https://ubuntu.com/advantage

This message is shown once a day. To disable it please create the /root/.hushlogin file.

root@DESKTOP-J8JFPPQ:~#
已进入 Ubuntu Shell:
-
root→ 当前用户是 root(最高权限) -
DESKTOP-J8JFPPQ→ Windows 主机名 -
~→ 当前在/root目录 -
#→ root 用户提示符(普通用户是$)
参考链接:
-
-
最简单的测试是否FQ成功的方法:
ping google.com -
自检 Ubuntu 是否安装成功的自检命令:
lsb_release -a应该看到:
No LSB modules are available.
Distributor ID: Ubuntu
Description:    Ubuntu 22.04.5 LTS
Release:        22.04
Codename:       jammy
uname -r应该看到类似这样的输出:
5.10.16.3-microsoft-standard-WSL2
在 Ubuntu 中创建普通用户
-
创建用户
adduser yuan系统会依次问你:
-
设置密码(输入时不显示,正常)
-
确认密码
-
其他信息(姓名、电话等)-> 一路回车即可
-
-
把该用户加入 sudo 组
usermod -aG sudo yuan验证用
groups yuan,看到yuan : yuan sudo的输出证明用户yuan已成功加入 sudo 组。
把 WSL 的「默认登录用户」从 root 改成普通用户
-
先退出 Ubuntu:
exit回到 Windows PowerShell / CMD
-
在 PowerShell 中设置 Ubuntu 默认用户
wsl -d Ubuntu -u yuan如果这条命令能直接进入:
yuan@DESKTOP-J8JFPPQ:/mnt/c/Windows/system32$说明用户本身是 OK 的。
-
设置为永久默认用户
# 在 Windows PowerShell(管理员或普通都行) 执行
ubuntu config --default-user yuan
更改默认目录
当前的工作目录在 Windows 的 system32 目录里:
yuan@DESKTOP-J8JFPPQ:/mnt/c/Windows/system32$
但是不建议长期在 /mnt/c 下开发,会有文件权限和符号链接等问题。所以要把目录改成 home 目录 ~,也就是 /home/yuan。
所以在 PowerShell 中启动 WSL 时需要用:
wsl ~
这样工作目录才会是 home 目录。
Windows Terminal 下载链接: https://github.com/microsoft/terminal/releases/download/v1.23.13503.0/Microsoft.WindowsTerminal_1.23.13503.0_8wekyb3d8bbwe.msixbundle
WSL Ubuntu 配置
Ubuntu apt 换成阿里云镜像
-
备份原 sources.list
sudo cp /etc/apt/sources.list /etc/apt/sources.list.bak -
写入 Ubuntu 22.04(jammy)阿里云源
sudo tee /etc/apt/sources.list << 'EOF'
deb https://mirrors.aliyun.com/ubuntu/ jammy main restricted universe multiverse
deb https://mirrors.aliyun.com/ubuntu/ jammy-updates main restricted universe multiverse
deb https://mirrors.aliyun.com/ubuntu/ jammy-backports main restricted universe multiverse
deb https://mirrors.aliyun.com/ubuntu/ jammy-security main restricted universe multiverse
EOF
配置 Python + uv 环境
-
先确认你不是 root:
whoami如果是的话,先切换成 yuan 再往下做:
# 一打开 WSL 就是 root 的用这个命令 su - yuan # 用 sudo su 自己切换成 root 的用这个命令 exit -
安装 Python 基础组件
sudo apt update
sudo apt install -y python3 python3-venv python3-pip build-essential
验证:
python3 --version对于 Ubuntu-22.04,它的官方系统 Python 版本为 Python 3.10,无法用 apt 系统工具强行升级。所以如果想用更高版本的 Python,可以用
uv工具来安装。 -
安装 uv
# 使用官方安装脚本
curl -LsSf https://astral.sh/uv/install.sh | sh
把 uv 永久加入 PATH:
echo 'export PATH="$HOME/.local/bin:$PATH"' >> ~/.bashrc
source ~/.bashrc
验证:
which uv
uv --version
应该显示:
/home/yuan/.local/bin/uv
uv 0.9.18
如果错误地把 uv 安装在 root 中,可以这样清理:
sudo rm -f /root/.local/bin/uv /root/.local/bin/uvx验证:
sudo -i
which uv
如果清理干净了的话,应该是没有任何输出。
-
用 uv 安装高版本 Python
查看可用的 Python 版本:
uv python list安装 Python 3.12:
uv python install 3.12 -
pip / uv 配置国内镜像
mkdir -p ~/.pip
cat > ~/.pip/pip.conf << 'EOF'
[global]
index-url = https://mirrors.aliyun.com/pypi/simple/
trusted-host = mirrors.aliyun.com
timeout = 60
EOF
验证:
pip config list输出应该是:
global.index-url='https://mirrors.aliyun.com/pypi/simple/'
global.timeout='60'
global.trusted-host='mirrors.aliyun.com'
证明已经配置成功。
-
指定版本 Python 创建项目虚拟环境
# 显式指定 Python 3.12
python3.12 -m venv /tmp/piptest312
source /tmp/piptest312/bin/activate  # 激活
python --version
deactivate  # 取消激活
删除测试目录:
rm -rf /tmp/piptest
Docker 安装和配置
Windows 特定版本 Docker 安装包下载: https://docs.docker.com/desktop/release-notes/
阿里云 Docker 镜像下载: https://mirrors.aliyun.com/docker-toolbox/
Docker 4.5+ 之后,默认只信任 Microsoft Store 版 WSL,而我这个电脑又用不了 Microsoft Store,无法简单地用 wsl --install 或者 wsl --update 来进行 WSL 的下载和升级,只能手动安装旧版本的系统内置 WSL,所以如果想在 Windows 上使用 Docker Desktop 只能用低于 4.5 版本的 Docker。
还有一种方法是直接在 WSL 中安装部署 Docker Engine,不依赖 Docker Desktop。
前置条件检查:
# 在 PowerShell 中
wsl -l -v
确保返回的是:
Ubuntu-22.04 Running 2
确认无误后 wsl ~ 进入 WSL Ubuntu,并执行以下命令:
# 更新系统依赖
sudo apt update
sudo apt install -y ca-certificates curl gnupg lsb-release

# 添加 Docker 官方 GPG key
sudo mkdir -p /etc/apt/keyrings
curl -fsSL https://download.docker.com/linux/ubuntu/gpg \
  | sudo gpg --dearmor -o /etc/apt/keyrings/docker.gpg

# 设置权限
sudo chmod a+r /etc/apt/keyrings/docker.gpg

# 添加 Docker 官方仓库
echo \
  "deb [arch=$(dpkg --print-architecture) signed-by=/etc/apt/keyrings/docker.gpg] \
  https://download.docker.com/linux/ubuntu \
  $(lsb_release -cs) stable" \
| sudo tee /etc/apt/sources.list.d/docker.list > /dev/null

# 安装 Docker Engine
sudo apt update
sudo apt install -y docker-ce docker-ce-cli containerd.io docker-compose-plugin
启动 Docker:
# WSL 没有 systemd(默认),所以用下面方式:
sudo service docker start
验证:
docker version
返回:
Client: Docker Engine - Community
 Version:           29.1.3
 API version:       1.52
 Go version:        go1.25.5
 Git commit:        f52814d
 Built:             Fri Dec 12 14:49:37 2025
 OS/Arch:           linux/amd64
 Context:           default

Server: Docker Engine - Community
 Engine:
  Version:          29.1.3
  API version:      1.52 (minimum version 1.44)
  Go version:       go1.25.5
  Git commit:       fbf3ed2
  Built:            Fri Dec 12 14:49:37 2025
  OS/Arch:          linux/amd64
  Experimental:     false
 containerd:
  Version:          v2.2.1
  GitCommit:        dea7da592f5d1d2b7755e3a161be07f43fad8f75
 runc:
  Version:          1.3.4
  GitCommit:        v1.3.4-0-gd6d73eb8
 docker-init:
  Version:          0.19.0
  GitCommit:        de40ad0
允许非 root 用户使用 docker:
sudo usermod -aG docker $USER

# 退出 WSL
exit

# 重新进入 WSL
wsl ~
再测试:
docker run hello-world
看到欢迎信息则证明安装成功。
如果启动 docker 过程中遇到问题:
yuan@DESKTOP-J8JFPPQ:~$ sudo service docker start
 * Starting Docker: docker [ OK ]
yuan@DESKTOP-J8JFPPQ:~$ docker version
Client: Docker Engine - Community
 Version:           29.1.3
 API version:       1.52
 Go version:        go1.25.5
 Git commit:        f52814d
 Built:             Fri Dec 12 14:49:37 2025
 OS/Arch:           linux/amd64
 Context:           default
Cannot connect to the Docker daemon at unix:///var/run/docker.sock. Is the docker daemon running?
最后一行的 Cannot connect to the Docker daemon 信息说明 WSL 遇到了 iptables/nft 兼容问题。而且当前使用的是旧版 WSL,不支持 systemd,所以 systemctl 无论怎么设置都永远不可用,需要使用专门的旧版 WSL Docker 配置方法:
# 安装 iptables
sudo apt update
sudo apt install -y iptables

# 切换 iptables 后端
sudo update-alternatives --set iptables /usr/sbin/iptables-legacy
sudo update-alternatives --set ip6tables /usr/sbin/ip6tables-legacy

# 版本确认,如果返回 iptables 证明成功,如果返回 nf_tables 证明失败
iptables --version
前台启动 Docker 进行验证:
sudo dockerd
会输出一长串加载信息,最后一行如果是:
INFO[2025-12-29T16:25:35.231434478+08:00] API listen on /var/run/docker.sock
则说明启动成功。只有按 Ctrl + C 才会退出 Docker。
新开一个命令行窗口测试:
docker info
docker run --rm hello-world
如果 hello-world 正常输出,说明 Docker Engine OK,网络 OK,WSL 环境 OK。
还有一种让 Docker 在后台启动的方法:
sudo sh -c 'nohup dockerd > /var/log/dockerd.log 2>&1 &'
验证:
ps -ef | grep dockerd | grep -v grep
应该看到如下输出:
root 28 10 0 16:40 ? 00:00:00 dockerd
查看 Docker 状态:
docker info
能看到 Server: 一整段信息 → Docker 正在运行;出现 Cannot connect to the Docker daemon → Docker 没运行
最简单的人肉判断法:
docker ps
返回结果:
# 立即返回列表(哪怕是空的)→ Docker 正在运行
CONTAINER ID   IMAGE     COMMAND   CREATED   STATUS    PORTS     NAMES

# 报 daemon 错 → 没运行
failed to connect to the docker API at unix:///var/run/docker.sock; check if the path is correct and if the daemon is running: dial unix /var/run/docker.sock: connect: no such file or directory
停止 Docker 运行的方法:
# 适用于前端启动和后端启动
sudo pkill dockerd
如果是前端启动也可以直接 Ctrl + C 停止 Docker 运行。
设置登入 WSL 后 Docker 自行拉起:
# 编辑 ~/.bashrc
nano ~/.bashrc
添加以下内容到文件末尾:
if ! pgrep -x dockerd >/dev/null; then
  sudo sh -c 'nohup dockerd > /var/log/dockerd.log 2>&1 &'
fi
这样每次打开 WSL,如果 dockerd 不在,就自动拉起。
验证 docker compose / 项目级使用是否完全可行
所有操作在 WSL 中进行。
-
确认 docker compose 插件是否存在
docker compose version输出:
Docker Compose version v5.0.0 -
创建一个最小项目(Nginx + 持久化页面)
Smoke testing is a preliminary, high-level software test to quickly verify a new build's core functionalities work, ensuring it's stable enough for deeper testing
mkdir -p ~/compose-smoke-test
cd ~/compose-smoke-test
创建
index.html:cat > index.html <<'EOF' <h1>WSL Docker Compose OK</h1> <p>If you can see this page, port mapping works.</p> EOF创建
compose.yml:cat > compose.yml <<'EOF' services: web: image: nginx:alpine ports: - "8080:80" volumes: - ./index.html:/usr/share/nginx/html/index.html:ro restart: unless-stopped EOF -
启动并检查状态
docker compose up -d
docker compose ps
查看日志:
docker compose logs --tail=50 web -
在 WSL 内验证端口
curl -sS http://localhost:8080 | head返回:
WSL Docker Compose OK -
在 Windows 本机浏览器验证
在 Windows 打开浏览器访问
http://localhost:8080能看到页面 = WSL → Windows 端口映射是 OK 的。 -
验证 volume 挂载是否真的生效
在 WSL 中修改
index.html:echo "<p>Updated at $(date)</p>" >> index.html刷新浏览器页面,应该立刻出现新添组件。
-
验证重启 WSL 后还能保持可控
在 Windows PowerShell 中彻底关闭 WSL:
wsl --shutdown重新进入 WSL 并验证 dockerd 自动拉起 + compose 可控
wsl ~然后在 WSL 中:
ps -ef | grep dockerd | grep -v grep docker compose -f ~/compose-smoke-test/compose.yml ps curl -sS http://localhost:8080 | head -
清理
cd ~/compose-smoke-test
docker compose down

# 删除目录
cd ~
rm -rf ~/compose-smoke-test
myapp 镜像拉取和构建
原工作目录存储在 Windows 本机上,如果想避免对原环境造成影响,就先把整个项目复制到 WSL 环境中,在做后续环境配置工作。
我的 Windows 项目在 F:\detector1208\detector1208,则 WSL 中对应的路径是 /mnt/f/detector1208/detector1208,然后把这个项目整体复制到 WSL 中:
复制之前要确保原 Windows 的工作目录没有被打开,VScode 中也不能打开,要保证完全退出关闭。
# 先在 WSL 环境中创建空文件夹 detector
mkdir -p ~/detector
# 整体复制项目到新创建的空文件夹
cp -r /mnt/f/detector1208/detector1208 ~/detector/
找到工作目录文件夹中的 Dockerfile,Dockerfile 是构建镜像的脚本文件,构建出来的东西叫镜像(image),运行镜像得到容器(container)。
构建镜像的命令:
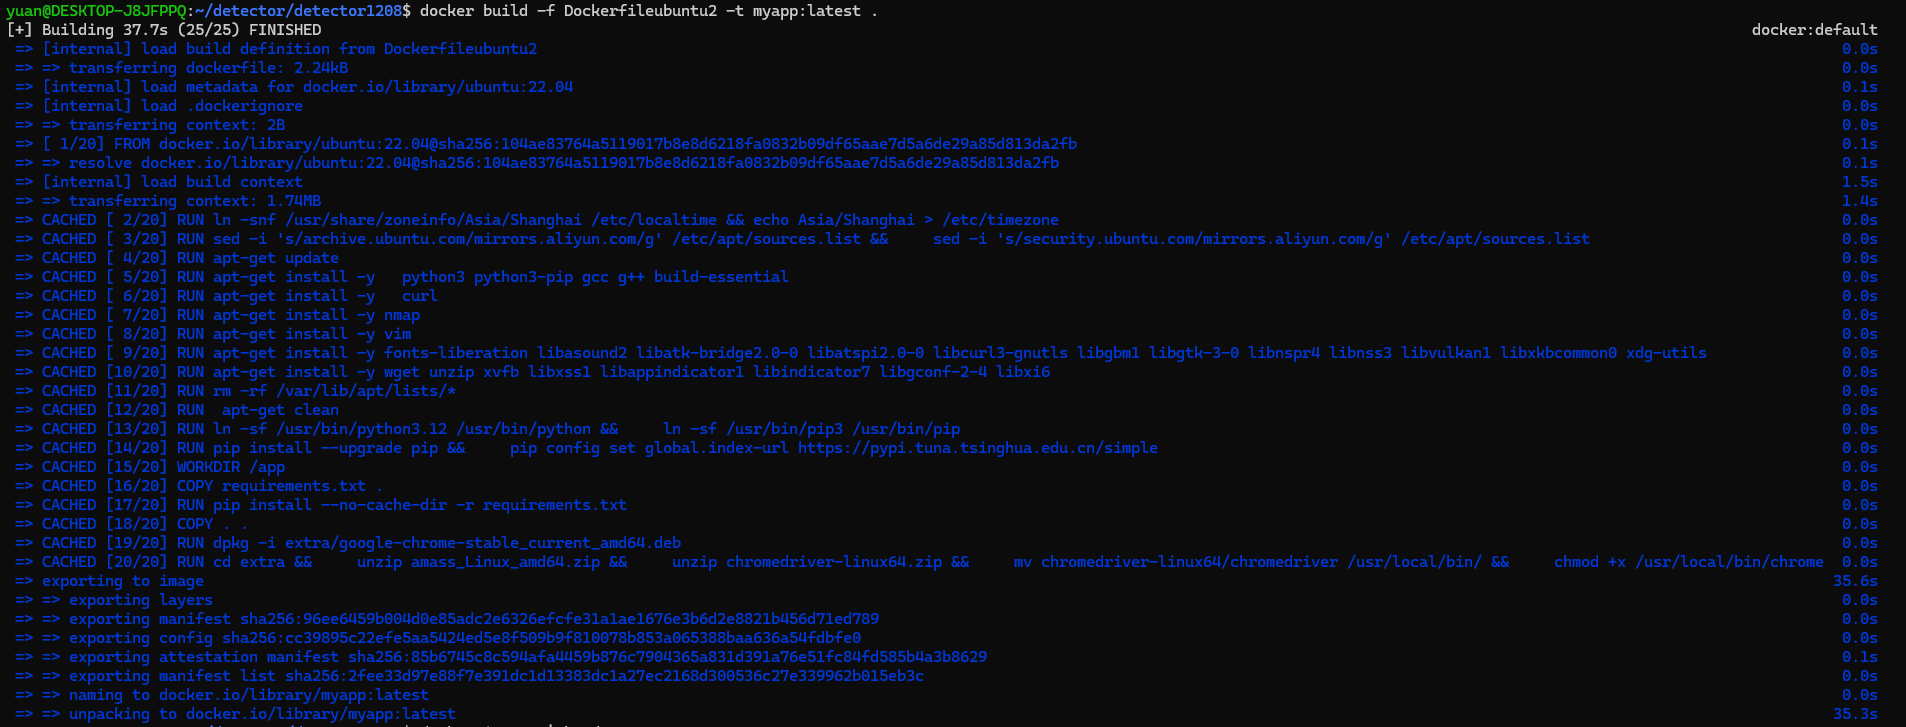
docker build -f Dockerfileubuntu2 -t myapp:latest .
因为我的工作目录中存在很多个 Dockerfile,所以需要指定唯一 Dockerfile 进行镜像构建,这里就用到了 -f Dockerfileubuntu2,如果一般情况下目录中只有一个 Dockerfile,则运行 docker build -t myapp:latest . 会自动默认为用 Dockerfile 进行构建。
Dockerfileubuntu2 中的第一行定义了构建镜像时所需要的基础操作系统环境,是 Ubuntu-22.04:
FROM ubuntu:22.04
如果直接通过 docker build 构建环境可能会卡在第一步这里:
ERROR: failed to build: failed to solve: failed to fetch oauth token: Post "https://auth.docker.io/token": net/http: TLS handshake timeout
所以,最好是单独 pull ubuntu:22.04:
docker pull ubuntu:22.04
成功拉取 ubuntu:22.04 镜像后再执行 docker build -f Dockerfileubuntu2 -t myapp:latest . 就会顺利成功:
确认镜像存在:
docker images | head
docker images | grep myapp
运行容器:
# Dockerfile 里 EXPOSE 5000 + CMD gunicorn ... 0.0.0.0:5000,所以按 5000 映射:
docker run --rm --name myapp-test -p 5000:5000 myapp:latest
Windows 浏览器窗口验证: 浏览器打开 http://localhost:5000。
后台跑:
docker run -d --name myapp -p 5000:5000 myapp:latest
docker logs -f myapp
Troubleshooting:
docker ps -a --filter name=myapp
docker logs myapp-test
docker logs myapp
删除指定镜像的方法:
# 查看现有镜像
docker images | head

# 删除指定镜像
docker rmi hello-world:latest nginx:alpine

 浙公网安备 33010602011771号