CCNA学习笔记4--Telnet实验
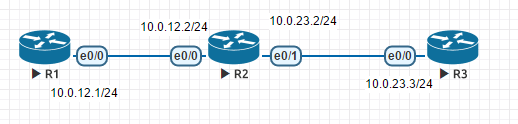
实验拓扑
实验目的:
1. 掌握配置Telnet的相关命令
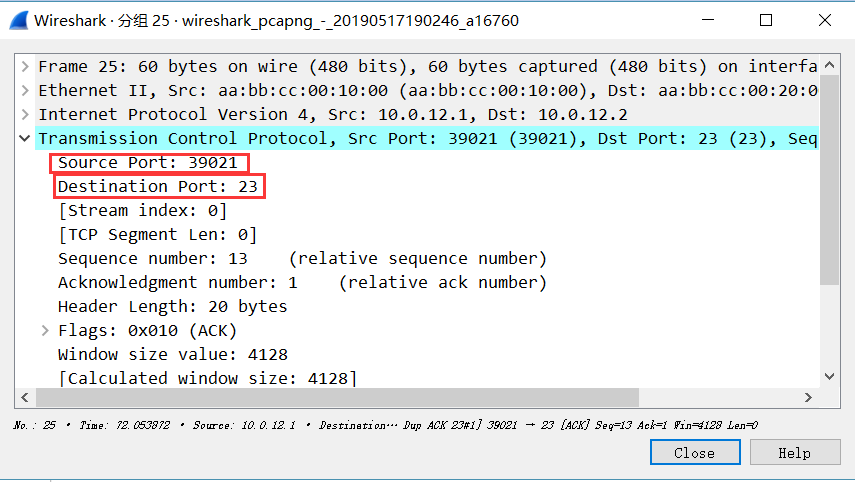
2. 通过观察抓取的包,得到Telnet使用的是23号端口,每次会话是随机获取的源端口
实验步骤:
|
1.基本配置 Router>enable Router#configure terminal R1(config)#enable password cisco Router(config)#no ip domain lookup
Router(config)#line console 0 Router(config-line)#password cisco Router(config-line)#logging synchronous Router(config-line)#exec-timeout 0 0
Router(config-line)#line vty 0 4 Router(config-line)#password cisco Router(config-line)#logging synchronous Router(config-line)#exit
Router(config)#hostname R1 R1(config)#^Z
R1#wr R1#show running-config |
|
2.每台路由器上每个端口配置相应的ip地址 R1(config)#interface ethernet 0/0 R1(config-if)#ip address 10.0.12.1 255.255.255.0 R1(config-if)#no shutdown
R2(config)#interface ethernet 0/0 R2(config-if)#ip address 10.0.12.2 255.255.255.0 R2(config-if)#no shutdown R2(config)#interface ethernet 0/1 R2(config-if)#ip address 10.0.23.2 255.255.255.0 R2(config-if)#no shutdown
R3(config)#interface ethernet 0/0 R3(config-if)#ip address 10.0.23.3 255.255.255.0 R3(config-if)#no shutdown
|
|
3配完地址之后一定要做的事情是测验直连是否通 R2#ping 10.0.12.1 Type escape sequence to abort. Sending 5, 100-byte ICMP Echos to 10.0.12.1, timeout is 2 seconds: .!!!! Success rate is 80 percent (4/5), round-trip min/avg/max = 1/1/1 ms R2#ping 10.0.23.3 Type escape sequence to abort. Sending 5, 100-byte ICMP Echos to 10.0.23.3, timeout is 2 seconds: .!!!! Success rate is 80 percent (4/5), round-trip min/avg/max = 1/1/1 ms |
|
R1#ping 10.0.12.2 Type escape sequence to abort. Sending 5, 100-byte ICMP Echos to 10.0.12.2, timeout is 2 seconds: !!!!! Success rate is 100 percent (5/5), round-trip min/avg/max = 1/1/1 ms R1#ping 10.0.23.2 Type escape sequence to abort. Sending 5, 100-byte ICMP Echos to 10.0.23.2, timeout is 2 seconds: ..... Success rate is 0 percent (0/5) R1#ping 10.0.23.3 Type escape sequence to abort. Sending 5, 100-byte ICMP Echos to 10.0.23.3, timeout is 2 seconds: ..... Success rate is 0 percent (0/5) |
|
4.在三个路由器上全部启动Telnet功能 R1(config)#line vty 0 4 R1(config-line)#transport input telnet R1(config-line)#login R1(config-line)#password node-R1 |
|
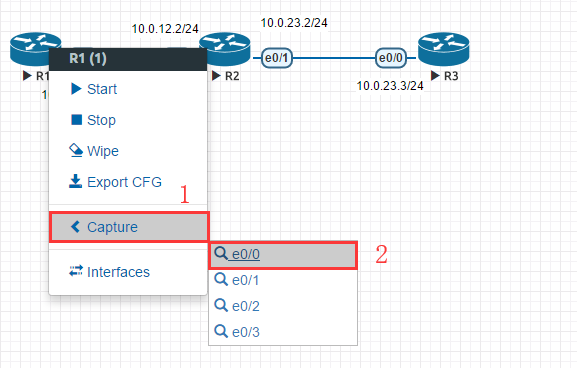
5.打开抓包工具
|
|
6.在R1上Telnet R2,再用R2 Telnet R3.这样就能在R1上操作R3了 R1#telnet 10.0.12.2 Trying 10.0.12.2 ... Open User Access Verification Password: R2>enable Password: R2#telnet 10.0.23.3 Trying 10.0.23.3 ... Open User Access Verification Password: R3>enable Password: R3# |
|
7.查看抓的包。这里基本应该提取出的信息是Telnet使用的是23号端口,而源端口是随机分配的。
|
|
8.在R2上查看有谁Telnet我 R2#show users Line User Host(s) Idle Location * 0 con 0 idle 00:00:00 2 vty 0 10.0.23.3 00:07:14 10.0.12.1 |


 浙公网安备 33010602011771号