
一.简单的Rabbitmq队列通信
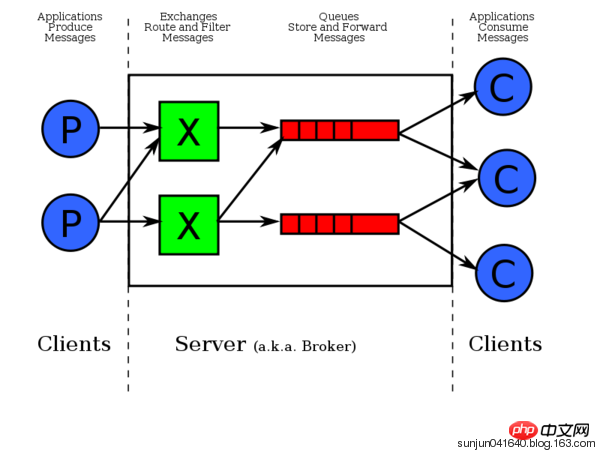
由上图可知,数据是先发给exchange交换器,exchage再发给相应队列。pika模块是python对rabbitMQ的API接口。接收端有一个回调函数,一接收到数据就调用该函数。一条消息被一个消费者接收后,该消息就从队列删除。
二.
1.Ubuntu安装rabbitmq-server
由于rabbitMq需要erlang语言的支持,在安装rabbitMq之前需要安装erlang,执行命令:
1 sudo apt-get install erlang-nox
安装RabbitMQ服务软件包:
1 sudo apt-get install rabbitmq-server
启动、停止、重启、状态rabbitMq命令:
1 启动:sudo rabbitmq-server start
2 关闭: sudo rabbitmq-server stop
3 重启: sudo rabbitmq-server restart
4 查看状态:sudo rabbitmqctl status
安装RabbitMQ监控管理插件进行RabbitMQ的管理
1 rabbitmq-plugins enable rabbitmq_management #插件rabbitmq_management启动成功后就可以通过web页面进行RabbitMQ的监控和管理
使用rabbitmq_management插件进行监控和管理
使用firefox浏览器登录:http://localhost:15672

在登录页面使用 guest/guest用户名和密码登录RabbitMQ管理系统,在系统中可以对RabbitMQ服务进行channel,queue,用户等的管理
2.rabbitmq 用户管理相关指令:
 1 # 新增一个用户
 2 rabbitmqctl  add_user  Username  Password
 3
 4 # 删除一个用户
 5 rabbitmqctl  delete_user  Username
 6
 7 # 修改用户的密码
 8 rabbitmqctl  change_password  Username  Newpassword
 9
10 # 查看当前用户列表
11 rabbitmqctl  list_users
3.用户权限:
用户权限指的是用户对exchange,queue的操作权限,包括配置权限,读写权限。配置权限会影响到exchange,queue的声明和删除。读写权限影响到从queue里取消息,向exchange发送消息以及queue和exchange的绑定(bind)操作。
例如: 将queue绑定到某exchange上,需要具有queue的可写权限,以及exchange的可读权限;向exchange发送消息需要具有exchange的可写权限;从queue里取数据需要具有queue的可读权限。详细请参考官方文档中"How permissions work"部分。
相关命令为:
 1 # 设置用户权限
 2 rabbitmqctl  set_permissions  -p  VHostPath  User  ConfP  WriteP  ReadP
 3
 4 # 查看(指定hostpath)所有用户的权限信息
 5 rabbitmqctl  list_permissions  [-p  VHostPath]
 6
 7 # 查看指定用户的权限信息
 8 rabbitmqctl  list_user_permissions  User
 9
10 # 清除用户的权限信息
11 rabbitmqctl  clear_permissions  [-p VHostPath]  User
4.用户角色:
按照个人理解,用户角色可分为五类,超级管理员, 监控者, 策略制定者, 普通管理者以及其他。
(1) 超级管理员(administrator)
可登陆管理控制台(启用management plugin的情况下),可查看所有的信息,并且可以对用户,策略(policy)进行操作。
(2) 监控者(monitoring)
可登陆管理控制台(启用management plugin的情况下),同时可以查看rabbitmq节点的相关信息(进程数,内存使用情况,磁盘使用情况等)
(3) 策略制定者(policymaker)
可登陆管理控制台(启用management plugin的情况下), 同时可以对policy进行管理。但无法查看节点的相关信息(上图红框标识的部分)。
(4) 普通管理者(management)
仅可登陆管理控制台(启用management plugin的情况下),无法看到节点信息,也无法对策略进行管理。
(5) 其他
无法登陆管理控制台,通常就是普通的生产者和消费者。
设置用户角色命令:
1 rabbitmqctl  set_user_tags  User  Tag
2
3 # User为用户名, Tag为角色名(对应于上面的administrator,monitoring,policymaker,management,或其他自定义名称)。
4
5 #也可以给同一用户设置多个角色,例如:
6
7 rabbitmqctl  set_user_tags  hncscwc  monitoring  policymaker
rabbitmq-用户管理,详情查看:http://www.cnblogs.com/AloneSword/p/4200051.html
4.Windows环境下安装rabbitmq:
windows下安装教程:https://jingyan.baidu.com/article/a17d5285173ce68098c8f2e5.html
安装pika模块:
python中使用rabbitmq服务,可以使用现成的类库pika、txAMQP或者py-amqplib,这里用pika
在命令行中直接使用pip安装命令:
1 pip install pika
三.RabbitMQ队列基本使用步骤(python Django环境下):
消息生产者、rabbitmq中间件、消息消费者
1.用python语言新建并编写好send.py(消息生产者)、receive.py(消息消费者)文件
2.远程访问rabbitmq-server端(开启rabbitmq服务端):
1)需在rabbitmq-server端创建一个用户:sudo rabbitmqctl add_user nan nan123
2)设置该用户角色类型:rabbitmqctl set_user_tags nan administrator
3)设置权限:rabbitmqctl set_permissions -p '/' nan '.' '.' '.'
4)重启rabbitmq服务:sudo service rabbitmq-server restart
3.执行python中send.py、receive.py文件,测试结果
send.py:


 1 #!/usr/bin/env python
 2 import pika
 3
 4 credentials = pika.PlainCredentials("nan","nan123456") #文本格式验证
 5 connection = pika.BlockingConnection(pika.ConnectionParameters(
 6     '192.168.1.145',credentials=credentials))
 7 channel = connection.channel() # 生成管道,在管道内跑队列
 8
 9 # 声明queue
10 channel.queue_declare(queue='hello')
11
12 # n RabbitMQ a message can never be sent directly to the queue, it always needs to go through an exchange.
13 channel.basic_publish(exchange='',# 先把数据发给exchange交换机,再由交换机转发给对应的队列
14                       routing_key='hello', # 向'hello'队列发数据
15                       body='Hello World!' # 数据
16                       )
17 print(" [x] Sent 'Hello World!'")
18 connection.close() #关闭管道
receive.py:
 1 # _*_coding:utf-8_*_
 2
 3 import pika
 4
 5 credentials = pika.PlainCredentials("nan","nan123456")
 6 connection = pika.BlockingConnection(pika.ConnectionParameters(
 7     '192.168.1.145',credentials=credentials))
 8 channel = connection.channel()
 9
10 # You may ask why we declare the queue again ‒ we have already declared it in our previous code.
11 # We could avoid that if we were sure that the queue already exists. For example if send.py program
12 # was run before. But we're not yet sure which program to run first. In such cases it's a good
13 # practice to repeat declaring the queue in both programs.
14 channel.queue_declare(queue='hello')
15
16
17 def callback(ch, method, properties, body):
18     print(" [x] Received %r" % body)
19
20
21 channel.basic_consume(callback,
22                       queue='hello',
23                       no_ack=True)
24
25 print(' [*] Waiting for messages. To exit press CTRL+C')
26 channel.start_consuming() # 开始接收数据
RabbitMQ 消息分发轮询
- 上面的只是一个生产者、一个消费者,能不能一个生产者多个消费者呢?
可以,上面的例子,多启动几个消费者consumer,看一下消息的接收情况。
采用轮询机制;把消息依次分发 - 假如消费者处理消息需要15秒,如果当机了,那这个消息处理明显还没处理完,怎么处理?
(可以模拟消费端断了,分别注释和不注释 no_ack=True 看一下)
你没给我回复确认,就代表消息没处理完。 -
上面的效果消费端断了就转到另外一个消费端去了,但是生产者怎么知道消费端断了呢?
答:因为生产者和消费者是通过socket连接的,socket断了,就说明消费端断开了。 -
上面的模式只是依次分发,实际情况是机器配置不一样。怎么设置类似权重的操作?
RabbitMQ怎么办呢,RabbitMQ做了简单的处理就能实现公平的分发。
就是RabbitMQ给消费者发消息的时候检测下消费者里的消息数量,如果超过指定值(比如1条),就不给你发了。
只需要在消费者端,channel.basic_consume前加上就可以了。
send.py文件与上面相同,
receive.py:
 1 # _*_coding:utf-8_*_
 2
 3 import pika
 4
 5 credentials = pika.PlainCredentials("nan","nan123456")
 6 connection = pika.BlockingConnection(pika.ConnectionParameters(
 7     '192.168.1.145',credentials=credentials))
 8 channel = connection.channel()
 9
10 # You may ask why we declare the queue again ‒ we have already declared it in our previous code.
11 # We could avoid that if we were sure that the queue already exists. For example if send.py program
12 # was run before. But we're not yet sure which program to run first. In such cases it's a good
13 # practice to repeat declaring the queue in both programs.
14 channel.queue_declare(queue='hello')
15
16
17 def callback(ch, method, properties, body):
18     """
19
20     :param ch: <BlockingChannel impl=<Channel number=1 OPEN conn=<SelectConnection OPEN socket=('192.168.1.142', 56299)->('192.168.1.145', 5672) params=<ConnectionParameters host=192.168.1.145 port=5672 virtual_host=/ ssl=False>>>>
21     :param method: <Basic.Deliver(['consumer_tag=ctag1.6f751fb2780d43cf99db8914ae16e24a', 'delivery_tag=1', 'exchange=', 'redelivered=False', 'routing_key=hello'])>
22     :param properties: <BasicProperties>
23     """
24     print(" [x] Received %r" % body)
25
26 channel.basic_qos(prefetch_count=1)  # 类似权重,按能力分发,如果有一个消息,就不在给你发
27 channel.basic_consume(callback,
28                       queue='hello',
29                       no_ack=True)
30
31 print(' [*] Waiting for messages. To exit press CTRL+C')
32 channel.start_consuming() # 开始接收数据
注:在Ubuntu开启rabbitmq-server服务,可能会遇上错误:ERROR:node with name "rabbit" already runing on ** ,此时用linux命令:ps aux|grep erl查看,找到进程PID ,用命令:kill -9 -PID杀掉进程
 1 ps aux输出格式:
 2
 3 USER PID %CPU %MEM VSZ RSS TTY STAT START TIME COMMAND
 4
 5
 6
 7 格式说明:
 8
 9 USER: 行程拥有者
10
11 PID: pid
12
13 %CPU: 占用的 CPU 使用率
14
15 %MEM: 占用的记忆体使用率
16
17 VSZ: 占用的虚拟记忆体大小
18
19 RSS: 占用的记忆体大小
20
21 TTY: 终端的次要装置号码 (minor device number of tty)
22
23
24
25 STAT: 该行程的状态,linux的进程有5种状态:
26
27 D 不可中断 uninterruptible sleep (usually IO)
28
29 R 运行 runnable (on run queue)
30
31 S 中断 sleeping
32
33 T 停止 traced or stopped
34
35 Z 僵死 a defunct (”zombie”) process
36
37 注: 其它状态还包括W(无驻留页), <(高优先级进程), N(低优先级进程), L(内存锁页).
38
39
40
41 START: 行程开始时间
42
43 TIME: 执行的时间
44
45 COMMAND:所执行的指令
1) ps a 显示现行终端机下的所有程序,包括其他用户的程序。
2)ps -A 显示所有程序。
3)ps c 列出程序时,显示每个程序真正的指令名称,而不包含路径,参数或常驻服务的标示。
4)ps -e 此参数的效果和指定"A"参数相同。
5)ps e 列出程序时,显示每个程序所使用的环境变量。
6)ps f 用ASCII字符显示树状结构,表达程序间的相互关系。
7)ps -H 显示树状结构,表示程序间的相互关系。
8)ps -N 显示所有的程序,除了执行ps指令终端机下的程序之外。
9)ps s 采用程序信号的格式显示程序状况。
10)ps S 列出程序时,包括已中断的子程序资料。
11)ps -t  指定终端机编号,并列出属于该终端机的程序的状况。
12)ps u  以用户为主的格式来显示程序状况。
13)ps x  显示所有程序,不以终端机来区分。
ps是显示当前状态处于running的进程,grep表示在这些里搜索,而ps aux是显示所有进程和其状态。

$ ps aux | grep amoeba
查到amoeba的进程

$ kill -s 9 pid 杀死进程
 1 ➜  ~ ps aux|grep erl
 2 wangyizhe        4519   0.7  0.4  4134296  29636 s000  S    二05下午  12:43.67 /usr/local/Cellar/erlang/19.0.2/lib/erlang/erts-8.0.2/bin/beam.smp -W w -A 64 -P 1048576 -t 5000000 -stbt db -K true -B i -- -root /usr/local/Cellar/erlang/19.0.2/lib/erlang -progname erl -- -home /Users/wangyizhe -- -pa /usr/local/Cellar/rabbitmq/3.6.4/ebin -noshell -noinput -s rabbit boot -sname rabbit@localhost -boot /usr/local/opt/erlang/lib/erlang/bin/start_clean -kernel inet_default_connect_options [{nodelay,true}] -rabbit tcp_listeners [{"127.0.0.1",5672}] -sasl errlog_type error -sasl sasl_error_logger false -rabbit error_logger {file,"/usr/local/var/log/rabbitmq/rabbit@localhost.log"} -rabbit sasl_error_logger {file,"/usr/local/var/log/rabbitmq/rabbit@localhost-sasl.log"} -rabbit enabled_plugins_file "/usr/local/etc/rabbitmq/enabled_plugins" -rabbit plugins_dir "/usr/local/Cellar/rabbitmq/3.6.4/plugins" -rabbit plugins_expand_dir "/usr/local/var/lib/rabbitmq/mnesia/rabbit@localhost-plugins-expand" -os_mon start_cpu_sup false -os_mon start_disksup false -os_mon start_memsup false -mnesia dir "/usr/local/var/lib/rabbitmq/mnesia/rabbit@localhost" -kernel inet_dist_listen_min 25672 -kernel inet_dist_listen_max 25672
 3 wangyizhe        4532   0.0  0.0  2434824    464   ??  Ss   二05下午   0:12.77 erl_child_setup 256
 4 wangyizhe         949   0.0  0.0  2461372    256   ??  S    二04下午   0:00.99 /usr/local/Cellar/erlang/19.0.2/lib/erlang/erts-8.0.2/bin/epmd -daemon
 5 wangyizhe       14897   0.0  0.0  2424600    472 s001  R+    4:12下午   0:00.00 grep --color=auto --exclude-dir=.bzr --exclude-dir=CVS --exclude-dir=.git --exclude-dir=.hg --exclude-dir=.svn erl
 6 ➜  ~ kill -9 4519
 7 ➜  ~ rabbitmq-server
 8
 9               RabbitMQ 3.6.4. Copyright (C) 2007-2016 Pivotal Software, Inc.
10   ##  ##      Licensed under the MPL.  See http://www.rabbitmq.com/
11   ##  ##
12   ##########  Logs: /usr/local/var/log/rabbitmq/rabbit@localhost.log
13   ######  ##        /usr/local/var/log/rabbitmq/rabbit@localhost-sasl.log
14   ##########
15               Starting broker...
四、RabbitMQ 消息持久化(durable、properties)
1.rabbitmq相关指令:
1 rabbitmqctl list_queues # 查看当前queue数量及queue里消息数量
2.消息持久化:
如果队列里还有消息,RabbitMQ 服务端宕机了呢?消息还在不在?
把RabbitMQ服务重启,看一下消息在不在。
上面的情况下,宕机了,消息就没了,下面看看如何把消息持久化。
每次声明队列的时候,都加上durable,注意每个队列都得写,客户端、服务端声明的时候都得写。
通过设置durable=True ,只是把队列持久化了,但是队列里的消息没了。
durable的作用只是把队列持久化。离消息持久话还差一步:
发送端发送消息时,加上properties,实现消息持久化
1 # dyrable=True:队列持久化
2 channel.queue_declare(queue='hello2', durable=True)
3
4
5 # 发送端发送消息时,加上properties 消息持久化
6 properties=pika.BasicProperties(
7     delivery_mode=2,  # 消息持久化
8     )
关于 ch.basic_ack(delivery_tag = method.delivery_tag) ,与 no_ack=True
no_ack=True:每次Consumer接到数据后,不管是否处理完成,RabbitMQ Server会立即把这个Message标记为完成,然后从queue中删除此消息,当consumer异常退出或宕机时,虽接收到数据,但没处理,server端会认为你已收到并处理,server端从queue中删除该消息,会丢失数据。
ch.basic_ack(delivery_tag = method.delivery_tag) :在回调函数中设置,表示在处理完数据后发送ack,告诉RabbitMQ数据已经被接收,处理完成,RabbitMQ可以去安全的删除它了。如果Consumer退出或宕机但没有发送ack,那么RabbitMQ就会把这个Message发送到下一个Consumer。这样就保证了在Consumer异常退出的情况下数据也不会丢失。
demo:安全的、持久化消息
send.py:
import pika
import time

credentials = pika.PlainCredentials('nan', 'nan123456')
connection = pika.BlockingConnection(pika.ConnectionParameters(
    '192.168.1.145',credentials=credentials))
channel = connection.channel()

# 声明queue
channel.queue_declare(queue='task_queue',durable=True) # 队列持久化


import sys

message = ' '.join(sys.argv[1:]) or "Hello World! %s" % time.time()

channel.basic_publish(exchange='',
                      routing_key='task_queue',
                      body=message,
                      properties=pika.BasicProperties(
                          delivery_mode=2,  # 消息持久化
                      )

                      )
print(" [x] Sent %r" % message)
connection.close()
receive.py:
import pika, time

credentials = pika.PlainCredentials('nan', 'nan123456')
connection = pika.BlockingConnection(pika.ConnectionParameters(
    '192.168.1.145',credentials=credentials))
channel = connection.channel()


def callback(ch, method, properties, body):
    print(" [x] Received %r" % body)
    time.sleep(20)
    print(" [x] Done")
    print("method.delivery_tag", method.delivery_tag)
    ch.basic_ack(delivery_tag=method.delivery_tag)
    #ackownledgement 告诉生产者,消息处理完成,可以正常删除队列

# 声明queue
channel.queue_declare(queue='task_queue',durable=True) #队列持久化

channel.basic_consume(callback,
                      queue='task_queue',
                      #no_ack=True
                      )

print(' [*] Waiting for messages. To exit press CTRL+C')
channel.start_consuming()
注:带消息持久化+公平分发:
如需公平分发只需要在 channel.basic_consume(callback,queue='task_queue'),前面加上一句代码:
channel.basic_qos(prefetch_count=1)
eg:
channel.basic_qos(prefetch_count=1) # 类似权重,按能力分发,如果已经有一个消息了,就不再给你发
channel.basic_consume(callback,queue='task_queue')
五、RabbitMQ 广播模式(exchange)
前面的效果都是一对一发的,如果做一个广播效果,这时候就要用到exchange了,exchange必须精确的知道收到的消息要发给谁。的类型决定了怎么处理,
exchange类型主要有4种,:
- fanout: 所有绑定到此exchange的queue都可以接收消息
- direct: 通过routingKey和exchange决定的那个唯一的queue可以接收消息
- topic: 所有符合routingKey(此时可以是一个表达式)的routingKey所bind的queue可以接收消息
- headers: 通过headers 来决定把消息发给哪些queue (不重要)
表达式符号说明:#代表一个或多个字符,*代表任何字符
例:#.a会匹配a.a,aa.a,aaa.a等
*.a会匹配a.a,b.a,c.a等
注:使用RoutingKey为#,Exchange Type为topic的时候相当于使用fanout
1、fanout 纯广播、all
需要queue和exchange绑定,因为消费者不是和exchange直连的,消费者是连在queue上,queue绑定在exchange上,消费者只会在queu里度消息。
消息生产者将消息发到exchange交换机,再由交换机转发到相应binding的queue中,消费着从queue中取消息
发送端:send.py
import pika
import sys

credentials = pika.PlainCredentials('nan', 'nan123456')
connection = pika.BlockingConnection(pika.ConnectionParameters(
    '192.168.1.145',credentials=credentials))
channel = connection.channel()


channel.exchange_declare(exchange='logs',type='fanout')#声明广播管道,因为是广播,不需要声明queue

message = ' '.join(sys.argv[1:]) or "info: Hello World!"

channel.basic_publish(exchange='logs',
                      routing_key='', # routing_key为空,但必须写
                      body=message)
print(" [x] Sent %r" % message)
connection.close()
接收端:receive.py
import pika

credentials = pika.PlainCredentials('nan', 'nan123456')
connection = pika.BlockingConnection(pika.ConnectionParameters(
    '192.168.1.145',credentials=credentials))
channel = connection.channel()


channel.exchange_declare(exchange='logs', type='fanout') # 声明管道

# 声明queue但不指定名字,rabbit会随机分配一个名字,exclusive=True(排他、唯一的),会在使用此queue的消费者断开后,自动将queue删除
result = channel.queue_declare(exclusive=True)
queue_name = result.method.queue # 获取随机的queue名字


channel.queue_bind(exchange='logs', queue=queue_name) #queue绑定到交换机上

print(' [*] Waiting for logs. To exit press CTRL+C')


def callback(ch, method, properties, body):
    print(" [x] %r" % body)


channel.basic_consume(callback, queue=queue_name,no_ack=True)

channel.start_consuming()
注意:广播,是实时的,收不到就没了,消息不会存下来,类似收音机。
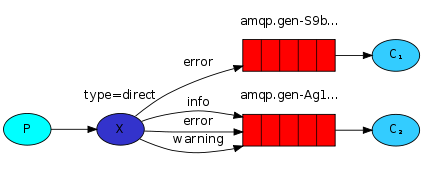
2、direct 有选择的接收消息
RabbitMQ还支持根据关键字发送,即:队列绑定关键字,发送者将数据根据关键字发送到消息exchange,exchange根据 关键字 判定应该将数据发送至指定队列
发送端:send.py
import pika
import sys
credentials = pika.PlainCredentials('nan', 'nan123456')
connection = pika.BlockingConnection(pika.ConnectionParameters(
    '192.168.1.145',credentials=credentials))
channel = connection.channel()

channel.exchange_declare(exchange='direct_logs',type='direct')

severity = sys.argv[1] if len(sys.argv) > 1 else 'info' #严重程度,级别[info][warning][error],

message = ' '.join(sys.argv[2:]) or 'Hello World!'


channel.basic_publish(exchange='direct_logs',
                      routing_key=severity,
                      body=message)
print(" [x] Sent %r:%r" % (severity, message))
connection.close()
接收端:receive.py
import pika
import sys

credentials = pika.PlainCredentials('nan', 'nan123456')
connection = pika.BlockingConnection(pika.ConnectionParameters(
    '192.168.1.145',credentials=credentials))
channel = connection.channel()

channel.exchange_declare(exchange='direct_logs',type='direct')

result = channel.queue_declare(exclusive=True)
queue_name = result.method.queue


severities = sys.argv[1:] # 输入的数据:info, warning, error
if not severities: # 如果没严重等级,错误信息
    sys.stderr.write("Usage: %s [info] [warning] [error]\n" % sys.argv[0])
    sys.exit(1)

for severity in severities: # 循环取出客户端输入的数据,逐个进行交换机 queue队列绑定,表示只接收客户端输入的这几个数据,完全匹配模式
    channel.queue_bind(exchange='direct_logs',queue=queue_name,routing_key=severity)

print(' [*] Waiting for logs. To exit press CTRL+C')


def callback(ch, method, properties, body):
    print(" [x] %r:%r" % (method.routing_key, body))


channel.basic_consume(callback,
                      queue=queue_name,
                      no_ack=True)

channel.start_consuming()
运行发送端,指定发送级别的参数,例:
1 #sys.argv[0]:send.py , sys.argv[1]:warning
2 python send.py warning
运行接收端,指定接收级别的参数,例:
1 #sys.argv[0]:receive.py  , sys.argv[1]:info  , sys.argv[2]:warning
2 python receive.py info warning
3 python receive.py warning error
3、topic 更细致的过滤
比如把error中,apache和mysql的分别或取出来
发送端:send.py
import pika
import sys

credentials = pika.PlainCredentials('nan', 'nan123456')
connection = pika.BlockingConnection(pika.ConnectionParameters(
    '192.168.1.145',credentials=credentials))
channel = connection.channel()


channel.exchange_declare(exchange='topic_logs',type='topic')

routing_key = sys.argv[1] if len(sys.argv) > 1 else 'anonymous.info'
message = ' '.join(sys.argv[2:]) or 'Hello World!'

channel.basic_publish(exchange='topic_logs',routing_key=routing_key,body=message)
print(" [x] Sent %r:%r" % (routing_key, message))
connection.close()
接收端:receive.py
import pika
import sys

credentials = pika.PlainCredentials('nan', 'nan123456')
connection = pika.BlockingConnection(pika.ConnectionParameters(
    '192.168.1.145',credentials=credentials))
channel = connection.channel()


channel.exchange_declare(exchange='topic_logs', type='topic')

result = channel.queue_declare(exclusive=True)
queue_name = result.method.queue

binding_keys = sys.argv[1:]
if not binding_keys:
    sys.stderr.write("Usage: %s [binding_key]...\n" % sys.argv[0])
    sys.exit(1)

for binding_key in binding_keys:
    channel.queue_bind(exchange='topic_logs',
                       queue=queue_name,
                       routing_key=binding_key)

print(' [*] Waiting for logs. To exit press CTRL+C')


def callback(ch, method, properties, body):
    print(" [x] %r:%r" % (method.routing_key, body))


channel.basic_consume(callback,
                      queue=queue_name,
                      no_ack=True)

channel.start_consuming()
注:符号“#”匹配一个或多个词,符号“*”匹配不多不少一个词
运行发送端:
(rabbitmq_test) G:\Python\rabbitmq_test>python topic_send.py info # 发送消息:info
 [x] Sent 'info':'Hello World!'

(rabbitmq_test) G:\Python\rabbitmq_test>python topic_send.py info.123 # 发送消息:info.123
[x] Sent 'info.123':'Hello World!' (rabbitmq_test) G:\Python\rabbitmq_test>python topic_send.py info.fgh.123 [x] Sent 'info.fgh.123':'Hello World!'
(rabbitmq_test) G:\Python\rabbitmq_test>python topic_send.py info.fgh.123 # 发送消息:info.fgh.123
[x] Sent 'info.fgh.123':'Hello World!'
运行接收端:
# 接收端1,接收# ,可以接收到所有消息
(rabbitmq_test) G:\Python\rabbitmq_test>python topic_recv.py #
 [*] Waiting for logs. To exit press CTRL+C
 [x] 'info':b'Hello World!'
 [x] 'info.123':b'Hello World!'
 [x] 'info.fgh.123':b'Hello World!'


# 接收端2,只能接收info.*信息(*:代指不多不少就一个词,不是一个字母),info.*.开头的都接收不到
(rabbitmq_test) G:\Python\rabbitmq_test>python topic_recv.py info.*
 [*] Waiting for logs. To exit press CTRL+C
 [x] 'info.123':b'Hello World!'


# 接收端3,接收info.# 消息,只要前面是info.#开头的消息都接收,不管后面是什么
(rabbitmq_test) G:\Python\rabbitmq_test>python topic_recv.py info.#
 [*] Waiting for logs. To exit press CTRL+C
 [x] 'info':b'Hello World!'
 [x] 'info.123':b'Hello World!'
 [x] 'info.fgh.123':b'Hello World!'
4、RabbitMQ RPC 实现(Remote procedure call)
不知道你有没有发现,上面的流都是单向的,如果远程的机器执行完返回结果,就实现不了了。
如果返回,这种模式叫什么呢,RPC(远程过程调用),snmp就是典型的RPC
RabbitMQ能不能返回呢,怎么返回呢?既是发送端又是接收端。
但是接收端返回消息怎么返回?可以发送到发过来的queue里么?不可以。
返回时,再建立一个queue,把结果发送新的queue里
demo:斐波那契函数。client端向server提问斐波那契数,服务端计算出结果并返回给client端
1.client端生产消息,并另外生成一个队列及唯一标识,随client端的basic_publish发送,
2.server端basic_consume收到client端消息,调用回调函数,在回调函数中重新给client端发送数据,队列及唯一标识均采用client端提供
3.client端接收到client端发送的消息,实现一发一收操作。
client端:
import pika
import uuid
import time

class FibonacciRpcClient(object):
    def __init__(self):
        credentials = pika.PlainCredentials("nan", "nan123456")  # 文本格式验证
        self.connection = pika.BlockingConnection(pika.ConnectionParameters(
            host='192.168.1.145', credentials=credentials))

        self.channel = self.connection.channel()
        result = self.channel.queue_declare(exclusive=True)
        self.callback_queue = result.method.queue

        self.channel.basic_consume(self.on_response,  # 只要一收到消息就调用on_response
                                   no_ack=True,
                                   queue=self.callback_queue)  # 收这个queue的消息

    def on_response(self, ch, method, props, body):  # 必须四个参数
        # 如果收到的ID和本机生成的相同,则返回的结果就是我想要的指令返回的结果
        #props:拿到的是消息生产者中pika.BasicProperties生成的数据: props: <BasicProperties(['correlation_id=6af7f676-b249-4b5a-8b3e-63914eb60ac1'])>
        # body:从server端中获得的结果信息
        if self.corr_id == props.correlation_id:
            self.response = body

    def call(self, n):
        self.response = None  # 初始self.response为None
        self.corr_id = str(uuid.uuid4())  # 随机唯一字符串
        self.channel.basic_publish(
                exchange='',
                routing_key='rpc_queue',  # 发消息到rpc_queue,server端声明了rpc_queue队列
                properties=pika.BasicProperties( #server端中的props将拿到下列的数据
                    reply_to = self.callback_queue,  # 传给server端,让服务端将命令结果返回到callback_queue队列
                    correlation_id = self.corr_id,  # 把随机uuid同时发给服务端,当client端接收到server端消息时,通过对比uuid确定获取消息是否正确
                ),
                body=str(n)
        )
        while self.response is None:  # 当没有数据时,就一直循环,不阻塞
            # 启动后,on_response函数接到消息,self.response 值就不为空了
            self.connection.process_data_events()  # 非阻塞版的start_consuming()
        # 收到消息就调用on_response
        return int(self.response)

if __name__ == '__main__':
    fibonacci_rpc = FibonacciRpcClient()
    print(" [x] Requesting fib(7)")
    response = fibonacci_rpc.call(5)
    print(" [.] Got %r" % response)
server端:
import pika
import time

def fib(n):
    if n == 0:
        return 0
    elif n == 1:
        return 1
    else:
        return fib(n-1) + fib(n-2)

def on_request(ch, method, props, body):
    # props: 拿到的是消息消费者中pika.BasicProperties生成的数据,props: <BasicProperties(['correlation_id=6af7f676-b249-4b5a-8b3e-63914eb60ac1', 'reply_to=amq.gen-67hcaEz8UoL0mryk_pWpmw'])>
    n = int(body)
    print(" [.] fib(%s)" % n)
    response = fib(n)

    ch.basic_publish(
            exchange='',  # 把执行结果发回给客户端
            routing_key=props.reply_to,  # 从客户端拿到,按客户端要求数据返回到这个队列
            # 返回客户端发过来的correction_id 为了让客户端验证消息一致性
            properties=pika.BasicProperties(correlation_id = props.correlation_id),
            body=str(response)
    )
    ch.basic_ack(delivery_tag = method.delivery_tag)  # 任务完成,告诉客户端

if __name__ == '__main__':
    credentials = pika.PlainCredentials("nan", "nan123456")  # 文本格式验证
    connection = pika.BlockingConnection(pika.ConnectionParameters(
        host='192.168.1.145', credentials=credentials))
    channel = connection.channel()
    channel.queue_declare(queue='rpc_queue')  # 声明一个rpc_queue ,

    channel.basic_qos(prefetch_count=1)
    # 在rpc_queue里收消息,收到消息就调用on_request
    channel.basic_consume(on_request, queue='rpc_queue')
    print(" [x] Awaiting RPC requests")
    channel.start_consuming()
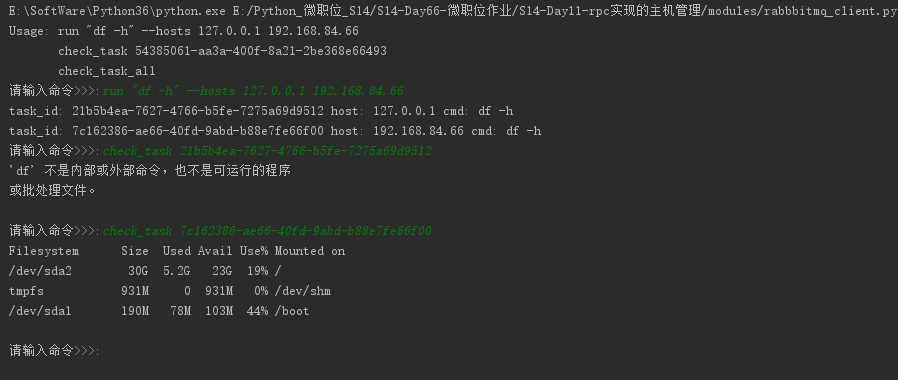
python作业(第十一周)基于RabbitMQ rpc实现的主机管理
作业需求:
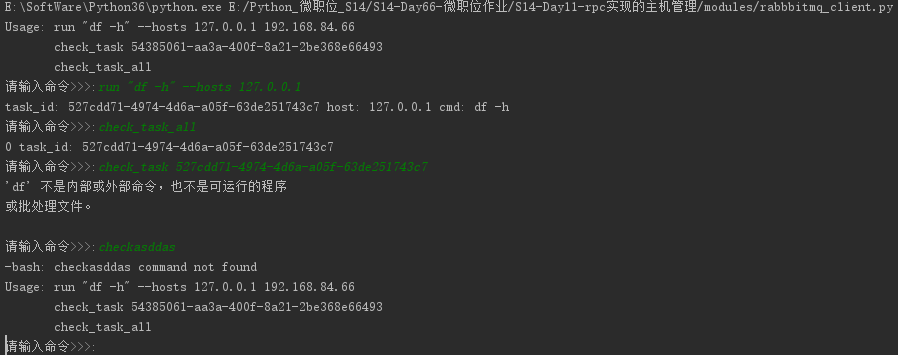
可以对指定机器异步的执行多个命令
例子:
>>:run "df -h" --hosts 192.168.3.55 10.4.3.4
task id: 45334
>>: check_task 45334
>>:
注意,每执行一条命令,即立刻生成一个任务ID,不需等待结果返回,通过命令check_task TASK_ID来得到任务结果
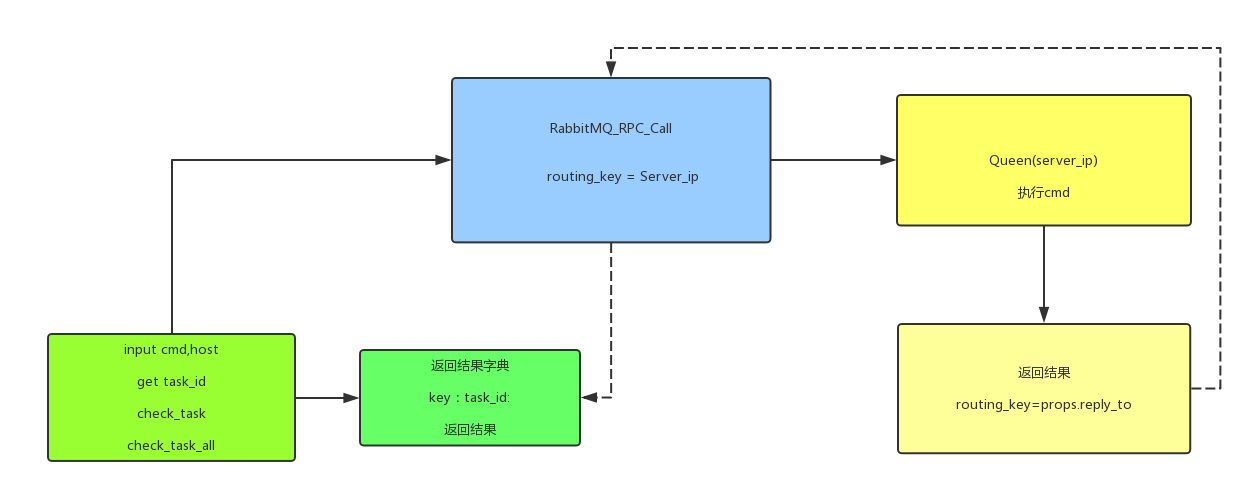
思路解析:
分析需求其实可以发现,输入命令为消费者,执行命令是生产者,参照RabbitMQ的官方文档rpc部分和课上的代码就可以了。
1. 使用RabbitMQ_RPC, Queen使用主机IP
2. 消费者输入命令,分割字段,获取run,check_task,check_task_all,host等信息,传给生产者。
3. 生产者执行命令处理windows/linux不同消息发送情况windows decode(‘gbk’) linux decode('utf-8'),返回结果。
4. 消费者将结果存成字典,查询结果后删除。
关于疑问在测试的过程中发现
while self.response is None:
            self.connection.process_data_events()
在这段中如果没有消息返回就一直处于死循环也就是说,如果生产者挂掉一台,那我就会卡住,查看官方文档,对这个简单RPC实现也是延伸了下这个问题。
核心代码:
消费者:
#!/usr/bin/env python
# -*- coding:utf-8 -*-
# Time:2017/12/6 15:52
__Author__ = 'Sean Yao'
import pika
import uuid

class CommandToRabbitmq(object):
    def __init__(self):
        self.connection = pika.BlockingConnection(pika.ConnectionParameters(
            host='localhost'))

        self.channel = self.connection.channel()

        result = self.channel.queue_declare(exclusive=True)
        self.callback_queue = result.method.queue

        self.channel.basic_consume(self.on_response, no_ack=True,
                                   queue=self.callback_queue)

    def on_response(self, ch, method, props, body):
        if self.corr_id == props.correlation_id:
            self.response = body

    def call(self, command, host):
        self.response = None
        self.corr_id = str(uuid.uuid4())
        ack = self.channel.basic_publish(exchange='',
                                         routing_key=host,
                                         properties=pika.BasicProperties(
                                             reply_to=self.callback_queue,
                                             correlation_id=self.corr_id),
                                         body=str(command))
        while self.response is None:
            # 等待消息
            self.connection.process_data_events()

        task_id = self.corr_id
        res = self.response.decode()
        tmp_dict[task_id] = res
        print('task_id: %s host: %s cmd: %s ' % (self.corr_id, host, command))
        return self.corr_id, self.response.decode()

def help():
    print('Usage: run "df -h" --hosts 127.0.0.1 192.168.84.66 ')
    print('       check_task 54385061-aa3a-400f-8a21-2be368e66493 ')
    print('       check_task_all')


def start(command_input):
    command_list = command_input.split()
    if command_list[0] == 'check_task':
        try:
            print(tmp_dict[command_list[1]])
            del tmp_dict[command_list[1]]
        except IndexError:
            help()
    elif command_list[0] == 'run':
        # 获取命令主机,并循环执行
        try:
            ip_hosts_obj = command_input.split('run')
            hosts_obj = (ip_hosts_obj[1].split('--hosts'))
            hosts = hosts_obj[1].strip().split()
            command = command_input.split("\"")[1]
            for host in hosts:
                try:
                    command_rpc.call(command, host)
                except TypeError and AssertionError:
                    break
        except IndexError:
            print('-bash: %s command not found' % command_input)
            help()
    elif command_list[0] == 'check_task_all':
        for index, key in enumerate(tmp_dict.keys()):
            print(index, 'task_id: %s' % key)
    elif command_list[0] == 'help':
        help()
    else:
        print('-bash: %s command not found' % command_input)
        help()


command_rpc = CommandToRabbitmq()
exit_flag = True
tmp_dict = {}
help()
while exit_flag:
    command_input = input('请输入命令>>>:').strip()
    if len(command_input) == 0:
        continue
    else:
        start(command_input)
生产者:
#!/usr/bin/env python
# -*- coding:utf-8 -*-
# Time:2017/12/6 15:52
__Author__ = 'Sean Yao'
import pika
import time
import subprocess
import platform

connection = pika.BlockingConnection(pika.ConnectionParameters(
    host='localhost'))

# rabbitmq 设有权限的连接
# connection = pika.BlockingConnection(pika.ConnectionParameters(
# host='192.168.1.105',credentials=pika.PlainCredentials('admin', 'admin')))

channel = connection.channel()
channel.queue_declare(queue='127.0.0.1')
os_res = platform.system()

# def command(cmd, task_id):
def command(cmd):
    if os_res == 'Windows':
        res = subprocess.Popen(cmd, shell=True, stdout=subprocess.PIPE, stderr=subprocess.PIPE)
        msg = res.stdout.read().decode('gbk')
        if len(msg) == 0:
            msg = res.stderr.read().decode('gbk')
        print(msg)
        return msg

    else:
        res = subprocess.Popen(cmd, shell=True, stdout=subprocess.PIPE, stderr=subprocess.PIPE)
        print(res)
        msg = res.stdout.read().decode()
        if len(msg) == 0:
            msg = res.stderr.read().decode()
        return msg

def on_request(ch, method, props, body):
    cmd = body.decode()
    respone = command(cmd)
    ch.basic_publish(exchange='',
                     routing_key=props.reply_to,
                     properties=pika.BasicProperties(correlation_id=props.correlation_id),
                     body=respone)
    ch.basic_ack(delivery_tag=method.delivery_tag)


channel.basic_qos(prefetch_count=1)
channel.basic_consume(on_request, queue='127.0.0.1')
print(" [x] Awaiting RPC requests")
channel.start_consuming()

 浙公网安备 33010602011771号