nacos 集群部署 nacos2.x版本
直连ip模式
进入nacos目录下的conf文件夹 nacos8849/conf
编辑 application.properties根据需要打开 Mysql 数据库 建表语句在 同目录下的 nacos-mysql.sql 主要修改 server.port=8849
#
# Copyright 1999-2021 Alibaba Group Holding Ltd.
#
# Licensed under the Apache License, Version 2.0 (the "License");
# you may not use this file except in compliance with the License.
# You may obtain a copy of the License at
#
#      http://www.apache.org/licenses/LICENSE-2.0
#
# Unless required by applicable law or agreed to in writing, software
# distributed under the License is distributed on an "AS IS" BASIS,
# WITHOUT WARRANTIES OR CONDITIONS OF ANY KIND, either express or implied.
# See the License for the specific language governing permissions and
# limitations under the License.
#

#*************** Spring Boot Related Configurations ***************#
### Default web context path:
server.servlet.contextPath=/nacos
### Default web server port:
server.port=8849

#*************** Network Related Configurations ***************#
### If prefer hostname over ip for Nacos server addresses in cluster.conf:
# nacos.inetutils.prefer-hostname-over-ip=false

### Specify local server's IP:
# nacos.inetutils.ip-address=


#*************** Config Module Related Configurations ***************#
### If use MySQL as datasource:
spring.datasource.platform=mysql

### Count of DB:
db.num=1

### Connect URL of DB:
db.url.0=jdbc:mysql://127.0.0.1:3306/nacos?characterEncoding=utf8&connectTimeout=1000&socketTimeout=3000&autoReconnect=true&useUnicode=true&useSSL=false&serverTimezone=UTC
db.user.0=root
db.password.0=root

### Connection pool configuration: hikariCP
db.pool.config.connectionTimeout=30000
db.pool.config.validationTimeout=10000
db.pool.config.maximumPoolSize=20
db.pool.config.minimumIdle=2

#*************** Naming Module Related Configurations ***************#
### Data dispatch task execution period in milliseconds: Will removed on v2.1.X, replace with nacos.core.protocol.distro.data.sync.delayMs
# nacos.naming.distro.taskDispatchPeriod=200

### Data count of batch sync task: Will removed on v2.1.X. Deprecated
# nacos.naming.distro.batchSyncKeyCount=1000

### Retry delay in milliseconds if sync task failed: Will removed on v2.1.X, replace with nacos.core.protocol.distro.data.sync.retryDelayMs
# nacos.naming.distro.syncRetryDelay=5000

### If enable data warmup. If set to false, the server would accept request without local data preparation:
# nacos.naming.data.warmup=true

### If enable the instance auto expiration, kind like of health check of instance:
# nacos.naming.expireInstance=true

### will be removed and replaced by `nacos.naming.clean` properties
nacos.naming.empty-service.auto-clean=true
nacos.naming.empty-service.clean.initial-delay-ms=50000
nacos.naming.empty-service.clean.period-time-ms=30000

### Add in 2.0.0
### The interval to clean empty service, unit: milliseconds.
# nacos.naming.clean.empty-service.interval=60000

### The expired time to clean empty service, unit: milliseconds.
# nacos.naming.clean.empty-service.expired-time=60000

### The interval to clean expired metadata, unit: milliseconds.
# nacos.naming.clean.expired-metadata.interval=5000

### The expired time to clean metadata, unit: milliseconds.
# nacos.naming.clean.expired-metadata.expired-time=60000

### The delay time before push task to execute from service changed, unit: milliseconds.
# nacos.naming.push.pushTaskDelay=500

### The timeout for push task execute, unit: milliseconds.
# nacos.naming.push.pushTaskTimeout=5000

### The delay time for retrying failed push task, unit: milliseconds.
# nacos.naming.push.pushTaskRetryDelay=1000

### Since 2.0.3
### The expired time for inactive client, unit: milliseconds.
# nacos.naming.client.expired.time=180000

#*************** CMDB Module Related Configurations ***************#
### The interval to dump external CMDB in seconds:
# nacos.cmdb.dumpTaskInterval=3600

### The interval of polling data change event in seconds:
# nacos.cmdb.eventTaskInterval=10

### The interval of loading labels in seconds:
# nacos.cmdb.labelTaskInterval=300

### If turn on data loading task:
# nacos.cmdb.loadDataAtStart=false


#*************** Metrics Related Configurations ***************#
### Metrics for prometheus
#management.endpoints.web.exposure.include=*

### Metrics for elastic search
management.metrics.export.elastic.enabled=false
#management.metrics.export.elastic.host=http://localhost:9200

### Metrics for influx
management.metrics.export.influx.enabled=false
#management.metrics.export.influx.db=springboot
#management.metrics.export.influx.uri=http://localhost:8086
#management.metrics.export.influx.auto-create-db=true
#management.metrics.export.influx.consistency=one
#management.metrics.export.influx.compressed=true

#*************** Access Log Related Configurations ***************#
### If turn on the access log:
server.tomcat.accesslog.enabled=true

### The access log pattern:
server.tomcat.accesslog.pattern=%h %l %u %t "%r" %s %b %D %{User-Agent}i %{Request-Source}i

### The directory of access log:
server.tomcat.basedir=

#*************** Access Control Related Configurations ***************#
### If enable spring security, this option is deprecated in 1.2.0:
#spring.security.enabled=false

### The ignore urls of auth, is deprecated in 1.2.0:
nacos.security.ignore.urls=/,/error,/**/*.css,/**/*.js,/**/*.html,/**/*.map,/**/*.svg,/**/*.png,/**/*.ico,/console-ui/public/**,/v1/auth/**,/v1/console/health/**,/actuator/**,/v1/console/server/**

### The auth system to use, currently only 'nacos' and 'ldap' is supported:
nacos.core.auth.system.type=nacos

### If turn on auth system:
nacos.core.auth.enabled=false

### worked when nacos.core.auth.system.type=ldap,{0} is Placeholder,replace login username
# nacos.core.auth.ldap.url=ldap://localhost:389
# nacos.core.auth.ldap.userdn=cn={0},ou=user,dc=company,dc=com

### The token expiration in seconds:
nacos.core.auth.default.token.expire.seconds=18000

### The default token:
nacos.core.auth.default.token.secret.key=SecretKey012345678901234567890123456789012345678901234567890123456789

### Turn on/off caching of auth information. By turning on this switch, the update of auth information would have a 15 seconds delay.
nacos.core.auth.caching.enabled=true

### Since 1.4.1, Turn on/off white auth for user-agent: nacos-server, only for upgrade from old version.
nacos.core.auth.enable.userAgentAuthWhite=false

### Since 1.4.1, worked when nacos.core.auth.enabled=true and nacos.core.auth.enable.userAgentAuthWhite=false.
### The two properties is the white list for auth and used by identity the request from other server.
nacos.core.auth.server.identity.key=serverIdentity
nacos.core.auth.server.identity.value=security

#*************** Istio Related Configurations ***************#
### If turn on the MCP server:
nacos.istio.mcp.server.enabled=false

#*************** Core Related Configurations ***************#

### set the WorkerID manually
# nacos.core.snowflake.worker-id=

### Member-MetaData
# nacos.core.member.meta.site=
# nacos.core.member.meta.adweight=
# nacos.core.member.meta.weight=

### MemberLookup
### Addressing pattern category, If set, the priority is highest
# nacos.core.member.lookup.type=[file,address-server]
## Set the cluster list with a configuration file or command-line argument
# nacos.member.list=192.168.16.101:8847?raft_port=8807,192.168.16.101?raft_port=8808,192.168.16.101:8849?raft_port=8809
## for AddressServerMemberLookup
# Maximum number of retries to query the address server upon initialization
# nacos.core.address-server.retry=5
## Server domain name address of [address-server] mode
# address.server.domain=jmenv.tbsite.net
## Server port of [address-server] mode
# address.server.port=8080
## Request address of [address-server] mode
# address.server.url=/nacos/serverlist

#*************** JRaft Related Configurations ***************#

### Sets the Raft cluster election timeout, default value is 5 second
# nacos.core.protocol.raft.data.election_timeout_ms=5000
### Sets the amount of time the Raft snapshot will execute periodically, default is 30 minute
# nacos.core.protocol.raft.data.snapshot_interval_secs=30
### raft internal worker threads
# nacos.core.protocol.raft.data.core_thread_num=8
### Number of threads required for raft business request processing
# nacos.core.protocol.raft.data.cli_service_thread_num=4
### raft linear read strategy. Safe linear reads are used by default, that is, the Leader tenure is confirmed by heartbeat
# nacos.core.protocol.raft.data.read_index_type=ReadOnlySafe
### rpc request timeout, default 5 seconds
# nacos.core.protocol.raft.data.rpc_request_timeout_ms=5000

#*************** Distro Related Configurations ***************#

### Distro data sync delay time, when sync task delayed, task will be merged for same data key. Default 1 second.
# nacos.core.protocol.distro.data.sync.delayMs=1000

### Distro data sync timeout for one sync data, default 3 seconds.
# nacos.core.protocol.distro.data.sync.timeoutMs=3000

### Distro data sync retry delay time when sync data failed or timeout, same behavior with delayMs, default 3 seconds.
# nacos.core.protocol.distro.data.sync.retryDelayMs=3000

### Distro data verify interval time, verify synced data whether expired for a interval. Default 5 seconds.
# nacos.core.protocol.distro.data.verify.intervalMs=5000

### Distro data verify timeout for one verify, default 3 seconds.
# nacos.core.protocol.distro.data.verify.timeoutMs=3000

### Distro data load retry delay when load snapshot data failed, default 30 seconds.
# nacos.core.protocol.distro.data.load.retryDelayMs=30000
编辑 cluster.conf 输入其他几个集群的nacos节点 切记 即便都在同一台机子上 ip都不要填写127.0.0.1 ,同台机器上端口不要连续 最好间隔 三个端口原因 看 这里
准确来说 需要 占用 ${server.port} ${server.port+1000} ${server.port+1001} ${server.port-1000}端口
#2023-01-04T10:31:16.415999500
192.168.1.103:8849
192.168.1.103:8852
192.168.1.103:8855
复制三份 依次启动 三份
客户机 只需要在配置文件 用将所有集群节点 填入即可 用 ,分割
server:
  port: 5133
#nacos 会将应用名称作为服务名称
spring:
  application:
    name: order-nacosa
  cloud:
    nacos:
      #server-addr: 127.0.0.1:8852
      discovery:
        username: nacos
        password: nacos
#        namespace: public
#        port: 8847
        server-addr: 127.0.0.1:8849,127.0.0.1:8852,127.0.0.1:8855
挂载SLB模式(内网SLB,不可暴露到公网,以免带来安全风险)
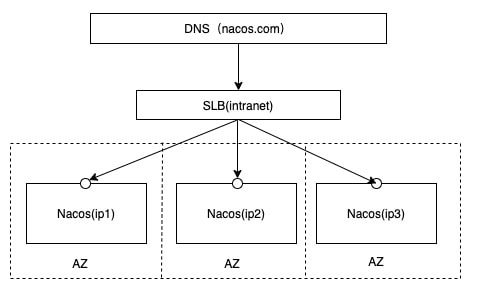
首先根据 nacos 集群部署 直连ip模式 配置 ,挂载SLB模式与其区别就是 增加了层代理 这里用 nginx实现
安装nginx时,注意要安装上stream模块,即,在./configure 阶段,--with-stream
./configure --with-stream
make
make install
若 在 ./configure 阶段忘记 添加 命令可在 make install DESTDIR=${输出地址} [需要注意的是,在指定安装目录的时候,目录好像要写绝对路径(也可能是我记错了)]。 然后将输出目录下的 sbin/nginx 复制到现有的nginx目录下
配置nginx ,编辑 conf/nginx.conf文件 在 http模块下添加
upstream nacoscluster {
	server 127.0.0.1:8849;
	server 127.0.0.1:8852;
	server 127.0.0.1:8855;
}

server {
	listen       8847;
	server_name  localhost;


	location /nacos/ {
		proxy_pass http://nacoscluster/nacos/;
	}


}
在 http 同级 添加
stream {

	log_format proxy '$remote_addr [$time_local] '
		'$protocol $status $bytes_sent $bytes_received '
		'$session_time "$upstream_addr" '
		'"$upstream_bytes_sent" "$upstream_bytes_received" "$upstream_connect_time"';

	access_log /usr/local/nginx/logs/tcp-access.log proxy ;
	open_log_file_cache off;

	# 统一放置,方便管理
	include tcpConf/*.conf;
}
#user  nobody;
worker_processes  1;

#error_log  logs/error.log;
#error_log  logs/error.log  notice;
#error_log  logs/error.log  info;

#pid        logs/nginx.pid;


events {
	worker_connections  1024;
}

stream {

	log_format proxy '$remote_addr [$time_local] '
		'$protocol $status $bytes_sent $bytes_received '
		'$session_time "$upstream_addr" '
		'"$upstream_bytes_sent" "$upstream_bytes_received" "$upstream_connect_time"';

	access_log /usr/local/nginx/logs/tcp-access.log proxy ;
	open_log_file_cache off;

	# 统一放置,方便管理
	include tcpConf/*.conf;
}


		http {
		include       mime.types;
		default_type  application/octet-stream;

		#log_format  main  '$remote_addr - $remote_user [$time_local] "$request" '
		#                  '$status $body_bytes_sent "$http_referer" '
		#                  '"$http_user_agent" "$http_x_forwarded_for"';

		#access_log  logs/access.log  main;

		sendfile        on;
		#tcp_nopush     on;

		#keepalive_timeout  0;
		keepalive_timeout  65;

		#gzip  on;
		upstream nacoscluster {
		server 127.0.0.1:8849;
		server 127.0.0.1:8852;
		server 127.0.0.1:8855;
}

		server {
		listen       8847;
		server_name  localhost;


		location /nacos/ {
		proxy_pass http://nacoscluster/nacos/;
}


}

		server {
		listen       80;
		server_name  localhost;

		#charset koi8-r;

		#access_log  logs/host.access.log  main;

		location / {
		root   html;
		index  index.html index.htm;
}

		#error_page  404              /404.html;

		# redirect server error pages to the static page /50x.html
		#
		error_page   500 502 503 504  /50x.html;
		location = /50x.html {
		root   html;
}

		# proxy the PHP scripts to Apache listening on 127.0.0.1:80
		#
		#location ~ \.php$ {
		#    proxy_pass   http://127.0.0.1;
		#}

		# pass the PHP scripts to FastCGI server listening on 127.0.0.1:9000
		#
		#location ~ \.php$ {
		#    root           html;
		#    fastcgi_pass   127.0.0.1:9000;
		#    fastcgi_index  index.php;
		#    fastcgi_param  SCRIPT_FILENAME  /scripts$fastcgi_script_name;
		#    include        fastcgi_params;
		#}

		# deny access to .htaccess files, if Apache's document root
		# concurs with nginx's one
		#
		#location ~ /\.ht {
		#    deny  all;
		#}
}


		# another virtual host using mix of IP-, name-, and port-based configuration
		#
		#server {
		#    listen       8000;
		#    listen       somename:8080;
		#    server_name  somename  alias  another.alias;

		#    location / {
		#        root   html;
		#        index  index.html index.htm;
		#    }
		#}


		# HTTPS server
		#
		#server {
		#    listen       443 ssl;
		#    server_name  localhost;

		#    ssl_certificate      cert.pem;
		#    ssl_certificate_key  cert.key;

		#    ssl_session_cache    shared:SSL:1m;
		#    ssl_session_timeout  5m;

		#    ssl_ciphers  HIGH:!aNULL:!MD5;
		#    ssl_prefer_server_ciphers  on;

		#    location / {
		#        root   html;
		#        index  index.html index.htm;
		#    }
		#}

}
新建tcpConf文件夹 ,在 tcpConf文件夹下新建 形如 *.conf文件 内容如下
upstream grpc9847 {
	server 127.0.0.1:9849;
	server 127.0.0.1:9852;
	server 127.0.0.1:9855;

}

server {
    listen 9847;
    proxy_connect_timeout 8s;
    proxy_timeout 24h;
    proxy_pass grpc9847;
}

upstream grpc9848 {
	server 127.0.0.1:9850;
	server 127.0.0.1:9853;
	server 127.0.0.1:9856;

}

server {
    listen 9848;
    proxy_connect_timeout 8s;
    proxy_timeout 24h;
    proxy_pass grpc9848;
}


upstream jRaft7847 {
	server 127.0.0.1:7849;
	server 127.0.0.1:7852;
	server 127.0.0.1:7855;

}

server {
    listen 7847;
    proxy_connect_timeout 8s;
    proxy_timeout 24h;
    proxy_pass jRaft7847;
}
重启 nginx nginx -s reload
客户端 只需要 配置更改为 nginx配置的代理的端口即可
server:
  port: 5133
#nacos 会将应用名称作为服务名称
spring:
  application:
    name: order-nacosa
  cloud:
    nacos:
      #server-addr: 127.0.0.1:8852
      discovery:
        username: nacos
        password: nacos
#        namespace: public
#        port: 8847
        server-addr: 127.0.0.1:8847

 浙公网安备 33010602011771号