1. MainActivity:
 1 /**
 2      * 用隐式意图跳转
 3      * @param view
 4      */
 5     public void sendMsg(View view){
 6         Intent intent= new Intent();
 7         intent.setAction("com.example.infotransmission.SEND.MSG");
 8         intent.addCategory("android.intent.category.DEFAULT");
 9         intent.setData(Uri.parse("msg:帮我查询一下流量"));
10         intent.putExtra("targetNumberKey", "10086");
11         startActivity(intent);
12     }
2. SendMsgActivity:
 1 package com.example.infotransmission;
 2
 3 import android.app.Activity;
 4 import android.content.Intent;
 5 import android.net.Uri;
 6 import android.os.Bundle;
 7 import android.util.Log;
 8 import android.widget.Button;
 9 import android.widget.EditText;
10
11 import androidx.annotation.Nullable;
12
13 public class SendMsgActivity extends Activity {
14
15     private static final String TAG = "SendMsgActivity";
16     private EditText mEditReceiverPhoneNum;
17     private EditText mEditContent;
18     private Button mButtonSendMsg;
19
20     @Override
21     protected void onCreate(@Nullable Bundle savedInstanceState) {
22         super.onCreate(savedInstanceState);
23         setContentView(R.layout.activity_msg);
24
25         // 初始化控件
26         initView();
27
28         // 拿到意图
29         Intent intent = getIntent();
30         if (intent != null) {
31             String targetNumber = intent.getStringExtra("targetNumberKey");
32             Log.d(TAG, "number is == " + targetNumber);
33             mEditReceiverPhoneNum.setText(targetNumber);
34             Uri data = intent.getData();
35             Log.d(TAG, "data is == " + data);
36             if (data != null) {
37                 // 去掉前面的约束内容然后把剩下的放入内容框中
38                 String content = data.toString().replace("msg:", "");
39                 mEditContent.setText(content);
40             }
41
42         }
43     }
44
45     private void initView() {
46         mEditReceiverPhoneNum = (EditText) this.findViewById(R.id.edit_recever_phone_number);
47         mEditContent = (EditText) this.findViewById(R.id.edit_msg_content);
48         mButtonSendMsg = (Button) this.findViewById(R.id.btn_send_msg);
49
50     }
51 }
3. activity_main:
1 <Button
2         android:layout_width="match_parent"
3         android:layout_height="wrap_content"
4         android:text="发送短信"
5         android:onClick="sendMsg"/>
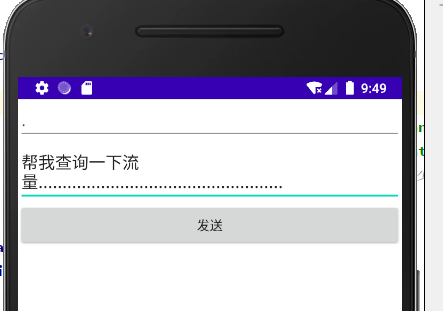
4. activity_msg:
 1 <?xml version="1.0" encoding="utf-8"?>
 2 <LinearLayout
 3     xmlns:android="http://schemas.android.com/apk/res/android"
 4     android:layout_width="match_parent"
 5     android:layout_height="match_parent"
 6     android:orientation="vertical">
 7
 8     <EditText
 9         android:layout_width="match_parent"
10         android:layout_height="wrap_content"
11         android:maxLines="1" //定义当内容较多时,最多分成几行
12         android:hint="接收者"
13         android:id="@+id/edit_recever_phone_number"/>
14
15     <EditText
16         android:layout_width="match_parent"
17         android:layout_height="wrap_content"
18         android:hint="键入信息"
19         android:id="@+id/edit_msg_content"/>
20
21     <Button
22         android:layout_width="match_parent"
23         android:layout_height="wrap_content"
24         android:text="发送"
25         android:id="@+id/btn_send_msg"/>
26 </LinearLayout>
5. Manifest注册:
 1 <!--        exported默认为true,表示第三方软件可以调用-->
 2         <activity android:name=".SendMsgActivity"
 3             android:exported="true">
 4             <intent-filter>
 5                 <action android:name="com.example.infotransmission.SEND.MSG"/>
 6                 <category android:name="android.intent.category.DEFAULT"/>
 7 <!--                这里定义URI的头部,其有一套完整的约束,如果不少msg就不会跳转到SendMsgActivity并报错-->
 8                 <data android:scheme="msg"/>
 9             </intent-filter>
10         </activity>
这里第一行人为添加"."来显示出效果。原本就是”10086“

 浙公网安备 33010602011771号