[GO]Gin框架学习笔记
1.Gin框架入门
Gin框架的基本逻辑
func main() {
    //Default返回一个默认的路由引擎
	r := gin.Default()
    //定义一个路由 可以返回一个渲染的html页面或者是json等格式的数据
	r.GET("/test", func(c *gin.Context) {
		c.JSON(http.StatusOK, gin.H{
			"message":  "ok",
		})
	})
    //运行
	r.Run()
}
Gin框架支持RESTful API的开发,即使用不同的方式可以使用同一个页面进行不同的交互.
func main() { r := gin.Default() r.GET("/test", func(c *gin.Context) { c.JSON(http.StastsOK, gin.H{ "message": "GET", }) }) r.POST("/test", func(c *gin.Context) { c.JSON(http.StastsOK, gin.H{ "message": "POST", }) }) r.PUT("/test", func(c *gin.Context) { c.JSON(http.StastsOK, gin.H{ "message": "PUT", }) }) r.DELETE("/test", func(c *gin.Context) { c.JSON(http.StastsOK, gin.H{ "message": "DELETE", }) })//为没有配置路由的地址设置一个默认的返回页面r.Any("/test", func(c *gin.Context) {...}) //Any可以匹配所有请求方法}r.NoRoute(func(c *gin.Context) { c.HTML(http.StatusNotFound, "views/404.html", nil) })
Gin框架中的路由使用的是httprouter库。
基本原理是构造一个路由地址的前缀树。
gin框架支持路由组,比如这样,可以方便配置二级路由.
userGroup := r.Group("/user")
	{
		userGroup.GET("/index", func(c *gin.Context) {...})
		userGroup.GET("/login", func(c *gin.Context) {...})
		userGroup.POST("/login", func(c *gin.Context) {...})

	}
	shopGroup := r.Group("/shop")
	{
		shopGroup.GET("/index", func(c *gin.Context) {...})
		shopGroup.GET("/cart", func(c *gin.Context) {...})
		shopGroup.POST("/checkout", func(c *gin.Context) {...})
	}
同样也可以嵌套路由组
shopGroup := r.Group("/shop")
	{
		shopGroup.GET("/index", func(c *gin.Context) {...})
		shopGroup.GET("/cart", func(c *gin.Context) {...})
		shopGroup.POST("/checkout", func(c *gin.Context) {...})
		// 嵌套路由组
		xx := shopGroup.Group("xx")
		xx.GET("/oo", func(c *gin.Context) {...})
	}
2.使用Gin获取参数
2.1 querystring参数
获取前端传递的,显示在url后面的querystring参数,如127.0.0.1:8080/get?username="yyy"
r.GET("/get", func(c *gin.Context) {
  		//如果没有传这个参数,就使用默认的zzz
		username := c.DefaultQuery("username", "zzz")
		username := c.Query("username")
		//输出json结果给调用方
		c.JSON(http.StatusOK, gin.H{
			"message":  "ok",
			"username": username,
		})
2.2 form参数
r.POST("/posttest", func(c *gin.Context) {
		// 取不到值时会返回设置的默认值
		//username := c.DefaultPostForm("username", "zzz")
		username := c.PostForm("username")
		address := c.PostForm("address")
		//输出json结果给调用方
		c.JSON(http.StatusOK, gin.H{
			"message":  "ok",
			"username": username,
			"address":  address,
		})
	})
使用postman测试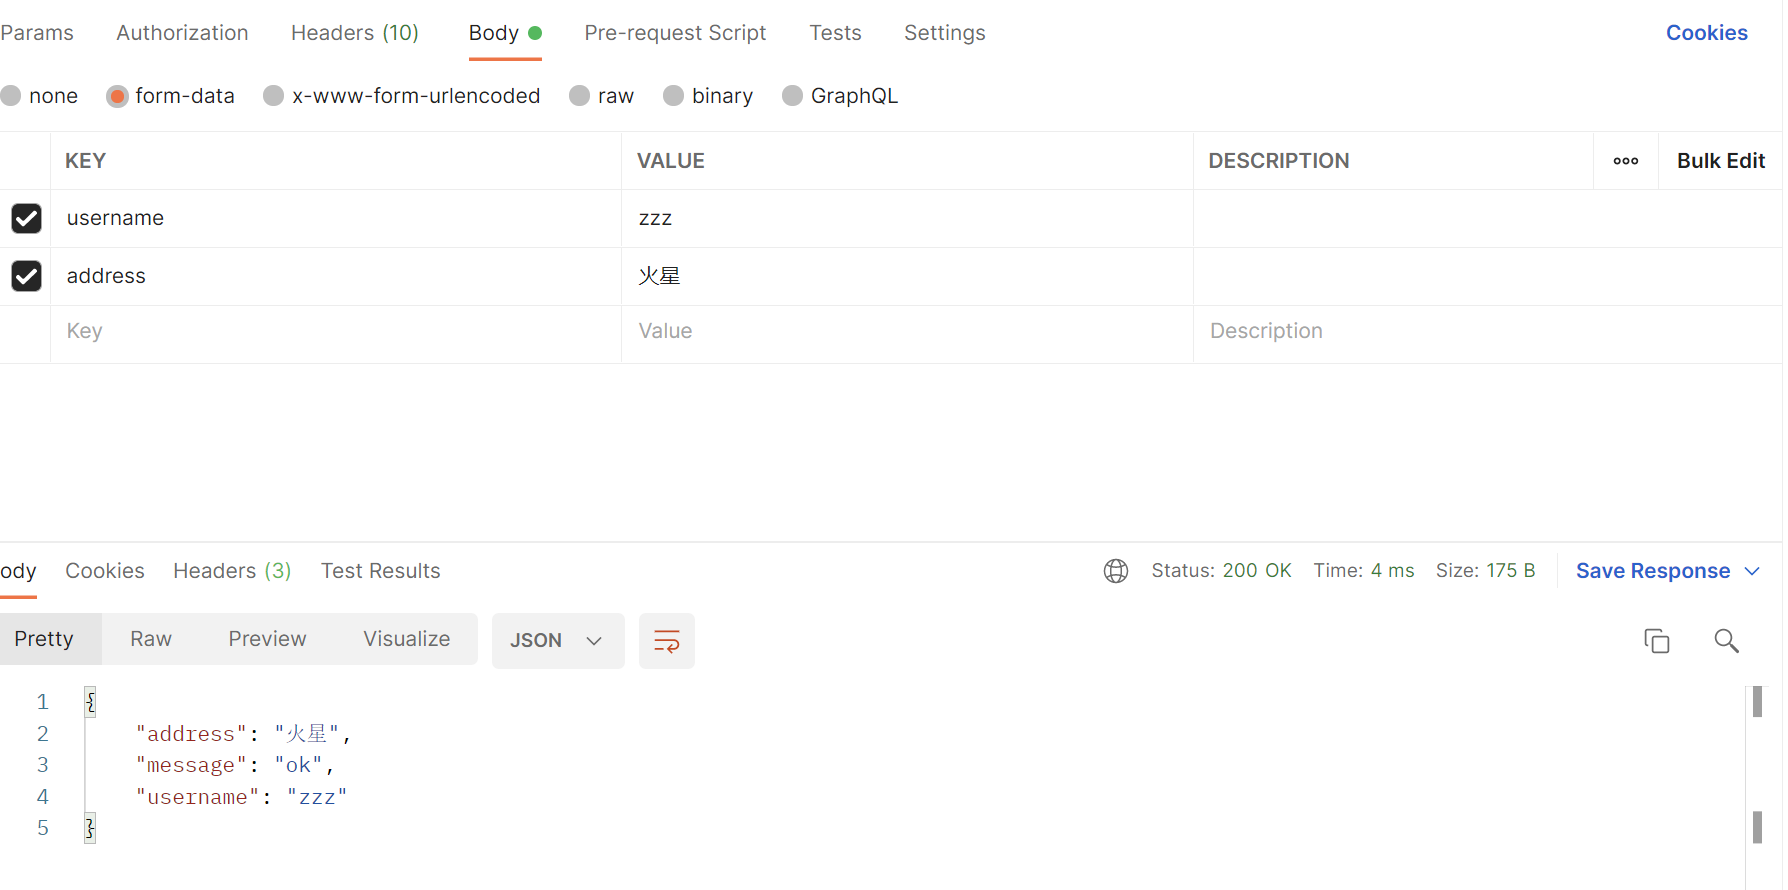
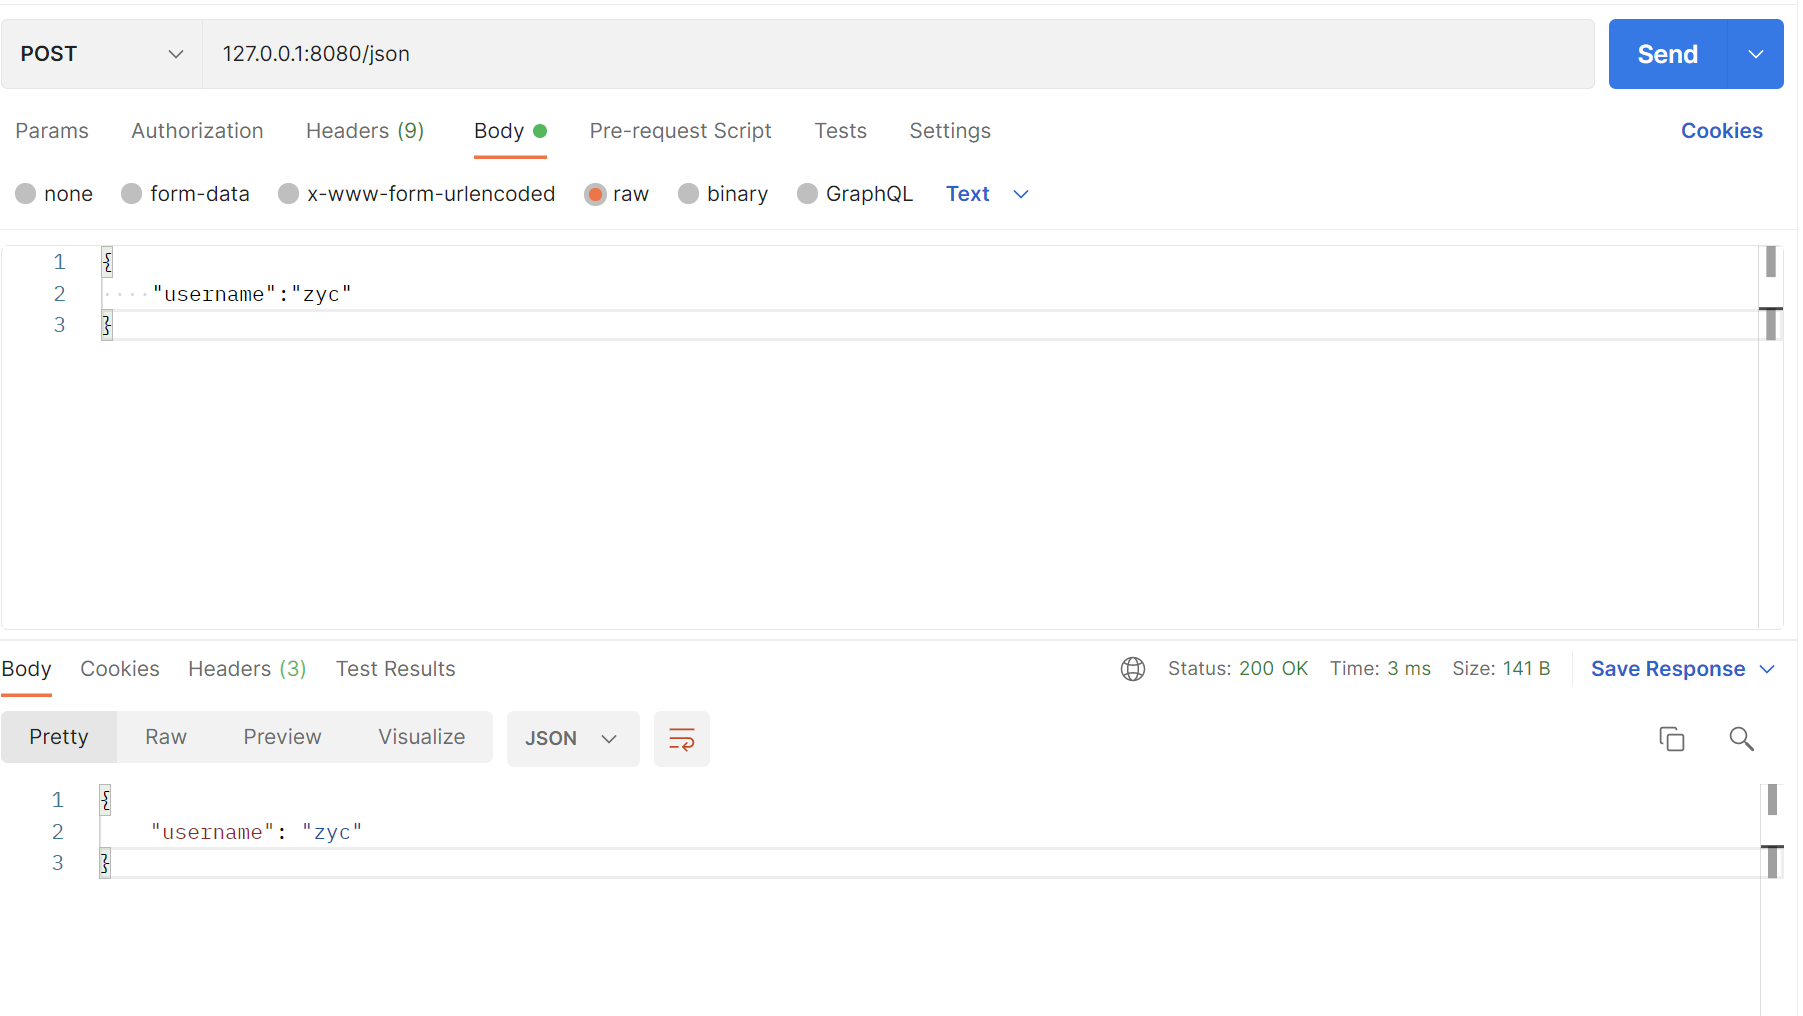
2.3 JSON参数
获取前端以JSON形式传递的参数.
r.POST("/json", func(c *gin.Context) {
  	// 从c.Request.Body读取请求数据 t为一个json类型的数据
	t, _ := c.GetRawData()
	// 定义map或结构体 用于存放数据
	var m map[string]interface{}
	// 将JSON格式的数据反序列化 放到m这个映射中
	_ = json.Unmarshal(t, &m)
	//返回m数据
	c.JSON(http.StatusOK, m)
})
使用postman测试
2.4 path参数
请求的参数通过URL路径传递,例如:127.0.01:8080/test/我爱你
r.GET("/test/:username/:talk", func(c *gin.Context) {
		username := c.Param("username")
		talk := c.Param("talk")
		//输出json结果给调用方
		c.JSON(http.StatusOK, gin.H{
			"message":  "ok",
			"username": username,
			"talk":  talk,
		})
	})
// 这个规则既能匹配/user/john/格式也能匹配/user/john/send这种格式
// 如果没有其他路由器匹配/user/john,它将重定向到/user/john/
r.GET("/user/:name/*action", func(c *gin.Context) {
		name := c.Param("name")
		action := c.Param("action")
		message := name + " is " + action
		c.String(http.StatusOK, message)
	})
输入url测试: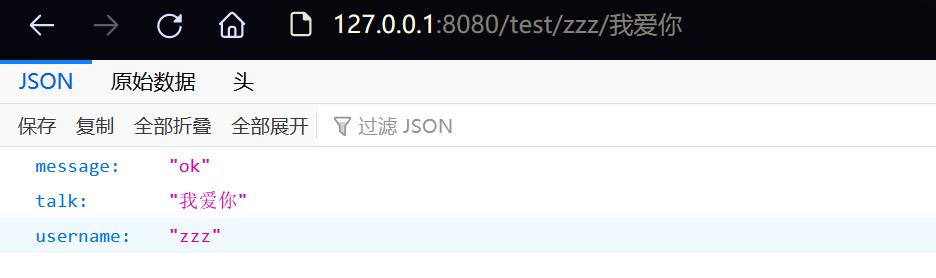
2.5参数绑定
为了能够更方便的获取请求相关参数,提高开发效率,我们可以基于请求的Content-Type识别请求数据类型并利用反射机制自动提取请求中QueryString、form表单、JSON、XML等参数到结构体中。 下面的示例代码演示了.ShouldBind()强大的功能,它能够基于请求自动提取JSON、form表单和QueryString类型的数据,并把值绑定到指定的结构体对象。
// Binding from JSON
type Login struct {
	User     string `form:"user" json:"user" binding:"required"`
	Password string `form:"password" json:"password" binding:"required"`
}

func main() {
	router := gin.Default()

	// 绑定JSON的示例 ({"user": "zzz", "password": "123456"})
	router.POST("/loginJSON", func(c *gin.Context) {
		var login Login

		if err := c.ShouldBind(&login); err == nil {
			fmt.Printf("login info:%#v\n", login)
			c.JSON(http.StatusOK, gin.H{
				"user":     login.User,
				"password": login.Password,
			})
		} else {
			c.JSON(http.StatusBadRequest, gin.H{"error": err.Error()})
		}
	})

	// 绑定form表单示例 (user=zzz&password=123456)
	router.POST("/loginForm", func(c *gin.Context) {
		var login Login
		// ShouldBind()会根据请求的Content-Type自行选择绑定器
		if err := c.ShouldBind(&login); err == nil {
			c.JSON(http.StatusOK, gin.H{
				"user":     login.User,
				"password": login.Password,
			})
		} else {
			c.JSON(http.StatusBadRequest, gin.H{"error": err.Error()})
		}
	})

	// 绑定QueryString示例 (/loginQuery?user=zzz&password=123456)
	router.GET("/loginForm", func(c *gin.Context) {
		var login Login
		// ShouldBind()会根据请求的Content-Type自行选择绑定器
		if err := c.ShouldBind(&login); err == nil {
			c.JSON(http.StatusOK, gin.H{
				"user":     login.User,
				"password": login.Password,
			})
		} else {
			c.JSON(http.StatusBadRequest, gin.H{"error": err.Error()})
		}
	})

	// Listen and serve on 0.0.0.0:8080
	router.Run(":8080")
}
注意,这里GET请求和POST请求使用参数绑定有所不同,GET方法中只会使用 Form 绑定引擎(query)。
而POST方法则会首先检查 content-type 是否为 JSON 或 XML,使用对应的绑定方法进行绑定,如果不是再使用 Form(form-data)。
还可以绑定uri,html前端返回的复选框信息等
3.文件上传
首先定义一个简单的前端文件upload.html
<!DOCTYPE html>
<html lang="zh-CN">
<head>
    <title>上传文件示例</title>
</head>
<body>
<form action="/upload" method="post" enctype="multipart/form-data">
    <input type="file" name="f1">
    <input type="submit" value="上传">
</form>
</body>
</html>

我们加载这个html文件,然后写一个GET方法,无需返回值,用于前端渲染
	r.LoadHTMLFiles("./templates/upload.html")
	r.GET("/upload",func(c *gin.Context){
		c.HTML(http.StatusOK,"upload.html",nil)
	})
使用一个POST方法用于接收浏览器传来的文件数据,
r.POST("/upload", func(c *gin.Context) {
	c.HTML(http.StatusOK,"upload.html",nil)
	file,err:=c.FormFile("f1") //读取html上传的文件f1,f1是在html中定义的文件名
	if err!=nil{
		c.JSON(http.StatusInternalServerError,gin.H{
			"message":err.Error(),
		})
		return
	}
	log.Println(file.Filename)
	dst := fmt.Sprintf("D:/software/%s",file.Filename) //拼接上传到服务器保存的路径
	c.SaveUploadedFile(file,dst)  //上传到指定路径
	c.JSON(http.StatusOK,gin.H{ //返回json信息
		"message":fmt.Sprintf("'%s' upload!",file.Filename),
	})
})
多文件上传
r.POST("/upload", func(c *gin.Context) {
		// Multipart form
		form, _ := c.MultipartForm()
		files := form.File["file"]

		for index, file := range files {
			log.Println(file.Filename)
			dst := fmt.Sprintf("C:/tmp/%s_%d", file.Filename, index)
			// 上传文件到指定的目录
			c.SaveUploadedFile(file, dst)
		}
		c.JSON(http.StatusOK, gin.H{
			"message": fmt.Sprintf("%d files uploaded!", len(files)),
		})
	})
4.重定向
HTTP重定向到指定的uri中
r.GET("/test", func(c *gin.Context) {
	c.Redirect(http.StatusMovedPermanently, "http://www.baidu.com/")
})
路由重定向到其他路由
r.GET("/test", func(c *gin.Context) {
    // 指定重定向的URL
    c.Request.URL.Path = "/test2"
    r.HandleContext(c)
})
r.GET("/test2", func(c *gin.Context) {
    c.JSON(http.StatusOK, gin.H{"hello": "world"})
})
5.自定义中间件
中间件可以在处理请求的时候,加入自己的处理函数,中间件适合处理一些公共的业务逻辑,比如登录认证、权限校验、数据分页、记录日志、耗时统计等。
5.1 定义中间件
Gin中的中间件是一个gin.HandlerFunc类型。
给出一个的中间件案例,用于统计执行时间.
func TimeCost() gin.HandlerFunc {
	return func(c *gin.Context) {
		t := time.Now()
		// 可以通过c.Set在请求上下文中设置值,后续的处理函数能够取到该值
		c.Set("example", "12345")
		// before request 调用请求的剩余处理程序

		c.Next()

		// after request 不调用请求的剩余处理程序
		cost := time.Since(t)
		log.Print(cost)

		// access the status we are sending
		status := c.Writer.Status()
		log.Println(status)
	}
}
5.2 注册中间件
全局注册
r.Use(TimeCost())

r.GET("/test", func(c *gin.Context) {
		name := c.MustGet("name").(string) // 可以从上下文取值,获取中间件设置的值
		log.Println(name)
		c.JSON(http.StatusOK, gin.H{
			"message": "Hello world!",
		})
	})
单独对某个路由注册
r.GET("/test2", TimeCost(), func(c *gin.Context) {
		name := c.MustGet("name").(string) // 从上下文取值
		log.Println(name)
		c.JSON(http.StatusOK, gin.H{
			"message": "Hello world!",
		})
	})
为路由组注册中间件
shopGroup := r.Group("/shop", TimeCost())
{
    shopGroup.GET("/index", func(c *gin.Context) {...})
    ...
}
//或者
shopGroup := r.Group("/shop")
shopGroup.Use(TimeCost())
{
    shopGroup.GET("/index", func(c *gin.Context) {...})
    ...
}
5.3 在中间件中使用goroutine
在中间件或处理程序中启动新的Goroutines时,不应该使用其中的原始上下文,必须使用只读副本(c.Copy())
r.GET("/long_async", func(c *gin.Context) {
		// 创建要在goroutine中使用的副本
		cCp := c.Copy()
		go func() {
			// simulate a long task with time.Sleep(). 5 seconds
			time.Sleep(5 * time.Second)

			// 这里使用你创建的副本
			log.Println("Done! in path " + cCp.Request.URL.Path)
		}()
	})

	r.GET("/long_sync", func(c *gin.Context) {
		// simulate a long task with time.Sleep(). 5 seconds
		time.Sleep(5 * time.Second)

		// 这里没有使用goroutine,所以不用使用副本
		log.Println("Done! in path " + c.Request.URL.Path)
	})
5.4 gin默认中间件
gin.Default()默认使用了Logger和Recovery中间件,其中:
Logger中间件将日志写入gin.DefaultWriter,即使配置了GIN_MODE=release。Recovery中间件会recover任何panic。如果有panic的话,会写入500响应码。
如果不想使用上面两个默认的中间件,可以使用gin.New()新建一个没有任何默认中间件的路由。
5.5 自定义HTTP配置
可以直接使用http.ListenAndServe
func main() {
	router := gin.Default()
	http.ListenAndServe(":8080", router)
}
也可以进行配置
func main() {
	router := gin.Default()

	s := &http.Server{
		Addr:           ":8080",
		Handler:        router,
		ReadTimeout:    10 * time.Second,
		WriteTimeout:   10 * time.Second,
		MaxHeaderBytes: 1 << 20,
	}
	s.ListenAndServe()
}
6.多端口运行
package main

import (
	"log"
	"net/http"
	"time"

	"github.com/gin-gonic/gin"
	"golang.org/x/sync/errgroup"
)

var (
	g errgroup.Group
)

func router01() http.Handler {
	e := gin.New()
	e.Use(gin.Recovery())
	e.GET("/", func(c *gin.Context) {
		c.JSON(
			http.StatusOK,
			gin.H{
				"code":  http.StatusOK,
				"error": "Welcome server 01",
			},
		)
	})

	return e
}

func router02() http.Handler {
	e := gin.New()
	e.Use(gin.Recovery())
	e.GET("/", func(c *gin.Context) {
		c.JSON(
			http.StatusOK,
			gin.H{
				"code":  http.StatusOK,
				"error": "Welcome server 02",
			},
		)
	})

	return e
}

func main() {
	server01 := &http.Server{
		Addr:         ":8080",
		Handler:      router01(),
		ReadTimeout:  5 * time.Second,
		WriteTimeout: 10 * time.Second,
	}

	server02 := &http.Server{
		Addr:         ":8081",
		Handler:      router02(),
		ReadTimeout:  5 * time.Second,
		WriteTimeout: 10 * time.Second,
	}
   // 借助errgroup.Group或者自行开启两个goroutine分别启动两个服务
	g.Go(func() error {
		return server01.ListenAndServe()
	})

	g.Go(func() error {
		return server02.ListenAndServe()
	})

	if err := g.Wait(); err != nil {
		log.Fatal(err)
	}
}

 浙公网安备 33010602011771号