03-串口-铁头山羊STM32标准库新版笔记
一、通信协议

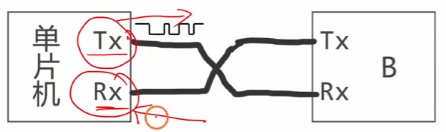
Tx:数据发送引脚
Rx:数据接收引脚
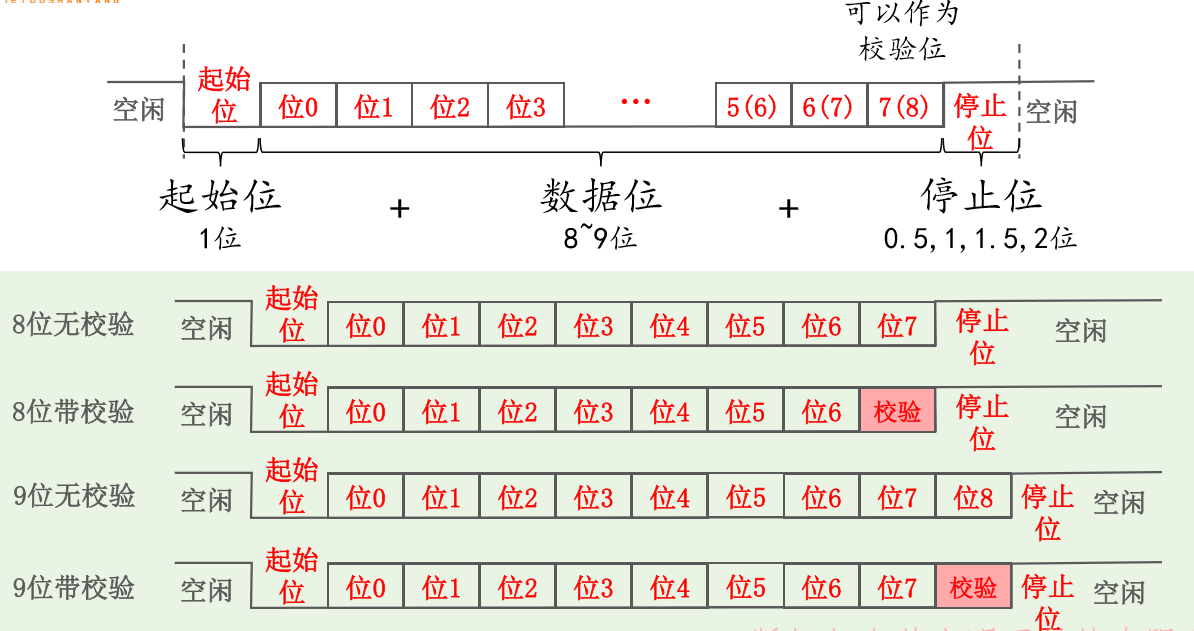
波特率:每秒钟最多传输多少位
常用的波特率:9600、115200、921600
例子1:通过串口发送十进制数字27
例子2:发送字符串“Hello”
ASCII码:H-0x48(0100 1000) e-0x65(0110 0101) l-0x6c(0110 1010) o-0x6f(0110 1111)
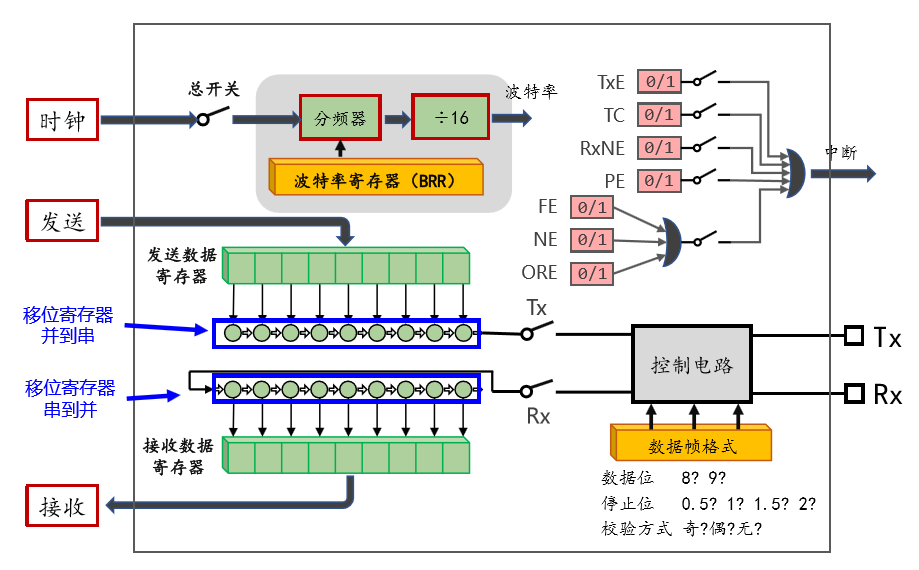
二、USART模块的使用方法

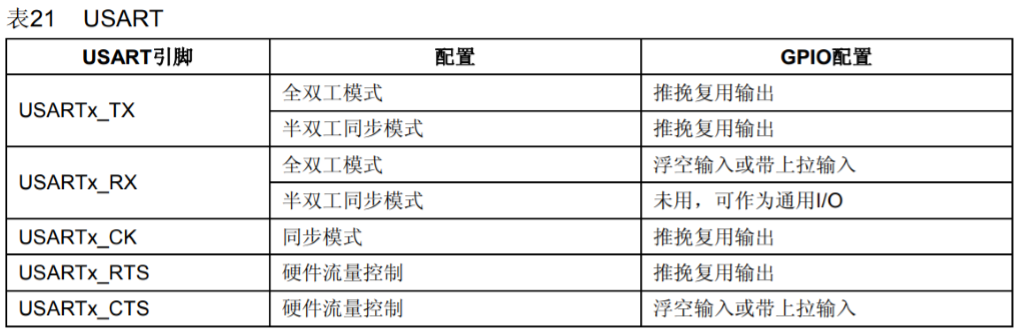
三、初始化IO引脚


点击查看代码
#include "stm32f10x.h"

int main(void)
{
	RCC_APB2PeriphClockCmd(RCC_APB2Periph_USART1, ENABLE);  //开启时钟

	USART_InitTypeDef USART_InitStruct;

	USART_InitStruct.USART_BaudRate = 115200;  //波特率115200
	USART_InitStruct.USART_Mode = USART_Mode_Tx | USART_Mode_Rx;  //双向
	USART_InitStruct.USART_WordLength = USART_WordLength_8b;  //8位数据位
	USART_InitStruct.USART_StopBits = USART_StopBits_1;  //无校验位
	USART_InitStruct.USART_Parity = USART_Parity_No;  //1位停止位

	USART_Init(USART1, &USART_InitStruct);  //初始化串口

	GPIO_InitTypeDef GPIO_InitStruct;

//	// PA9 tx 复用输出推挽
//	RCC_APB2PeriphClockCmd(RCC_APB2Periph_GPIOA, ENABLE);
//	GPIO_InitStruct.GPIO_Pin = GPIO_Pin_9;
//	GPIO_InitStruct.GPIO_Mode = GPIO_Mode_AF_PP;
//	GPIO_InitStruct.GPIO_Speed = GPIO_Speed_10MHz;
//	GPIO_Init(GPIOA, &GPIO_InitStruct);
//
//	// PA10 rx 输入浮空 输入上拉
//	RCC_APB2PeriphClockCmd(RCC_APB2Periph_GPIOA, ENABLE);
//	GPIO_InitStruct.GPIO_Pin = GPIO_Pin_10;
//	GPIO_InitStruct.GPIO_Mode = GPIO_Mode_IPU;
//	GPIO_Init(GPIOA, &GPIO_InitStruct);

	RCC_APB2PeriphClockCmd(RCC_APB2Periph_AFIO, ENABLE);  //使能AFIO模块的时钟
	GPIO_PinRemapConfig(GPIO_Remap_USART1, ENABLE);  //USART1_REMAP = 1

	// PB6 tx 输出推挽
	RCC_APB2PeriphClockCmd(RCC_APB2Periph_GPIOB, ENABLE);

	GPIO_InitStruct.GPIO_Pin = GPIO_Pin_6;
	GPIO_InitStruct.GPIO_Mode = GPIO_Mode_AF_PP;
	GPIO_InitStruct.GPIO_Speed = GPIO_Speed_10MHz;
	GPIO_Init(GPIOB, &GPIO_InitStruct);

	// PB7 rx 输入浮空 输入上拉
	RCC_APB2PeriphClockCmd(RCC_APB2Periph_GPIOB, ENABLE);

	GPIO_InitStruct.GPIO_Pin = GPIO_Pin_7;
	GPIO_InitStruct.GPIO_Mode = GPIO_Mode_IPU;
	GPIO_Init(GPIOB, &GPIO_InitStruct);

	while(1)
	{
	}
}
四、发送数据
TxE:-发送数据寄存器空-当TDR空时,TxE=1;否则TxE=0
TC:-发送完成-当TDR空且移位寄存器空时,TC=1;否则TC=0
效果:向串口调试窗口发送1,2,3,4,5
点击查看代码
#include "stm32f10x.h"

void My_USART_SendBytes(USART_TypeDef *USARTx, uint8_t *pData, uint16_t Size);

int main(void)
{
	RCC_APB2PeriphClockCmd(RCC_APB2Periph_AFIO, ENABLE);
	GPIO_PinRemapConfig(GPIO_Remap_USART1, ENABLE);

	GPIO_InitTypeDef GPIO_InitStruct;

	// PB6
	RCC_APB2PeriphClockCmd(RCC_APB2Periph_GPIOB, ENABLE);

	GPIO_InitStruct.GPIO_Pin = GPIO_Pin_6;
	GPIO_InitStruct.GPIO_Mode = GPIO_Mode_AF_PP;
	GPIO_InitStruct.GPIO_Speed = GPIO_Speed_10MHz;
	GPIO_Init(GPIOB, &GPIO_InitStruct);

	// PB7
	RCC_APB2PeriphClockCmd(RCC_APB2Periph_GPIOB, ENABLE);

	GPIO_InitStruct.GPIO_Pin = GPIO_Pin_7;
	GPIO_InitStruct.GPIO_Mode = GPIO_Mode_IPU;
	GPIO_Init(GPIOB, &GPIO_InitStruct);


	RCC_APB2PeriphClockCmd(RCC_APB2Periph_USART1, ENABLE);

	USART_InitTypeDef USART_InitStruct;

	USART_InitStruct.USART_BaudRate = 115200;
	USART_InitStruct.USART_Mode = USART_Mode_Tx | USART_Mode_Rx;
	USART_InitStruct.USART_WordLength = USART_WordLength_8b;
	USART_InitStruct.USART_StopBits = USART_StopBits_1;
	USART_InitStruct.USART_Parity = USART_Parity_No;

	USART_Init(USART1, &USART_InitStruct);

	USART_Cmd(USART1, ENABLE); // 闭合总开关

	uint8_t bytesToSend[] = {1,2,3,4,5};

	My_USART_SendBytes(USART1, bytesToSend, 5);

	while(1)
	{
	}
}

// @作用:使用串口一次性发送多个字节
// @参数:pData-要发送的数据  Size-字节的数量
void My_USART_SendBytes(USART_TypeDef *USARTx, uint8_t *pData, uint16_t Size)
{
	for(uint32_t i = 0; i < Size; i++)
	{
		// #1. 等待发送数据寄存器为空
		while(USART_GetFlagStatus(USART1, USART_FLAG_TXE) == RESET);

		// #2. 将要发送的数据写入发数据寄存器当中
		USART_SendData(USART1, pData[i]);
	}

	// #3等待数据发送完成
	while(USART_GetFlagStatus(USART1, USART_FLAG_TC) == RESET);
}
五、格式化打印字符串
点击查看代码
#include "stm32f10x.h"
#include <stdio.h>
#include "delay.h"

void My_USART_SendBytes(USART_TypeDef *USARTx, uint8_t *pData, uint16_t Size);
void My_USART1_Init(void);

int main(void)
{
	Delay_Init();
	My_USART1_Init();

//	printf("Hello world. \r\n");

	while(1)
	{
		uint32_t currentTick = GetTick();

		uint32_t miliSeconds = currentTick % 1000;
		currentTick = currentTick / 1000;

		uint32_t seconds = currentTick % 60;
		currentTick = currentTick / 60;

		uint32_t minutes = currentTick % 60;
		currentTick = currentTick / 60;

		uint32_t hour = currentTick;

		printf("%02u:%02u:%02u.%03u\r\n", hour, minutes, seconds, miliSeconds);

		Delay(100);
	}
}

//
// @简介:通过串口发送多个字节
// @参数 USARTx:填写串口的名称
// @参数 pData:要发送的数据
// @参数 Size:要发送数据的数量,单位是字节
//
void My_USART_SendBytes(USART_TypeDef *USARTx, uint8_t *pData, uint16_t Size)
{
	for(uint32_t i = 0; i < Size; i++)
	{
		// #1. 等待发送数据寄存器为空
		while(USART_GetFlagStatus(USART1, USART_FLAG_TXE) == RESET);

		// #2. 写入发数据寄存器当中
		USART_SendData(USART1, pData[i]);
	}

	// 等待发送完成
	while(USART_GetFlagStatus(USART1, USART_FLAG_TC) == RESET);
}

//
// @简介:对USART1进行初始化
//        PB6 - Tx, PB7 - Rx
//        115200, 8, 1, None, 双向
//
void My_USART1_Init(void)
{
	// #1. 初始化PB6和PB7
	GPIO_InitTypeDef GPIO_InitStruct;

//	// PA9 tx
//	RCC_APB2PeriphClockCmd(RCC_APB2Periph_GPIOA, ENABLE);
//	GPIO_InitStruct.GPIO_Pin = GPIO_Pin_9;
//	GPIO_InitStruct.GPIO_Mode = GPIO_Mode_AF_PP;
//	GPIO_InitStruct.GPIO_Speed = GPIO_Speed_10MHz;
//	GPIO_Init(GPIOA, &GPIO_InitStruct);
//
//	// PA10 rx
//	RCC_APB2PeriphClockCmd(RCC_APB2Periph_GPIOA, ENABLE);
//	GPIO_InitStruct.GPIO_Pin = GPIO_Pin_10;
//	GPIO_InitStruct.GPIO_Mode = GPIO_Mode_IPU;
//	GPIO_Init(GPIOA, &GPIO_InitStruct);

	RCC_APB2PeriphClockCmd(RCC_APB2Periph_AFIO, ENABLE);
	GPIO_PinRemapConfig(GPIO_Remap_USART1, ENABLE);

	// PB6
	RCC_APB2PeriphClockCmd(RCC_APB2Periph_GPIOB, ENABLE);

	GPIO_InitStruct.GPIO_Pin = GPIO_Pin_6;
	GPIO_InitStruct.GPIO_Mode = GPIO_Mode_AF_PP;
	GPIO_InitStruct.GPIO_Speed = GPIO_Speed_10MHz;
	GPIO_Init(GPIOB, &GPIO_InitStruct);

	// PB7
	RCC_APB2PeriphClockCmd(RCC_APB2Periph_GPIOB, ENABLE);

	GPIO_InitStruct.GPIO_Pin = GPIO_Pin_7;
	GPIO_InitStruct.GPIO_Mode = GPIO_Mode_IPU;
	GPIO_Init(GPIOB, &GPIO_InitStruct);


	// #2. 初始化USART1
	RCC_APB2PeriphClockCmd(RCC_APB2Periph_USART1, ENABLE);

	USART_InitTypeDef USART_InitStruct;

	USART_InitStruct.USART_BaudRate = 115200;
	USART_InitStruct.USART_Mode = USART_Mode_Tx | USART_Mode_Rx;
	USART_InitStruct.USART_WordLength = USART_WordLength_8b;
	USART_InitStruct.USART_StopBits = USART_StopBits_1;
	USART_InitStruct.USART_Parity = USART_Parity_No;

	USART_Init(USART1, &USART_InitStruct);

	USART_Cmd(USART1, ENABLE); // 闭合总开关
}

//重写fputc函数:通过串口发送出去
int fputc(int ch, FILE *f)
{
	// #1. 等待发送寄存器为空
	while(USART_GetFlagStatus(USART1, USART_FLAG_TXE) == RESET);

	// #2. 写入发送寄存器当中
	USART_SendData(USART1, (uint8_t)ch);

	return ch;
}
六、接收数据
RxNE:-接收数据寄存器非空-当RDR非空时,RxNE=1;否则RxNE=0
PE:-奇偶校验错-如果接收到的数据有校验错误,则PE=1;否则PE=0
FE:-帧格式错误-接收到了无效的数据帧,则FE=1;否则FE=0
NE:-噪声错-接收的数据中检测到了噪声,则NE=1;否则NE=0
ORE:-过载错-由于过载造成了数据丢失,则ORE=1;否则ORE=0
效果:串口调试窗口发送1,板载LED亮,发送0,板载LED灭
main.c
点击查看代码
#include "stm32f10x.h"

void My_USART1_Init(void);
void My_OnBoardLED_Init(void);

int main(void)
{
	My_USART1_Init();
	My_OnBoardLED_Init();

	while(1)
	{
		// #1. 等待接收数据寄存器非空
		while(USART_GetFlagStatus(USART1, USART_FLAG_RXNE) == RESET);

		// #2. 把数据从接收数据寄存器里读出来
		uint8_t byteRcvd = USART_ReceiveData(USART1);

		// #3. 对数据进行处理
		if(byteRcvd == '0')
		{
			GPIO_WriteBit(GPIOC, GPIO_Pin_13, Bit_SET); // 亮灯
		}
		else if(byteRcvd == '1')
		{
			GPIO_WriteBit(GPIOC, GPIO_Pin_13, Bit_RESET); // 灭灯
		}
	}
}

//
// @简介:对USART1进行初始化
//        PB6 - Tx, PB7 - Rx
//        115200, 8, 1, None, 双向
//
void My_USART1_Init(void)
{
	// #1. 初始化PB6和PB7
	GPIO_InitTypeDef GPIO_InitStruct;

	RCC_APB2PeriphClockCmd(RCC_APB2Periph_AFIO, ENABLE);
	GPIO_PinRemapConfig(GPIO_Remap_USART1, ENABLE);

	// PB6
	RCC_APB2PeriphClockCmd(RCC_APB2Periph_GPIOB, ENABLE);

	GPIO_InitStruct.GPIO_Pin = GPIO_Pin_6;
	GPIO_InitStruct.GPIO_Mode = GPIO_Mode_AF_PP;
	GPIO_InitStruct.GPIO_Speed = GPIO_Speed_10MHz;
	GPIO_Init(GPIOB, &GPIO_InitStruct);

	// PB7
	RCC_APB2PeriphClockCmd(RCC_APB2Periph_GPIOB, ENABLE);

	GPIO_InitStruct.GPIO_Pin = GPIO_Pin_7;
	GPIO_InitStruct.GPIO_Mode = GPIO_Mode_IPU;
	GPIO_Init(GPIOB, &GPIO_InitStruct);


	// #2. 初始化USART1
	RCC_APB2PeriphClockCmd(RCC_APB2Periph_USART1, ENABLE);

	USART_InitTypeDef USART_InitStruct;

	USART_InitStruct.USART_BaudRate = 115200;
	USART_InitStruct.USART_Mode = USART_Mode_Tx | USART_Mode_Rx;
	USART_InitStruct.USART_WordLength = USART_WordLength_8b;
	USART_InitStruct.USART_StopBits = USART_StopBits_1;
	USART_InitStruct.USART_Parity = USART_Parity_No;

	USART_Init(USART1, &USART_InitStruct);

	USART_Cmd(USART1, ENABLE); // 闭合总开关
}

void My_OnBoardLED_Init(void)
{
	GPIO_InitTypeDef GPIO_InitStruct;

	RCC_APB2PeriphClockCmd(RCC_APB2Periph_GPIOC, ENABLE);

	GPIO_InitStruct.GPIO_Pin = GPIO_Pin_13;
	GPIO_InitStruct.GPIO_Mode = GPIO_Mode_Out_OD;
	GPIO_InitStruct.GPIO_Speed = GPIO_Speed_2MHz;
	GPIO_Init(GPIOC, &GPIO_InitStruct);

	GPIO_WriteBit(GPIOC, GPIO_Pin_13, Bit_SET);
}
七、封装常用功能
usart.h
点击查看代码
#ifndef _USART_H_
#define _USART_H_

#include "stm32f10x.h"

#define LINE_SEPERATOR_CR   0x00 // 回车 \r
#define LINE_SEPERATOR_LF   0x01 // 换行 \n
#define LINE_SEPERATOR_CRLF 0x02 // 回车+换行 \r\n

void My_USART_SendByte(USART_TypeDef *USARTx, const uint8_t Data);
void My_USART_SendBytes(USART_TypeDef *USARTx, const uint8_t *pData, uint16_t Size);
void My_USART_SendChar(USART_TypeDef *USARTx, const char C);
void My_USART_SendString(USART_TypeDef *USARTx, const char *Str);
void My_USART_Printf(USART_TypeDef *USARTx, const char *Format, ...);

 uint8_t My_USART_ReceiveByte(USART_TypeDef *USARTx);
uint16_t My_USART_ReceiveBytes(USART_TypeDef *USARTx, uint8_t *pDataOut, uint16_t Size, int Timeout);
     int My_USART_ReceiveLine(USART_TypeDef *USARTx, char *pStrOut, uint16_t MaxLength, uint16_t LineSeperator, int Timeout);

#endif
usart.c
点击查看代码
#include "usart.h"
#include <stdio.h>
#include <string.h>
#include <stdarg.h>
#include "delay.h"

static USART_TypeDef *usart_for_printf = 0; // 用于printf的USART名称

//
// @简介:使用串口发送一个字节的数据
//
// @参数 USARTx:串口名称,如USART1, USART2, USART3 ...
// @参数 Data  : 要发送的数据
//
void My_USART_SendByte(USART_TypeDef *USARTx, const uint8_t Data)
{
	My_USART_SendBytes(USARTx, &Data, 1);
}

//
// @简介:使用串口发送多个字节的数据
//
// @参数 USARTx:串口名称,如USART1, USART2, USART3 ...
// @参数 pData : 要发送的数据(数组)
// @参数 Size  :要发送数据的数量,单位是字节
//
void My_USART_SendBytes(USART_TypeDef *USARTx, const uint8_t *pData, uint16_t Size)
{
	if(Size == 0) return;

	for(uint16_t i=0; i < Size; i++)
	{
		while(USART_GetFlagStatus(USARTx, USART_FLAG_TXE) == RESET);

		USART_SendData(USARTx, pData[i]);
	}

	while(USART_GetFlagStatus(USARTx, USART_FLAG_TC) == RESET);
}

//
// @简介:通过串口发送一个字符
//
// @参数 USARTx:串口名称,如USART1, USART2, USART3 ...
// @参数 C     :要发送的字符
//
void My_USART_SendChar(USART_TypeDef *USARTx, const char C)
{
	My_USART_SendBytes(USARTx, (const uint8_t *)&C, 1);
}

//
// @简介:通过串口发送字符串
//
// @参数 USARTx:串口名称,如USART1, USART2, USART3 ...
// @参数 Str   :要发送的字符串
//
void My_USART_SendString(USART_TypeDef *USARTx, const char *Str)
{
	My_USART_SendBytes(USARTx, (const uint8_t *)Str, strlen(Str));
}

//
// @简介:通过串口格式化打印字符串
//
// @参数 USARTx:串口名称,如USART1, USART2, USART3 ...
// @参数 Format:字符串的格式
// @参数 ...   :可变参数
//
void My_USART_Printf(USART_TypeDef *USARTx, const char *Format, ...)
{
	usart_for_printf = USARTx;

	va_list args;
	va_start(args, Format);
	vprintf(Format, args);
	va_end(args);
}


//
// @简介:通过串口读取一字节的数据
//
// @参数 USARTx  :串口名称,如USART1, USART2, USART3 ...
//
// @返回值:读取到的字节
//
uint8_t My_USART_ReceiveByte(USART_TypeDef *USARTx)
{
	while(USART_GetFlagStatus(USARTx, USART_FLAG_RXNE) == RESET);

	return USART_ReceiveData(USARTx);
}

//
// @简介:通过串口读取多个字节的数据
//
// @参数 USARTx  :串口名称,如USART1, USART2, USART3 ...
// @参数 pDataOut:输出参数,读取到的数据将输出到此数组当中
// @参数 Size    :需要读取的字节数量
// @参数 Timeout :超时时间,单位是毫秒,负数表示无限长。如果超时时间内没有读取完成则返回。
//
// @返回值:实际读取到的数据数量
//
uint16_t My_USART_ReceiveBytes(USART_TypeDef *USARTx, uint8_t *pDataOut, uint16_t Size, int Timeout)
{
	uint32_t expireTime;

	Delay_Init();

	if(Timeout >= 0)
	{
		expireTime = GetTick() + Timeout; // 计算过期时间,过期时间 = 当前时间+Timeout
	}

	uint16_t i = 0;

	do
	{
		if(USART_GetFlagStatus(USARTx, USART_FLAG_RXNE) == SET)
		{
			pDataOut[i++] = USART_ReceiveData(USARTx);

			if(i==Size) break;
		}
	}
	while(Timeout < 0 || GetTick() < expireTime); // 判断是否超时

	return i;
}


//
// @简介:通过串口读取一行字符串
//
// @参数 USARTx       :串口名称,如USART1, USART2, USART3 ...
// @参数 pStrOut      :输出参数,读取到的数据将输出到此数组当中
// @参数 MaxLength    :字符串的最大长度
// @参数 LineSeperator:行分隔符 LINE_SEPERATOR_CR   - 回车 \r
//                               LINE_SEPERATOR_LF   - 换行 \n
//                               LINE_SEPERATOR_CRLF - 回车+换行 \r\n
// @参数 Timeout      :超时时间,单位是毫秒,负数表示无限长。如果超时时间内没有读取完成则返回
//
// @返回值:0 - 成功读到一行字符串
//         -1 - 超时(Timeout内未读到一行完整的字符串)
//         -2 - 超过字符串的最大长度(字符串的最大长度用MaxLength参数设置)
//
int My_USART_ReceiveLine(USART_TypeDef *USARTx, char *pStrOut, uint16_t MaxLength, uint16_t LineSeperator, int Timeout)
{
	int ret = -1;
	uint32_t expireTime;

	Delay_Init();

	if(Timeout >= 0)
	{
		expireTime = GetTick() + Timeout; // 计算过期时间,过期时间 = 当前时间+Timeout
	}

	uint16_t i = 0;

	do
	{
		if(USART_GetFlagStatus(USARTx, USART_FLAG_RXNE) == SET)
		{
			char c = (char)USART_ReceiveData(USARTx);
			pStrOut[i++] = c;

			if(LineSeperator == LINE_SEPERATOR_CR && c == '\r') // \r
			{
				pStrOut[i] = 0;
				ret = 0;
				break;
			}
			else if(LineSeperator == LINE_SEPERATOR_LF && c == '\n') // \n
			{
				pStrOut[i] = 0;
				ret = 0;
				break;
			}
			else if(pStrOut[i-2] == '\r' && c == '\n') // \r\n
			{
				pStrOut[i] = 0;
				ret = 0;
				break;
			}

			if(i == MaxLength) // 超过最大长度
			{
				ret = -2;
				break;
			}
		}
	}
	while(Timeout < 0 || GetTick() < expireTime); // 判断是否超时

	return ret;
}

//
// @简介:此函数为对fputc的重写,以实现串口格式化打印功能
//
int fputc(int ch, FILE *f)
{
	// #1. 等待TXE
	while(USART_GetFlagStatus(usart_for_printf, USART_FLAG_TXE) == RESET);
	// #2. 将数据写入TDR
	USART_SendData(usart_for_printf, (uint8_t)ch);

	return ch;
}

 浙公网安备 33010602011771号