
RTSP/GB28181/HIKSDK/Ehome协议视频上云服务平台EasyCVR人脸识别开发ArcSoftFace环境搭建
前段时间很多用户咨询我们TSINGSEE青犀视频全线产品能否实现人脸识别,那时候对人脸识别的研究我们也才处于起步状态,目前我们在EasyCVR视频上云网关上已经开始搭建的人脸识别的环境,本文就和大家分享一下。

一、ArcSoftFace环境搭建
安装 VS2013 环境安装包(vcredist_x86_vs2013.exe)
1、从官网(http://www.arcsoft.com.cn/ai/arcface.html)申请 sdk,下载 对应的 sdk 版本(x86 或 x64)并解压
2、头文件配置:inc 文件夹内文件放入\ArcFaceDemo\include\inc 文件夹内
3、SDK 库配置:
x64 版本:
将 libarcsoft_face_engine.lib 放至\ArcFaceDemo\lib64\FreeSdk 文件夹下
x86 版本:
将 libarcsoft_face_engine.lib 放至\ArcFaceDemo\lib32\FreeSdk 文件夹下
4、在运行代码的时候将对应版本 SDK 和 OpenCV 的 dll 库放至项目根目录下,以免运行时找不到对应的 dll 库
5、将官网申请的 APPID 及 SDKKEY 填写至 ArcFaceEngine.cpp 文件中,注意平台和版本对应
6、在 Debug 或者 Release 中选择配置管理器,选择对应的平台
7、Demo 使用多字节字符集 , 如 果 报 MSB8031 错 误 , 请 下 载 安 装 vc_mbcsmfc.exe(https://www.microsoft.com/en-us/download/details .aspx?id=40770)
二、目的
1、对视频流中出的人物进行人脸截取
2、上传识别信息
3、人脸对比
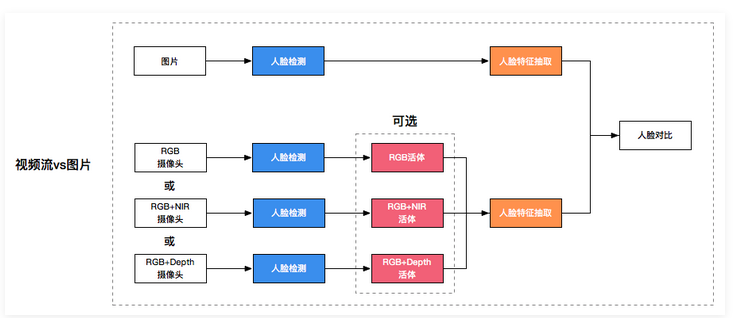
三、人脸识别AI SDK 离线版本实现基本步骤(视频引擎)见下图
1、初始化视频引擎
2、获取视频流帧数据
3、对帧数据人脸识别,返回人脸相关信息(区域,活体,性别等)
4、根据区域抠图获得人脸图片数据
5、调用人脸匹配接口
四、示例代码
激活代码
MRESULT ArcFaceEngine::ActiveSDK(char* appID,char* sdkKey, char* activeKey)
{
#ifdef PRO
	MRESULT res = ASFOnlineActivation(appID, sdkKey, activeKey);
#else
	MRESULT res = ASFOnlineActivation(appID, sdkKey);
#endif
	if (MOK != res && MERR_ASF_ALREADY_ACTIVATED != res)
		return res;
	return MOK;
}
人脸检测代码
MRESULT ArcFaceEngine::PreDetectFace(IplImage* image, ASF_SingleFaceInfo& faceRect, bool isRGB)
{
	if (!image)
	{
		return -1;
	}

	IplImage* cutImg = NULL;
	MRESULT res = MOK;
	ASF_MultiFaceInfo detectedFaces = { 0 };//人脸检测

	if (isRGB)
	{
		cutImg = cvCreateImage(cvSize(image->width - (image->width % 4), image->height),
			IPL_DEPTH_8U, image->nChannels);

		PicCutOut(image, cutImg, 0, 0);

		ASVLOFFSCREEN offscreen = { 0 };
		ColorSpaceConversion(cutImg, ASVL_PAF_RGB24_B8G8R8, offscreen);

		res = ASFDetectFacesEx(m_hEngine, &offscreen, &detectedFaces);
	}
	else  //IR图像
	{
		cv::Mat grayMat;
		cv::Mat matImg(image, false);						//IplImage转Mat 设为ture为深拷贝
		cv::cvtColor(matImg, grayMat, CV_BGR2GRAY);
		IplImage* iplGrayMat = &IplImage(grayMat);		//mat 转 IplImage 浅拷贝

		cutImg = cvCreateImage(cvSize(iplGrayMat->width - (iplGrayMat->width % 4), iplGrayMat->height),
			IPL_DEPTH_8U, iplGrayMat->nChannels);

		PicCutOut(iplGrayMat, cutImg, 0, 0);

		ASVLOFFSCREEN offscreen = { 0 };
		ColorSpaceConversion(cutImg, ASVL_PAF_GRAY, offscreen);

		res = ASFDetectFacesEx(m_hEngine, &offscreen, &detectedFaces);
	}

	if (res != MOK || detectedFaces.faceNum < 1)
	{
		cvReleaseImage(&cutImg);
		return -1;
	}

	int max = 0;
	int maxArea = 0;

	for (int i = 0; i < detectedFaces.faceNum; i++)
	{
		if (detectedFaces.faceRect[i].left < 0)
			detectedFaces.faceRect[i].left = 10;
		if (detectedFaces.faceRect[i].top < 0)
			detectedFaces.faceRect[i].top = 10;
		if (detectedFaces.faceRect[i].right < 0 || detectedFaces.faceRect[i].right > cutImg->width)
			detectedFaces.faceRect[i].right = cutImg->width - 10;
		if (detectedFaces.faceRect[i].bottom < 0 || detectedFaces.faceRect[i].bottom > cutImg->height)
			detectedFaces.faceRect[i].bottom = cutImg->height - 10;

		if ((detectedFaces.faceRect[i].right - detectedFaces.faceRect[i].left)*
			(detectedFaces.faceRect[i].bottom - detectedFaces.faceRect[i].top) > maxArea)
		{
			max = i;
			maxArea = (detectedFaces.faceRect[i].right - detectedFaces.faceRect[i].left)*
				(detectedFaces.faceRect[i].bottom - detectedFaces.faceRect[i].top);
		}
	}

	faceRect.faceRect.left = detectedFaces.faceRect[max].left;
	faceRect.faceRect.top = detectedFaces.faceRect[max].top;
	faceRect.faceRect.right = detectedFaces.faceRect[max].right;
	faceRect.faceRect.bottom = detectedFaces.faceRect[max].bottom;
	faceRect.faceOrient = detectedFaces.faceOrient[max];
	cvReleaseImage(&cutImg);

	return res;
}
更多关于EasyCVR视频平台

EasyCVR已经支持集成海康EHome协议,感兴趣的用户可以阅读一下《EasyCVR集成海康EHome协议系列——配置及协议介绍》、《EasyCVR集成海康EHome协议系列——Ehome协议调用流程介绍》等文。

 浙公网安备 33010602011771号