Spring框架第一篇之Spring的第一个程序
一、下载Spring的jar包
通过http://repo.spring.io/release/org/springframework/spring/地址下载最新的Spring的zip包,当然,如果你是在使用maven工程的话,可以不用下载Zip包,可以直接在maven工程的pom.xml文件中添加Spring的依赖即可。
二、创建工程导入jar包
第一篇的内容记录一些入门知识点,所以只需要导入几个必要的基础包则可,这里项目只导入Spring的以下几个包:
spring-core-4.3.9.RELEASE.jar
spring-beans-4.3.9.RELEASE.jar
spring-context-4.3.9.RELEASE.jar
spring-expression-4.3.9.RELEASE.jar
除此之外,还需要导入两个日志jar包:
log4j-1.2.15.jar
commons-logging-1.1.3.jar
三、创建测试工程
整个工程目录如下图所示:

3.1 编写ISomeService接口类
package com.ietree.spring.basic.ioc;

/**
 * 接口类
 *
 * @author Root
 */
public interface ISomeService {

    void doSomeThing();

}
3.2 编写SomeServiceImpl类,实现ISomeService
package com.ietree.spring.basic.ioc;

/**
 * 实现类
 *
 * @author Root
 */
public class SomeServiceImpl implements ISomeService {

    public SomeServiceImpl() {
        System.out.println("执行无参构造器,创建SomeServiceImpl对象");
    }

    @Override
    public void doSomeThing() {
        System.out.println("执行doSomeThing()方法...");
    }

}
3.3 编写applicationContext.xml配置文件
其中xml中的schema配置可以直接从Spring官方文档中复制(spring-framework-4.3.9.RELEASE\docs\spring-framework-reference\html\xsd-configuration.html)
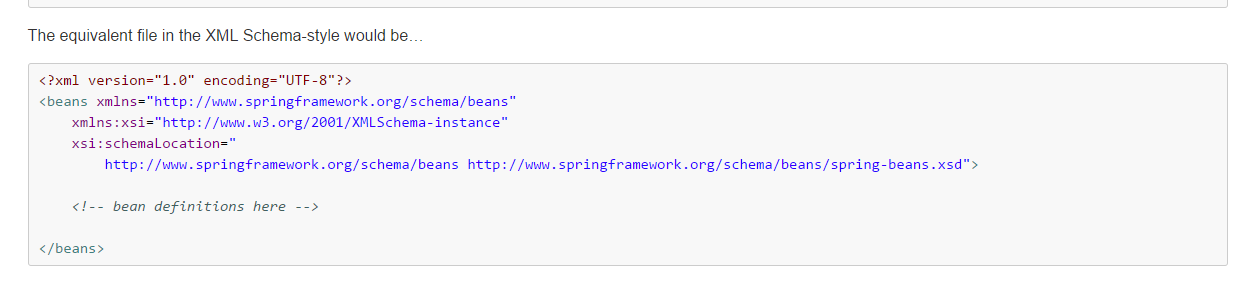
所以将schema复制之后需要配置对应的bean,这里的id可以随便命名,只需要对应需要创建的类即可,之后需要根据配置的bean的id值来获取对象,不要再通过最早的那种通过new Object()的方式获取了。
<?xml version="1.0" encoding="UTF-8"?>
<beans xmlns="http://www.springframework.org/schema/beans"
    xmlns:xsi="http://www.w3.org/2001/XMLSchema-instance"
    xsi:schemaLocation="
        http://www.springframework.org/schema/beans
        http://www.springframework.org/schema/beans/spring-beans.xsd">

    <!--
           注册Service
           这里相当于容器做了SomeServiceImpl myService = new SomeServiceImpl();
     -->
    <bean id="myService" class="com.ietree.spring.basic.ioc.SomeServiceImpl"/>


</beans>
以上步骤配置完成之后,Spring的环境就算简单搭建完成了,现在来测试一下。
四、获取对象的几种方式
1、通过new Object();方式获取对象
@Test
public void test01() {
    ISomeService service = new SomeServiceImpl();
    service.doSomeThing();
}
2、通过ClassPathXmlApplicationContext对象加载Spring的配置文件,采用getBean的方式获取对象
@Test
public void test02() {

    // 创建容器对象,加载Spring配置文件
    // ClassPathXmlApplicationContext会从类路径下查找配置文件
    ApplicationContext ac = new ClassPathXmlApplicationContext("applicationContext.xml");

    ISomeService service = (ISomeService) ac.getBean("myService");
    service.doSomeThing();
}
3、通过FileSystemXmlApplicationContext对象加载Spring的配置文件,采用getBean的方式获取对象
@Test
public void test03() {

    // FileSystemXmlApplicationContext会从项目的根下查找配置文件,或者从当前系统的D盘根目录下查找配置文件
    ApplicationContext ac = new FileSystemXmlApplicationContext("applicationContext.xml");

    ISomeService service = (ISomeService) ac.getBean("myService");
    service.doSomeThing();
}
4、通过BeanFactory对象加载Spring的配置文件,采用getBean的方式获取对象
   // ApplicationContext与BeanFactory容器的区别:
    // 1)ApplicationContext容器在进行初始化时,会将其中的所有Bean(对象)进行创建。
    //        缺点:占用系统资源(内存、CPU等)
    //        优点:响应速度快
    // 2)BeanFactory容器中的对象,在容器初始化时并不会被创建,而是在真正获取该对象时才被创建。
    //        缺点:响应速度慢
    //        优点:不多占用系统资源(内存、CPU等)
    @Test
    public void test04() {

        // 创建容器对象,加载Spring配置文件
        BeanFactory bf = new XmlBeanFactory(new ClassPathResource("applicationContext.xml"));

        ISomeService service = (ISomeService) bf.getBean("myService");
        service.doSomeThing();
    }
五、获取对象的源码分析
点击ApplicationContext按 CTRL + T 可以看到下图,ApplicationContext对象实际上是一个接口,它有ClassPathXmlApplicationContext和FileSystemXmlApplicationContext两种实现方式。
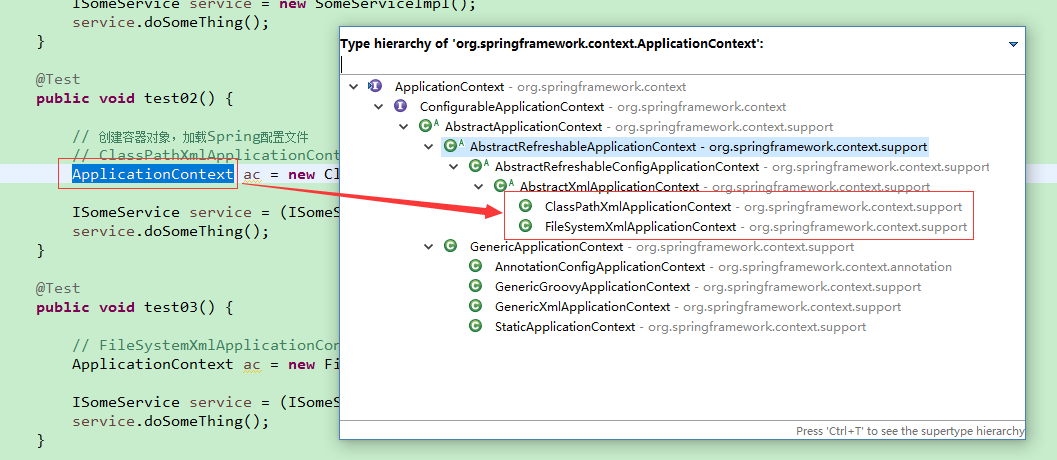
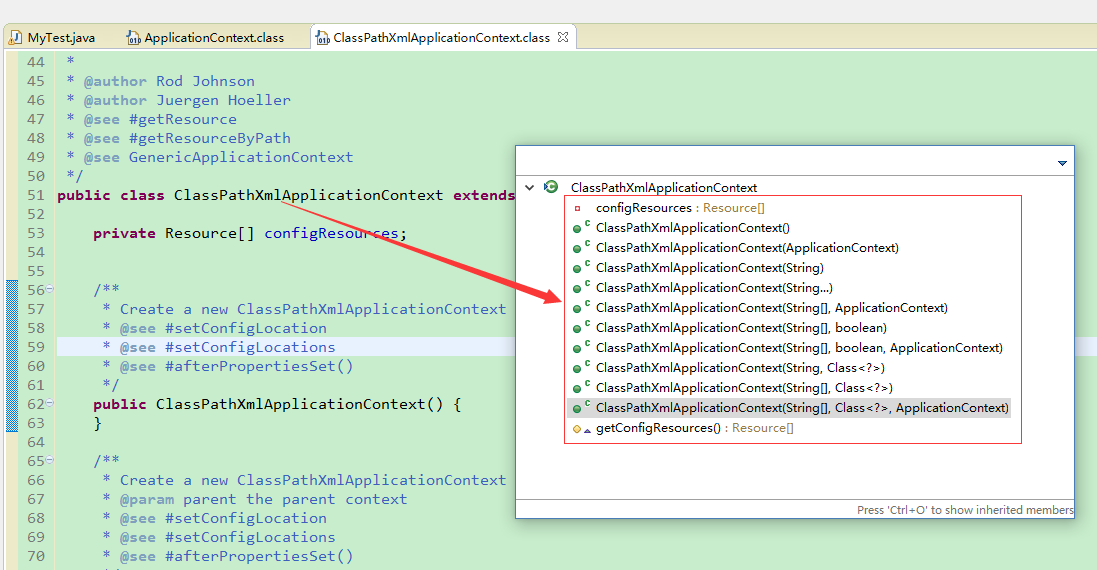
1、首先进入ClassPathXmlApplicationContext对象,可以看到有很多的构造方法,实际上只要将applicationContext.xml配置文件放在项目中的src目录下,使用ClassPathXmlApplicationContext的任何一种构造方法都可以获取到容器。
比如:
@Test
public void test02() {

    // 创建容器对象,加载Spring配置文件
    // ClassPathXmlApplicationContext会从类路径下查找配置文件
    @SuppressWarnings("resource")
    ApplicationContext ac = new ClassPathXmlApplicationContext("applicationContext.xml");
    // ApplicationContext ac = new ClassPathXmlApplicationContext(new String[] {"applicationContext.xml"}, true, null);

    ISomeService service = (ISomeService) ac.getBean("myService");
    service.doSomeThing();
}
使用快捷键CTRL + O 可以查看类结构,下图是ClassPathXmlApplicationContext对象结构图:
2、之后再进入FileSystemXmlApplicationContext类查看类结构:
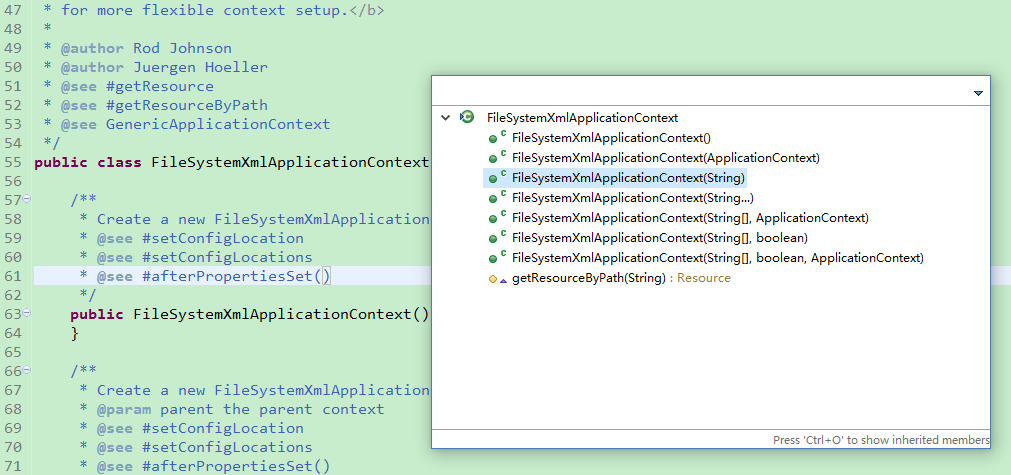
实际上会发现这两个类非常相似,不同的是,在使用ClassPathXmlApplicationContext类时,applicationContext.xml配置文件只能放在项目的src目录下,而在使用FileSystemXmlApplicationContext类时,只需要将类放在项目的根目录下,
或者放在当前系统指定的盘符下,程序都可以加载到容器。因为 FileSystemXmlApplicationContext首先会从项目的根下查找配置文件,或者从当前系统的盘盘符根目录下查找配置文件。
3、看看使用 BeanFactory bf = new XmlBeanFactory(new ClassPathResource("applicationContext.xml"));方式实现的原理:
首先进入ApplicationContext接口会发现这个接口实际继承了很多的其他类,其中有HierarchicalBeanFactory类,
public interface ApplicationContext extends EnvironmentCapable, ListableBeanFactory, HierarchicalBeanFactory,
        MessageSource, ApplicationEventPublisher, ResourcePatternResolver {
进入HierarchicalBeanFactory接口,可以看到还有XmlBeanFactory的实现方式:

所以使用 XmlBeanFactory的构造函数也能够实现获取容器对象
public XmlBeanFactory(Resource resource) throws BeansException {
    this(resource, null);
}

 浙公网安备 33010602011771号