私有云Canonical’s Charmed OpenStack部署教程
 本文是私有云Canonical’s Charmed OpenStack部署教程,介绍了MAAS部署、后续操作、节点添加、疑难解答,以及Juju安装、配置和控制器创建等步骤,适用于测试环境。
私有云Canonical’s Charmed OpenStack部署教程
阅读原文
建议阅读原文,始终查看最新文档版本,获得最佳阅读体验:《私有云Canonical’s Charmed OpenStack部署教程》
https://docs.dingtalk.com/i/nodes/OG9lyrgJPzMqBkMDT9pEAwRdWzN67Mw4
引言
私有云非常强大灵活,目前OpenStack可以说是私有云的代名词了。然而,部署OpenStack是极其复杂的,幸运的是,canonical公司提供了一种比较简单的方法,能短时间完成OpenStack的部署,并且能高效运维。大大提高了部署及运维OpenStack的效率。
本文会详细介绍如何部署OpenStack,需要注意的是,私有云的建设本身就是很复杂的,OpenStack又非常灵活,如果真的要在生产环境中部署OpenStack,必须要经过仔细调研,慎重决策。本教程仅适用于测试环境。
其实canonical还提供了一种更加简单的方法用于部署OpenStack(严格来说叫做microstack),只需几条命令就能部署一个微型的私有云。我也写了一篇文档,介绍如何部署:《sunbeam部署OpenStack(microstack)》,不过虽然我部署成功了,但创建实例的时候报错了,还未解决。
简介
Canonical’s Charmed OpenStack,简单说,这个解决方案就是可以很方便地部署OpenStack,以及运维OpenStack,而且可以超大规模部署,也可以是很少的节点。
官方网站:Canonical OpenStack | Ubuntu
部署(实验环境)
参考资料:Install MAAS — charm-deployment-guide 0.0.1.dev519 documentation (openstack.org)
必要条件
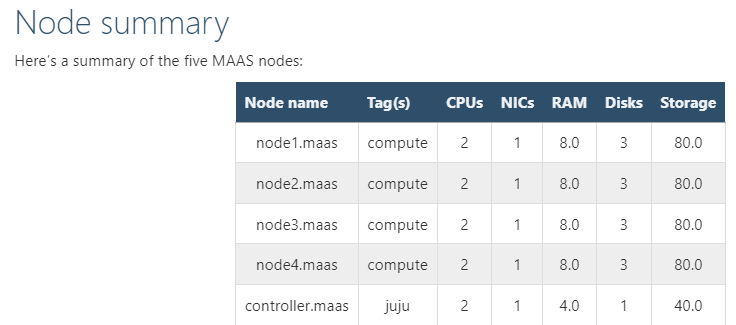
The entire environment will consist of a single MAAS system with five nodes. This MAAS cluster will contain a single zone, with the MAAS system (region and rack controllers) connected to both the external network and the single zone.
Here are the hardware requirements:(总共有六个节点)
-
1 x MAAS system: 8GiB RAM, 2 CPUs, 1 NIC, 1 x 40GiB storage
-
1 x Juju controller node: 4GiB RAM, 2 CPUs, 1 NIC, 1 x 40GiB storage
-
4 x cloud nodes: 8GiB RAM, 2 CPUs, 1 NIC, 2 x 80GiB storage
在实验环境中,我用的全是虚拟机,虚拟机是用virt-manager创建的,KVM虚拟机也是可以通过PXE启动的
部署MAAS
MAAS是个裸金属服务器管理平台,可以自动化大批量部署操作系统MAAS | Metal as a Service
sudo hostnamectl hostname MAAS-system
sudo snap install maas-test-db
sudo snap install maas
sudo maas init region+rack --maas-url http://192.168.122.95:5240/MAAS --database-uri maas-test-db:///
sudo maas createadmin --username admin --password ubuntu --email 1426693102@qq.com
sudo maas apikey --username admin > ./admin-api-key
如果发现没有出现ubuntu release,再多等等,一般都会刷新的(实测,发现很难完全下载完成),实在不行再用proxy(因为我发现proxy似乎有问题,下载非常慢,而且总是无法下载完成)
:::
特别说明:
比较好的办法,是找到一台能正常用snap安装软件,已经正常访问maas.io网站的电脑,然后设置proxy,这样就能很好解决问题了,否则会一直卡在下载镜像的页面。具体操作方法看此文《***实现代理上网》
:::

部署MAAS之后的操作
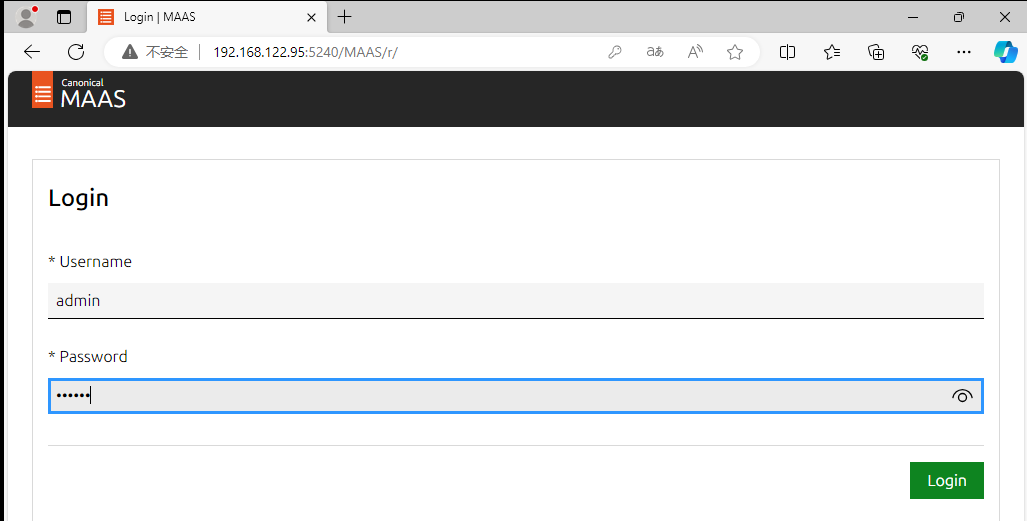
访问web ui 注意:为了方便,我这边是额外创建了一台虚拟机(虚拟机名称为win11-24H2),安装了Windows11系统,访问MAAS webUI
网址是http://192.168.122.95:5240/MAAS
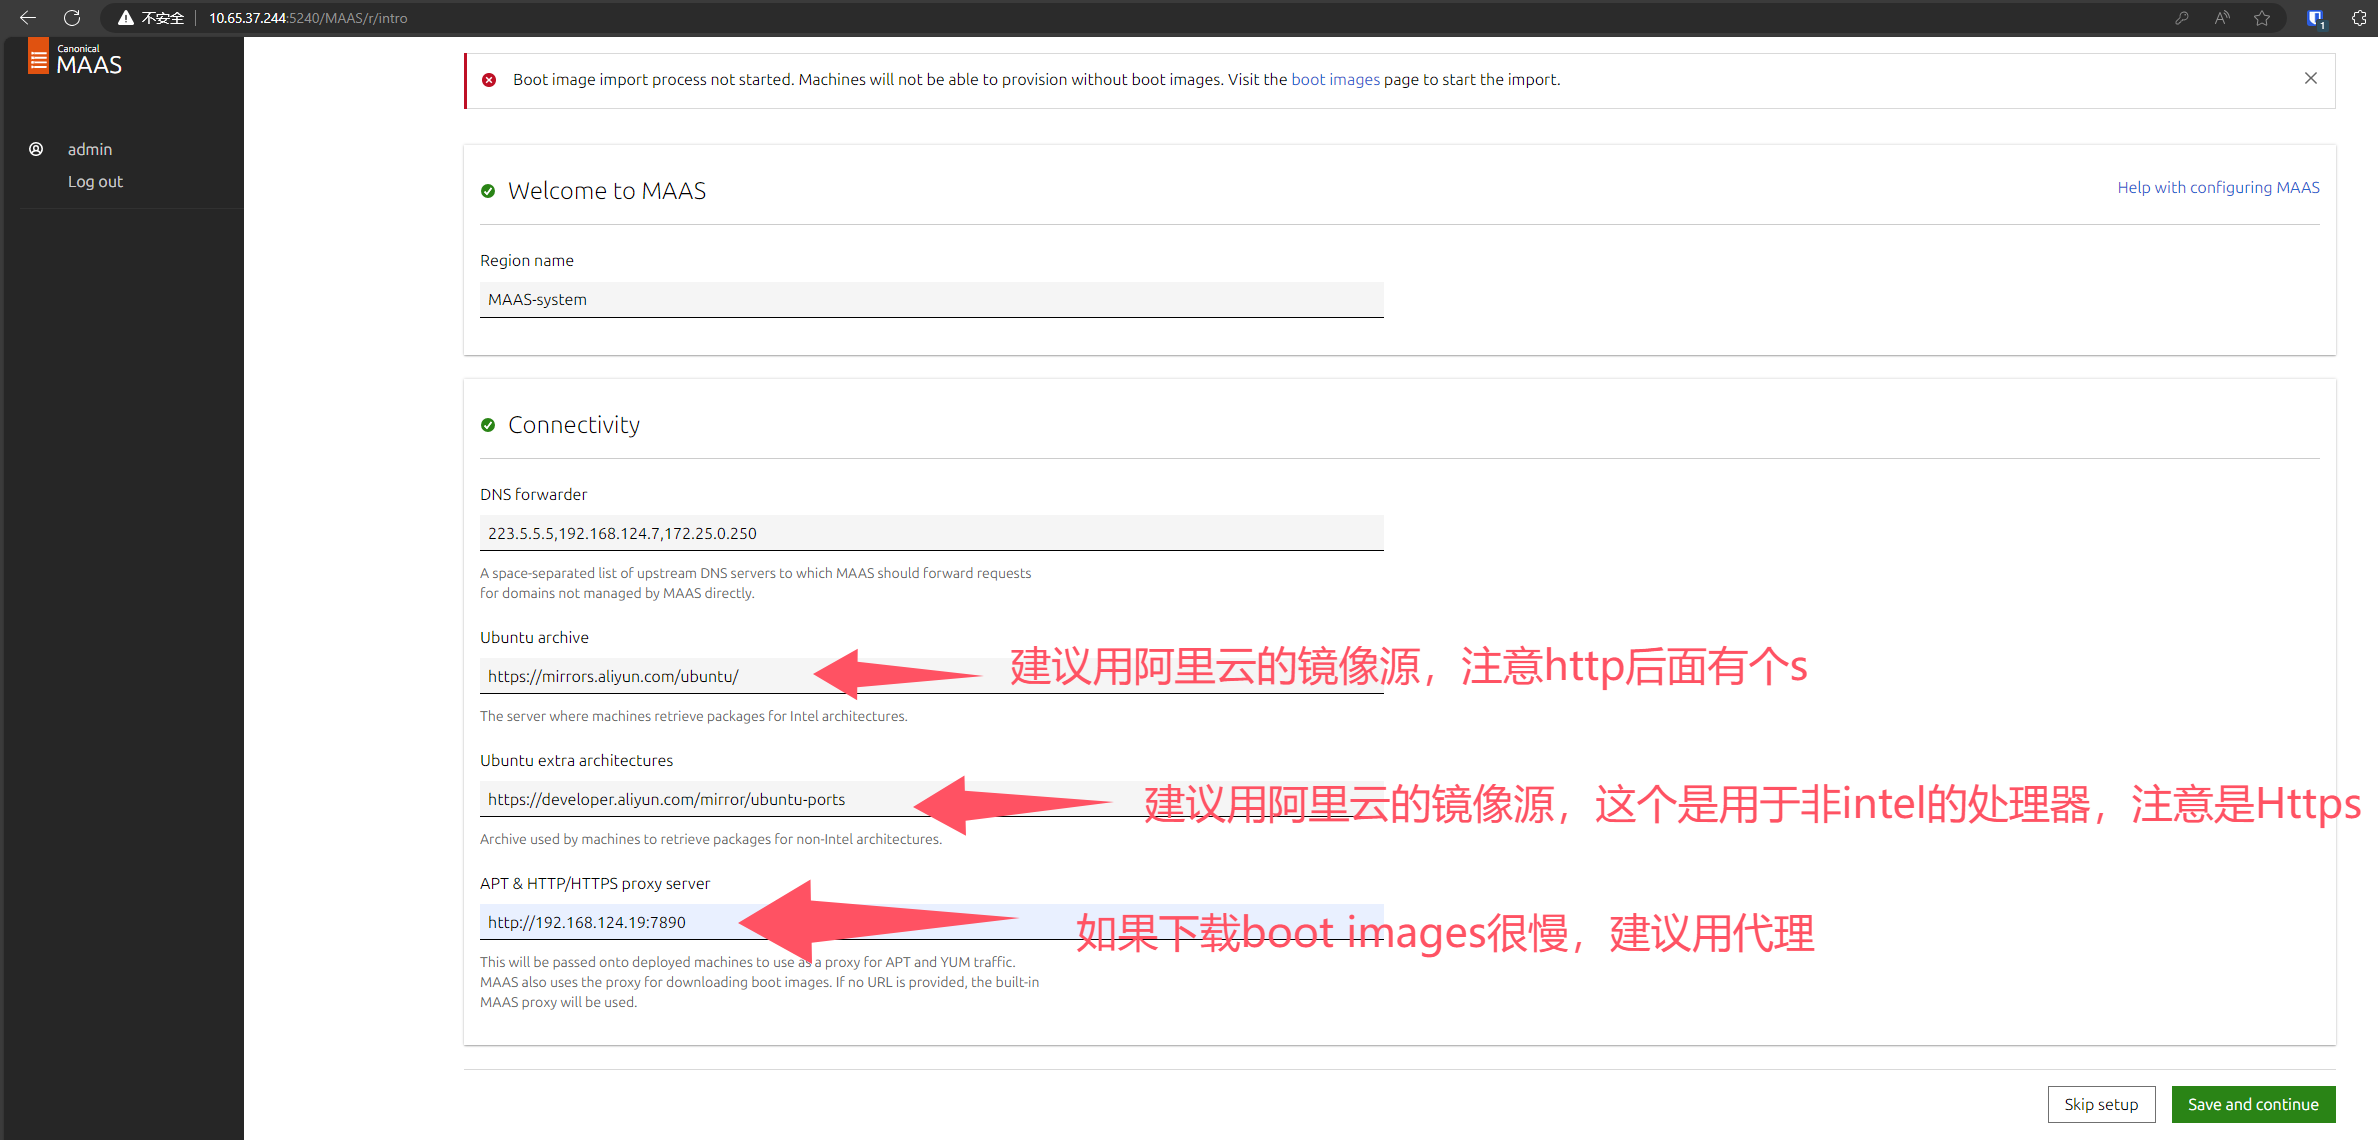
https://mirrors.aliyun.com/ubuntu/
https://developer.aliyun.com/mirror/ubuntu-ports
proxy服务器上的日志,可以看到,网速很快

如果发现没有出现ubuntu release,再多等等,一般都会刷新的(实测,发现很难完全下载完成),实在不行再用proxy(因为我发现proxy似乎有问题,下载非常慢,而且总是无法下载完成)
:::
特别说明:
比较好的办法,是找到一台能正常用snap安装软件,已经正常访问maas.io网站的电脑,然后设置proxy,这样就能很好解决问题了,否则会一直卡在下载镜像的页面。具体操作方法看此文《***实现代理上网》
:::
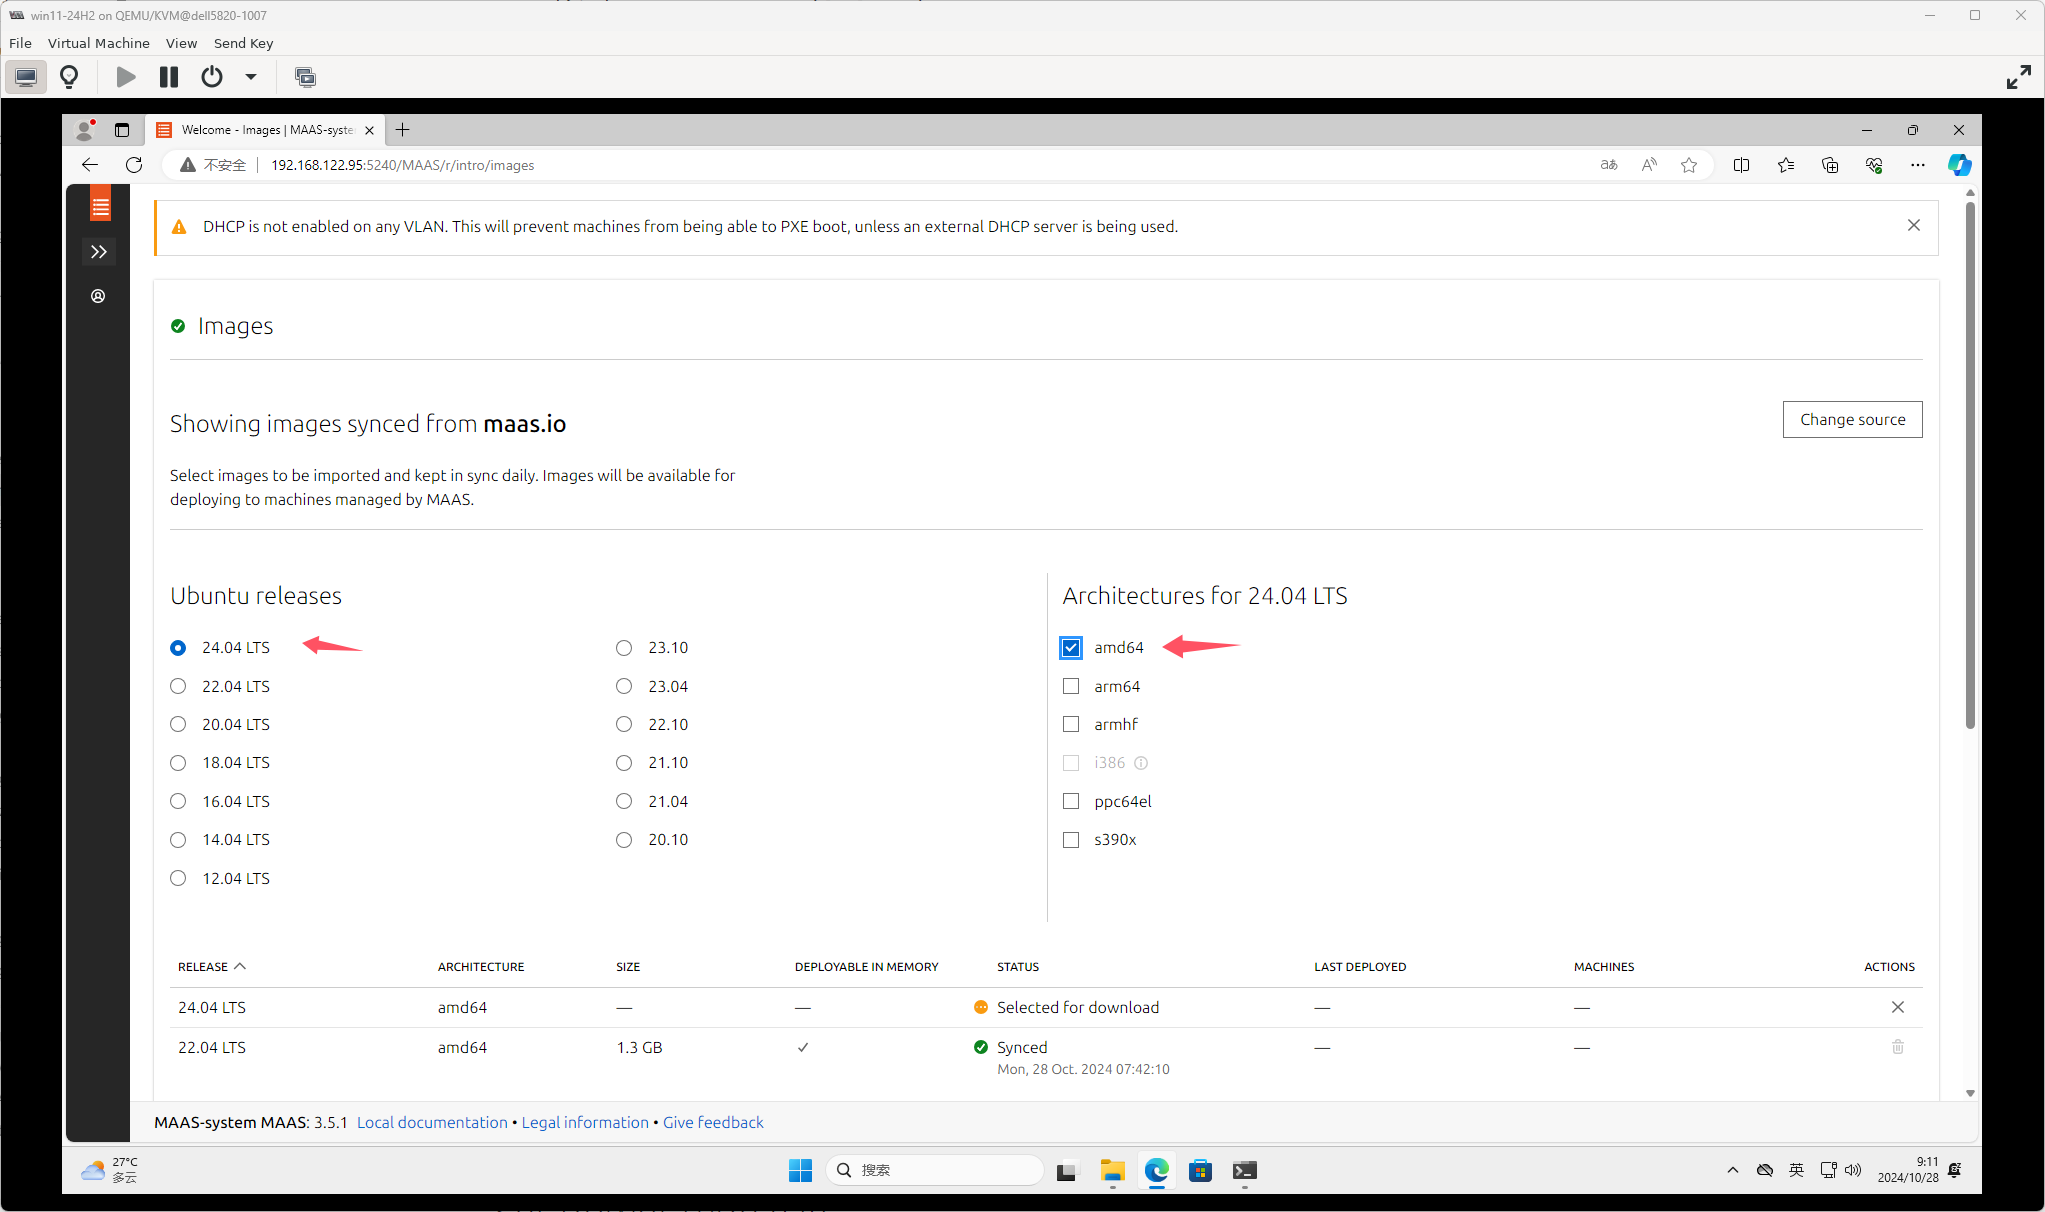
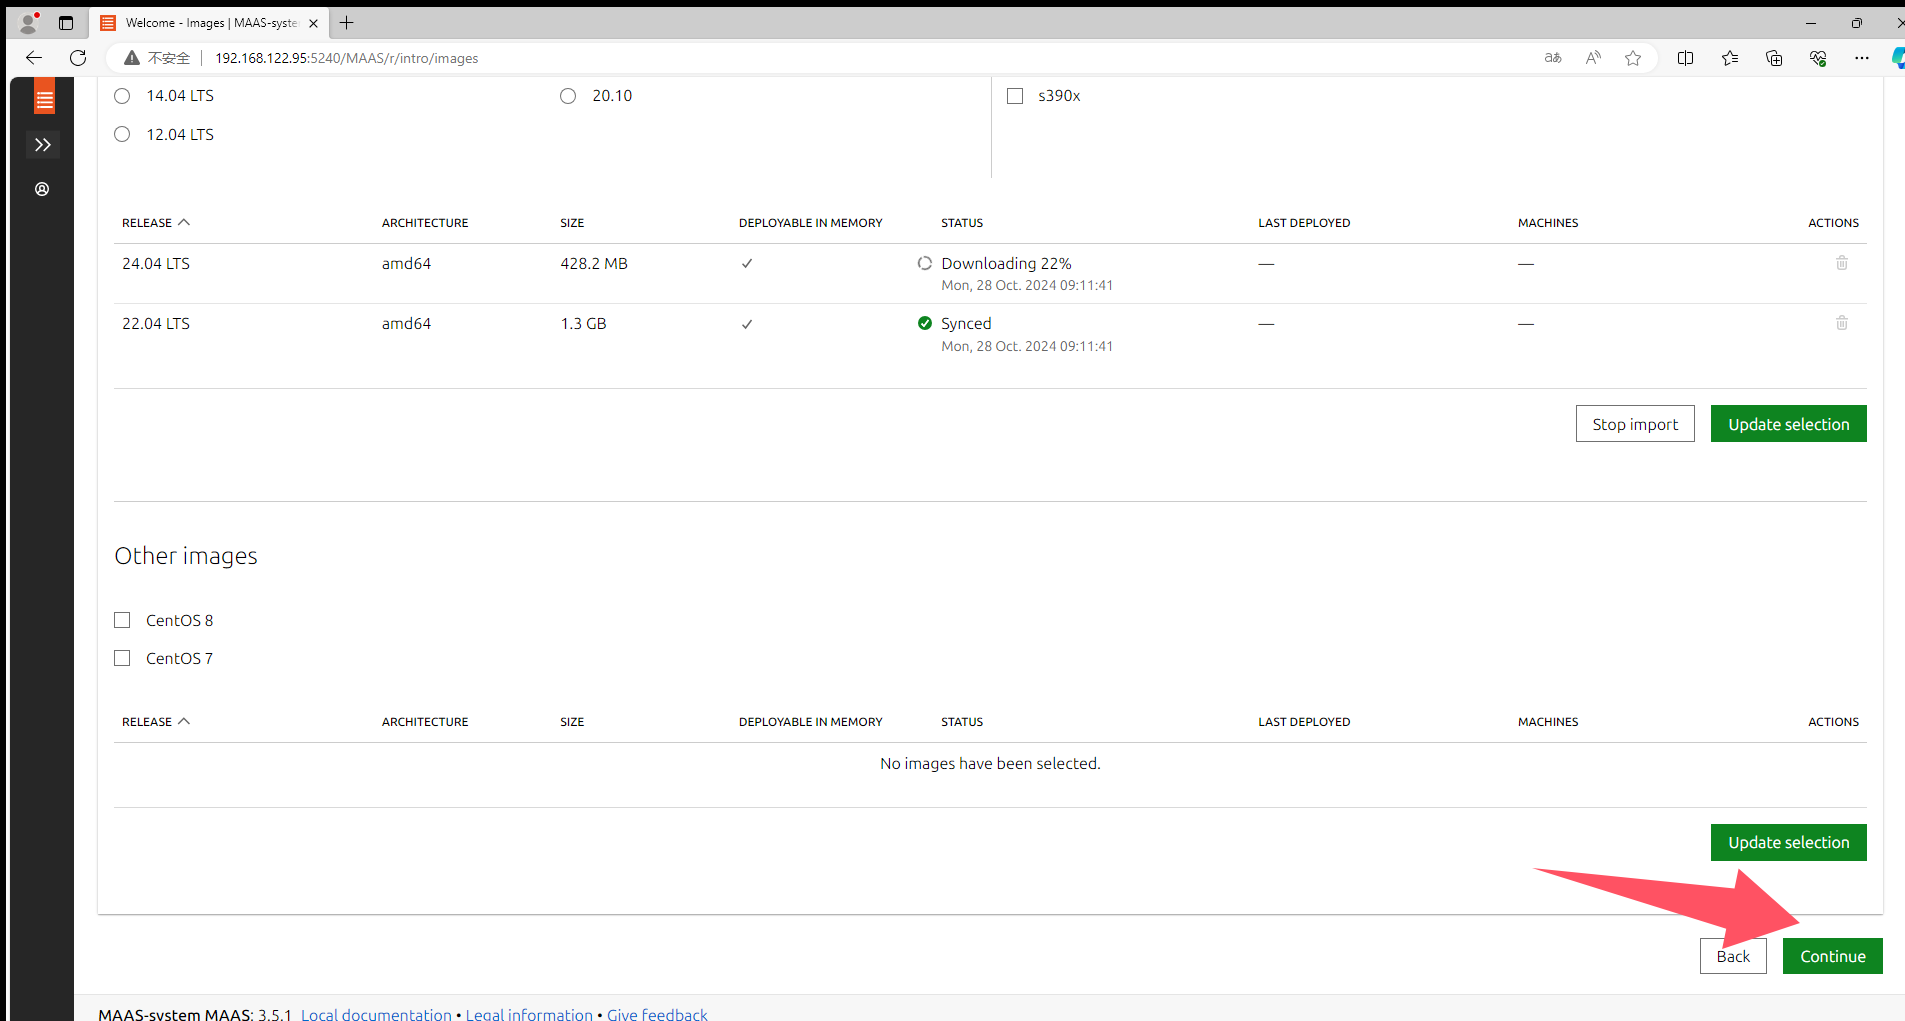
下载速度还是比较快的
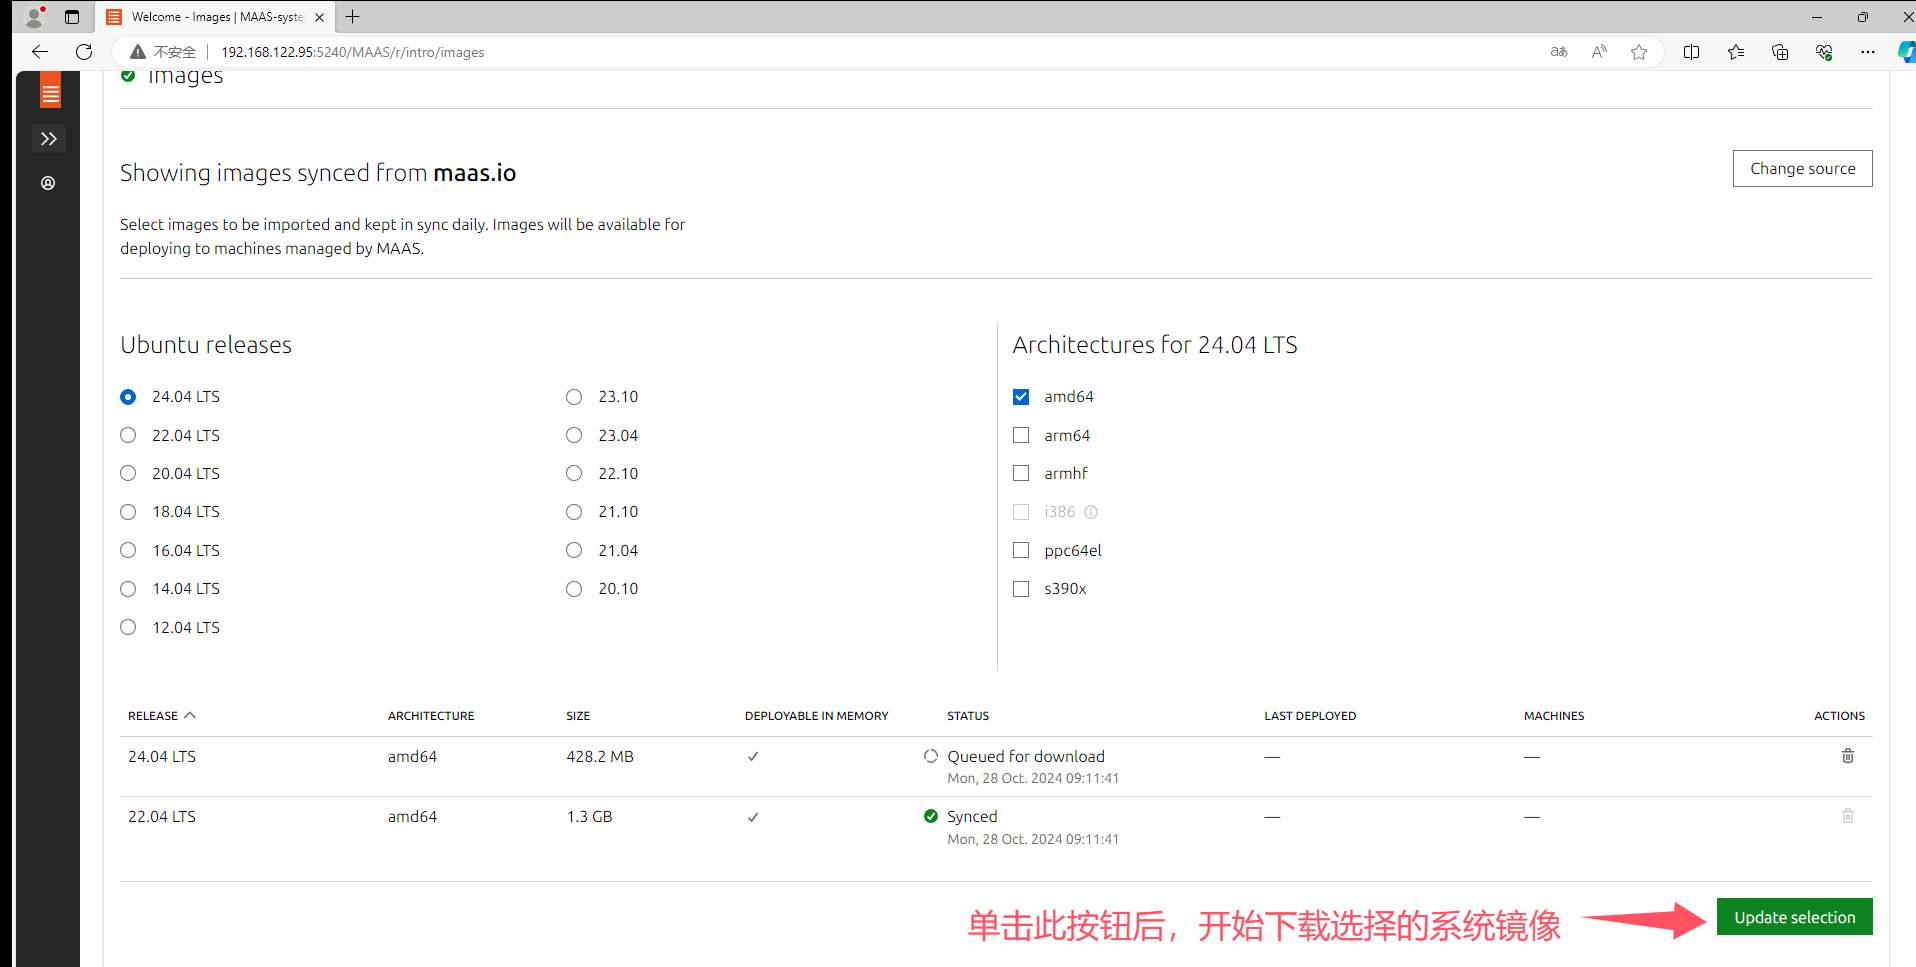
可以不用等待镜像下载完成,直接单击“continue”
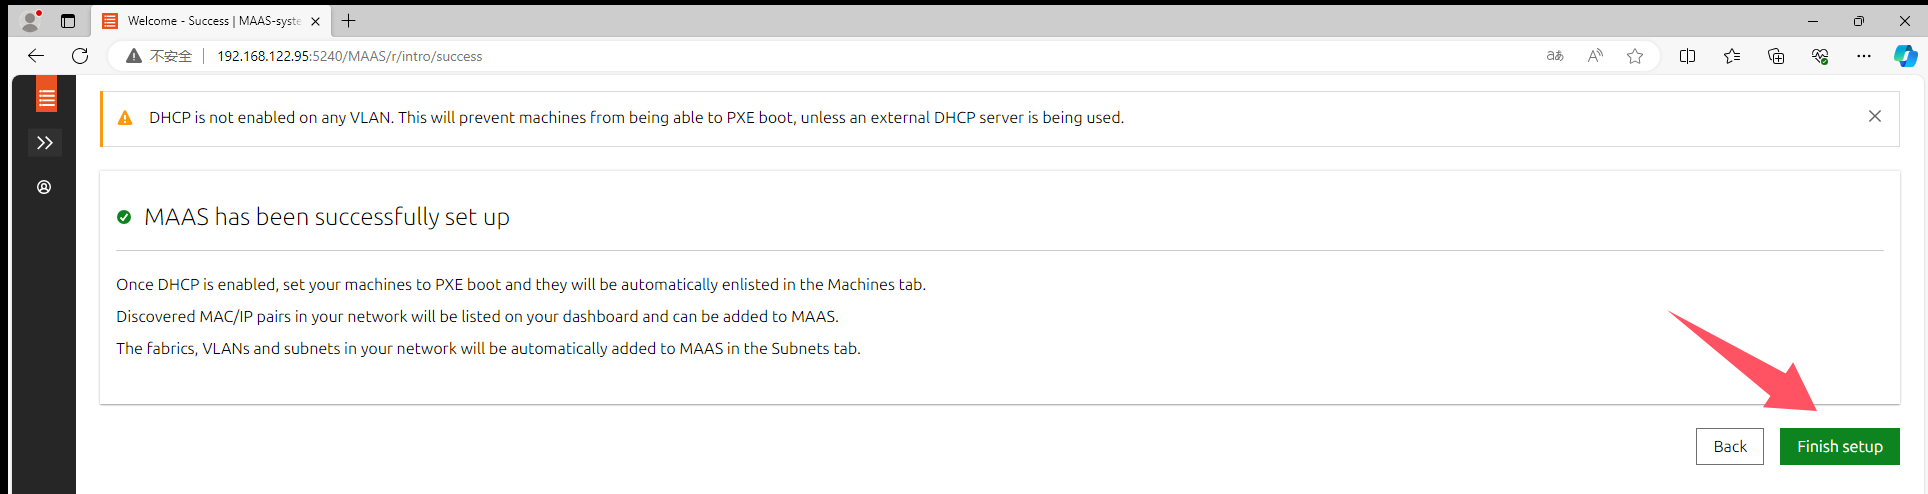
MAAS初始化配置完成
ssh-keygen -t rsa -b 4096 -C "1426693102@qq.com"


拷贝id_rsa.pub文件的内容
cat .ssh/id_rsa.pub

登录Launchpad.net网站,然后导航到个人配置文件设置页面,将刚刚复制的文件内容拷贝到方框内。


SSH-KEY的作用是为了让生成公钥的主机能够不用输入密码直接ssh连接到machine(包括PE和已经部署的系统)


检查MAAS健康度

启用DHCP
不能用默认的nat网桥中的dhcp,我发现无法正常加载PE


必须要定义动态ip范围,才能启用dhcp


务必要将首选dns设置为MAAS-system的ip地址,否则主机加载完PE后,运行脚本会失败。

添加其余五个节点(详细介绍juju控制器节点)
其他五个节点是juju调用了MAAS远程安装系统以及相关的应用程序的。本节演示如何让MAAS自动发现主机,并部署操作系统
注意,我做了完整演示,只是为了让自己清楚如何利用MAAS发现主机并部署操作系统,对于本实验而言,只要进行到Create OVS bridge就行了,不用自己通过MAAS部署系统,部署系统的任务juju会完成的。
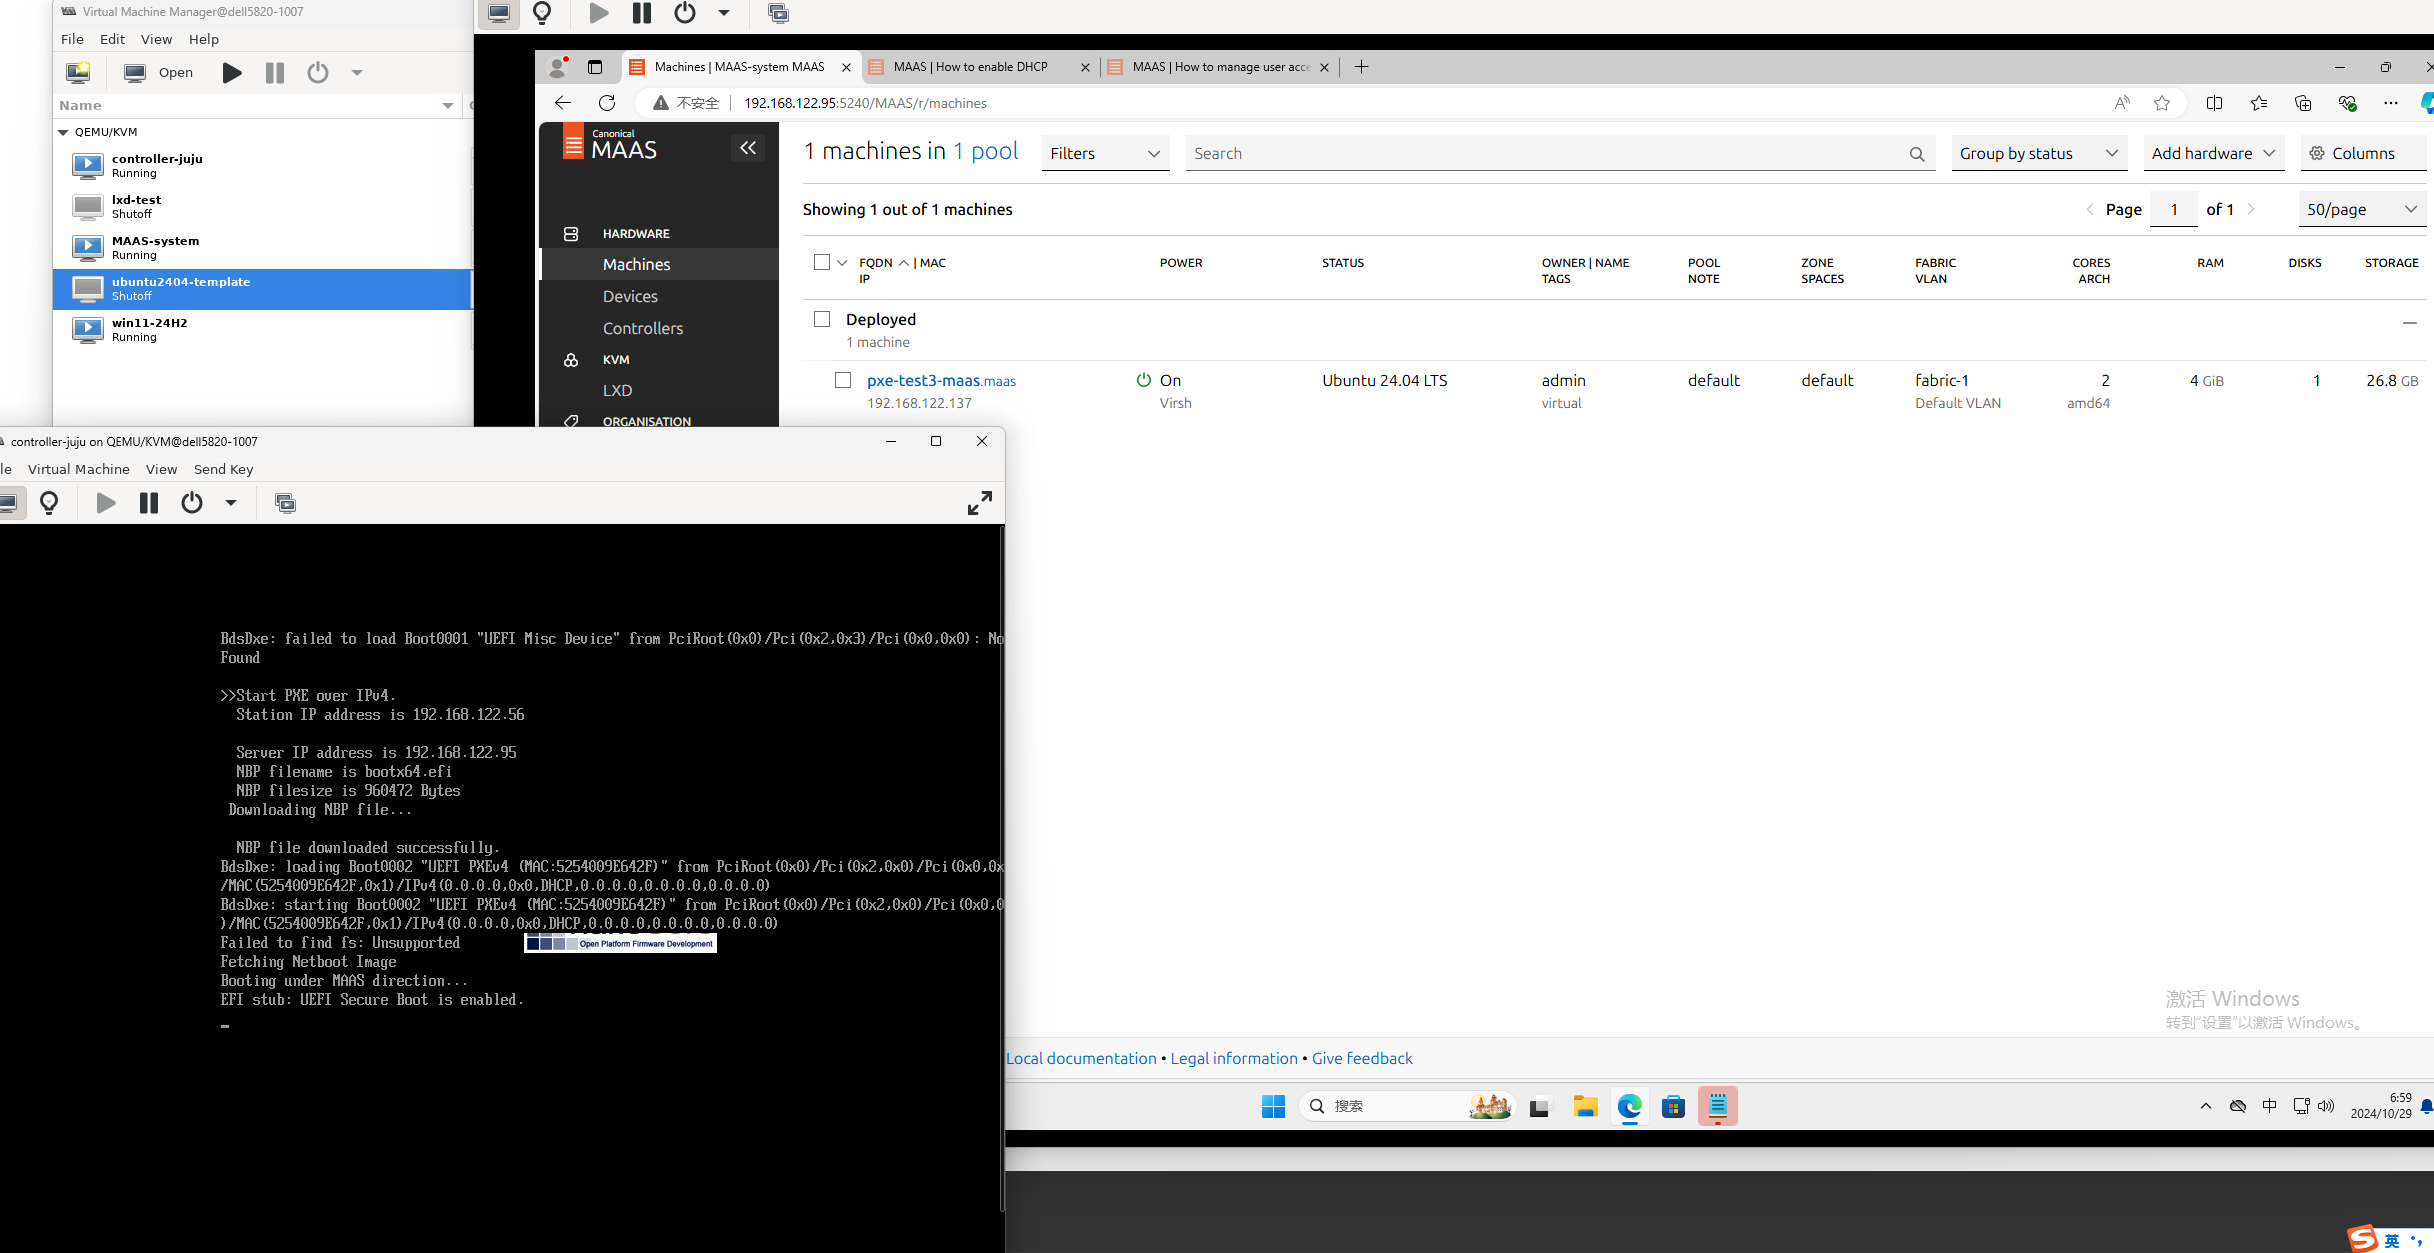
首先用virt-manager新创建一个虚拟机,不用安装系统


注意,所有MAAS的节点,应该要一直保持pxe为第一启动项。


正在加载PE,加载完成后会自动运行一些脚本,然后自动关机,MAAS的machines页面就能看到这个新的主机了

添加其余五个节点(实验,可略过)
上面的步骤只是部署好了MAAS,还有五个节点如何处理呢?其实是通过MAAS远程自动化部署的,这正是MAAS的强项。
找一台服务器以pxe方式启动,我这里用的也是kvm虚拟机,这台服务器我们当做node1
下图是直接将网卡作为第一启动项,其实不建议这样做,可以使能启动菜单,然后开机的时候手工选择以pxe方式启动,第一启动项仍然设置为磁盘。


如果MAAS上不启用DHCP,就无法正常加载PE,如下图:

启用dhcp后,能找到PXE服务器,但是ui上的machine选项卡并没有自动出现这台虚拟机(注意,虚拟机设置为UEFI启动),具体解决方法,请看疑难解答的第一条。


我把虚拟机改为bios,也能正常加载启动镜像,但是machines上还是没有自动显示虚拟机的信息


疑难解答
加载完PE后,machines界面没有自动出现虚拟机或物理服务器的信息
参考资料:MAAS | How to troubleshoot common issues
问题:从PXE能正常加载启动映像,但是出现登录页面后,很快就好弹出失败(failed)的信息,提示“no datasource found”

可能的解决方案,将子网中的dns地址配置为MAAS控制器的ip地址,如下图所示,没有报错信息了,可以看到PE 正在自动进行update,还有运行一些脚本,之后会自动关机,刷新machines界面,就能看到自动出现了这台服务器的信息


刷新machines页面后,自动出现了虚拟机的信息,而且状态显示为NEW

点进去能看到详细信息:

使用已经存在的dhcp服务器
参考资料:MAAS | How to troubleshoot common issues
上面一小节介绍的是直接用maas服务器上的dhcp和dns,这是官方推荐的做法,但有时候我们可能想要用自己另外部署的dhcp服务器,这样也是可以的,具体操作如下:
一开始我将dhcp服务器上的选项67的值设置为pxelinux.0,发现无法引导,如下图所示:

将dhcp服务器的选项67的值改为了bootx64.efi,发现能正常引导了,如下图,192.168.122.95是maas服务器的ip地址。 不过这在uefi下测试是可行的,bios可能不行。


配置nodes(关键是power type)
因为我用的是kvm虚拟机,所以power type要选择virsh

commission nodes


kvm虚拟机自动开机,自动加载PE,MAAS上可以查看实时日志。


重命名nodes
将刚刚添加的节点改名,方便我们识别,一般改为主机名或者VM名称,这个节点是juju控制器,我将其改为controller-juju

tag nodes
比如可以给node1至node4打上compute标签,给juju控制器打上juju标签、

Create OVS bridge
每个计算节点都要按照下图所示创建OVS网桥

allocate machines(不用操作)
注意:这一步和下一小节不用操作,否则会导致juju无法部署系统,写这两部分的原因是让自己知道如何只通过maas部署系统
在部署操作系统之前,需要先allocate machine


deploy machines(不用操作)
deploy就是给主机安装操作系统


可以看到,虚拟机自动重启了,可以logs中看实时日志

添加其余四个计算节点
node1至node4也要按照上面的第6步至第13步操作(特别注意,不要部署操作系统),主机计算节点的标签不同,应该配置为compute,另外每个计算节点是有两个磁盘的
准备commission nodes(实验)
什么是commission machine,看官方文档:MAAS | About commissioning machines
配置power drivers
参考资料:MAAS | Reference: Power drivers
configuratin选项页有个叉叉,点进去,提示MAAS无法控制主机电源,需要手动编辑power type

因为我用的是虚拟机,而且是用virt-manager创建的,所以此处选择virsh
qemu+ssh://mywind@192.168.124.12/system

commission nodes


虚拟机自动开机了


commission完成,不会自动关机(因为之前选择了防止machine关机)

重命名nodes(实验)

给节点打标签(实验)
比如可以给node1至node4打上compute标签,给juju控制器打上juju标签
Create OVS bridge(实验)
每个计算节点都要按照下图所示创建OVS网桥

machine的生命周期管理(life cycle)
下图展示了一台机器(服务器或PC等)从采购到报废的全流程(针对MAAS)

allocate machines(实验)

machine的状态变为了allocated

deploy machines(实验)
参考资料:MAAS | About deploying machines
新的主机需要先经过allocate,才能deploy
下图展示了整个部署的过程

开始部署(deploy)


machine状态变为了deploying

logs选项卡可以看到实时日志

虚拟机自动重启了


部署完成

安装juju
参考资料:Install Juju — charm-deployment-guide 0.0.1.dev519 documentation (openstack.org)
Releases · juju/juju (github.com)
juju是安装在MAAS-system主机上的,利用juju来自动化创建juju控制器
sudo snap install --channel=3.5 juju
:::
扩展阅读
snap info juju可以查询juju软件包有哪些可用版本(channels),可以看出最新稳定版本是3.5.4

:::
Add MAAS to Juju
创建一个名为maas-cloud.yaml的文件,内容如下:
clouds:
  maas-one:
    type: maas
    auth-types: [oauth1]
    endpoint: http://192.168.122.95:5240/MAAS
cat <<EOF > maas-cloud.yaml
clouds:
  maas-one:
    type: maas
    auth-types: [oauth1]
    endpoint: http://192.168.122.95:5240/MAAS
EOF
juju add-cloud --client -f maas-cloud.yaml maas-one

Add the MAAS credentials
创建一个名为maas-creds.yaml的文件,内容如下:
credentials:
  maas-one:
    anyuser:
      auth-type: oauth1
      maas-oauth: V6sKqyYj9aQhmYzPB7:VwjvPm8KT4K3atxr6A:s7TcgKRDmKuZFuzRwFG39BMg4quYRzy4
注意:上面的maas-oauth值就是之前安装MAAS时生成的admin-api-key文件的内容

用这个命令快速创建yaml文件
cat <<EOF > maas-creds.yaml
credentials:
  maas-one:
    anyuser:
      auth-type: oauth1
      maas-oauth: V6sKqyYj9aQhmYzPB7:VwjvPm8KT4K3atxr6A:s7TcgKRDmKuZFuzRwFG39BMg4quYRzy4
EOF
juju add-credential --client -f maas-creds.yaml maas-one
创建juju控制器
juju bootstrap --constraints tags=juju maas-one maas-controller --verbose --debug
这一步很容易出错,我发现就算是用proxy也不行,我在测试的时候发现在192.168.124.0/24网段下,非常顺利。但是在10.65.37.0/24网段下,总是报错,于是我想是网络问题,就用了proxy,然而发现还是不行,最后,我直接用了透明proxy,就是在宿主机上安装*****Aproxy软件,开启透明proxy,节点配置的是192.168.124.19,发现就就可以了。(插曲:其实也没有那么顺利,一开始我用的是透明proxy网关的方式,发现还是会报错,最后我换了一台主机,用的是透明proxy,终于成功部署了juju控制器)
juju bootstrap --constraints tags=juju maas-one maas-controller --config snap-http-proxy=http://10.65.37.32:7890 --config snap-https-proxy=http://10.65.37.32:7890 --config snap-store-proxy=http://10.65.37.32:7890 --config snap-store-proxy-url=http://10.65.37.32:7890 --config juju-http-proxy=http://10.65.37.32:7890 --config juju-https-proxy=http://10.65.37.32:7890 --config juju-no-proxy="192.168.0.0/16,10.0.0.0/8,172.16.0.0/12,localhost,127.0.0.1" --config apt-http-proxy=http://10.65.37.32:7890 --config apt-https-proxy=http://10.65.37.32:7890 --config apt-no-proxy="192.168.0.0/16,10.0.0.0/8,172.16.0.0/12,localhost,127.0.0.1" --debug --verbose --keep-broken
#--debug  --verbose是方便调试的,--keep-broken这个参数的作用是当创建控制器失败时,machine不会关机,方便我们进一步远程到machine上诊断  参考资料:https://juju.is/docs/juju/manage-controllers#heading--bootstrap-a-controller
#https://juju.is/docs/juju/manage-logs#heading--manage-the-log-files
ubuntu@MAAS-system:~$ juju bootstrap --constraints tags=juju maas-one maas-controller --verbose --debug
11:57:37 INFO  juju.cmd supercommand.go:56 running juju [3.5.4 31b4b0914740b84ad8166993635ac797a44276de gc go1.23.1]
11:57:37 DEBUG juju.cmd supercommand.go:57   args: []string{"/snap/juju/28520/bin/juju", "bootstrap", "--constraints", "tags=juju", "maas-one", "maas-controller", "--verbose", "--debug"}
11:57:37 DEBUG juju.cmd.juju.commands bootstrap.go:1455 authenticating with region "" and credential "anyuser" ()
11:57:37 DEBUG juju.cmd.juju.commands bootstrap.go:1614 provider attrs: map[]
11:57:38 INFO  cmd authkeys.go:113 Adding contents of "/home/ubuntu/.local/share/juju/ssh/juju_id_rsa.pub" to authorized-keys
11:57:38 INFO  cmd authkeys.go:113 Adding contents of "/home/ubuntu/.ssh/id_rsa.pub" to authorized-keys
11:57:38 DEBUG juju.cmd.juju.commands bootstrap.go:1699 preparing controller with config: map[agent-metadata-url: agent-stream:released apt-ftp-proxy: apt-http-proxy: apt-https-proxy: apt-mirror: apt-no-proxy: authorized-keys:ssh-rsa AAAAB3NzaC1yc2EAAAADAQABAAACAQDQzigVQt3ccLQpdoXM5pTJ/LYjwXsjz44w1Jk2gFckerqX+9muca0JyXrG/wN6llC9gxTZE+LXSr1Mo5P67BhJVzwuKUgAL59oepsUu8/HWakOJHjr43sc/2ti5psK2flECYgjgsSe9O4XQfCjidn4brTFHyew0yphIkGQjusvNwmZ/0ZgyxN8hW4bElu76+N2dE1hP+XAcCEAJIcCim17WxzgXrRltaIMPgrIzPERks8chnSc0fjaUDbJV9FHN9gFe3ruL+50y2jHZN/u6q4QxduVNVIrPEPewDM3JPeyBwFxhoKRBUOThyt0jRIKb0VhlWhnI07US2CvF0UM1lL82+WtySGKl5AZIWKr14Z97CajEwyiIrL28osozqfLcmyj0hRT2hSgQ2t4HykkQ/uSecRNqNg0blhJoFGCb2BFAMqj1jWucKrOcIYGb1/PQno2qS1mhRO2Uz81+bdP+kEx6pCCXmzkksKdKDLjVmHZYWg5Ip8Ij/MXpVX+EJC55FA2zWdKJY8qWE8Ev4Uo/Tmfmtaj6nYawpedLxrYbvCDNMKujU/qdCAF13LmqYCiBBm217UiRe1/Cja7UZgSk262J8boYy/cPCtkhC9HxaBUJyUrpaSJoYA9QV/siUMiQGPjkm6ofUA4fMQNBdg+weExVXjZDNtt8+t6grBFC533/Q== juju-client-key
ssh-rsa AAAAB3NzaC1yc2EAAAADAQABAAACAQDMMdmfe365rM8ePzlGFIzEMxlnF+izuGn8G67CLAJcUfGaV7AQOxnRFfyn+97/g0Tj95pfWA4XiHpuG9W1gr4RxhTQuRNLblES4zHtohQa0s2o9LliDLoDmaPtr8eKoSRDv7chSCYj/G3RDwLqEtyeXVm718uGQ4hTh+uONsPJ5wdYWhu6g6rNhbHSxJvZtCQNYxm5sAoWjaj/Xy/saeqtH2kbP8jxXU3JSH0qElSJvZf9/eVuxwaA7O0c7HwiXQnVUGXsK42xpJF7gjsrRzCFFdr8ahOkxU6dep5tbswia67nXLBBr94ih8cw+OQbPK9Y6oeDWGYeRmuF95LM3hJjpNOwR3Ov3iqnW09VPtJR3ciCoMb8XZVR87g8si96PIWOyddyfGFik3gi0+mLL2Oa37DYcg0itEmjcTsAp6am2XKXShLRSUlNM6z8goekaaH0QKy5ZGK8EJ3AeEFXFXAxouBFeXj8Lad1ryWaqTYaU1BDbWr93pyStu/IkKb668KLL7sBFsi2zX3Fvoam1p54gQFSIwnVzq7mjv3FaPma5SGXLw329fIeRZHz3lOK55KG9M8TOrWZQYMa8SKrmqTbmHwtEaylir2txOe6oaHtP0FWRSA8OWWr7vJh7OGxpEkyMD9eto5JK/+etuG0KDR7hqpnxIrNnmB7tBgkQe3c6w== 1426693102@qq.com
 automatically-retry-hooks:true backup-dir: charmhub-url:https://api.charmhub.io cloudinit-userdata: container-image-metadata-defaults-disabled:false container-image-metadata-url: container-image-stream:released container-inherit-properties: container-networking-method: default-base: default-space: development:false disable-network-management:false disable-telemetry:false egress-subnets: enable-os-refresh-update:true enable-os-upgrade:true fan-config: firewall-mode:instance ftp-proxy: http-proxy: https-proxy: ignore-machine-addresses:false image-metadata-defaults-disabled:false image-metadata-url: image-stream:released juju-ftp-proxy: juju-http-proxy: juju-https-proxy: juju-no-proxy:127.0.0.1,localhost,::1 logforward-enabled:false logging-config: logging-output: lxd-snap-channel:5.0/stable max-action-results-age:336h max-action-results-size:5G max-status-history-age:336h max-status-history-size:5G mode:requires-prompts name:controller net-bond-reconfigure-delay:17 no-proxy:127.0.0.1,localhost,::1 num-container-provision-workers:4 num-provision-workers:16 provisioner-harvest-mode:destroyed proxy-ssh:false resource-tags: saas-ingress-allow:0.0.0.0/0,::/0 secret-backend:auto snap-http-proxy: snap-https-proxy: snap-store-assertions: snap-store-proxy: snap-store-proxy-url: ssh-allow:0.0.0.0/0,::/0 ssl-hostname-verification:true test-mode:false transmit-vendor-metrics:true type:maas update-status-hook-interval:5m uuid:624e2af2-c61f-44b0-8dde-bd46c8360f88]
11:57:38 DEBUG juju.provider.maas environprovider.go:63 opening model "controller".
11:57:38 INFO  cmd bootstrap.go:1002 Creating Juju controller "maas-controller" on maas-one/default
11:57:38 INFO  juju.cmd.juju.commands bootstrap.go:1073 combined bootstrap constraints: tags=juju
11:57:38 DEBUG juju.environs.bootstrap bootstrap.go:326 model "controller" supports application/machine networks: true
11:57:38 DEBUG juju.environs.bootstrap bootstrap.go:328 network management by juju enabled: true
11:57:38 INFO  cmd bootstrap.go:409 Loading image metadata
11:57:38 INFO  cmd bootstrap.go:475 Looking for packaged Juju agent version 3.5.4 for amd64
11:57:38 INFO  juju.environs.bootstrap tools.go:78 looking for bootstrap agent binaries: version=3.5.4
11:57:38 DEBUG juju.environs.tools tools.go:87 finding agent binaries in stream: "released"
11:57:38 DEBUG juju.environs.tools tools.go:89 reading agent binaries with major.minor version 3.5
11:57:38 DEBUG juju.environs.tools tools.go:98 filtering agent binaries by version: 3.5.4
11:57:38 DEBUG juju.environs.tools tools.go:101 filtering agent binaries by os type: ubuntu
11:57:38 DEBUG juju.environs.tools tools.go:104 filtering agent binaries by architecture: amd64
11:57:38 DEBUG juju.environs.tools urls.go:133 trying datasource "keystone catalog"
11:57:38 DEBUG juju.environs.simplestreams simplestreams.go:417 searching for signed metadata in datasource "default simplestreams"
11:57:38 DEBUG juju.environs.simplestreams simplestreams.go:451 looking for data index using path streams/v1/index2.sjson
11:57:40 DEBUG juju.environs.simplestreams simplestreams.go:747 using default candidate for content id "com.ubuntu.juju:released:agents" are {20210329 mirrors:1.0 content-download streams/v1/cpc-mirrors-agents.sjson []}
11:57:40 DEBUG juju.environs.simplestreams simplestreams.go:463 looking for data index using URL https://streams.canonical.com/juju/tools/streams/v1/index2.sjson
11:57:40 DEBUG juju.environs.simplestreams simplestreams.go:486 read metadata index at "https://streams.canonical.com/juju/tools/streams/v1/index2.sjson"
11:57:40 DEBUG juju.environs.simplestreams simplestreams.go:1018 finding products at path "streams/v1/com.ubuntu.juju-released-agents.sjson"
11:57:41 INFO  juju.environs.bootstrap tools.go:80 found 1 packaged agent binaries
11:57:41 INFO  cmd bootstrap.go:488 Located Juju agent version 3.5.4-ubuntu-amd64 at https://streams.canonical.com/juju/tools/agent/3.5.4/juju-3.5.4-linux-amd64.tgz
11:57:41 INFO  cmd bootstrap.go:586 Starting new instance for initial controller
11:57:41 INFO  cmd bootstrap.go:188 Launching controller instance(s) on maas-one/default...
11:57:41 DEBUG juju.provider.maas environ.go:685 attempting to acquire node in zone "default"
11:57:41 DEBUG juju.cloudconfig.instancecfg instancecfg.go:947 Setting numa ctl preference to false
11:57:41 DEBUG juju.provider.maas environ.go:769 maas user data; 4456 bytes
11:57:52 DEBUG juju.provider.maas environ.go:797 started instance "wftkpp"
11:57:52 INFO  cmd bootstrap.go:334  - wftkpp (arch=amd64 mem=8G cores=8)
11:57:52 INFO  juju.environs.bootstrap bootstrap.go:1014 newest version: 3.5.4
11:57:52 INFO  juju.environs.bootstrap bootstrap.go:1029 picked bootstrap agent binary version: 3.5.4
11:57:52 INFO  cmd bootstrap.go:629 Installing Juju agent on bootstrap instance
12:08:00 DEBUG juju.cloudconfig.instancecfg instancecfg.go:947 Setting numa ctl preference to false
Waiting for address
12:08:00 DEBUG juju.provider.maas instance.go:88 "juju-controller" has addresses ["local-cloud:192.168.122.3@undefined(id:-1)"]
Attempting to connect to 192.168.122.3:22
12:08:01 DEBUG juju.provider.common bootstrap.go:708 connection attempt for 192.168.122.3 failed: ssh: connect to host 192.168.122.3 port 22: Connection refused
12:08:06 DEBUG juju.provider.common bootstrap.go:708 connection attempt for 192.168.122.3 failed: ssh: connect to host 192.168.122.3 port 22: Connection refused
12:08:10 DEBUG juju.provider.maas instance.go:88 "juju-controller" has addresses ["local-cloud:192.168.122.3@undefined(id:-1)"]
12:08:11 DEBUG juju.provider.common bootstrap.go:708 connection attempt for 192.168.122.3 failed: ssh: connect to host 192.168.122.3 port 22: Connection refused
12:08:17 DEBUG juju.provider.common bootstrap.go:708 connection attempt for 192.168.122.3 failed: /var/lib/juju/nonce.txt does not exist
12:08:20 DEBUG juju.provider.maas instance.go:88 "juju-controller" has addresses ["local-cloud:192.168.122.3@undefined(id:-1)"]
12:08:22 DEBUG juju.provider.common bootstrap.go:708 connection attempt for 192.168.122.3 failed: /var/lib/juju/nonce.txt does not exist
12:08:27 DEBUG juju.provider.common bootstrap.go:708 connection attempt for 192.168.122.3 failed: /var/lib/juju/nonce.txt does not exist
12:08:30 DEBUG juju.provider.maas instance.go:88 "juju-controller" has addresses ["local-cloud:192.168.122.3@undefined(id:-1)"]
12:08:32 INFO  cmd bootstrap.go:476 Connected to 192.168.122.3
12:08:32 INFO  juju.cloudconfig userdatacfg_unix.go:605 Fetching agent: curl -sSf --retry 10 -o $bin/tools.tar.gz <[https://streams.canonical.com/juju/tools/agent/3.5.4/juju-3.5.4-linux-amd64.tgz]>
12:08:32 INFO  cmd bootstrap.go:546 Running machine configuration script...
12:14:02 INFO  cmd bootstrap.go:745 Bootstrap agent now started
12:14:02 DEBUG juju.provider.maas instance.go:88 "juju-controller" has addresses ["local-cloud:192.168.122.3@undefined(id:-1)"]
12:14:02 INFO  juju.juju api.go:380 API endpoints changed from [] to [192.168.122.3:17070]
12:14:02 INFO  cmd controller.go:93 Contacting Juju controller at 192.168.122.3 to verify accessibility...
12:14:02 INFO  juju.juju api.go:86 connecting to API addresses: [192.168.122.3:17070]
12:14:04 DEBUG juju.api apiclient.go:1036 successfully dialed "wss://192.168.122.3:17070/model/624e2af2-c61f-44b0-8dde-bd46c8360f88/api"
12:14:04 INFO  juju.api apiclient.go:571 connection established to "wss://192.168.122.3:17070/model/624e2af2-c61f-44b0-8dde-bd46c8360f88/api"
12:14:04 DEBUG juju.api monitor.go:35 RPC connection died
12:14:04 INFO  cmd controller.go:118
Bootstrap complete, controller "maas-controller" is now available
Controller machines are in the "controller" model
12:14:04 INFO  cmd bootstrap.go:713
Now you can run
        juju add-model <model-name>
to create a new model to deploy workloads.
12:14:04 INFO  cmd supercommand.go:556 command finished
目标机器(MAAS中tag为juju的machine)自动重启,自动开始部署操作系统

部署完成后,发现自动连接到目标机器,自动运行脚本

运行成功

:::
故障诊断
我在创建juju控制器时,经常遇到如下图所示的报错“Attempt 1 to wait for snapd to be seeded...\n
error: cannot assert: cannot decode request body into assertions: unexpected EOF”

:::
Create the model
juju add-model openstack

查看juju的状态

安装OpenStack
参考资料:Install OpenStack — charm-deployment-guide 0.0.1.dev519 documentation
本节演示如何安装非高可用的OpenStack,如果想要安装高可用的OpenStack请看此文https://docs.openstack.org/charm-guide/latest/admin/ha.html
#温馨提示:下行命令可以监控安装过程,用另外一个terminal
watch -n 5 -c juju status --color
切换到指定的上下文
juju switch maas-controller:openstack
Ceph OSD
ceph-osd应用要部署到四个计算节点中
创建一个名为ceph-osd.yaml的文件:
cat <<EOF > ceph-osd.yaml
ceph-osd:
  osd-devices: /dev/vda /dev/vdb
EOF
juju deploy -n 4 --channel quincy/stable --config ceph-osd.yaml --constraints tags=compute ceph-osd

watch -n 5 -c juju status --color此命令下查看实时进度

MAAS web UI上看,相应的节点也在发生变化

Nova Compute
可以不用等待上面的运行完成,直接可以运行下面的命令
cat <<EOF > nova-compute.yaml
nova-compute:
  config-flags: default_ephemeral_format=ext4
  enable-live-migration: true
  enable-resize: true
  migration-auth-type: ssh
  virt-type: qemu
EOF
juju deploy -n 3 --to 1,2,3 --channel 2023.2/stable --config nova-compute.yaml nova-compute
MySQL InnoDB Cluster
juju deploy -n 3 --to lxd:0,lxd:1,lxd:2 --channel 8.0/stable mysql-innodb-cluster

Vault
参考资料:Install OpenStack — charm-deployment-guide 0.0.1.dev519 documentation
juju deploy --to lxd:3 --channel 1.8/stable vault
juju deploy --channel 8.0/stable mysql-router vault-mysql-router
juju integrate vault-mysql-router:db-router mysql-innodb-cluster:db-router
juju integrate vault-mysql-router:shared-db vault:shared-db
安装Vault client,在juju client所在的机器执行此命令
参考资料:charm-vault/README.md 位于 stable/1.8 - charm-vault - OpenDev: Free Software Needs Free Tools
sudo snap install vault
Initialise Vault

注意,下行命令中的ip地址要填写vault容器的ip地址,如上图
export VAULT_ADDR="http://192.168.122.11:8200"
vault operator init -key-shares=5 -key-threshold=3

Unseal Vault
vault operator unseal DhsxJjDb/B95v4+coCakbJ5aiyOWKA4HlhTHXSkxqa6Q
vault operator unseal D0pCJlDxlsrc1Upa2LF0zsI/JDPvMzNeL/ehboVC2rVD
vault operator unseal +JbtTO8WZ0vc/EgAV3JEg8SaCcYL1dvRtNNIL1Zi4WrF
Authorise the vault charm
注意:下面命令中VAULT_TOKEN的值要填写之前用vault operator init -key-shares=5 -key-threshold=3命令生成的Initial Root Token
export VAULT_TOKEN=s.VfoM5ERim6ijyFUiRQ8ZvM32
vault token create -ttl=10m

参考资料:Juju | How to manage actions
juju run --wait=2m vault/leader authorize-charm token=s.5ADtY49S9w6fxsZowL7gpqk2

接下来要为vault提供一个CA证书
参考资料:Managing TLS certificates — charm-guide 0.0.1.dev813 documentation (openstack.org)
juju run vault/leader generate-root-ca

颁发证书:
juju integrate mysql-innodb-cluster:certificates vault:certificates

Neutron networking
cat <<EOF > neutron.yaml
ovn-chassis:
  bridge-interface-mappings: br-ext:enp1s0
  ovn-bridge-mappings: physnet1:br-ext
neutron-api:
  neutron-security-groups: true
  flat-network-providers: physnet1
EOF
juju deploy -n 3 --to lxd:0,lxd:1,lxd:2 --channel 23.09/stable ovn-central

juju deploy --to lxd:1 --channel 2023.2/stable --config neutron.yaml neutron-api

juju deploy --channel 2023.2/stable neutron-api-plugin-ovn
juju deploy --channel 23.09/stable --config neutron.yaml ovn-chassis

juju integrate neutron-api-plugin-ovn:neutron-plugin neutron-api:neutron-plugin-api-subordinate
juju integrate neutron-api-plugin-ovn:ovsdb-cms ovn-central:ovsdb-cms
juju integrate ovn-chassis:ovsdb ovn-central:ovsdb
juju integrate ovn-chassis:nova-compute nova-compute:neutron-plugin
juju integrate neutron-api:certificates vault:certificates
juju integrate neutron-api-plugin-ovn:certificates vault:certificates
juju integrate ovn-central:certificates vault:certificates
juju integrate ovn-chassis:certificates vault:certificates

juju deploy --channel 8.0/stable mysql-router neutron-api-mysql-router
juju integrate neutron-api-mysql-router:db-router mysql-innodb-cluster:db-router
juju integrate neutron-api-mysql-router:shared-db neutron-api:shared-db
Keystone
juju deploy --to lxd:0 --channel 2023.2/stable keystone

juju deploy --channel 8.0/stable mysql-router keystone-mysql-router
juju integrate keystone-mysql-router:db-router mysql-innodb-cluster:db-router
juju integrate keystone-mysql-router:shared-db keystone:shared-db

juju integrate keystone:identity-service neutron-api:identity-service
juju integrate keystone:certificates vault:certificates
RabbitMQ
juju deploy --to lxd:2 --channel 3.9/stable rabbitmq-server

juju integrate rabbitmq-server:amqp neutron-api:amqp
juju integrate rabbitmq-server:amqp nova-compute:amqp

Nova cloud controller
cat <<EOF > ncc.yaml
nova-cloud-controller:
  network-manager: Neutron
EOF
juju deploy --to lxd:3 --channel 2023.2/stable --config ncc.yaml nova-cloud-controller

juju deploy --channel 8.0/stable mysql-router ncc-mysql-router
juju integrate ncc-mysql-router:db-router mysql-innodb-cluster:db-router
juju integrate ncc-mysql-router:shared-db nova-cloud-controller:shared-db
juju integrate nova-cloud-controller:identity-service keystone:identity-service
juju integrate nova-cloud-controller:amqp rabbitmq-server:amqp
juju integrate nova-cloud-controller:neutron-api neutron-api:neutron-api
juju integrate nova-cloud-controller:cloud-compute nova-compute:cloud-compute
juju integrate nova-cloud-controller:certificates vault:certificates
Placement
juju deploy --to lxd:3 --channel 2023.2/stable placement

juju deploy --channel 8.0/stable mysql-router placement-mysql-router
juju integrate placement-mysql-router:db-router mysql-innodb-cluster:db-router
juju integrate placement-mysql-router:shared-db placement:shared-db

juju integrate placement:identity-service keystone:identity-service
juju integrate placement:placement nova-cloud-controller:placement
juju integrate placement:certificates vault:certificates
OpenStack dashboard
juju deploy --to lxd:2 --channel 2023.2/stable openstack-dashboard

juju deploy --channel 8.0/stable mysql-router dashboard-mysql-router
juju integrate dashboard-mysql-router:db-router mysql-innodb-cluster:db-router
juju integrate dashboard-mysql-router:shared-db openstack-dashboard:shared-db

juju integrate openstack-dashboard:identity-service keystone:identity-service
juju integrate openstack-dashboard:certificates vault:certificates
Glance
juju deploy --to lxd:3 --channel 2023.2/stable glance

juju deploy --channel 8.0/stable mysql-router glance-mysql-router
juju integrate glance-mysql-router:db-router mysql-innodb-cluster:db-router
juju integrate glance-mysql-router:shared-db glance:shared-db

juju integrate glance:image-service nova-cloud-controller:image-service
juju integrate glance:image-service nova-compute:image-service
juju integrate glance:identity-service keystone:identity-service
juju integrate glance:certificates vault:certificates

Ceph monitor
cat <<EOF > ceph-mon.yaml
ceph-mon:
  expected-osd-count: 3
  monitor-count: 3
EOF
The above informs the MON cluster that it is comprised of three nodes and that it should expect at least four OSDs (disks).
juju deploy -n 3 --to lxd:0,lxd:1,lxd:2 --channel reef/stable --config ceph-mon.yaml ceph-mon
juju integrate ceph-mon:osd ceph-osd:mon
juju integrate ceph-mon:client nova-compute:ceph
juju integrate ceph-mon:client glance:ceph
Cinder
cat <<EOF > cinder.yaml
cinder:
  block-device: None
  glance-api-version: 2
EOF
juju deploy --to lxd:1 --channel 2023.2/stable --config cinder.yaml cinder

juju deploy --channel 8.0/stable mysql-router cinder-mysql-router
juju integrate cinder-mysql-router:db-router mysql-innodb-cluster:db-router
juju integrate cinder-mysql-router:shared-db cinder:shared-db

juju integrate cinder:cinder-volume-service nova-cloud-controller:cinder-volume-service
juju integrate cinder:identity-service keystone:identity-service
juju integrate cinder:amqp rabbitmq-server:amqp
juju integrate cinder:image-service glance:image-service
juju integrate cinder:certificates vault:certificates

juju deploy --channel 2023.2/stable cinder-ceph

juju integrate cinder-ceph:storage-backend cinder:storage-backend
juju integrate cinder-ceph:ceph ceph-mon:client
juju integrate cinder-ceph:ceph-access nova-compute:ceph-access
Ceph RADOS Gateway
juju deploy --to lxd:0 --channel reef/stable ceph-radosgw

juju integrate ceph-radosgw:mon ceph-mon:radosgw
至此OpenStack安装完毕

配置OpenStack
参考资料:Configure OpenStack — charm-deployment-guide 0.0.1.dev519 documentation
安装OpenStack client
下行命令在juju client所在的机器运行
sudo snap install openstackclients
mkdir -p /home/ubuntu/snap/openstackclients
创建管理员用户环境
下载一个文件,然后将此文件放入juju client所在机器的用户home目录,注意:一定要加sudo
cd ~
sudo wget https://docs.openstack.org/project-deploy-guide/charm-deployment-guide/latest/_downloads/c894c4911b9572f0b5f86bdfc5d12d8e/openrc
source ~/openrc

env | grep OS_

这一小节的命令要以管理员用户执行
检查端点是否存在问题
openstack endpoint list --interface admin
如果端点没有任何值,说明OpenStack安装有问题

创建image和flavor
下载image
Import a boot image into Glance to create server instances with. Here we import a Jammy amd64 image:
mkdir ~/cloud-images

wget http://cloud-images.ubuntu.com/jammy/current/jammy-server-cloudimg-amd64.img \
   -O ~/cloud-images/jammy-amd64.img
导入image(镜像)
openstack image create --public --container-format bare \
   --disk-format qcow2 --file ~/cloud-images/jammy-amd64.img \
   jammy-amd64

创建一个flavor(实例类型)
openstack flavor create --ram 2048 --disk 60 --ephemeral 20 m1.small

Set up public networking
openstack network create --external --share \
   --provider-network-type flat --provider-physical-network physnet1 \
   ext_net

创建一个子网,注意,这里的子网网段不能随便填,要根据物理网络的网段填写。
openstack subnet create --network ext_net --no-dhcp \
   --gateway 192.168.122.1 --subnet-range 192.168.122.0/24 \
   --allocation-pool start=192.168.122.100,end=192.168.122.190 \
   ext_subnet

创建一个非管理员用户环境
Create a new domain, project, and user. Here we’ll use ‘domain1’, ‘project1’, and ‘user1’ respectively. You will be prompted to provide the new user’s password:
openstack domain create domain1
openstack project create --domain domain1 project1
openstack user create --domain domain1 --project project1 --password-prompt user1

We’ll use the user’s ID to assign her the ‘Member’ role:
openstack role add --user dae5a1113d954e36a6bf07e44f74cbc7 \
   --project project1 Member
Create an OpenStack user authentication file for user ‘user1’. All we’re missing is the Keystone URL, which we can get from the current user ‘admin’ environment:
echo $OS_AUTH_URL

cat <<EOF > project1-rc
export OS_AUTH_URL=https://192.168.122.16:5000/v3
export OS_USERNAME=user1
export OS_PASSWORD=Mywind@1234
export OS_USER_DOMAIN_NAME=domain1
export OS_PROJECT_NAME=project1
export OS_PROJECT_DOMAIN_NAME=domain1
export OS_AUTH_VERSION=3
export OS_IDENTITY_API_VERSION=3
export OS_REGION_NAME=RegionOne
export OS_AUTH_PROTOCOL=https
export OS_CACERT=/home/ubuntu/snap/openstackclients/common/root-ca.crt
export OS_AUTH_TYPE=password
EOF
source project1-rc
echo $OS_USERNAME
这一小节的命令要以非管理员账户执行
确认用户环境是否正常
openstack image list

创建私有网络(self-service network)
openstack network create --internal user1_net

openstack subnet create --network user1_net --dns-nameserver 192.168.122.95 \
   --subnet-range 192.168.0.0/24 \
   --allocation-pool start=192.168.0.10,end=192.168.0.99 \
   user1_subnet

创建路由
openstack router create user1_router
openstack router add subnet user1_router user1_subnet
openstack router set user1_router --external-gateway ext_net

Configure SSH and security groups
An SSH keypair needs to be imported into the cloud in order to access your instances.
Generate one first if you do not yet have one. This command creates a passphraseless keypair (remove the **-N** option to avoid that):
mkdir ~/cloud-keys

ssh-keygen -q -N '' -f ~/cloud-keys/user1-key
将创建的sshkey导入到OpenStack用户user1
openstack keypair create --public-key ~/cloud-keys/user1-key.pub user1

创建安全组
Security groups will need to be configured to allow the passing of SSH traffic. You can alter the default group rules or create a new group with its own rules. We do the latter by creating a group called ‘Allow_SSH’:
openstack security group create --description 'Allow SSH' Allow_SSH
openstack security group rule create --proto tcp --dst-port 22 Allow_SSH

创建并访问一个实例
Create a Jammy amd64 instance called ‘jammy-1’:
openstack server create --image jammy-amd64 --flavor m1.small \
   --key-name user1 --network user1_net --security-group Allow_SSH \
   jammy-1

非常快就创建好了
Request and assign a floating IP address to the new instance:
FLOATING_IP=$(openstack floating ip create -f value -c floating_ip_address ext_net)
openstack server add floating ip jammy-1 $FLOATING_IP
查看刚刚创建的示例信息:

The first address listed is in the private network and the second one is in the public network:
You can monitor the booting of the instance with this command:
openstack console log show jammy-1

Connect to the instance in this way:
ssh -i ~/cloud-keys/user1-key ubuntu@$FLOATING_IP

然后就可以直接在实例中运行命令了,例如:
ip a


配置OpenStack dashboard
To log in to the Horizon dashboard you will need its IP address and the admin password.Obtain the address in this way:
juju status --format=yaml openstack-dashboard | grep public-address | awk '{print $2}' | head -1

The password can be queried from Keystone:
juju exec --unit keystone/leader leader-get admin_passwd

输入网址http://192.168.122.20/horizon 登录OpenStack dashboard


VM consoles
Enable a remote access protocol such as novnc (or spice) if you want to connect to VM consoles from within the dashboard:
juju config nova-cloud-controller console-access-protocol=novnc
日志、监控和告警
参考资料:Enable the Observability plugin for central logging, monitoring and alerting | Ubuntu
用OpenStack dashboard创建image
ubuntu server 24.04
下载image
本机演示如何通过OpenStack dashboard创建ubuntu系统image(镜像),ubuntu server 24.04版本
这个网站可以下载官方创建的ubuntu系统镜像Ubuntu Cloud Images - the official Ubuntu images for public clouds, Openstack, KVM and LXD
先下载镜像(ubuntu server 24.04)https://cloud-images.ubuntu.com/noble/current/noble-server-cloudimg-amd64.img
创建image
然后在dashboard中选择镜像--创建镜像


dashboard创建安全组

dashboard创建密钥对

在dashboard上新建实例
创建一个ubuntu server 24.04系统的实例


注意我这里选择的是外部网络(物理网络)


OpenStack开始创建实例,很快

连接到实例控制台

创建自定义镜像
参考资料:MAAS | How to customise images
默认情况下,用maas给主机安装操作系统,都是官方的镜像,有时候我们想部署自定义镜像,比如在官方镜像的基础上安装额外的包,更改系统设置等等,本节详细说明如何创建自定义镜像
创建自定义ubuntu镜像(ubuntu server 22.04.5)
参考资料:MAAS | How to build an Ubuntu image Provision | Packer | HashiCorp Developer
#sudo apt install packer
#如果提示没有可用的包,则可以去官方找安装教程
#https://developer.hashicorp.com/packer/tutorials/docker-get-started/get-started-install-cli
wget -O- https://apt.releases.hashicorp.com/gpg | sudo gpg --dearmor -o /usr/share/keyrings/hashicorp-archive-keyring.gpg
echo "deb [signed-by=/usr/share/keyrings/hashicorp-archive-keyring.gpg] https://apt.releases.hashicorp.com $(lsb_release -cs) main" | sudo tee /etc/apt/sources.list.d/hashicorp.list
sudo apt update && sudo apt install packer -y

sudo apt install qemu-utils -y
sudo apt install qemu-system -y
sudo apt install ovmf -y
sudo apt install cloud-image-utils -y

sudo apt install make libnbd-bin nbdkit fuse2fs -y

#这边设置proxy的原因是实验电脑始终无法正常下载官方镜像,另外一台电脑没有问题,所以我就在另外一台电脑上安装了proxy软件,实验电脑通过proxy服务器上网
export http_proxy=http://192.168.124.19:7897
export https_proxy=http://192.168.124.19:7897
export no_proxy="192.168.0.0/16,10.0.0.0/8,172.16.0.0/12,localhost,127.0.0.1"
git clone https://github.com/canonical/packer-maas.git
cd packer-maas/ubuntu
下面是我在源文件(ubuntu-lvm.pkr.hcl)的基础上适当调整
source "qemu" "lvm" {
  boot_command    = ["<wait>e<wait5>", "<down><wait><down><wait><down><wait2><end><wait5>", "<bs><bs><bs><bs><wait>autoinstall ---<wait><f10>"]
  boot_wait       = "2s"
  cpus            = 2
  disk_size       = "8G"
  format          = "raw"
  headless        = var.headless
  http_directory  = var.http_directory
  iso_checksum    = "file:http://releases.ubuntu.com/${var.ubuntu_series}/SHA256SUMS"
  iso_target_path = "packer_cache/${var.ubuntu_series}.iso"
  iso_url         = "https://releases.ubuntu.com/${var.ubuntu_series}/${var.ubuntu_lvm_iso}"
  memory          = 2048
  qemuargs = [
    ["-vga", "qxl"],
    ["-device", "virtio-blk-pci,drive=drive0,bootindex=0"],
    ["-device", "virtio-blk-pci,drive=cdrom0,bootindex=1"],
    ["-device", "virtio-blk-pci,drive=drive1,bootindex=2"],
    ["-drive", "if=pflash,format=raw,id=ovmf_code,readonly=on,file=/usr/share/${lookup(local.uefi_imp, var.architecture, "")}/${lookup(local.uefi_imp, var.architecture, "")}_CODE${var.ovmf_suffix}.fd"],
    ["-drive", "if=pflash,format=raw,id=ovmf_vars,file=${lookup(local.uefi_imp, var.architecture, "")}_VARS.fd"],
    ["-drive", "file=output-lvm/packer-lvm,if=none,id=drive0,cache=writeback,discard=ignore,format=raw"],
    ["-drive", "file=seeds-lvm.iso,format=raw,cache=none,if=none,id=drive1,readonly=on"],
    ["-drive", "file=packer_cache/${var.ubuntu_series}.iso,if=none,id=cdrom0,media=cdrom"]
  ]
  shutdown_command       = "sudo -S shutdown -P now"
  ssh_handshake_attempts = 500
  ssh_password           = var.ssh_ubuntu_password
  ssh_timeout            = var.timeout
  ssh_username           = "mywind"
  ssh_wait_timeout       = var.timeout
}

build {
  sources = ["source.qemu.lvm"]

  provisioner "file" {
    destination = "/tmp/"
    sources     = ["${path.root}/scripts/curtin-hooks", "${path.root}/scripts/network-staticIP-sample.yaml.txt", "${path.root}/scripts/sources.list", "${path.root}/scripts/.bashrc"]
  }

  provisioner "shell" {
    environment_vars  = ["HOME_DIR=/home/mywind", "http_proxy=${var.http_proxy}", "https_proxy=${var.https_proxy}", "no_proxy=${var.no_proxy}"]
    execute_command   = "echo 'ubuntu' | {{ .Vars }} sudo -S -E sh -eux '{{ .Path }}'"
    expect_disconnect = true
    scripts           = ["${path.root}/scripts/curtin.sh", "${path.root}/scripts/networking.sh", "${path.root}/scripts/cleanup.sh", "${path.root}/scripts/dl_custom.sh"]
  }

  post-processor "compress" {
    output = "custom-ubuntu-lvm.dd.gz"
  }
}
user-data-lvm文件内容:
#cloud-config
autoinstall:
  version: 1
  identity:
    hostname: ubuntu
    username: mywind
    password: "Mywind@1234"
  keyboard:
    layout: us
    variant: ''
  ssh:
    install-server: true
  storage:
    grub:
      update_nvram: true
    swap:
      size: 0
    layout:
      name: lvm
  late-commands:
    - echo 'ubuntu ALL=(ALL) NOPASSWD:ALL' > /target/etc/sudoers.d/ubuntu
  package_update: true
  package_upgrade: true
variables.pkr.hcl文件内容:
packer {
  required_version = ">= 1.7.0"
  required_plugins {
    qemu = {
      version = "~> 1.0"
      source  = "github.com/hashicorp/qemu"
    }
  }
}

variable "headless" {
  type        = bool
  default     = true
  description = "Whether VNC viewer should not be launched."
}

variable "http_directory" {
  type    = string
  default = "http"
}

variable "http_proxy" {
  type    = string
  default = "${env("http_proxy")}"
}

variable "https_proxy" {
  type    = string
  default = "${env("https_proxy")}"
}

variable "no_proxy" {
  type    = string
  default = "${env("no_proxy")}"
}

variable "ssh_password" {
  type    = string
  default = "Mywind@1234"
}

variable "ssh_username" {
  type    = string
  default = "root"
}

variable "ssh_ubuntu_password" {
  type    = string
  default = "Mywind@1234"
}

variable "timeout" {
  type        = string
  default     = "0.5h"
  description = "Timeout for building the image"
}
我在scripts文件夹中创建几个文件

sources.list文件内容:
deb https://mirrors.aliyun.com/ubuntu/ jammy main restricted universe multiverse
deb-src https://mirrors.aliyun.com/ubuntu/ jammy main restricted universe multiverse

deb https://mirrors.aliyun.com/ubuntu/ jammy-security main restricted universe multiverse
deb-src https://mirrors.aliyun.com/ubuntu/ jammy-security main restricted universe multiverse

deb https://mirrors.aliyun.com/ubuntu/ jammy-updates main restricted universe multiverse
deb-src https://mirrors.aliyun.com/ubuntu/ jammy-updates main restricted universe multiverse

# deb https://mirrors.aliyun.com/ubuntu/ jammy-proposed main restricted universe multiverse
# deb-src https://mirrors.aliyun.com/ubuntu/ jammy-proposed main restricted universe multiverse

deb https://mirrors.aliyun.com/ubuntu/ jammy-backports main restricted universe multiverse
deb-src https://mirrors.aliyun.com/ubuntu/ jammy-backports main restricted universe multiverse
dl_custom.sh脚本文件内容:
cp /etc/apt/sources.list /etc/apt/sources.list.bak
mv /tmp/network-staticIP-sample.yaml.txt /etc/netplan/network-staticIP-sample.yaml.txt
mv /tmp/sources.list /etc/apt/sources.list
mv /tmp/.bashrc ~/.bashrc
timedatectl set-timezone Asia/Shanghai
echo configure aliyun mirrors
echo installing apt packages
apt update
apt install nmap tree arp-scan smbclient -y
apt upgrade -y
reboot
network-staticIP-sample.yaml.txt文件内容(这个文件是方便我们配置网络的时候参考的yaml文件模板)
network:
  version: 2
  ethernets:
    enp0s25:
      addresses:
      - "10.65.37.244/24"
      nameservers:
        addresses:
        - 192.168.124.7
        - 223.5.5.5
        search:
        - dltornado2.com
      dhcp4: false
      routes:
      - to: "default"
        via: "10.65.37.254"
.bashrc文件的内容:
# ~/.bashrc: executed by bash(1) for non-login shells.
# see /usr/share/doc/bash/examples/startup-files (in the package bash-doc)
# for examples

# If not running interactively, don't do anything
case $- in
    *i*) ;;
      *) return;;
esac

# don't put duplicate lines or lines starting with space in the history.
# See bash(1) for more options
HISTCONTROL=ignoreboth

# append to the history file, don't overwrite it
shopt -s histappend

# for setting history length see HISTSIZE and HISTFILESIZE in bash(1)
HISTSIZE=1000
HISTFILESIZE=2000

# check the window size after each command and, if necessary,
# update the values of LINES and COLUMNS.
shopt -s checkwinsize

# If set, the pattern "**" used in a pathname expansion context will
# match all files and zero or more directories and subdirectories.
#shopt -s globstar

# make less more friendly for non-text input files, see lesspipe(1)
[ -x /usr/bin/lesspipe ] && eval "$(SHELL=/bin/sh lesspipe)"

# set variable identifying the chroot you work in (used in the prompt below)
if [ -z "${debian_chroot:-}" ] && [ -r /etc/debian_chroot ]; then
    debian_chroot=$(cat /etc/debian_chroot)
fi

# set a fancy prompt (non-color, unless we know we "want" color)
case "$TERM" in
    xterm-color|*-256color) color_prompt=yes;;
esac

# uncomment for a colored prompt, if the terminal has the capability; turned
# off by default to not distract the user: the focus in a terminal window
# should be on the output of commands, not on the prompt
#force_color_prompt=yes

if [ -n "$force_color_prompt" ]; then
    if [ -x /usr/bin/tput ] && tput setaf 1 >&/dev/null; then
	# We have color support; assume it's compliant with Ecma-48
	# (ISO/IEC-6429). (Lack of such support is extremely rare, and such
	# a case would tend to support setf rather than setaf.)
	color_prompt=yes
    else
	color_prompt=
    fi
fi

if [ "$color_prompt" = yes ]; then
    PS1='${debian_chroot:+($debian_chroot)}\[\033[01;32m\]\u@\h\[\033[00m\]:\[\033[01;34m\]\w\[\033[00m\]\$ '
else
#    PS1='${debian_chroot:+($debian_chroot)}\u@\h:\w\$ '
     PS1='\[\e[32;1m\][\u@\h \W]\$ \[\e[0m\]'
fi
unset color_prompt force_color_prompt

# If this is an xterm set the title to user@host:dir
case "$TERM" in
xterm*|rxvt*)
#    PS1="\[\e]0;${debian_chroot:+($debian_chroot)}\u@\h: \w\a\]$PS1"
     PS1='\[\e[32;1m\][\u@\h \W]\$ \[\e[0m\]'
    ;;
*)
    ;;
esac

# enable color support of ls and also add handy aliases
if [ -x /usr/bin/dircolors ]; then
    test -r ~/.dircolors && eval "$(dircolors -b ~/.dircolors)" || eval "$(dircolors -b)"
    alias ls='ls --color=auto'
    #alias dir='dir --color=auto'
    #alias vdir='vdir --color=auto'

    alias grep='grep --color=auto'
    alias fgrep='fgrep --color=auto'
    alias egrep='egrep --color=auto'
fi

# colored GCC warnings and errors
#export GCC_COLORS='error=01;31:warning=01;35:note=01;36:caret=01;32:locus=01:quote=01'

# some more ls aliases
alias ll='ls -alF'
alias la='ls -A'
alias l='ls -CF'

# Add an "alert" alias for long running commands.  Use like so:
#   sleep 10; alert
alias alert='notify-send --urgency=low -i "$([ $? = 0 ] && echo terminal || echo error)" "$(history|tail -n1|sed -e '\''s/^\s*[0-9]\+\s*//;s/[;&|]\s*alert$//'\'')"'

# Alias definitions.
# You may want to put all your additions into a separate file like
# ~/.bash_aliases, instead of adding them here directly.
# See /usr/share/doc/bash-doc/examples in the bash-doc package.

if [ -f ~/.bash_aliases ]; then
    . ~/.bash_aliases
fi

# enable programmable completion features (you don't need to enable
# this, if it's already enabled in /etc/bash.bashrc and /etc/profile
# sources /etc/bash.bashrc).
if ! shopt -oq posix; then
  if [ -f /usr/share/bash-completion/bash_completion ]; then
    . /usr/share/bash-completion/bash_completion
  elif [ -f /etc/bash_completion ]; then
    . /etc/bash_completion
  fi
fi
开始构建自定义镜像
make custom-ubuntu-lvm.dd.gz

创建自定义ubuntu镜像(ubuntu server 24.04.1)
这个方法跟上一节是类似的。
附录
release machine
参考资料:MAAS | Reference: MAAS glossary

什么是release machine?release machine就是将node从deployed或allocated状态变为Ready状态,release机器时可以选择是否擦除数据
以下是一个示例:

被release的主机如果关机了,则会自动开机,自动加载PE,然后在MAAS dashboard上也能看到当前的状态是“disk erasing”

关于作者和DreamAI
关注微信公众号“AI发烧友”,获取更多IT开发运维实用工具与技巧,还有很多AI技术文档!


 浙公网安备 33010602011771号