
KubeSpray部署k8s集群
Kubespray 是 Kubernetes incubator 中的项目,目标是提供 Production Ready Kubernetes 部署方案,该项目基础是通过 Ansible Playbook 来定义系统与 Kubernetes 集群部署的任务,具有以下几个特点:
- l 可以部署在 AWS, GCE, Azure, OpenStack 以及裸机上.
- l 部署 High Available Kubernetes 集群.
- l 可组合性 (Composable),可自行选择 Network Plugin (flannel, calico, canal, weave) 来部署.
- l 支持多种 Linux distributions(CoreOS, Debian Jessie, Ubuntu 16.04, CentOS/RHEL7).
GitHub地址:https://github.com/kubernetes-sigs/kubespray
环境准备
1)所以的主机都需要关闭selinux,执行的命令如下:
setenforce 0
sed -i --follow-symlinks 's/SELINUX=enforcing/SELINUX=disabled/g' /etc/sysconfig/selinux
2)防火墙(可选)和网络设置,所有的主机都执行以下命令:
systemctl stop firewalld & systemctl disable firewalld
modprobe br_netfilter
echo '1' > /proc/sys/net/bridge/bridge-nf-call-iptables
sysctl -w net.ipv4.ip_forward=1
3)#设置内核参数
sudo vim /etc/security/limits.conf
* soft nofile 32768
* hard nofile 65535
* soft nproc 32768
* hadr nproc 65535
4)设置k8s内核参数
sudo vim /etc/sysctl.d/k8s.conf
net.bridge.bridge-nf-call-ip6tables = 1
net.bridge.bridge-nf-call-iptables = 1
net.ipv4.ip_nonlocal_bind = 1
net.ipv4.ip_forward = 1
vm.swappiness=0
5)重新加载生效
sudo sysctl --system
sudo sysctl -p
6) 安装 python 及 epel (在Ansible主机上安装并配置好与各node的免秘钥登录)
yum install -y epel-release python36 python36-pip git
部署k8s集群
1)#克隆项目
wget https://github.com/kubernetes-sigs/kubespray/archive/v2.12.4.tar.gz
2)# Install dependencies from ``requirements.txt``
sudo /usr/bin/pip3.6 install -r requirements.txt
3)# Copy ``inventory/sample`` as ``inventory/mycluster``
cp -rfp inventory/sample inventory/mycluster
4)# Update Ansible inventory file with inventory builder
declare -a IPS=(10.10.1.3 10.10.1.4 10.10.1.5)

CONFIG_FILE=inventory/mycluster/hosts.yaml /usr/bin/python3.6 contrib/inventory_builder/inventory.py ${IPS[@]}
5)# Review and change parameters under ``inventory/mycluster/group_vars``
cat inventory/mycluster/group_vars/all/all.yml

cat inventory/mycluster/group_vars/k8s-cluster/k8s-cluster.yml
6)# Deploy Kubespray with Ansible Playbook - run the playbook as root
# The option `--become` is required, as for example writing SSL keys in /etc/,
# installing packages and interacting with various systemd daemons.
# Without --become the playbook will fail to run!
ansible-playbook -i inventory/mycluster/hosts.yaml --become --become-user=root cluster.yml
扩展
Adding node
1、Add the new worker node to your inventory in the appropriate group (or utilize a dynamic inventory).
2、Run the ansible-playbook command, substituting cluster.yml for scale.yml:
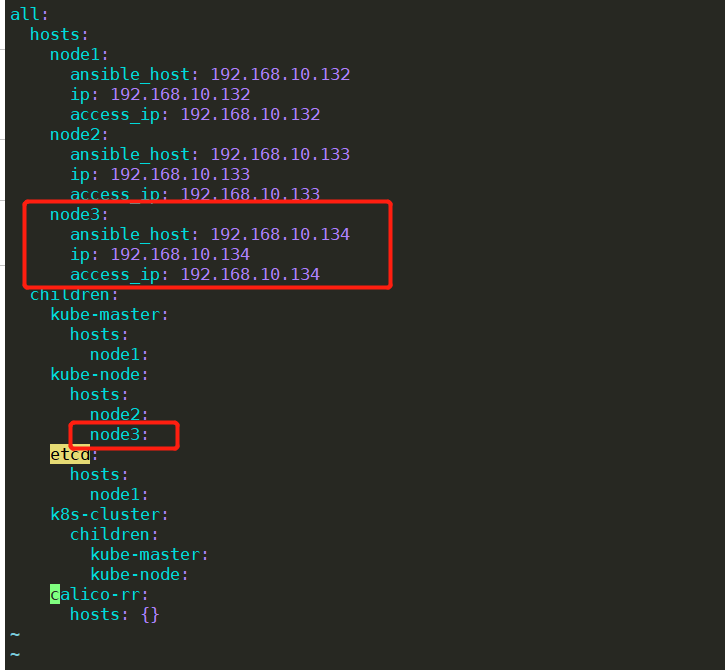
如下图:node3为新增节点
ansible-playbook -i inventory/mycluster/hosts.yaml scale.yml -b -v
Remove nodes
1、hosts.yaml无需修改,运行命令--extra-vars指定node。
ansible-playbook -i inventory/mycluster/hosts.yaml remove-node.yml -b -v --extra-vars "node=node3"
地址:https://github.com/kubernetes-sigs/kubespray/blob/master/docs/getting-started.md
升级
ansible-playbook upgrade-cluster.yml -b -i inventory/sample/hosts.ini -e kube_version=v1.15.0
地址:https://github.com/kubernetes-sigs/kubespray/blob/master/docs/upgrades.md
卸载
ansible-playbook -i inventory/mycluster/hosts.ini reset.yml

#每台node都要执行
rm -rf /etc/kubernetes/
rm -rf /var/lib/kubelet
rm -rf /var/lib/etcd
rm -rf /usr/local/bin/kubectl
rm -rf /etc/systemd/system/calico-node.service
rm -rf /etc/systemd/system/kubelet.service

reboot
后记:
1、默认从国外下载镜像因为node需要能上外网。
2、安装需要点时间耐心等待,遇到报错解决后继续安装。
3、当添加worker node或者升级集群版本时,会把原先手动修改的集群参数给还原这点要特别注意。
微信

支付宝


 浙公网安备 33010602011771号