
《Note --- Unreal 4 --- Sample analyze --- StrategyGame(continue...)》
-----------------------------------------------------------------------------------------------------------------------------------------------------------------------------------------------------------------------------------
整体模块module分析:
打开StrategyGame.uproject来看:
{
    "FileVersion": 3,
    "Version": 0,
    "VersionName": "0.0",
    "EngineVersion": "0.0.0-0",
    "PackageFileUE4Version": 226,
    "PackageFileLicenseeUE4Version": 0,
    "EngineAssociation": "",
    "FriendlyName": "",
    "Description": "",
    "Category": "",
    "CreatedBy": "",
    "CreatedByURL": "",
    "Modules": [
        {
            "Name": "StrategyGame",
            "Type": "Runtime",
            "LoadingPhase": "Default"
        },
        {
            "Name": "StrategyGameLoadingScreen", //这个是额外增加的module
            "Type": "Runtime",
            "LoadingPhase": "PreLoadingScreen" //从代码中找到解释, 这个module必须设置成这种类型, 否则不会 “hook in time”, 从字面意思来看,是预加载一直存在于内存中的;
        }
    ],
    "EpicSampleNameHash": "0",
    "TargetPlatforms": [
        "Android",
        "IOS",
        "MacNoEditor",
        "WindowsNoEditor"
    ]
}
可以看到这里面定义了两个模块, 名字,类型,还有一个”LoadingPhase”的属性;
这个文件里面的内容是自己定义的, 还是自动生成的 ?
CONTINUE ... ...
这个demo从整体模块来讲可以看成有两个, 一个模块这里指的是生成dll的个数, 除了主模块StrategyGame之外,还有一个StrategyGameLoadingScreen:
- StrategyGameLoadingScreen: 作为子模块, 会生成一个dll, UE4Editor-StrategyGameLoadingScreen.dll(只是在editor里面编译运行过游戏); 具体实现的时候添加的内容有:
文件StrategyGameLoadingScreen.h/cpp
FStrategyGameLoadingScreenModule : IStrategyGameLoadingScreenModule : public IModuleInterface
利用这样的继承关系实现一个新的module;
其具有自己的build文件: StrategyGameLoadingScreen.Build.cs文件:
using UnrealBuildTool;

// This module must be loaded "PreLoadingScreen" in the .uproject file, otherwise it will not hook in time!

public class StrategyGameLoadingScreen : ModuleRules
{
    public StrategyGameLoadingScreen(TargetInfo Target)
    {
        PrivateIncludePaths.Add("../../StrategyGame/Source/StrategyGameLoadingScreen/Private");

        PublicDependencyModuleNames.AddRange(
            new string[] {
                "Core",
                "CoreUObject",
                "Engine"
            }
        );

        PrivateDependencyModuleNames.AddRange(
            new string[] {
                "MoviePlayer",
                "Slate",
                "SlateCore",
                "InputCore"
            }
        );
    }
}
可以看到其内部定义了该模块的额外include path, 以及使用那些引擎的原生模块; 认为, 可能是: public为属性的模块可以和其他模块进行接口之间调用的交互,而private的只能是自己当前模块使用的(参考RulesCompiler.cs);
这个模块的主要功能是实现开始菜单的部分,并且一些UI元素如背景图等是代码写出来的(class SStrategyLoadingScreen 的Construct 函数 ), 在此发现SNew和SAssignNew是UI 进行new专用的;
但是对于这个demo的UI而言,这个module里面的内容还不够, 猜测主模块StrategyGame里面对于UI的处理是结合这个模块的;
- 主模块StrategyGame:
这个模块对应了一个UE4Editor-StrategyGame.dll; 其内部使用了上面那个StrategyGameLoadingScreen模块:
在StrategyGame.Build.cs文件里面除了增加其他module,还有:
        PrivateDependencyModuleNames.AddRange(
            new string[] {
                "StrategyGameLoadingScreen"
            }
        );
- 主模块StrategyGame和StrategyGameLoadingScreen模块的交互:
这个demo中,主要是主模块调用子模块函数然后让其显示菜单背景图等, 需要包含子模块的头文件, 显式加载子模块, 调用子模块的具体实现:
void AStrategyMenuHUD::ShowLoadingScreen()
{
    IStrategyGameLoadingScreenModule* LoadingScreenModule = FModuleManager::LoadModulePtr<IStrategyGameLoadingScreenModule>("StrategyGameLoadingScreen");
    if( LoadingScreenModule != nullptr )
    {
        LoadingScreenModule->StartInGameLoadingScreen();
    }
}
这个StrategyGameLoadingScreen模块作为具有PreLoadingScreen属性的模块,在游戏启动时候会专门先加载(LaunchEngineLoop.cpp, EnginePreInit(…)):
    // Load up all modules that need to hook into the loading screen
    if (!IProjectManager::Get().LoadModulesForProject(ELoadingPhase::PreLoadingScreen) || !IPluginManager::Get().LoadModulesForEnabledPlugins(ELoadingPhase::PreLoadingScreen))
    {
        return 1;
}
关于模块加载函数LoadModulesForProject其参数是:
    enum Type
    {
        /** Loaded before the engine is fully initialized, immediately after the config system has been initialized.  Necessary only for very low-level hooks */
        PostConfigInit,
        /** Loaded before the engine is fully initialized for modules that need to hook into the loading screen before it triggers */
        PreLoadingScreen,
        /** Right before the default phase */
        PreDefault,
        /** Loaded at the default loading point during startup (during engine init, after game modules are loaded.) */
        Default,
        /** Right after the default phase */
        PostDefault,
        /** After the engine has been initialized */
        PostEngineInit,
        /** Do not automatically load this module */
        None,
        // NOTE: If you add a new value, make sure to update the ToString() method below!
        Max
};
所以可以知道,不同的module属性会在加载的时候具有不同的时机;
看后面可以发现会逐一加载后面几个属性的module(LaunchEngineLoop.cpp):
bool FEngineLoop::LoadStartupModules()
{
    FScopedSlowTask SlowTask(3);

    SlowTask.EnterProgressFrame(1);
    // Load any modules that want to be loaded before default modules are loaded up.
    if (!IProjectManager::Get().LoadModulesForProject(ELoadingPhase::PreDefault) || !IPluginManager::Get().LoadModulesForEnabledPlugins(ELoadingPhase::PreDefault))
    {
        return false;
    }

    SlowTask.EnterProgressFrame(1);
    // Load modules that are configured to load in the default phase
    if (!IProjectManager::Get().LoadModulesForProject(ELoadingPhase::Default) || !IPluginManager::Get().LoadModulesForEnabledPlugins(ELoadingPhase::Default))
    {
        return false;
    }

    SlowTask.EnterProgressFrame(1);
    // Load any modules that want to be loaded after default modules are loaded up.
    if (!IProjectManager::Get().LoadModulesForProject(ELoadingPhase::PostDefault) || !IPluginManager::Get().LoadModulesForEnabledPlugins(ELoadingPhase::PostDefault))
    {
        return false;
    }

    return true;
}
-----------------------------------------------------------------------------------------------------------------------------------------------------------------------------------------------------------------------------------
Blueprint和code布局总览:
比如,在game mode的代码和blueprint里面都定义当前的角色, 那么当前使用的角色到底是哪个?
想来,如果在代码的BeginPlay里面定义一些事情,再在blueprint里面的beginPlay节点后面连接定义一些事情,那么估计应该是先走代码里面的,再走blueprint里面的逻辑;
-----------------------------------------------------------------------------------------------------------------------------------------------------------------------------------------------------------------------------------
GameMode部分:
本demo中gamemode C++类没有创建对应的blueprint资源, 认为,对于一些不需要美术,或者不经常改动的变量,可以不暴露给editor,这样就不需要额外的blueprint, 纯C++类即可, 特别对于一些单件类可能更是如此;
GameMode主要是包含一些游戏性相关的接口,比如AllowCheats, InitGame, InitGameState, GetDefaultPawnClassForController, StartPlay, SetPause, ResetLevel, StartToLeaveMap, PreLogin,
CanSpectate(这个好像是是否freecamera)等, 在本demo中, 只是重新实现了InitGameState, RestartPlayer函数, 新增一些如ModifyDamage, ReturnToMenu, FinishGam, ExitGme这样的函数, 新增的函数如果允许blueprint来调用可以加上属性”BlueprintCallable”;
-----------------------------------------------------------------------------------------------------------------------------------------------------------------------------------------------------------------------------------
GameState部分:
GameStateBase is a class that manages the game's global state, and is spawned by GameModeBase.
这个demo里面这部分没有对这个类进行特定的blueprint资源;
有个类APlayerState:public AInfo 于文件PlayerState.h, 属于引擎原生文件, 如playername, playerID, starttime 等;
Demo中这个类添加了一些如敌人(这是个塔防游戏)个数(数组存储),OnCharPawn(供AI部分代码调用spawn出新的敌人); SetGamePaused供blueprint调用;
小地图指针也存储于此类: TWeakObjectPtr<AStrategyMiniMapCapture> MiniMapCamera;
-----------------------------------------------------------------------------------------------------------------------------------------------------------------------------------------------------------------------------------
MiniMap部分:
左下角的小地图有类: class AStrategyMiniMapCapture : public ASceneCapture2D[该父类自带一个DrawFrustum的component, 是个camera] 增加一些小地图宽高,AudioListener的FrontDir,RightDir[但在这里没用,应该只是存储,然后更新立体声时候从这里拿]等,以及辅助capture的变量; 在其BeginPlay函数里面存储this到GameState中; 根据tick函数来进行capture的更新; ASceneCapture2D自带GetCaptureComponent2D()->UpdateContent()[内部实现:{ CaptureSceneDeferred(); }];用于更新自身rendertarget的内容;
该类具有blueprint实例, 实例里面定义了当前使用哪个RenderTarget资源;
至于这个类里面的render target,在这个demo里面是自定义的成员变量:
在BeginPlay()里面将其给了父类中rendertarget:
        MiniMapView = NewObject<UTextureRenderTarget2D>();
        MiniMapView->InitAutoFormat(MiniMapWidth,MiniMapHeight);
        GetCaptureComponent2D()->TextureTarget = MiniMapView;
注意这里虽然是New出来的,但是没有显式析构; 其定义是 UPROPERTY() UTextureRenderTarget2D* MiniMapView; 应该是这样加上属性令UE4管理其析构的;
这里有点怀疑, 不使用额外的自定义的rendertarget应该也可以, 而在blueprint里面赋值的也只是这个TextureTarget, 而不是类中新增加的MiniMapView;
如此怀疑: blueprint与C++代码的交互是: 代码的BeginPlay()先走, 给TextureTarget赋值, 然后读取blueprint里面的值, 否则blueprint里面的值会被覆盖才对;
总感觉这个变量没什么用, 去掉应该也可以… … test … ….
该类内部专属editor代码,这部分代码关联着C++与blueprint之间交互的机制:https://docs.unrealengine.com/latest/CHN/Programming/Introduction/index.html
#if WITH_EDITOR
void AStrategyMiniMapCapture::PostEditChangeProperty(FPropertyChangedEvent& PropertyChangedEvent)
{
    Super::PostEditChangeProperty(PropertyChangedEvent);
    UProperty* PropertyThatChanged = PropertyChangedEvent.Property;
    FName PropertyName = PropertyThatChanged != nullptr ? PropertyThatChanged->GetFName() : NAME_None;

    if (PropertyName==FName(TEXT("RelativeRotation")))
    {
        FRotator ChangedRotation = RootComponent->GetComponentRotation();
        RootComponent->SetWorldRotation(FRotator(-90,0,ChangedRotation.Roll));
    }
}

void AStrategyMiniMapCapture::EditorApplyRotation(const FRotator& DeltaRotation, bool bAltDown, bool bShiftDown, bool bCtrlDown)
{
    FRotator FiltredRotation(0, DeltaRotation.Yaw, 0);
    Super::EditorApplyRotation(FiltredRotation, bAltDown, bShiftDown, bCtrlDown);
}

#endif
该类内部的GroundLevel定义: capture的camera Z值减去该值即为 [大约]距离地面的高度;
在StrategyPlayerController.Cpp里面发现代码用于坐标转换, 射线与平面检测(比较有用):
const FPlane GroundPlane = FPlane(FVector(0,0,GroundLevel), FVector::UpVector);

FViewport* const Viewport = GEngine->GameViewport->ViewportFrame->GetViewport();
FVector2D const ScreenRes = Viewport->GetSizeXY();
FVector RayOrigin, RayDirection;
FVector2D const ScreenCenterPoint = ScreenRes * 0.5f;//获取屏幕中心点
FStrategyHelpers::DeprojectScreenToWorld(ScreenCenterPoint, MyPlayer, RayOrigin, RayDirection);//屏幕中心点坐标转换到世界空间,传出世界空间中的射线始点与方向,其内部:
        FSceneViewProjectionData ProjectionData;
        if (Player->GetProjectionData(Player->ViewportClient->Viewport, eSSP_FULL, /*out*/ ProjectionData))
        {
            const FMatrix ViewMatrix = FTranslationMatrix(-ProjectionData.ViewOrigin) * ProjectionData.ViewRotationMatrix;
            const FMatrix InvViewMatrix = ViewMatrix.InverseFast();
            const FMatrix InvProjectionMatrix = ProjectionData.ProjectionMatrix.InverseFast();

            FSceneView::DeprojectScreenToWorld(ScreenPosition, ProjectionData.GetConstrainedViewRect(), InvViewMatrix, InvProjectionMatrix, /*out*/ RayOrigin, /*out*/ RayDirection);

            return true;
        }

FVector const WorldPoint = FStrategyHelpers::IntersectRayWithPlane(RayOrigin, RayDirection, GroundPlane);//在世界空间进行射线与平面检测
至于这个类及其render target与UI渲染的交互, 绘制到画面上: 是在class AStrategyHUD : public AHUD的函数DrawMiniMap()里面,该类重载了很多AHUD的函数,如DrawHUD; 默认的HUD可以在gamemode里面进行定义;关于小地图位置的设定也是在绘制的时候写死的,绘制:
            FCanvasTileItem MapTileItem( FVector2D( 0.0f, 0.0f), FVector2D( 0.0f, 0.0f ), FLinearColor::White );
            MapTileItem.Texture = MiniMapTexture->Resource;
            MapTileItem.Size = FVector2D( MapWidth, MapHeight );
            MapTileItem.BlendMode = SE_BLEND_Opaque;
            Canvas->DrawItem( MapTileItem, FVector2D( MiniMapMargin * UIScale, Canvas->ClipY - MapHeight - MiniMapMargin * UIScale ) )
-----------------------------------------------------------------------------------------------------------------------------------------------------------------------------------------------------------------------------------
HUD部分:
HUD和菜单本来算是同一种实现方式,但是在本demo中是不一样的;
像上段落提到的,class AStrategyHUD : public AHUD;作为本demo默认的HUD类;
如何使用UE4的UMG进行UI设计? 这种方法可以纯粹使用blueprint,而不必使用代码,只是在按钮按下之类的事件的响应函数中可以利用代码实现(为了能够在blueprint里面在响应时候被调用,这种专门后台处理UI的类应该暴露给blueprint,而这个类可以作为一个成员变量存储到主角类里面,这样blueprint里面通过主角来获得该类,进而调用函数);如果一个C++类具有两个blueprint实例,那么这两个实例之间应该是没关系的,所以对于这种专门后台处理UI相应事件的逻辑(供blueprint调用)的类, 不必具有blueprint实例; 主要使用的资源类型是”Widget Blueprint”, 在这种资源里面进行UI设计,添加相应事件,调用响应函数; 游戏整体与这个资源进行交互的机制是, 一般可以在level blueprint(比如menu是个专门的level, 就具有专门的level blueprint)里面使用”Create Wedget”节点,使用这个资源(比如做弹出菜单的时候可以常用这种):

然后将这个”PauseMenuReference”作为节点”Add to Viewport”的target, 将菜单添加到Viewport中;
关于UI相关的资源在UE4中有四种:
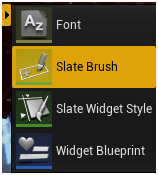
1. Font: 字体;
本demo中没有新建字体;
2. Slate Brush: An asset describing how a texture can exist in slate’s DPI-aware environment and how this texture responds resizing, eg. Scale9-stretching? Tiling?
在blueprint里面可以使用节点“MakeSlateBrush”来创建一个SlateBrush;
一个brush可以包一个UTexture或者UMaterialInstance,一个brush应该可以理解为,设定一个贴图怎样绘制(大小,边缘怎样处理,对其方式);
在Widget Blueprint资源里面,如果拖进去一个image的控件,会发现属性里面有Brush一栏,里面的设定和一个Slate Brush的设定是一样的;
在本demo中,创建了一个Slate Brush资源,使用的方法是(看起来是作为备份的默认图片):
const FSlateBrush*  SStrategyButtonWidget::GetButtonImage() const
{
    if (ButtonImage.IsValid())
    {
        return ButtonImage.Get();
    }
    else
    {
        return FStrategyStyle::Get().GetBrush("DefaultActionImageBrush");
    }
}
可以看到这种slate brush资源“DefaultActionImageBrush”是做后备万一的;
3. Slate Widget Style: Just a wrapper for the struct with real data in it;
4. Widget Blueprint: The widget blueprint enables extending UUserWidget the user extensible UWidget; 其实可以完全不使用代码,仅仅通过这种资源来进行所有UI的设定,然后在blueprint里面通过节点“”“Create Widget”引用这个资源,然后“Add to Viewport”即可;只是本demo全是C++代码写的,类似于早期的纯代码写windows app的UI,而不是利用MFC拖控件的方式;
- 自定义Widget:
Widget可以理解为在UE4中即指代UI控件,本demo没有使用Widget Blueprint资源来涉及UI,所有都是代码写的,创建了很多继承自ScompoundWidget的类,作为一种新的自定义的Widget来作为UI的最小单元控件(后被用于组合成一个style);
如:class SStrategyButtonWidget : public SCompoundWidget : public SWidget
自定义Widget内部具体内容(如点击时的事件回调函数,button上的text等)需要以SLATE_BEGIN_ARGS(SStrategyButtonWidget)形式开始,以SLATE_END_ARGS()形式结束,内容例如:
    SLATE_BEGIN_ARGS(SStrategyButtonWidget)
    {}
    /* Owning HUD for getting Game World */
    SLATE_ARGUMENT(TWeakObjectPtr<AStrategyHUD>, OwnerHUD)
    SLATE_DEFAULT_SLOT(FArguments, Content)
    /** called when the button is clicked */
    SLATE_EVENT(FOnClicked, OnClicked)//这个是自定义的新事件并自动被delegate,其实在SWidget里面有OnMouseButtonDown这样的虚函数已经托管好了,重载即可,这里拿来理解怎样新增自己事件以及绑定好回调函数
    /** text on the button */
    SLATE_ATTRIBUTE(FText, ButtonText)
    SLATE_END_ARGS()
又如:class SStrategyMiniMapWidget : public SCompoundWidget : public SWidget
这个是自定义小地图使用的widget,这部分和小地图的那个rendertarget渲染部分和事件响应(鼠标在小地图上点击,移动)是有关系的,该类还重载了OnPaint(…)函数, 这个函数内部只是绘制小地图上的白线的,通过FSlateDrawElement::MakeLines(…)函数;
至于小地图上的那个rendertarget的绘制,小地图部分已经提及;
一点比较有用的代码:
        AStrategyPlayerController* const PC = Cast<AStrategyPlayerController>(GEngine->GetFirstLocalPlayerController(OwnerHUD.Get()->GetWorld()));
        AStrategyGameState const* const MyGameState = PC && PC->GetWorld() ? PC->GetWorld()->GetGameState<AStrategyGameState>() : NULL;
        AStrategyHUD* const HUD = PC ? Cast<AStrategyHUD>(PC->MyHUD) : NULL;
注意这里自定义的几种新的Widget,但是对于editor而言是没用的,也没有对应的资源之类的东西,只是逻辑代码上的东西;这些自定义的widget应该被用于后面实现class SStrategySlateHUDWidget : public SCompoundWidget;
自定义的widget在其构造函数中会初始化该widget的属性,如:(https://docs.unrealengine.com/latest/CHN/Programming/Slate/Overview/index.html )


void SStrategyButtonWidget::Construct(const FArguments& InArgs)
{
    OwnerHUD = InArgs._OwnerHUD;
    ButtonText = InArgs._ButtonText;
    CenterText = InArgs._CenterText;
    CornerText = InArgs._CornerText;
    OnClicked = InArgs._OnClicked;
    OnClickedDisabled = InArgs._OnClickedDisabled;
    CoinIconVisible = InArgs._CoinIconVisible;
    TextHAlign = InArgs._TextHAlign;
    TextVAlign = InArgs._TextVAlign;
    TextMargin = InArgs._TextMargin;
    TextFont = InArgs._TextFont;
    Opacity = InArgs._Opacity;
    bIsUserActionRequired = false;
    bIsMouseButtonDown = false;
    bIsActiveAction = false;
    bIsActionAllowed = true;
    OnMouseEnterDel = InArgs._OnMouseEnterDel;
    OnMouseLeaveDel = InArgs._OnMouseLeaveDel;

    OpacityCurve = WidgetAnimation.AddCurve(0.0f, 0.2f, ECurveEaseFunction::QuadInOut);
    bMouseCursorVisible = true;


    ChildSlot
    .VAlign(VAlign_Fill)
    .HAlign(HAlign_Fill)
    [
        SNew(SOverlay)
        +SOverlay::Slot()
        .HAlign(HAlign_Center)
        .VAlign(VAlign_Center)
        [
            SNew(SImage)
            .Image(this, &SStrategyButtonWidget::GetButtonImage)
            .ColorAndOpacity(this,&SStrategyButtonWidget::GetImageColor)
        ]
        +SOverlay::Slot()
        .HAlign(HAlign_Center)
        .VAlign(VAlign_Center)
        [
            SNew(SImage)
            .Image(this, &SStrategyButtonWidget::GetButtonImage)
            .ColorAndOpacity(this,&SStrategyButtonWidget::GetTintColor)
        ]
        +SOverlay::Slot()
        .HAlign(TextHAlign.Get().IsSet() ? TextHAlign.Get().GetValue() : EHorizontalAlignment::HAlign_Center)
        .VAlign(TextVAlign.Get().IsSet() ? TextVAlign.Get().GetValue() : EVerticalAlignment::VAlign_Bottom)
        .Padding(TAttribute<FMargin>(this, &SStrategyButtonWidget::GetTextMargin))
        [
            SNew(STextBlock)
            .ShadowColorAndOpacity(this,&SStrategyButtonWidget::GetTextShadowColor)
            .ColorAndOpacity(this,&SStrategyButtonWidget::GetTextColor)
            .ShadowOffset(FIntPoint(-1,1))
            .Font(this, &SStrategyButtonWidget::GetTextFont)
            .Text(ButtonText)
        ]
        +SOverlay::Slot()
        .HAlign(EHorizontalAlignment::HAlign_Center)
        .VAlign(EVerticalAlignment::VAlign_Center)
        [
            SNew(STextBlock)
            .ShadowColorAndOpacity(this,&SStrategyButtonWidget::GetTextShadowColor)
            .ColorAndOpacity(this,&SStrategyButtonWidget::GetTextColor)
            .ShadowOffset(FIntPoint(-1,1))
            .Font(this, &SStrategyButtonWidget::GetTextFont)
            .Text(CenterText)
        ]
        +SOverlay::Slot()
        .HAlign(EHorizontalAlignment::HAlign_Right)
        .VAlign(EVerticalAlignment::VAlign_Top)
        [
            SNew(STextBlock)
            .ShadowColorAndOpacity(this,&SStrategyButtonWidget::GetTextShadowColor)
            .ColorAndOpacity(this,&SStrategyButtonWidget::GetTextColor)
            .ShadowOffset(FIntPoint(-1,1))
            .Text(CornerText)
        ]
        +SOverlay::Slot()
        [
            InArgs._Content.Widget
        ]

    ];
}
在本demo实现class SStrategySlateHUDWidget : public SCompoundWidget的时候, 其内部构造函数就用到了之前实现的几个别的Widget,也就是说,像class SStrategyMiniMapWidget,class SStrategyButtonWidget这样的widget都是为class SStrategySlateHUDWidget服务的,虽然他们都是Widget,并且具有相同的父子继承关系;
所以在void SStrategySlateHUDWidget::Construct(const FArguments& InArgs)里面有:
SNew(SCanvas)
SNew(SBorder)
SAssignNew(ActionButtonsWidget,SStrategyActionGrid)
SAssignNew(MiniMapWidget,SStrategyMiniMapWidget)
SNew(SImage)
SAssignNew(PauseMenuButtons[ButtonIndex++], SStrategyButtonWidget)
即是说,SStrategySlateHUDWidget 类把之前的小地图自定义widget,button自定义widget等widget组合了起来(指针成为其成员变量),它使用了它们;
另外在它重载的Tick函数里面有两行代码比较好用:
    UConsole* ViewportConsole = (GEngine !=NULL && GEngine->GameViewport != NULL) ? GEngine->GameViewport->ViewportConsole : NULL;
    if (ViewportConsole != NULL && (ViewportConsole->ConsoleState == "Typing" || ViewportConsole->ConsoleState == "Open"))
    {
        FSlateApplication::Get().SetAllUserFocusToGameViewport();
        FSlateApplication::Get().SetKeyboardFocus(SharedThis(this));
    }
然后组合了各种自定义的Widget的这个SStrategySlateHUDWidget又被class AStrategyHUD : public AHUD使用,在其BuildMenuWidgets(…)函数里面被SAssignNew出来:
void AStrategyHUD::BuildMenuWidgets()
{
    if (!GEngine || !GEngine->GameViewport)
    {
        return;
    }

    if (!MyHUDMenuWidget.IsValid())
    {
        const AStrategyPlayerController* PCOwner = Cast<AStrategyPlayerController>(PlayerOwner);

        if (PCOwner)
        {
            SAssignNew(MyHUDMenuWidget, SStrategySlateHUDWidget)//AstrategyHUD具有成员变量TSharedPtr<class SStrategySlateHUDWidget> MyHUDMenuWidget;
            .OwnerHUD(this);

            if (MyHUDMenuWidget.IsValid())
            {

                GEngine->GameViewport->AddViewportWidgetContent(
                    SNew(SWeakWidget)
                    .PossiblyNullContent(MyHUDMenuWidget.ToSharedRef())
                );

                MyHUDMenuWidget->ActionButtonsWidget->SetVisibility(EVisibility::Visible);
                MyHUDMenuWidget->ActionWidgetPosition.BindUObject(this,&AStrategyHUD::GetActionsWidgetPos);

                if (ActionPauseTexture != NULL)
                {
                    MyHUDMenuWidget->PauseButton->SetImage(ActionPauseTexture);
                    MyHUDMenuWidget->PauseButton->DeferredShow();
                }
                if (MenuButtonTexture != NULL)
                {
                    for (uint8 i = 0; i < MyHUDMenuWidget->PauseMenuButtons.Num(); i++)
                    {
                        MyHUDMenuWidget->PauseMenuButtons[i]->SetImage(MenuButtonTexture);
                    }
                }
            }
        }
    }
}
【这块HUD的分析思路有误,应该从默认HUD类class AStrategyHUD : public AHUD分析起,会发现其使用了自定义widget SStrategySlateHUDWidget, 然后进入到SStrategySlateHUDWidget的构造函数里面会发现其又组合里其他自定义widget;这样自顶向下的分析会更有效率更清晰; 以上的分析是自下至上的,容易糊涂;不过自顶而下的分析需要知道顶在哪里;】
- 自定义Style:
“Styles can be created and applied to the various parts of a widget. This makes it easy to iterate on the look of the components in the UI, as well as share and reuse styles.”;
本demo中,WidgetStyle类似是个容器类,它组合了之前的自定义widget,
这里style的基类:struct SLATECORE_API FSlateWidgetStyle,仅仅是个struct;
struct FStrategyHUDStyle : public FSlateWidgetStyle, 该类作为容器内部包含了FSlateBrush(可看出带配置的texture),FSlateColor等,然后定义一个class UStrategyHUDWidgetStyle : public USlateWidgetStyleContainerBase,是正规的类,包含一个FStrategyHUDStyle类型,这样blueprint就可以对其赋值了;
然后editor中创建这个类对应的style资源,然后再在某个构造函数(void SStrategyMenuWidget::Construct(const FArguments& InArgs))中查找使用它:
MenuStyle = &FStrategyStyle::Get().GetWidgetStyle<FStrategyMenuStyle>("DefaultStrategyMenuStyle");//注意这里是按照名字查找相关style的,也就是说,所有的widget style都应该放到一个map中,查找代码发现(SlateStyle.h,class SLATECORE_API FSlateStyleSet : public ISlateStyle):

    FString CoreContentRootDir; /** This dir is Engine/Slate folder to share the items **/

    TMap< FName, TSharedRef< struct FSlateWidgetStyle > > WidgetStyleValues;

会把所有的slate widget style收集起来;
#define IMAGE_BRUSH( RelativePath, ... ) FSlateImageBrush( FPaths::GameContentDir() / "Slate"/ RelativePath + TEXT(".png"), __VA_ARGS__ )
#define BOX_BRUSH( RelativePath, ... ) FSlateBoxBrush( FPaths::GameContentDir() / "Slate"/ RelativePath + TEXT(".png"), __VA_ARGS__ )
#define BORDER_BRUSH( RelativePath, ... ) FSlateBorderBrush( FPaths::GameContentDir() / "Slate"/ RelativePath + TEXT(".png"), __VA_ARGS__ )
#define TTF_FONT( RelativePath, ... ) FSlateFontInfo( FPaths::GameContentDir() / "Slate"/ RelativePath + TEXT(".ttf"), __VA_ARGS__ )
#define OTF_FONT( RelativePath, ... ) FSlateFontInfo( FPaths::GameContentDir() / "Slate"/ RelativePath + TEXT(".otf"), __VA_ARGS__ )
- 自定义Menu:
除了class AStrategyHUD : public AHUD还有一个hud:class AStrategyMenuHUD : public AHUD,按照之前的分析,前者主要是小地图,右上角的三个代表生命个数的木桶,后者主要是菜单hud;菜单HUD;editor中定义的是前者AStrategyHUD;
菜单除了具有单独的HUD,菜单还有单独的game mode和controller:
AStrategyMenuGameMode::AStrategyMenuGameMode(const FObjectInitializer& ObjectInitializer)
    : Super(ObjectInitializer)
{
    //setup our custom PC and HUD
    PlayerControllerClass = AStrategyMenuPlayerController::StaticClass();
    HUDClass = AStrategyMenuHUD::StaticClass();
    SpectatorClass = AStrategySpectatorPawn::StaticClass();
}
这个menu gamemode好像没有显式使用的地方,也没有对应的资源;这个Menu HUD的一个指针引用保存在了class SStrategyMenuWidget : public SCompoundWidget里面;
这个menu部分,好像一直是独立出来的一块似的;它的HUD,game mode,widget, PlayerController似乎都是自己和自己在用,没找到别的地方有使用它的;?????这是个没有完成的demo???
这个demo中的两个地图,两个game mode,他们是怎样工作的?难道是一个地图就可以有一个game mode?
发现,当游戏启动时候,会两个game mode的构造函数都会逐一进入,先进入的是AStrategyGameMode然后是AStrategyMenuGameMode的;
在DefaultEngine.ini里面:
GameDefaultMap=/Game/Maps/StrategyMenu
ServerDefaultMap=/Game/Maps/StrategyMenu
EditorStartupMap=/Game/Maps/TowerDefenseMap
GlobalDefaultGameMode="/Script/StrategyGame.StrategyGameMode"
这样的设定应该决定了游戏刚起来的时候默认地图是StrategyMenu,所以在游戏开时候回有LoadMap(…)调用来加载地图StrategyMenu,然后在LoadMap函数内部调用SetGameMode(…):
WorldContext.World()->SetGameMode(URL);//看来似乎一个地图一个world就有一个game mode设定
bool UWorld::SetGameMode(const FURL& InURL)
{
    if( IsServer() && !AuthorityGameMode )
    {
        AuthorityGameMode = GetGameInstance()->CreateGameModeForURL(InURL);//这个URL里面包含了地图名StrategyMenu,此时正在加载这个地图,按这个函数名来看,似乎会依赖loadmap的地图信息弄出来个game mode
        if( AuthorityGameMode != NULL )
        {
            return true;
        }
        else
        {
            UE_LOG(LogWorld, Error, TEXT("Failed to spawn GameMode actor."));
            return false;
        }
    }

    return false;
}
打开地图可以发现,对于主要的游戏地图TowerDefenseMap,它的World Setting里面使用的GameModeOverride是“StrategyGameMode”,而StrategyMenu地图里面的GameOverride是“StrategyMenuGameMenu”,所以知道了:整个游戏可以有自己的game mode,各个地图可以override自己的game mode,当然也就会有自己独特专属的Controller,HUD等等:
AStrategyMenuGameMode::AStrategyMenuGameMode(const FObjectInitializer& ObjectInitializer)
    : Super(ObjectInitializer)
{
    //setup our custom PC and HUD
    PlayerControllerClass = AStrategyMenuPlayerController::StaticClass();
    HUDClass = AStrategyMenuHUD::StaticClass();
    SpectatorClass = AStrategySpectatorPawn::StaticClass();
}
所以在地图StrategyMenu里面看到什么都没有,它的作用只是在它的world setting里面设定override的专属game mode,然后这个专属的game mode AStrategyMenuGameMode的构造函数里面会有设定专属的Controller和HUD以及SpectatorClass(这个就是主角类,玩家控制的),而这个StrategyMenu在project setting里面里面设定的是作为Startup map,所以游戏启动后,加载这个菜单地图,然后其构造函数指定这个菜单地图的HUD,controller,SpectatorClass;
对应菜单专属的controller AStrategyMenuPlayerController,没有做特殊时期,主要是SetupInputComponent()函数的重载实现, 并且没有特殊的实现,用的是PlayerController.CPP的;
-----------------------------------------------------------------------------------------------------------------------------------------------------------------------------------------------------------------------------------
Menu部分:
class SStrategyMenuWidget : public SCompoundWidget 这个是menu的widget,其构造函数中找到menu的style:MenuStyle = &FStrategyStyle::Get().GetWidgetStyle<FStrategyMenuStyle> ("DefaultStrategyMenuStyle"); 这style就有点像一个容器内部包含了很多菜单所需要的texture(类型FStrategyMenuStyle包含了SlateBrush,SlateSound等,然后editor中有这个类对应的blueprint资源,这个资源名字就是“DefaultStrategyMenuStyle”),然后在SStrategyMenuWidget的构造函数中通过MenuStyle找到这些texture,然后构建菜单按钮贴图等的布局;
在AStrategyMenuHUD的构造函数里面,直接通过代码方式增加子菜单的四个按钮“Easy”“Normal”“Hard”“Back”;在SStrategyMenuWidget有各个按钮的回调函数;这样菜单就启动起来了;
关于菜单间的切换进入游戏部分:
当点击easy等游戏难度选择按钮后,会调用到回调函数:
void AStrategyMenuHUD::LaunchGame()
{
    FString StartStr = FString::Printf(TEXT("/Game/Maps/TowerDefenseMap?%s=%d"), *AStrategyGameMode::DifficultyOptionName, (uint8) Difficulty);
    GetWorld()->ServerTravel(StartStr);//这里准备加载游戏主地图
    ShowLoadingScreen();//但是主地图不会马上加载并显示进来,所以需要一个loading页面,按照之前的分析,这个loading screen是在另外一个module里面,另外的module也不一定是同一个线程
}
对于函数ShowLoadingScreen():
void AStrategyMenuHUD::ShowLoadingScreen()
{
    IStrategyGameLoadingScreenModule* LoadingScreenModule = FModuleManager::LoadModulePtr<IStrategyGameLoadingScreenModule>("StrategyGameLoadingScreen");//这里就载入了新的module,进入加载游戏的那个页面
    if( LoadingScreenModule != nullptr )
    {
        LoadingScreenModule->StartInGameLoadingScreen();
    }
}
这里看出,UE4在切换的时候,使用GetWorld()->ServerTravel(StartStr);这样的函数,使得游戏转入下一个地图即游戏主地图“TowerDefenseMap”,同理,在载入地图的时候会加载override的gamemode “AStrategyGameMode”,其内部构造函数设定使用的controller,state,HUD,controller,DefaultPawnClass,就把各个类结合了起来,随后比如定义在state(类AStrategyGameState)里面的诸如重载的InitGameState这样的函数就会开始走,初始化游戏状态相关内容;
点击建筑,建筑上会出现即时弹出菜单,都是定义在StrategyBuilding文件里,弹出菜单存储在ASrategyHUD里面,只是显示隐藏,控件点击的触发回调都是一样的;
-----------------------------------------------------------------------------------------------------------------------------------------------------------------------------------------------------------------------------------
AI部分:
NPC行走路线的定义:
NPC自动转身走动:
CONTINUE ... ...
/**
 * SensingComponent encapsulates sensory (ie sight and hearing) settings and functionality for an Actor,
 * allowing the actor to see/hear Pawns in the world. It does *not* enable hearing
 * and sight sensing by default.
 */
UCLASS(config=Game)
class UStrategyAISensingComponent : public UPawnSensingComponent


StrategyAIController.h:
DECLARE_DELEGATE_OneParam(FOnBumpEvent, FHitResult const&);
DECLARE_DELEGATE(FOnMovementEvent);
如此这样声明一个事件,然后比如” FOnMovementEvent”就成为一种类型,可以声明变量;
    FOnMovementEvent MovementDelegate;
    MovementDelegate.BindUObject(this, &UStrategyAIAction_MoveToBrewery::OnMoveCompleted);
    MyAIController->RegisterMovementEventDelegate(MovementDelegate);
-----------------------------------------------------------------------------------------------------------------------------------------------------------------------------------------------------------------------------------
Gameplay部分:
在文件DefaultGame.ini里面:
[/Script/StrategyGame.StrategyGameMode]
TimeBeforeReturnToMenu=3
[/Script/StrategyGame.StrategyGameState]
WarmupTime=3
然后找到其对应的代码变量(StrategyGameMode.h):
    /** Time before game returns to menu after finish. */
    UPROPERTY(config)
    int32 TimeBeforeReturnToMenu;
    /** Warm up time before game starts */
    UPROPERTY(config)
    int32 WarmupTime;
可以知道如果想要读取这个ini里面的变量,只需要在声明变量的时候加上config关键字即可;
所以在游戏主界面的游戏启动前(点击了选择难度按钮后)的暖场时间,这个所谓的暖场时间只是主游戏界面左上角的倒计时,跟加载页面时间没关系,逻辑是(StrategyGameState.cpp):
void AStrategyGameState::StartGameplayStateMachine()
{
    if (WarmupTime > 0.f)
    {
        SetGameplayState(EGameplayState::Waiting);
        GetWorldTimerManager().SetTimer(TimerHandle_OnGameStart, this, &AStrategyGameState::OnGameStart, WarmupTime, false);
    }
    else
    {
        OnGameStart();
    }
}
关于这个启动游戏前的暖场时间和机制:
点击easy难度页面后调用:
void AStrategyMenuHUD::LaunchGame()
{
    FString StartStr = FString::Printf(TEXT("/Game/Maps/TowerDefenseMap?%s=%d"), *AStrategyGameMode::DifficultyOptionName, (uint8) Difficulty);
    GetWorld()->ServerTravel(StartStr);//@Virtuos[wangsongwei]here we begin to load the main game map TowerDefenseMap
    ShowLoadingScreen();//@Virtuos[wangsongwei]since the main game map will not load and appear quickly, we need one loading screen, and this screen is in another module, but this also is same one thread
}
ServerTravel函数加载主游戏地图,初始化state,在初始化state时候有调用:
void AStrategyGameState::StartGameplayStateMachine()
{
    if (WarmupTime > 0.f)
    {
        SetGameplayState(EGameplayState::Waiting);
        GetWorldTimerManager().SetTimer(TimerHandle_OnGameStart, this, &AStrategyGameState::OnGameStart, WarmupTime, false);//这里设定的不是loading页面的显示时间,只是游戏正式开始的倒计时,其实是一个等待时间,时间到了,就调用这里设定的回调函数开始游戏
    }
    else
    {
        OnGameStart();
    }
}
ShowLoadingScreen函数加载额外的那个screen loading的module,这个module不一定是有单独线程在走的,这个demo似乎是没有:
这个加载页面,它的具体实现是(StrategyGameLoadingScreen.cpp):
    virtual void CreateScreen()
    {
        FLoadingScreenAttributes LoadingScreen;
        LoadingScreen.bAutoCompleteWhenLoadingCompletes = true;
        LoadingScreen.MinimumLoadingScreenDisplayTime = 0.f;//这个值是可以改变等待时间的,单位是秒
        LoadingScreen.WidgetLoadingScreen = SNew(SStrategyLoadingScreen);
        GetMoviePlayer()->SetupLoadingScreen(LoadingScreen);
    }
按照这里的设定,是加载完成就自动退出,怎样才算是加载完成呢?它能自动监视游戏的state吗?主要逻辑部分代码在DefaultGameMoviePlayer.cpp里面;
这里的主视角的camera是class UStrategyCameraComponent : public UCameraComponent作为成员变量存储在StrategySpectatorPawn里面的,AStrategySpectatorPawn重载了MoveForward之类的函数来控制camera动;引擎怎么知道这个camera是主视角的camera?
发现当我们触发一个debug camera自由移动场景时候(ToggleDebugCamera命令行输入),void ADebugCameraController::OnActivate( APlayerController* OriginalPC )会进入,会有:
float const OrigCamFOV = OriginalPC->PlayerCameraManager->GetFOVAngle();
可以看出,主视角camera是存储在playerController里面的PlayerCameraManager里面的:
    /** Camera manager associated with this Player Controller. */
    UPROPERTY(BlueprintReadOnly, Category=PlayerController)
    class APlayerCameraManager* PlayerCameraManager;
    /** PlayerCamera class should be set for each game, otherwise Engine.PlayerCameraManager is used */
    UPROPERTY(EditAnywhere, BlueprintReadOnly, Category=PlayerController)
    TSubclassOf<class APlayerCameraManager> PlayerCameraManagerClass;
对于菜单的那个player controller是这么对其赋值的:
AStrategyMenuPlayerController::AStrategyMenuPlayerController(const FObjectInitializer& ObjectInitializer)
    : Super(ObjectInitializer)
{
    // just use the normal camera...fine for now
    PlayerCameraManagerClass = APlayerCameraManager::StaticClass();
}
APlayerCameraManager 虽然不包括camera component,但是其具有camera的必要信息;
在加载进入主游戏地图时候,会先spawn player controller,在spawn player controller的过程中会进行SpawnPlayerCameraManager()会有一些信息存储到APlayerCameraManager里面;
对于这个游戏demo而言,主视角只有平移操作,就是在平移ASpectatorPawn主角类对象,因为camera是它的子component,所以位置也变了,这样主视角变化;
而对于缩放整个level场景,实现方法的调用堆栈是:
void APlayerController::UpdateCameraManager(float DeltaSeconds)
void APlayerCameraManager::UpdateCamera(float DeltaTime)
void APlayerCameraManager::DoUpdateCamera(float DeltaTime)
void APlayerCameraManager::UpdateViewTarget(FTViewTarget& OutVT, float DeltaTime)
void APlayerCameraManager::UpdateViewTargetInternal(FTViewTarget& OutVT, float DeltaTime)
void AActor::CalcCamera(float DeltaTime, FMinimalViewInfo& OutResult)
void UStrategyCameraComponent::GetCameraView(float DeltaTime, FMinimalViewInfo& OutResult)
{
    APlayerController* Controller = GetPlayerController();
    if( Controller )
    {
        OutResult.FOV = 30.f;
        const float CurrentOffset = MinCameraOffset + ZoomAlpha * (MaxCameraOffset - MinCameraOffset);//缩放整个场景主要改变ZoomAlpha这个值实现的
        FVector Pos2 = Controller->GetFocalLocation();
        OutResult.Location = Controller->GetFocalLocation() - FixedCameraAngle.Vector() * CurrentOffset;
        OutResult.Rotation = FixedCameraAngle;
    }
}
在PlayerCameraManager.h里面:
/** A ViewTarget is the primary actor the camera is associated with. */
USTRUCT()
struct ENGINE_API FTViewTarget
{ class AActor* Target; }
Camera的ViewTarget保存camera注视的是?像这里就是“StrategySpectatorPawn_0”
-----------------------------------------------------------------------------------------------------------------------------------------------------------------------------------------------------------------------------------
Input部分:
PlayerController.h:
    /** Object that manages player input. */
    UPROPERTY(transient)
    class UPlayerInput* PlayerInput;
-----------------------------------------------------------------------------------------------------------------------------------------------------------------------------------------------------------------------------------
Sound部分:
类型可以是AmbientSound这种actor;
-----------------------------------------------------------------------------------------------------------------------------------------------------------------------------------------------------------------------------------
作弊cheat部分:
FReply SStrategySlateHUDWidget::OnCheatAddGold() const
{
    FReply Reply = FReply::Unhandled();
    APlayerController* PlayerController = Cast<APlayerController>(OwnerHUD->GetWorld()->GetFirstPlayerController());
    if (PlayerController)
    {
        UStrategyCheatManager* CheatManager = Cast<UStrategyCheatManager>(PlayerController->CheatManager);
        if (CheatManager != nullptr)
        {
            CheatManager->AddGold(10000);
            Reply = FReply::Handled();
        }
    }
    return Reply;
}
其中class UStrategyCheatManager : public UCheatManager;
    UFUNCTION(exec)// This function is executable from the command line.
    void AddGold(uint32 NewGold);
关于UCheatManager类,有定义free camera的controller:
UCLASS(Blueprintable, Within=PlayerController)
class ENGINE_API UCheatManager : public UObject
{
    GENERATED_UCLASS_BODY()

    /** Debug camera - used to have independent camera without stopping gameplay */
    UPROPERTY()
    class ADebugCameraController* DebugCameraControllerRef;

    /** Debug camera - used to have independent camera without stopping gameplay */
    UPROPERTY(EditDefaultsOnly, BlueprintReadOnly, Category="Debug Camera")
    TSubclassOf<class ADebugCameraController>  DebugCameraControllerClass;

    … …
}
/**
* Camera controller that allows you to fly around a level mostly unrestricted by normal movement rules.
*
* To turn it on, please press Alt+C or both (left and right) analogs on XBox pad,
* or use the "ToggleDebugCamera" console command. Check the debug camera bindings
* in DefaultPawn.cpp for the camera controls.
*/
UCLASS(config=Game)
class ENGINE_API ADebugCameraController
    : public APlayerController
{ … … }
UE4还提供了一个专门的类ADebugCameraHUD可供参考,在文件DebugCameraHUD.CPP里面;我们要实现的时候可以继承他;
PlayerController.h:
    /** Object that manages "cheat" commands.  Not instantiated in shipping builds. */
    UPROPERTY(transient, BlueprintReadOnly, Category="Cheat Manager")
    class UCheatManager* CheatManager;

    /**  Enables cheats within the game */
    UFUNCTION(exec)
    virtual void EnableCheats();
-----------------------------------------------------------------------------------------------------------------------------------------------------------------------------------------------------------------------------------
其他:
- 场景中的灯光都要被包含在一个LightmassImportanceVolume里面;
- 关于碰撞检测, 对于整个地面的那个static mesh actor:

而对于其他的actor, 则Collision Presets的设定是NoCollision, 比如墙,石头,木桶,都是可以穿过去的,为了防止此点, 场景中增加了大量的block volume; 利用block volume比物理actor之间检测碰撞应该更有效率;
- 武器attach到(NPC)角色身上的机制:
类class UStrategyAIDirector : public UActorComponent里面有暴露给blueprint的函数SetDefaultWeapon, 具体是在level blueprint里面进行设定的;
void UStrategyAIDirector::SetDefaultWeapon(UBlueprint* InWeapon)//注意有这种UBlueprint类型
{
    DefaultWeapon = InWeapon ? *InWeapon->GeneratedClass : nullptr;//这种GeneratedClass的属性: /** Pointer to the 'most recent' fully generated class */UPROPERTY(nontransactional)TSubclassOf<class UObject>    GeneratedClass;
}

void UStrategyAIDirector::SetDefaultWeaponClass(TSubclassOf<UStrategyAttachment> InWeapon)
{
    DefaultWeapon = InWeapon;
}
    创建了一个component, class UStrategyAttachment : public USkeletalMeshComponent, 然后创建它相关的blueprint资源, 然后这个资源被SetDefaultWeapon 设定上去; 随后被真正attach到NPC身上:
                if (DefaultWeapon != nullptr)
                {
                    UStrategyGameBlueprintLibrary::GiveWeaponFromClass(MinionChar, DefaultWeapon);
                }
void UStrategyGameBlueprintLibrary::GiveWeaponFromClass(AStrategyChar* InChar, TSubclassOf<UStrategyAttachment> ArmorClass)
{
    if (InChar && *ArmorClass)
    {
        auto MyWeapon = NewObject<UStrategyAttachment>(InChar, *ArmorClass);
        InChar->SetWeaponAttachment(MyWeapon);
    }
}
这种设定,使得在level blueprint里面设定的一个weapons(暂时先存储到UStrategyAIDirector : public UActorComponent 类里面, 这种继承关系应该只是为了tick),然后就被应用到了所有的NPC, 其实并不很好,只是这里的demo适合;
namespace UF
{
    // valid keywords for the UFUNCTION and UDELEGATE macros
    enum
    {
        /// This function is designed to be overridden by a blueprint.  Do not provide a body for this function;
        /// the autogenerated code will include a thunk that calls ProcessEvent to execute the overridden body.
        BlueprintImplementableEvent,
        /// This function is designed to be overridden by a blueprint, but also has a native implementation.
        /// Provide a body named [FunctionName]_Implementation instead of [FunctionName]; the autogenerated
        /// code will include a thunk that calls the implementation method when necessary.
        BlueprintNativeEvent,
        /// This function is sealed and cannot be overridden in subclasses.
        /// It is only a valid keyword for events; declare other methods as static or final to indicate that they are sealed.
        SealedEvent,
        /// This function is executable from the command line.
        Exec,
        /// This function is replicated, and executed on servers.  Provide a body named [FunctionName]_Implementation instead of [FunctionName];
        /// the autogenerated code will include a thunk that calls the implementation method when necessary.
        Server,
        /// This function is replicated, and executed on clients.  Provide a body named [FunctionName]_Implementation instead of [FunctionName];
        /// the autogenerated code will include a thunk that calls the implementation method when necessary.
        Client,
        /// This function is both executed locally on the server and replicated to all clients, regardless of the Actor's NetOwner
        NetMulticast,
        /// Replication of calls to this function should be done on a reliable channel.
        /// Only valid when used in conjunction with Client or Server
        Reliable,
        /// Replication of calls to this function can be done on an unreliable channel.
        /// Only valid when used in conjunction with Client or Server
        Unreliable,
        /// This function fulfills a contract of producing no side effects, and additionally implies BlueprintCallable.
        BlueprintPure,
        /// This function can be called from blueprint code and should be exposed to the user of blueprint editing tools.
        BlueprintCallable,
        /// This function will not execute from blueprint code if running on something without network authority
        BlueprintAuthorityOnly,
        /// This function is cosmetic and will not run on dedicated servers
        BlueprintCosmetic,
        /// The UnrealHeaderTool code generator will not produce a execFoo thunk for this function; it is up to the user to provide one.
        CustomThunk,
        /// Specifies the category of the function when displayed in blueprint editing tools.
        /// Usage: Category=CategoryName or Category="MajorCategory,SubCategory"
        Category,
        /// This function must supply a _Validate implementation
        WithValidation,
        /// This function is RPC service request
        ServiceRequest,
        /// This function is RPC service response
        ServiceResponse
    };
}
- PlayerController.h:
    /** SwitchLevel to the given MapURL. */
    UFUNCTION(exec)
    virtual void SwitchLevel(const FString& URL);

    /** Positions the mouse cursor in screen space, in pixels. */
    UFUNCTION( BlueprintCallable, Category="Game|Player", meta = (DisplayName = "SetMousePosition", Keywords = "mouse" ))
    void SetMouseLocation( const int X, const int Y );

    UFUNCTION(BlueprintCallable, Category="Game|Player", meta=(bTraceComplex=true))
    bool GetHitResultUnderFingerForObjects(ETouchIndex::Type FingerIndex, const  TArray<TEnumAsByte<EObjectTypeQuery> > & ObjectTypes, bool bTraceComplex, FHitResult& HitResult) const;

    /** Convert current mouse 2D position to World Space 3D position and direction. Returns false if unable to determine value. **/
    UFUNCTION(BlueprintCallable, Category = "Game|Player", meta = (DisplayName = "ConvertMouseLocationToWorldSpace", Keywords = "deproject"))
    bool DeprojectMousePositionToWorld(FVector& WorldLocation, FVector& WorldDirection) const;

    /** Convert current mouse 2D position to World Space 3D position and direction. Returns false if unable to determine value. **/
    UFUNCTION(BlueprintCallable, Category = "Game|Player", meta = (DisplayName = "ConvertScreenLocationToWorldSpace", Keywords = "deproject"))
    bool DeprojectScreenPositionToWorld(float ScreenX, float ScreenY, FVector& WorldLocation, FVector& WorldDirection) const;

    /**
     * Convert a World Space 3D position into a 2D Screen Space position.
     * @return true if the world coordinate was successfully projected to the screen.
     */
    UFUNCTION(BlueprintCallable, Category = "Game|Player", meta = (DisplayName = "ConvertWorldLocationToScreenLocation", Keywords = "project"))
    bool ProjectWorldLocationToScreen(FVector WorldLocation, FVector2D& ScreenLocation, bool bPlayerViewportRelative = false) const;

    /**
     * Convert a World Space 3D position into a 3D Screen Space position.
     * @return true if the world coordinate was successfully projected to the screen.
     */
    bool ProjectWorldLocationToScreenWithDistance(FVector WorldLocation, FVector& ScreenLocation, bool bPlayerViewportRelative = false) const;

 浙公网安备 33010602011771号