
The road of airtest
airtest - poco
一、poco辅助窗功能
1、选择poco模式

测试什么选择对应什么
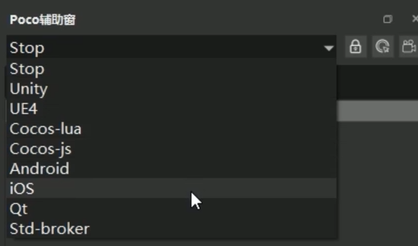
注意:(android、ios原生不需要接入poco-sdk,其他要)
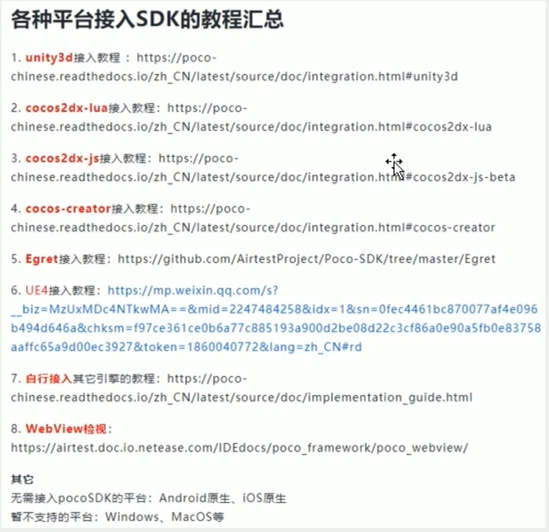
2、检索控件
锁定检索
跟随检索
3、录制脚本
二、API介绍&定位选择器
①基本选择器利用元素的一些基本属性来进行定位,比如name、text等等
eg:poco(name="网易云音乐")
②相对选择器利用控件之间的父子关系、爷孙关系和兄弟关系等来定位控件,例如 parent()、child()、offspring()等
eg:poco("LinearLayoutCompat").child("搜索")
③空间顺序选择器常用于Ul树中多个相同名称的节点定位,根据节点在Ul树的索引顺序进行定位,索引坐标从0开始
poco("mainActivityTab").offspring("aActionBar$Tab")[0]
①点击操作:
poco("star_single").click()
poco('star_single'). long_click()
②读取和设置控件的属性:
poco("star_single").get_name()
poco("star_single").attr('name')
poco("star_single").get_text()
poco("pos_input").set_text("123")
poco("pos_input"). setattr('text',"456")
③判断元素是否存在:
poco(XXX).exists()
④拖动与滑动:
poco("star"). drag_to (poco("shel I"))
⑤内部偏移和外部偏移:
poco("pearl").focus([0.1,0.1]).long_click()
poco("pearl").focus([0.9,0.9]). long_click()
poco("pearl").focus([0.5,-3]). long_click()
⑥遍历元素:
for star in poco("playDragAndDrop").child("star"):star. drag_to (poco("shell"))
⑦等待事件:
poco("bomb").wait_for_appearance()
poco("bomb").wait_for_disappearance()
yellow = poco("yellow")
blue = poco("blue")
black = poco("black")
poco.wait_for_all([yellow,blue,black])
poco.wait_for_any([bomb,yellow,blue])
可以下载对应demo进行操作:android_poco_demo download
其他详情可以查看:官网功能详情
airtest - selenium
一、元素定位语句
1、find_element_by_id()
2、find_element_by_name()
3、find_element_by_class_name()
4、find_element_by_xpath()
5、find_element_by_link_text()
6、find_element_by_partial_link_text()
7、find_element_by_css_selector()
二、操作元素
元素点击:
driver.find_element_by_xpath("[@id=\"right_content\"]").click()
输入:
driver.find_element_by_id("title").send_keys("123")
元素存在:
driver.assert_exist("//div[@alt='到学术首页']","xpath","请填写测试点.")
三、元素定位与实操
下拉框定位(用到的话,需要先引用)
引入下拉框类:Select
from selenium.webdriver.support.select import Select
定位到下拉框元素:
ime_select = driver.find_element_by_id('ime')
实例下拉框类:
select = Select(ime_select)
3种定位方式:
select.select_by_index(0)
select.select_by_value('2')
select.select_by_visible_text('关闭')
弹出框定位(用到的话,需要先引用)
引入弹出框类:Alert
from selenium.webdriver.common.alert import Alert
获取弹出框的文本信息:
driver. switch_to_alert().text
点击弹出框的确认按钮:
driver.switch_to_alert().accept()
四、Selenium辅助窗口功能
1、窗口开启Selenium Window
2、设置Chrome Path路径
设置好airtest ide Chrome Path路径,选择本地安装的chrome.exe即可
3、插入初始化语句
4、Selenium辅助窗功能实操
浏览器截图:driver.airtest_touch
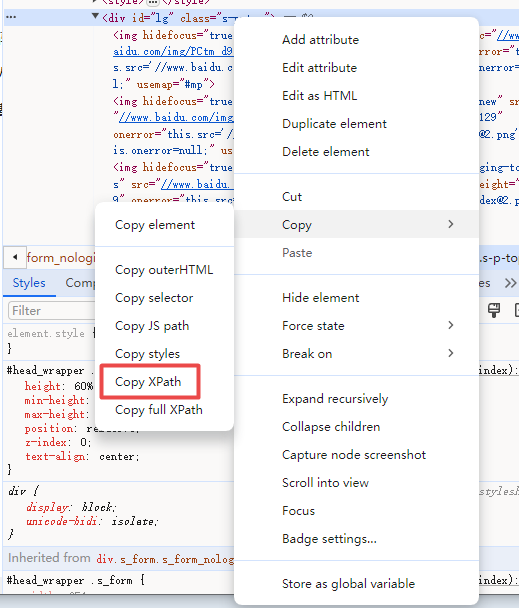
5、利用web F12功能,定位xpath属性
五、一些好用的
查看所有window窗口句柄
# -*- encoding=utf8 -*-
__author__ = "admin"

import win32gui
import win32con
from pywinauto import Desktop
from airtest.core.api import *

auto_setup(__file__)


def list_all_windows():
    def callback(hwnd, extra):
        if win32gui.IsWindowVisible(hwnd):
            title = win32gui.GetWindowText(hwnd)
            print(f"0x{hwnd:x} : {title}")
    win32gui.EnumWindows(callback, None)

list_all_windows()
WebDriverWait 语句等 (元素出现/可点才继续)
from selenium.webdriver.support.ui import WebDriverWait
from selenium.webdriver.support import expected_conditions as EC
from selenium.webdriver.common.by import By

wait = WebDriverWait(driver, 15)   # 15 秒超时

# until(条件): 等到条件为真,返回该元素(可直接接着操作)
el = wait.until(EC.presence_of_element_located((By.ID, "email")))
el.send_keys("abc@x.com")

# until_not(条件): 等到条件为假(比如"加载圈消失")
wait.until_not(EC.presence_of_element_located((By.ID, "loading")))
1. presence_of_element_located — 元素在 DOM 里(不要求可见)
只要 HTML 里出现了这个标签就算,哪怕它在屏幕外或被隐藏。适合"先拿到元素引用"。
# 等密码框出现在 DOM(不必可见),拿到后即可 clear/send_keys
pwd = wait.until(EC.presence_of_element_located((By.ID, "passwd")))
pwd.clear()
pwd.send_keys(PASSWORD)
2. visibility_of_element_located — 元素可见
比上一条严:必须在视口内且没有被
display:none/visibility:hidden藏起来。适合"要截图/要肉眼看到"的场景。
# 等登录按钮真的显示出来再操作(有些网站先渲染后显示)
login = wait.until(EC.visibility_of_element_located((By.ID, "login")))
assert login.is_displayed() is True
3. element_to_be_clickable — 可见且可点击
最常用在"点按钮"前。它本质是
visibility + enabled,能避开"元素在但被遮罩/禁用"导致的点击失败。
# 等登录按钮能点了再点(脚本里点入口就用这个)
wait.until(EC.element_to_be_clickable((By.ID, "login"))).click()
4. text_to_be_present_in_element — 元素文本含某串
用于"等某段文字出现",比如异步加载完才显示的内容。
# 等页面出现"登录成功"提示(假设有个 id=msg 的提示框)
wait.until(EC.text_to_be_present_in_element((By.ID, "msg"), "登录成功"))
print("提示文案已出现")
5. title_contains("xxx") — 标题含某串
等浏览器标签标题变化,常用于跳转后判断。
# 登录后标题变成"用户中心 - xxx"
wait.until(EC.title_contains("用户中心"))
print("标题已变,登录页已切换")
6. url_contains("/user") — 网址含某串
最直观的"跳转成功"判断。脚本里断言登录成功就用它。
# 点登录后等网址变成用户页
wait.until(EC.url_contains("/user"))
print("已跳到用户中心,登录成功")
7. alert_is_present() — 有弹窗(返回 Alert 对象)
处理
alert / confirm / prompt原生弹窗。拿到后.accept()确定或.dismiss()取消。
# 比如点了某个危险操作,弹出"确定删除?"
alert = wait.until(EC.alert_is_present())
print("弹窗文字:", alert.text)
alert.accept()        # 点"确定";取消用 alert.dismiss()
8. frame_to_be_available_and_switch_to_it — 可切到 iframe
元素在
<iframe>里时,必须先把驱动切进 iframe 才能定位里面的元素;用完用driver.switch_to.default_content()切回。
# 假设账号密码框在某个 id=login-frame 的 iframe 内
wait.until(EC.frame_to_be_available_and_switch_to_it((By.ID, "login-frame")))
# 现在才能在 iframe 里找元素
wait.until(EC.presence_of_element_located((By.ID, "email"))).send_keys(EMAIL)
# 用完切回主文档,否则后续定位会找不到外层元素
driver.switch_to.default_content()
脱离IDE运行
一、本地python环境设置
1、不用ide自带,用自己python本地环境(python版本≤3.9)

2、本地python需要安装的库
使用 pip install airtest 和 pip install pocoui,分别安装airtest库和pocoui库;(特别注意:poco框架的库名为pocoui,不能安装成poco)

3、删除库的命令
pip uninstall airtest;更新库到最新版本的命令:pip install-U airtest
如遇到安装超时的报错,可以换成国内源安装豆瓣源: pip install airtest -i https://pypi.tuna.tsinghua. edu.cn/simple
4、核对安装是否正确
pip list


二、命令行跑脚本
1、airtest run 命令的可传参数:
一device,用来指定连接的被测设备
一log,用来指定log内容和截图存放的目录
一recording,运行脚本时进行录屏操作
-no-image,传入该参数后,在脚本运行过程中不再保存截图(airtest≥1.1.7)
运行示例:
airtest run D:/test/report_test.air —device Android:/// —log D:/log/ —recordingD:/log/record01.mp4
释义:在D:/test/目录下,有1个叫report_test.air的脚本;命令行运行这个脚本,指定测试设备为连接上的第一台安卓设备,log保存路径为D:/log/,运行脚本时进行录屏操作,录屏文件保存到D:/log/record01.mp4

Chrome设置
1、下载chromedriver
https://googlechromelabs.github.io/chrome-for-testing/#stable
查询下自己安装的chrome版本,找到并下载对应的chromedriver版本
https://google-chrome.cn.uptodown.com/windows/versions 各对应版本
2、更新对应chromedriver
在对应"AirtestIDE-win-1.2.16\AirtestIDE"目录下放chromedriver
//在chrome目录中放chromedriver
//可以在python目录下也放一个
3、关闭chrome自动更新,防止版本太新,无法使用
cmd运行services.msc,找到以下,改为手动

2026.06.30更新Ps:
Airtest IDE 的情况有内置的 Selenium Window(Web 自动化插件),生成的是 Python + Selenium 代码。这里有两个注意点:
- Selenium 是 4.6 及以上 → 有 Selenium Manager,会自动下载匹配 driver,可以不用下载上面chromedriver,直接运行脚本即可。
- Selenium 3.x → 你要手动把对应 ChromeDriver 放到 PATH 里,或在代码里指定
executable_path。
1、先确认 Airtest 当前环境里的 Selenium 版本(命令行 pip show selenium)。是 4.6+ 就最省事,直接写脚本跑普通 Chrome。
2、还有如果你怕 常用的Chrome 自动更新把环境搞乱,可以考虑装 Chrome for Testing 固定版本来运行。

 浙公网安备 33010602011771号