
项目八遇到的知识点
一、cli3.0引入Mint UI
1、安装
- 官网地址:
- npm i mint-ui -S
2、使用当中遇到的问题
- 公司要做一个手机端页面当时想到vux,项目中用到cli3.0,当我引入vux的时候报了错
npm install @types/vux` if it exists or add a new declaration (.d.ts) file containing `declare module 'vux'; - 搞了好久都没解决,最后用了mint-ui,还是报类似vux的错,最后终于解决了。。。
main.ts中写
import Mint from "mint-ui";
Vue.use(Mint);
import 'mint-ui/lib/style.css'
- 这样写就会报错,解决方法如下
- 在项目src下建.d.ts文件
- shims-mint名字随便起
shims-mint.d.ts
declare module "mint-ui" {
const Mint: any;
export const Toast: any;
export const MessageBox: any;
export default Mint;
}
- 这样就可以在页面中引用ui组件,toast和messageBox需要重新引用
import { Toast, MessageBox } from "mint-ui";
3、Popup + Picker结合使用实现弹窗功能

页面
其他出行方式
<div
@click="handleTripMode"
class="info-box"
>
<img
src="../../assets/right.svg"
@click="handleTripMode"
>
<mt-button
@click="handleCancel"
class="sure"
>取消
<mt-button
@click="handleConfirm"
class="sure"
>确认
js
如果Picker选择的是对象
InitLoad() {
let list = [
{
id: 1,
Name: "其他"
},
{
id: 2,
Name: "打车"
},
{
id: 3,
Name: "步行"
}
];
this.dataList = [
{
values: list
}
];
}
handleConfirm() {
this.tripMode = this.$refs.VisitType.getValues()[0].Name;
this.popupVisible = false;
}
- 知识点
1.getValues():获取所有 slot 目前被选中的值
2.value-key 属性来指定显示的字段名
4、点击增加/删除列表

姓名 性别 年龄 增加 删除
<div @click="add">

<div @click="detele">

5、获取地址栏参数
方法1
-
在地址栏获取code的参数
UrlSearch(name) {
let [returnVal, index, queryArr] = [
"",
window.location.hash.indexOf("?"),
[]
];
if (index >= 0) {
queryArr = window.location.hash.substring(index).split("&");
for (let i = 0; i < queryArr.length; i++) {
const element = queryArr[i];
if (element.indexOf("=") >= 0) {
returnVal = element.split("=")[1];
break;
}
}
return returnVal;
}
}// 调用 this.UrlSearch("code")
方法2
each(array, fn) {
for (var i in array) {
fn(i, array[i]);
}
}
// 获取地址栏参数
getHrefData() {
var href = window.location.href;
var paramStr = href.substring(href.indexOf("?") + 1);
var paramArray = paramStr.split("&");
var reVal = {};
this.each(paramArray, function(index, item) {
var tmp = paramArray[index].split("=");
reVal[tmp[0]] = decodeURI(tmp[1]);
});
return reVal;
}
// 调用
const data = this.getHrefData();
const code = data.code; // 获取code
6、钉钉免登
-
获取微应用免登授权码
dd.ready(function() {
dd.runtime.permission.requestAuthCode({
corpId: _config.corpId, // 企业id
onSuccess: function (info) {
const code = info.code // 通过该免登授权码可以获取用户身份
}});
}); -
在哪里调用就写在哪里,可以封装到方法中
-
获取code 一般后端会有个接口,通过code登录
7、钉钉扫码登录
通过免登授权码换取用户身份
- 我项目中用到的是第三方企业应用免登服务端接口文档
正在在项目的使用
(1)、创建扫码登录应用授权
- 进入【钉钉开发者平台-应用开发-移动接入应用-登录-创建扫码登录应用授权】,创建扫码登录应用授权
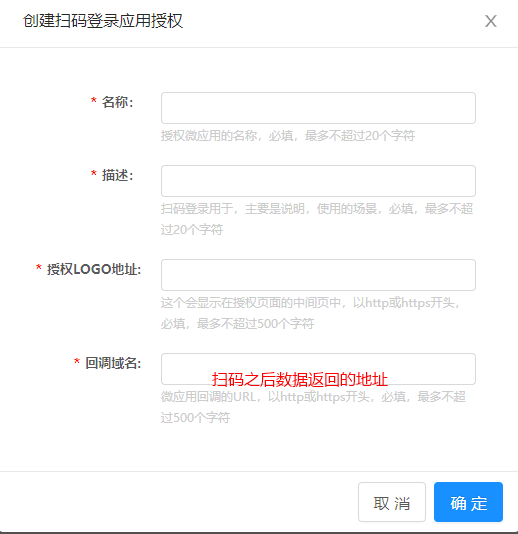
- 完成之后我们就可以拿到appId和appSecret了

(2)、构造扫码登录页面
1.第一种方式是直接使用钉钉提供的扫码登录页面
2.第二种方式是支持网站将钉钉登录二维码内嵌到自己的页面中
步骤1:在页面中先引入如下js文件
步骤2: 在需要使用钉钉登录的地方使用以下js对象
/*
* 解释一下goto参数,参考以下例子:
* var url = encodeURIComponent('http://localhost.me/index.php?test=1&aa=2');
* var goto = encodeURIComponent('https://oapi.dingtalk.com/connect/oauth2/sns_authorize?appid=appid&response_type=code&scope=snsapi_login&state=STATE&redirect_uri='+url)
*/
var obj = DDLogin({
id:"login_container",//这里需要你在自己的页面定义一个HTML标签并设置id,例如
goto: "", //请参考注释里的方式
style: "border:none;background-color:#FFFFFF;",
width : "365",
height: "400"
});
-
这段代码的意思就是在你id定义的DOM中生成二维码,扫码成功之后会给你当前页面(/login)返回一个临时授权码,通过如下代码接收临时授权码,然后构造需要跳转的地址(/home)带上临时授权码。
var hanndleMessage = function(event) {
var origin = event.origin;
console.log("origin", event.origin);
if (origin == "https://login.dingtalk.com") {
//判断是否来自ddLogin扫码事件。
var loginTmpCode = event.data; //拿到loginTmpCode后就可以在这里构造跳转链接进行跳转了
window.location.href =
"https://oapi.dingtalk.com/connect/oauth2/sns_authorize?appid=你的&response_type=code&scope=snsapi_login&state=STATE&redirect_uri=http://localhost:8080/home&loginTmpCode=" +
loginTmpCode;
}
};
if (typeof window.addEventListener != "undefined") {
window.addEventListener("message", hanndleMessage, false);
} else if (typeof window.attachEvent != "undefined") {
window.attachEvent("onmessage", hanndleMessage);
}
3.实例

最外层的index.html
DingTalk.vue
钉钉登录

 浙公网安备 33010602011771号