
项目五遇到的知识点
(一)、vuex保存登录状态
- vue 项目
1、安装 vuex
npm install vuex --save
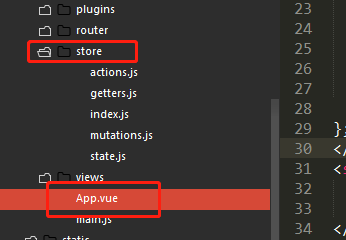
2、在src下面新建store文件夹
- store文件夹下新建state.js、actions.js、mutations.js、getters.js、index.js
index.js
import Vue from 'vue'
import Vuex from 'vuex'
Vue.use(Vuex)
import state from './state'
import actions from './actions'
import mutations from './mutations'
import getters from './getters'
export default new Vuex.Store({
state,
actions,
mutations,
getters
})
state.js
-
state访问状态对象
export default {
isLogin: false,
}
mutations.js
-
Mutations修改状态
-
tools.m.js是封装了一些方法
-
在这里主要是为了移除cookie
-
cookie可以用网上的都没关系
import tools from '../assets/js/tools.m.js';
export default {
loginOut(state){
//退出登录
state.isLogin = false;
tools.cookie.remove('user');
},
setLoginState(state){
//修改登录状态
state.isLogin = true;
}
}
getters.js
-
getters计算过滤操作
export default {
isLogin(state){
return state.isLogin;
}
}
action.js
-
actions异步修改状态
export default {
}
3、在main.js中引入store
import Vue from 'vue'
import router from './router'
import store from './store'
import App from './App.vue'
new Vue({
el: '#app',
store,
router,
render: h => h(App)
});
4、在APP.vue中一定要初始化数据,要不然一切白搭
5、登录页面login.vue中使用
-
下面也是用来封装的方法
-
下面代码就是cookie用户状态,修改,给cookie一个时间期限
6、退出页面loginOut.vue
结束。。。
(二)、vue中引入echarts
1、安装
npm install echarts --save
2、全局引入
(1)、在main.js中配置
import echarts from 'echarts' //引入echarts
Vue.prototype.$echarts = echarts //引入组件
(2)、echarts.vue中引用
-
柱状图
js
3、按需引入
- 如果是在许多页面中都有用到,就写在main.js中
main.js
//引入基本模板
let echarts = require('echarts/lib/echarts')
// 引入饼状图组件
require('echarts/lib/chart/pie')
// 引入提示框和title组件,图例
require('echarts/lib/component/tooltip')
require('echarts/lib/component/title')
require('echarts/lib/component/legend')
Vue.prototype.$echarts = echarts //引入组件
- 在组件中使用同上,如果只在一个地方使用就直接写在.vue文件中就好啦
- 注:这里用 require 不用 import 引入是因为 import 需要详细的路径
This is an 原文地址:
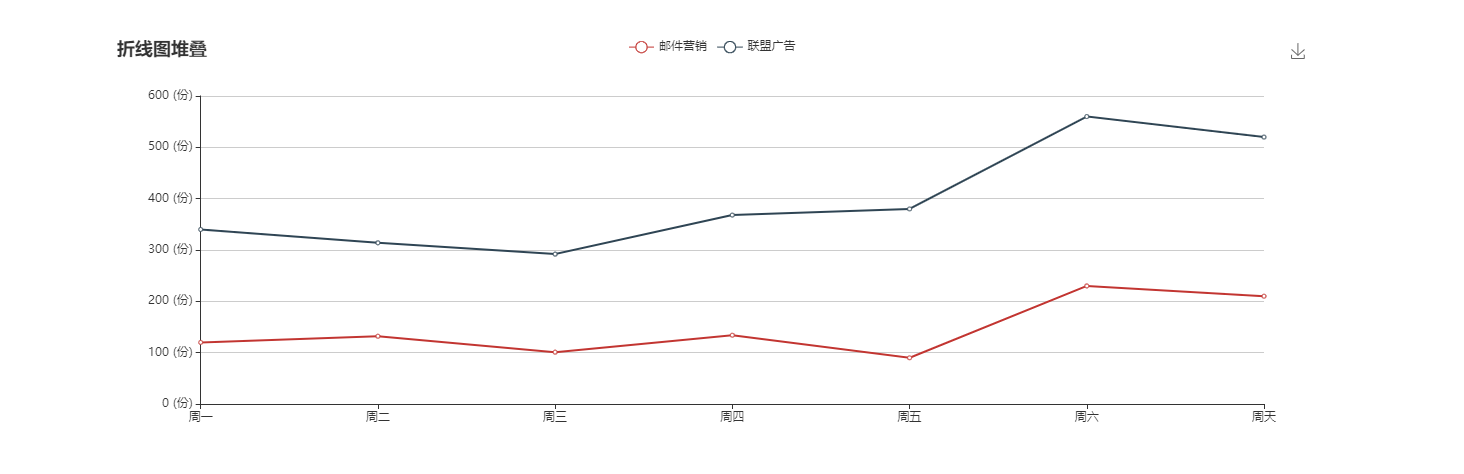
4、项目中使用折线图
js
(三)、点击div空白处隐藏v-show
1、方法1
-
通过监听事件
document.addEventListener('click',function(e){
if(e.target.className!='usermessage'){
that.userClick=false;
}
})
2、方法2
-
给最外层的div加个点击事件 @click="userClick=false"
-
给点击的元素上面加上:@click.stop="userClick=!userClick"
This is an 原文地址:
3、方法3
-
vue 在显示v-show的div外任意点击隐藏v-show
-
核心思想就是监听document的click/touchstart
-
用contains这个方法去判断点击的元素是否在区域外
-
this.$el
-
this.$el是在mounted中才会出现的
mounted() {
document.addEventListener('click', this.handleDocumentClick);
document.addEventListener('touchstart', this.handleDocumentClick);//移动
},methods: {
handleDocumentClick(e) {
if (!this.$el.contains(e.target)) {
this.isShow = false;
}
}
}
4、方法4
-
将点击的区域过滤。不需要再阻止冒泡,需要使用到ref属性
-
this.$refs
<div @click="isShow">
mounted(){
let that=this;
document.addEventListener('click',function(e){
if(that.$refs.box && !that.$refs.box.contains(e.target)){
that.show = false;
}
})
},
methods:{
isShow:function(){
this.show=true
}
}
(四)、vue项目中使用element UI组件
1、安装
npm i element-ui -S
2、完整引入Element
-
在main.js中写入一下内容
import Vue from 'vue';
import ElementUI from 'element-ui';
import 'element-ui/lib/theme-chalk/index.css';
import App from './App.vue';Vue.use(ElementUI);
new Vue({
el: '#app',
render: h => h(App)
});
3、vue+element-ui路由配置
import Vue from 'vue'
import Router from 'vue-router'
Vue.use(Router)
export default new Router({
mode: 'history',
routes: [
{
path: '/',
component: resolve => require(['@/views/index.vue'],resolve),
redirect: 'home',
children:[
{
path: '/home',
component: resolve => require(['@/views/home.vue'],resolve)
},
{
path: '/user',
component: resolve => require(['@/views/user.vue'],resolve),
children: [
{
path: 'login',
component: resolve => require(['@/components/user/login.vue'],resolve)
},
{
path: 'logout',
component: resolve => require(['@/components/user/logout.vue'],resolve)
}
]
}
]
}
]
})
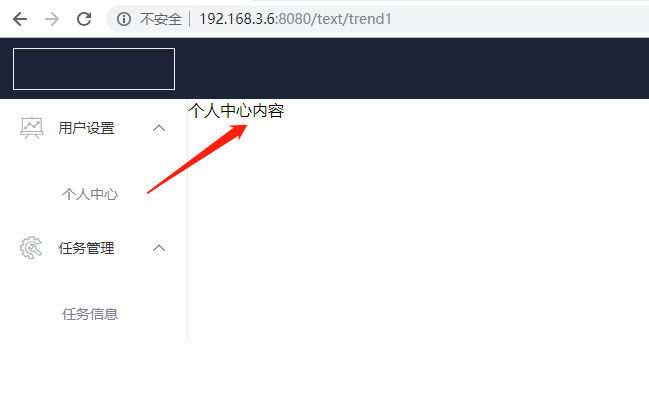
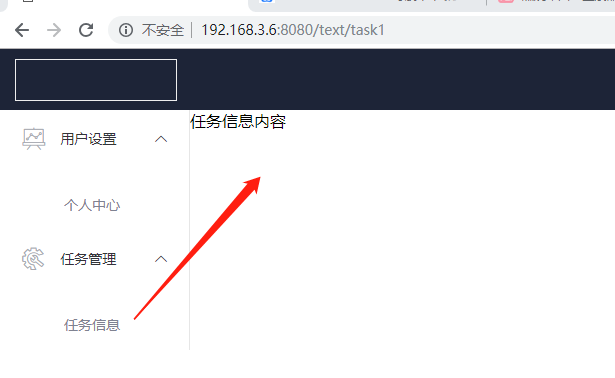
4、 NavMenu 导航菜单实现点击跳转不同的内容
- 效果图
路由配置
import Vue from 'vue'
import Router from 'vue-router'
Vue.use(Router)
export default new Router({
mode: 'history',
routes: [
{
path: '/text',
component: resolve => require(['@/views/text.vue'],resolve),
children: [
{
path: 'trend1',
name: 'trend1',
component: resolve => require(['@/components/text/trend1.vue'],resolve)
},
{
path: 'task1',
name: 'task1',
component: resolve => require(['@/components/text/task1.vue'],resolve)
}
]
}
]
});
views文件夹
-
新建text.vue
components文件夹
- 新建side.vue、task1.vue、trend1.vue
side.vue
<el-menu
class="el-menu-vertical-demo"
:default-active="activeIndex"
router
:default-openeds="openeds"
@open="handleOpen"
@close="handleClose">
用户设置
任务管理
task1.vue
任务信息内容
trend1.vue
个人中心内容
(五)、WebSocket
-
协议标识符是ws(如果加密,则为wss,对应 HTTPS 协议),服务器网址就是 URL
-
栗子
var ws = new WebSocket('wss://echo.websocket.org');
ws.onopen = function(evt) {
console.log('Connection open ...');
ws.send('Hello WebSockets!');
};ws.onmessage = function(evt) {
console.log('Received Message: ' + evt.data);
ws.close();
};ws.onclose = function(evt) {
console.log('Connection closed.');
};
(六)、父组件获取子组件input的值
-
子组件
data(){
return {
msg: ''
}
} -
父组件
<button @click="getMsg">
methods:{
getMsg(){
console.log(this.$refs.getInput.msg)
}
} -
注意尽量少用ref
(七)、Vue中v-for的使用
- 效果图
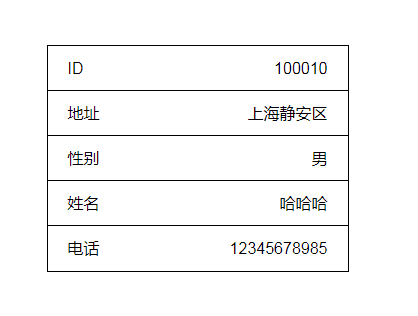
- v-for循环之前一直想要实现的内容,终于解决了...
html
less
.test-content {
width: 300px;
margin-top: 100px;
border: 1px solid #000;
.test-group {
height: 45px;
line-height: 45px;
padding: 0 20px;
box-sizing: border-box;
border-bottom: 1px solid #000;
&:last-of-type{
border-bottom: none;
}
.item-left,.item-right {
display: inline-block;
}
.item-left {
float: left;
}
.item-right {
float: right;
}
}
}
js
data() {
return {
testList:{
id: 'ID',
address: '地址',
sex: '性别',
name: '姓名',
phone: '电话',
},
testAjax: {
id: '100010',
address: '上海静安区',
sex: '男',
name: '哈哈哈',
phone: '12345678985',
}
}
}
- 实现testAjax一般是后端传的在对应的地方写,this.testAjax = '后端内容'
- 好处省了不少代码
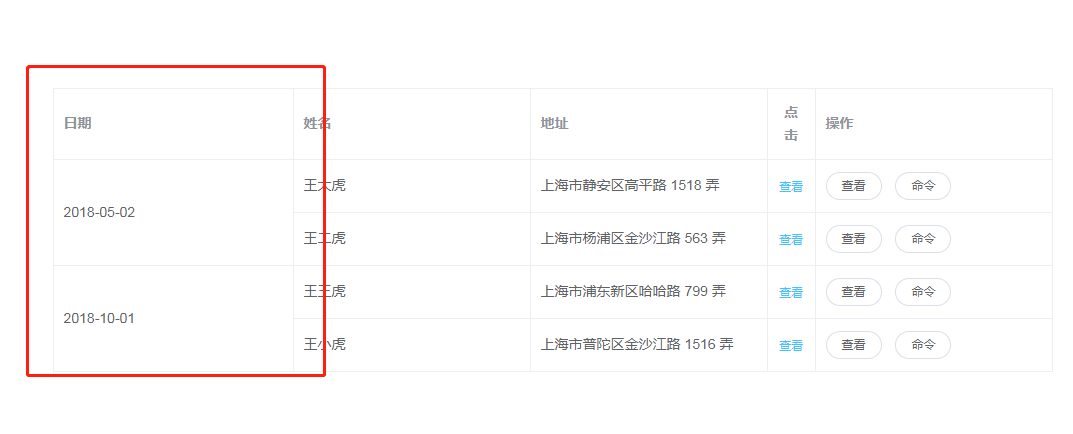
(八)、elementUI 的表单
- 效果图
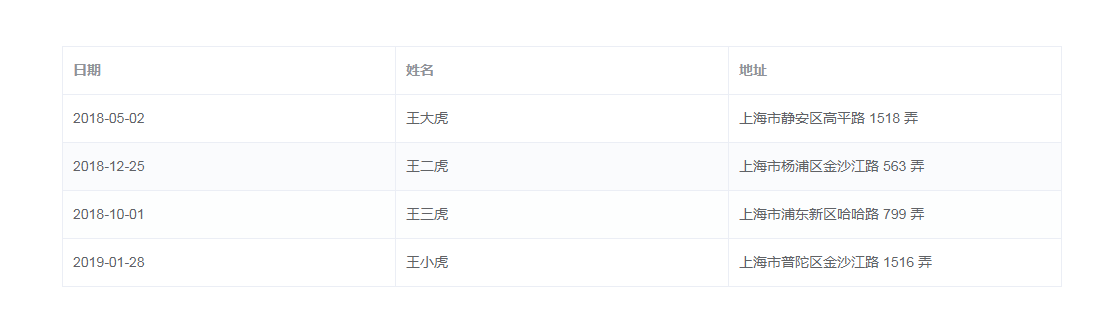
展开行
-
row-key:行数据的 Key,用来优化 Table 的渲染;在使用 reserve-selection 功能的情况下,该属性是必填的。类型为 String 时,支持多层访问:user.info.id,但不支持 user.info[0].id,此种情况请使用 Function。
-
expand-row-keys:可以通过该属性设置 Table 目前的展开行,需要设置 row-key 属性才能使用,该属性为展开行的 keys 数组。
-
type="expand"效果图
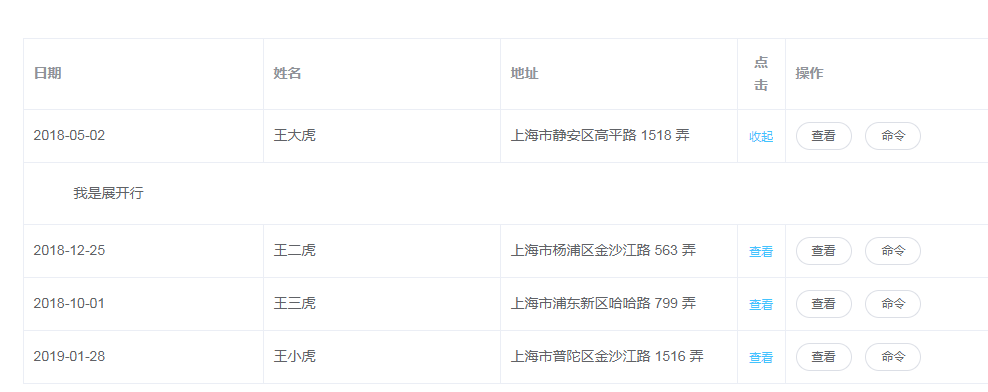
- 操作按钮效果图
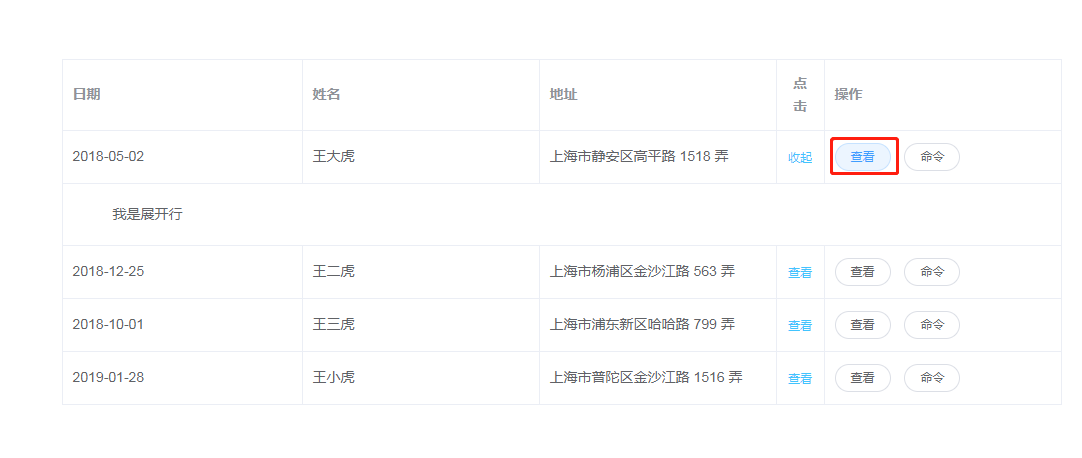
我是展开行
<el-button
round
size="mini"
@click="myClickLook(scope.$index, scope.row)"
>查看
<el-button
round
size="mini"
@click="myClickCommand(scope.$index, scope.row)"
>命令
合并单元格
(九)、JavaScript 中的12种循环遍历方法
-
1、for循环
-
for - 循环代码块一定的次数
-
经常用于数组的循环遍历
let arr = ['苹果','香蕉','梨'];
for (let i=0; i<arr.length; i++){
console.log(i,arr[i])
}
// 0 "苹果"
// 1 "香蕉"
// 2 "梨" -
2、for in 循环
-
for/in - 循环遍历对象的属性
-
key 代表对象的key值,obj[key]代表对应的value值
-
for in循环主要用于遍历普通对象
let obj = {
name: '张三',
age: 18,
sex: '男'
}
for(let key in obj){
console.log(key, obj[key]);
}
// name 张三
// age 18
// sex 男 -
3、while循环
-
While 循环会在指定条件为真时循环执行代码块。
-
只要指定条件为 true,循环就可以一直执行代码。
let cars = ['苹果','香蕉','梨','橘子'];
var i = 0;
while(cars[i]){
console.log(cars[i]);
i++;
}
// 苹果
// 香蕉
// 梨
// 橘子 -
4、do while 循环
-
do while循环是while循环的一个变体,它首先执行一次操作,然后才进行条件判断,是true的话再继续执行操作,是false的话循环结束
let i = 5;
do {
console.log(i);
i--;
}
while(i > 3)
//5
//4 -
5、Array forEach循环
-
forEach() 方法用于调用数组的每个元素,并将元素传递给回调函数。
-
注意: forEach() 对于空数组是不会执行回调函数的。
let arr = ['苹果','香蕉','梨'];
arr.forEach(function(i,index){
console.log(i,index);
})
// 苹果 0
// 香蕉 1
// 梨 2 -
6、Array map()方法
-
map()方法返回一个新数组,数组中的元素为原始数组元素调用函数处理后的值
-
map()方法按照原始数组元素顺序依次处理元素
-
map()不会对空数组进行检测
-
map()不会改变原始数组
-
map 和 forEach 方法都是只能用来遍历数组,不能用来遍历普通对象。
let arr = ['苹果','香蕉','梨'];
let tt = arr.map(function(i){
console.log(i);
})
// 苹果
// 香蕉
// 梨 -
7、Array filter()方法
-
filter() 方法返回符合一定条件的元素
-
filter 方法是 Array 对象内置方法,它会返回通过过滤的元素,不改变原来的数组。
let arr = [1,2,3];
let tt = arr.filter(function(i){
return i > 1;
})
console.log(tt);
//[2, 3] -
8、Array some()方法
-
some()方法用于检测数组中的元素是否满足条件(函数提供),返回boolean值,不改变原数组
let arr = [1,2,3];
let tt = arr.some(function(i){
return i > 1;
})
console.log(tt);//true -
9、Array every()方法
-
every() 方法用于检测数组所有元素是否都符合指定条件(通过函数提供),返回 boolean 值,不改变原数组。
let arr = [1,2,3];
let tt = arr.every(function(i){
return i > 1;
})
console.log(tt);//false -
10、 Array reduce()方法
-
reduce()方法接收一个函数作为累加器,数组中的每个值(从左到右)开始缩减,最终计算为一个值
let arr = [1,2,3];
let add = arr.reduce(function(i,j){
return i+j;
})
console.log(add);//6 -
11、Array reduceRight()方法
-
reduceRight()方法和reduce功能是一样的,它是从数组的末尾处向前开始计算
let arr = [1,2,3];
let add = arr.reduceRight(function(i,j){
return i+j;
})
console.log(add);//6 -
12、for of 循环
let arr = ['苹果','香蕉','梨'];
for(let i of arr){
console.log(i);
}
// 苹果
// 香蕉
// 梨
This is an 原文地址:
零碎知识点
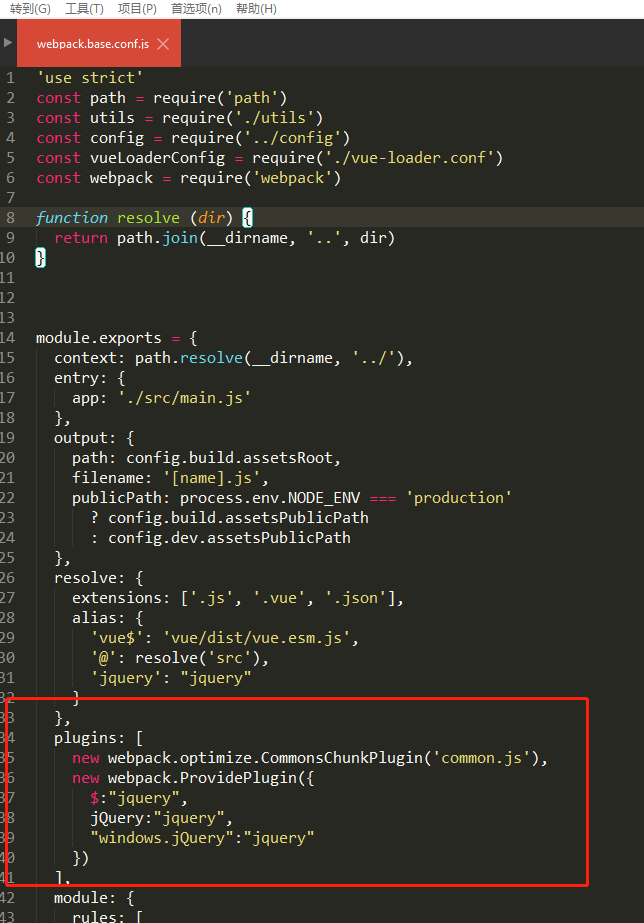
1、vue中如何引入jQuery
- 用vue-cli脚手架工具构建项目成功后当需引入jq
安装
npm install jquery --save
webpack.base.conf.js
const webpack = require('webpack');
module.exports = {
resolve: {
alias:{
'jquery': 'jquery
}
},
plugins:[
new webpack.optimize.CommonsChunkPlugin('common.js');
new webpack.ProvidePlugin({
$:"jquery",
jQuery:"jquery",
"windows.jQuery":"jquery"
})
]
}
在入口文件main.js中输入
import $ from 'jquery'
2 、三元运算符
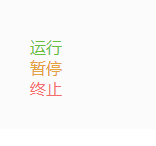
- ? :
- 运用两个三元运算符
- 不同状态变化不同颜色
- 效果图
![]()
html
js
data() {
return {
// 1是运行0是暂停-1是终止
items: [
{
title: '运行',
state: 1
},
{
title: '暂停',
state: 0
},
{
title: '终止',
state: -1
}
]
}
}
css
.cell {
.state-green {
color: #67C23A;
}
.state-orange {
color: #E6A23C;
}
.state-red {
color: #F56C6C;
}
}
3、element-ui 中的table的列隐藏问题解决
-
一般情况我控制元素显示隐藏用vue的v-show
-
el-table-column使用v-show时不支持换成v-if可达到目的
4、vue中'. native'修饰符的使用
-
在父组件中给子组件绑定一个原生的事件,就将子组件变成了普通的HTML标签,不加'. native'事件是无法触 发的。
<Senior class="senior-right" @click="getClick" />
<Senior class="senior-right" @click.native="getClick" />

 浙公网安备 33010602011771号