Flutter配置签名打包全流程填坑笔记
1、配置包名和版本
找到android-app-src-build.gradle文件
在defaultConfig{...}中配置好版本号以及包名

2、生成key
将keytool路径添加进环境变量,cmd命令提示符窗口输入命令:
keytool -genkey -v -keystore D:/key.jks -keyalg RSA -keysize 2048 -validity 10000 -alias key
上述命令表示在D盘生成key.jks密钥文件
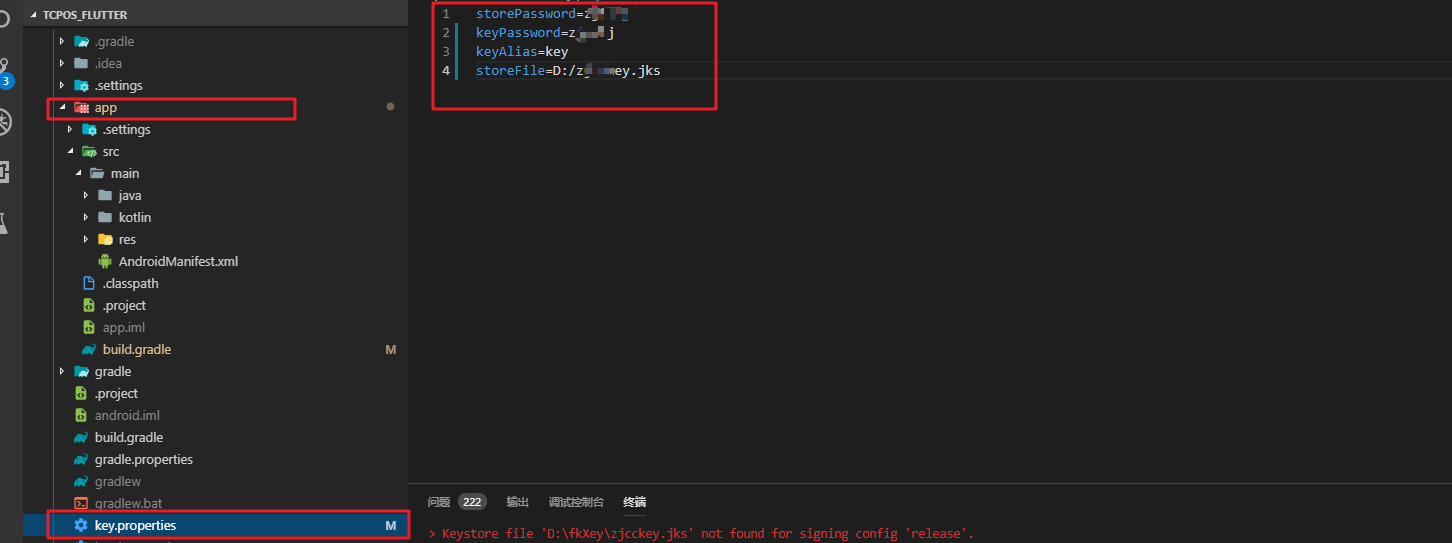
3、创建key.properities
在android目录中创建一个文件,文件名为:`key.properties'
文件内容为:(尖括号为占位符,具体参考下图)
storePassword = <password from previous step>
keyPassword = <password from previous step>
keyAlias = key
storeFile = <location of the key store file, e.g. /Users/<user name>/key.jks>
4、在gradle中配置签名
通过编辑<app dir>/android/app/build.gradle文件为您的应用配置签名
1、替换
android {
为
def keystorePropertiesFile = rootProject.file("key.properties")
def keystoreProperties = new Properties()
keystoreProperties.load(new FileInputStream(keystorePropertiesFile))

android {
2.替换
buildTypes {
    release {
        // TODO: Add your own signing config for the release build.
        // Signing with the debug keys for now, so `flutter run --release` works.
        signingConfig signingConfigs.debug
    }}
为
signingConfigs {
    release {
        keyAlias keystoreProperties['keyAlias']
        keyPassword keystoreProperties['keyPassword']
        storeFile file(keystoreProperties['storeFile'])
        storePassword keystoreProperties['storePassword']
    }
}
buildTypes {
    release {
        signingConfig signingConfigs.release
        ndk {
            abiFilters 'armeabi-v7a'
        }
    }
}
5.flutter平台下默认密钥配置删除(狠一点直接删除build应该也可)
flutter坑就坑在你配置好所有密钥时要去主动删除当前的默认密钥配置参数,找到文件:build/app/intermediates/signing_config/release/out/signing-config.json 情况里面的内容
6.执行打包命令
终端执行命令flutter build apk --release
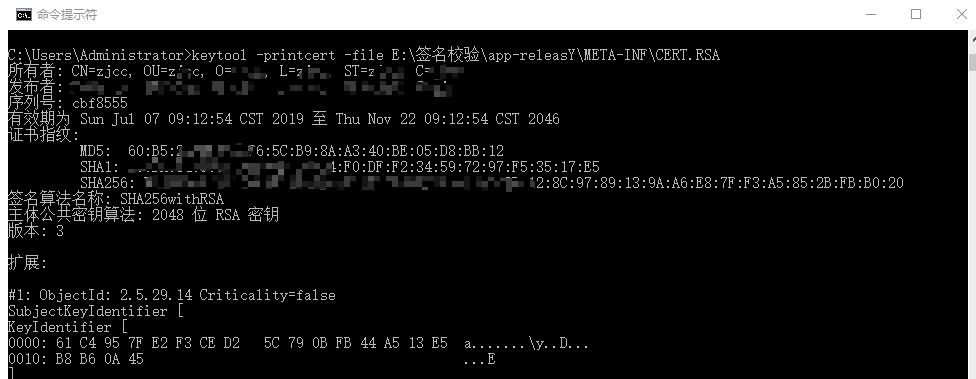
7.检查打包文件是否是自己配置的签名
将打包文件重命名成.zip后缀,解压。
cmd执行:keytool -printcert -file E:\签名校验\app-releasY\META-INF\CERT.RSA
其中app-releasY

 浙公网安备 33010602011771号