ubuntu16.04安装jenkins以及插件配置
1、环境准备
前提:系统必须安装jdk ,ubunt使用默认的install_java.sh安装,此处不赘述jdk安装步骤。
java -version

2、安装jenkins
2.1将存储库密钥添加到系统
在Ubuntu上安装Jenkins相对简单。我们将启用Jenkins APT存储库,导入存储库GPG密钥,并安装Jenkins包。
使用以下wget命令导入Jenkins存储库的GPG键:
apt-get update
wget -q -O - http://pkg.jenkins-ci.org/debian-stable binary/ | apt-key add -
2.2将Debian包存储库地址附加到服务器的sources.list
sh -c 'echo deb http://pkg.jenkins-ci.org/debian-stable binary/ > /etc/apt/sources.list.d/jenkins.list'
2.3 apt-get update
apt-get update
2.3.1安装jenkins报错
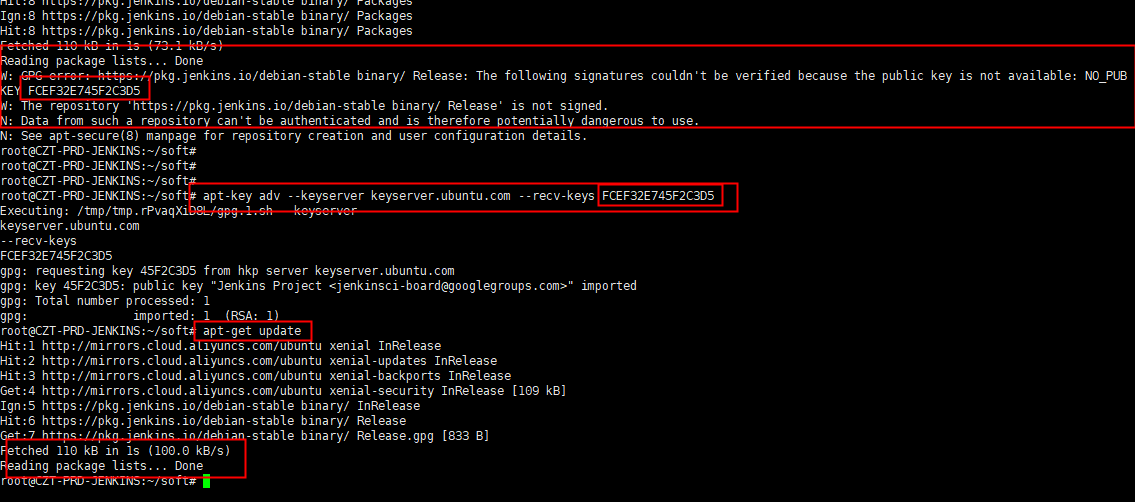
报错:由于没有公钥,无法验证下列签名
W: GPG error: https://pkg.jenkins.io/debian-stable binary/ Release: The following signatures couldn't be verified because the public key is not available: NO_PUBKEY FCEF32E745F2C3D5
解决方法
导入密钥:
apt-key adv --keyserver keyserver.ubuntu.com --recv-keys FCEF32E745F2C3D5
最后的输入keys要和你报错显示的一致哈
如下图
报错:
apt install jenkins报错:
Err:1 https://pkg.jenkins.io/debian-stable binary/ jenkins 2.277.4 gnutls_handshake() failed: Error in the pull function. E: Failed to fetch https://pkg.jenkins.io/debian-stable/binary/jenkins_2.277.4_all.deb gnutls_handshake() failed: Error in the pull function.

报错已经很明显了,是下载源问题,更改以下即可。
sh -c 'echo deb http://pkg.jenkins-ci.org/debian-stable binary/ > /etc/apt/sources.list.d/jenkins.list'
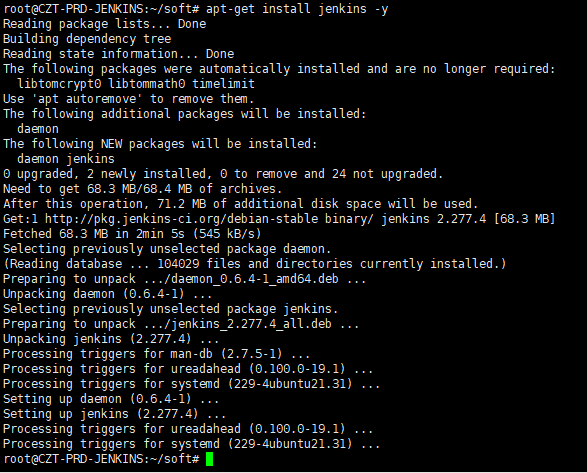
2.4 安装Jenkins
apt-get install jenkins
二、jenkins插件配置
1、更改jenkins工作目录workpace
jenkins默认安装的主目录为:/var/lib/jenkins,最新版本的jenkins在系统页面上高级按钮已经不存在更改选项。只能更改配置文件了。
将自定义目录更改至变量导入
root@jenkinis:vi /etc/profile
export JENKINS_HOME=/data/jenkins
root@jenkinis:source /etc/profile

然后创建目录指定权限
mkdir -p /data/jenkins
chown -R jenkins:jenkins jenkins
重启jenkins
/etc/init.d/jenkins restart
cat /data/jenkins/secrets/initialAdminPassword

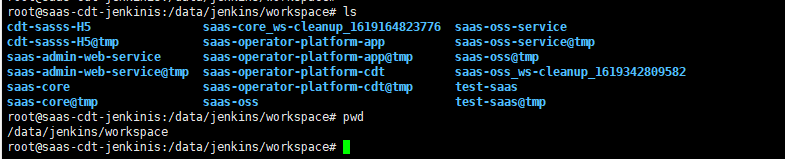
重启之后在全局配置的主目录显示还是/data/jenkins,新建一个项目试下,构建之后发现已经生效/data/jenkins/workspace,以下为jenkins创建的项目。正常使用。
/etc/init.d/jenkins start | restart | stop
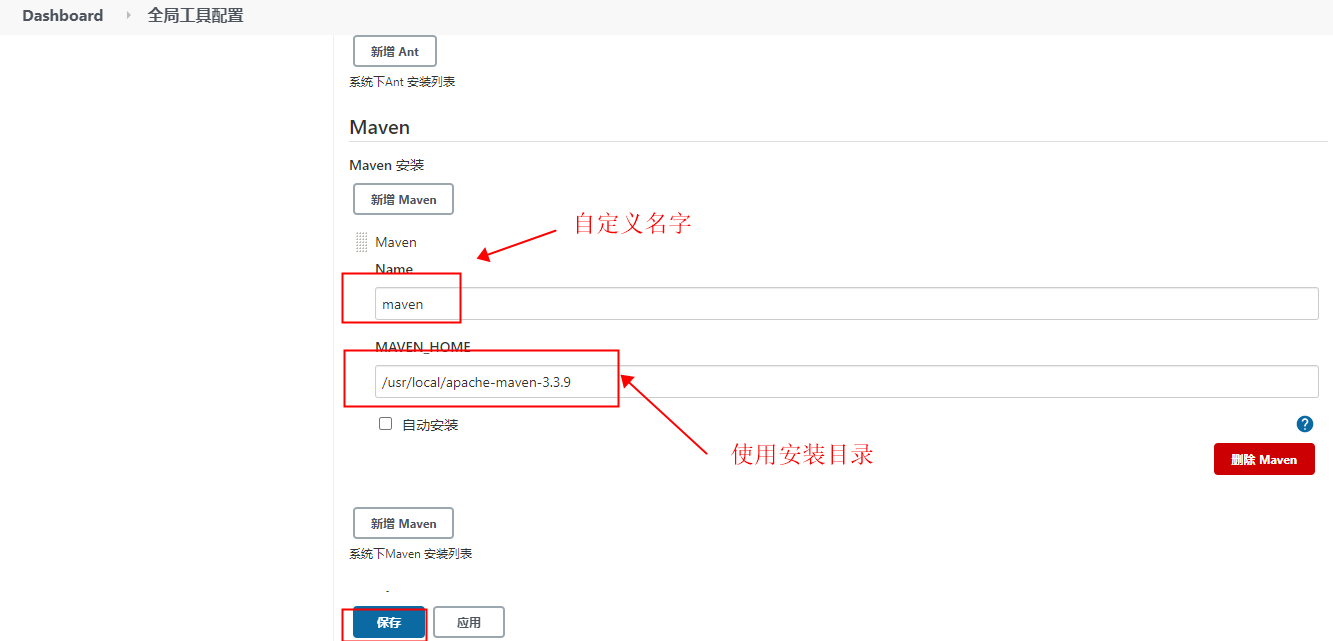
2、安装maven
2.1 自定义版本安装(我使用的是这个)
下载后解压至指定目录安装:
wget https://mirrors.tuna.tsinghua.edu.cn/apache/maven/maven-3/3.3.9/binaries/apache-maven-3.3.9-bin.tar.gz

tar -xvf apache-maven-3.3.9-bin.tar.gz -C /usr/local/
编辑文件变量添加:
vi /etc/profile
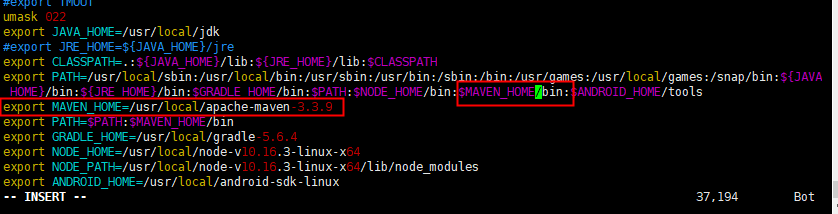
最后加载变量:

在jenkins系统配置页面增加maven配置:
最后配置maven的库配置:
[root@saas-cdt-jenkinis:/usr/local/apache-maven-3.3.9]#pwd
/usr/local/apache-maven-3.3.9
[root@saas-cdt-jenkinis:/usr/local/apache-maven-3.3.9]#mv settings.xml settings.xml.default
[root@saas-cdt-jenkinis:/usr/local/apache-maven-3.3.9]#vi conf/settings.xml
将私服库的登录等配置信息录入:
<?xml version="1.0" encoding="UTF-8"?>
<settings xmlns="http://maven.apache.org/SETTINGS/1.0.0"
          xmlns:xsi="http://www.w3.org/2001/XMLSchema-instance"
          xsi:schemaLocation="http://maven.apache.org/SETTINGS/1.0.0 http://maven.apache.org/xsd/settings-1.0.0.xsd">
  <localRepository>/data/jenkins/repo</localRepository>
  <pluginGroups></pluginGroups>
  <proxies></proxies>

  <servers>
      <server>
      <id>nexus-releases</id>
      <username>admin</username>
      <password>admin123</password>
    </server>
    <server>
      <id>nexus-snapshots</id>
      <username>admin</username>
      <password>admin123</password>
    </server>
  </servers>

  <mirrors>
    <mirror>
      <id>nexus-releases</id>
      <mirrorOf>*,!saas-local</mirrorOf>
      <url>http://192.168.224.234:8081/repository/maven-public/</url>
    </mirror>
    <mirror>
      <id>nexus-snapshots</id>
      <mirrorOf>*,!saas-local</mirrorOf>
      <url>http://192.168.224.234:8081/repository/maven-snapshots/</url>
    </mirror>
  </mirrors>

  <profiles>
   <profile>
      <id>nexus</id>
      <repositories>
        <repository>
          <id>nexus-releases</id>
          <url>http://nexus-releases</url>
          <releases><enabled>true</enabled></releases>
          <snapshots>
              <enabled>true</enabled>
              <updatePolicy>always</updatePolicy>
          </snapshots>
        </repository>
        <repository>
          <id>nexus-snapshots</id>
          <url>http://nexus-snapshots</url>
          <releases><enabled>true</enabled></releases>
          <snapshots>
             <enabled>true</enabled>
             <updatePolicy>always</updatePolicy>
          </snapshots>
        </repository>
      </repositories>
      <pluginRepositories>
         <pluginRepository>
                <id>nexus-releases</id>
                 <url>http://nexus-releases</url>
                 <releases><enabled>true</enabled></releases>
                 <snapshots><enabled>true</enabled></snapshots>
               </pluginRepository>
               <pluginRepository>
                 <id>nexus-snapshots</id>
                  <url>http://nexus-snapshots</url>
                <releases><enabled>true</enabled></releases>
                 <snapshots><enabled>true</enabled></snapshots>
             </pluginRepository>
         </pluginRepositories>
    </profile>
    <profile>
        <id>jdk18</id>
        <activation>
                <activeByDefault>true</activeByDefault>
                <jdk>1.8</jdk>
        </activation>
        <properties>
                <maven.compiler.source>1.8</maven.compiler.source>
                <maven.compiler.target>1.8</maven.compiler.target>
                <maven.compiler.compilerVersion>1.8</maven.compiler.compilerVersion>
        </properties>
     </profile>
  </profiles>

  <activeProfiles>
      <activeProfile>nexus</activeProfile>
  </activeProfiles>

</settings>
最后验证mvn版本成功:

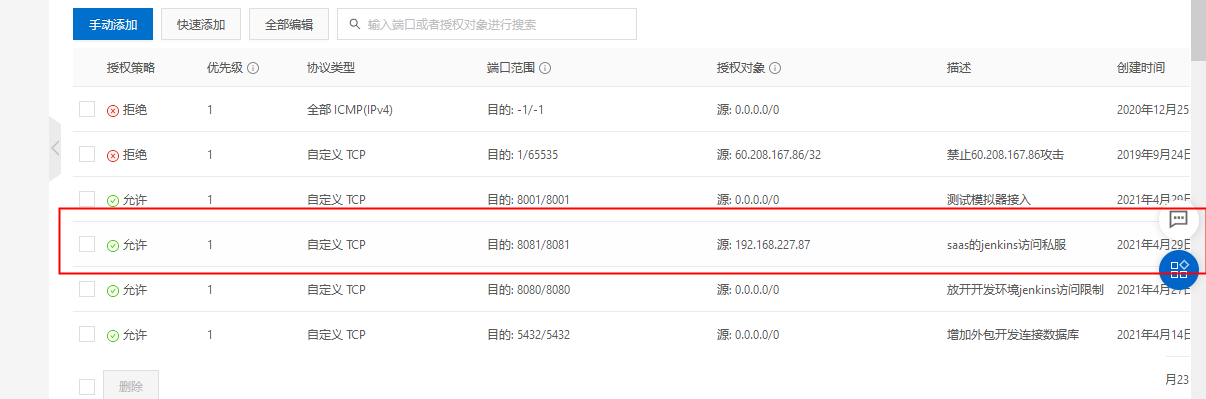
备注:访问maven私服权限
maven私服仓库192.168.224.234设置了安全组,默认的8081端口需要增加jenkins的访问权限,如下图:
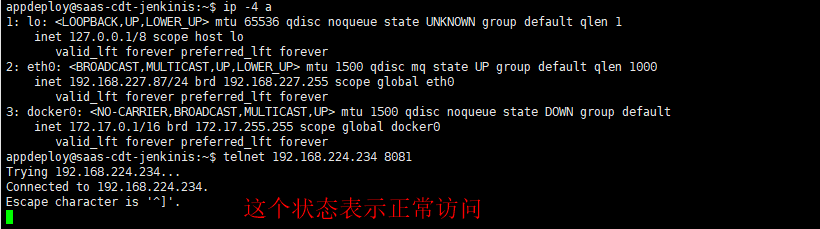
在jenkins机器上验证访问:
2.2使用系统插件安装
系统管理>插件管理>可选插件>
然后在右边的过滤输入框中输入搜索关键字: Maven Integration 或者 Pipeline Maven Integration ,搜索到了以后,点击直接安装,
安装完成后重启就好了。 我这安装的是 Maven Integration
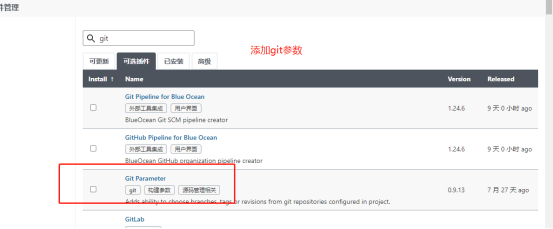
3、安装git参数插件
4、安装Gradle
这个包的功能是提供打包apk生成apk文件,
下载地址:https://gradle.org/releases/
下载gradle-5.6.4-all.zip包,将包解压至/usr/local目录并加入变量文件

变量文件配置:
vi /etc/profile 我是root用户编辑
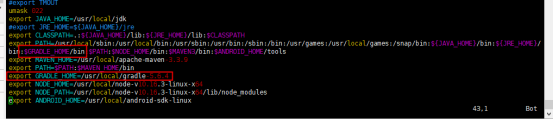
最后source /etc/profile加载变量
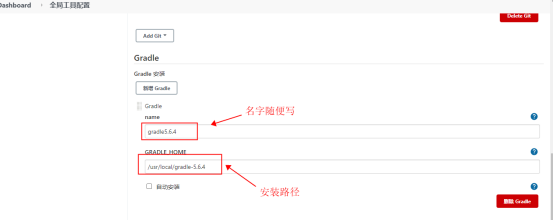
在Jenkins上加载Gradle配置
Jenkins的dashboard主页面>>系统管理>>全局工具配置>>Gradle 设置安装路径最后保存
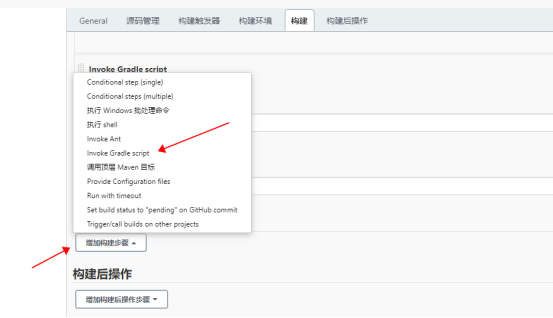
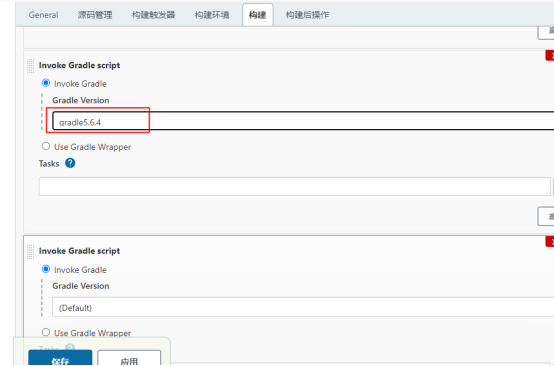
验证是否安装。随便新建一个项目>>增加构建步骤>>Invoke Gradle script
至此,自定义版本安装完成, 也可以在插件里面选择此插件进行安装。
5 安装Node.js
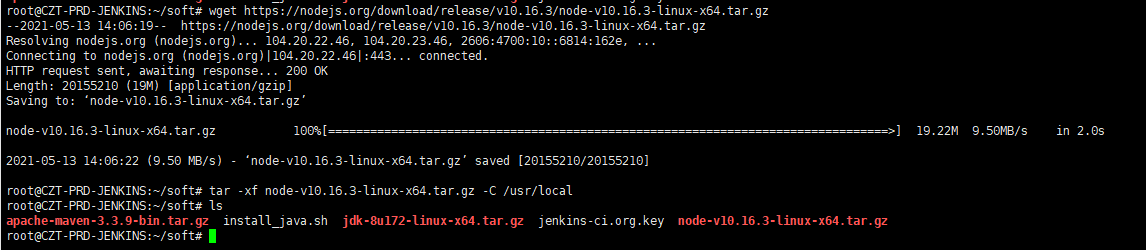
下载安装的是:https://nodejs.org/download/release/v10.16.3/node-v10.16.3-linux-x64.tar.gz
下载解压至/usr/local/
tar -xf node-v10.16.3-linux-x64.tar.gz -C /usr/local
添加变量/etc/profile
export NODE_HOME=/usr/local/node-v10.16.3-linux-x64
export NODE_PATH=/usr/local/node-v10.16.3-linux-x64/lib/node_modules
export PATH=$NODE_HOME/bin

保存退出加载变量生效:
source /etc/profile
创建一个软连接将自己的node的执行文件指到/usr/local/bin/node上,于是修改如下:
[root@CZT-PRD-JENKINS:]#ln -s /usr/local/node-v10.16.3-linux-x64/bin/node /usr/local/bin/
[root@CZT-PRD-JENKINS:]#ln -s /usr/local/node-v10.16.3-linux-x64/bin/npm /usr/local/bin/
不然会报错:
/usr/bin/env: node: No such file or directory
6 安装dos2unix
[root@CZT-PRD-JENKINS:/root/soft]#apt-get install dos2unix  直接安装即可
Reading package lists... Done
Building dependency tree
Reading state information... Done
The following packages were automatically installed and are no longer required:
  libtomcrypt0 libtommath0 timelimit
Use 'apt autoremove' to remove them.
The following NEW packages will be installed:
  dos2unix
0 upgraded, 1 newly installed, 0 to remove and 24 not upgraded.
Need to get 68.7 kB of archives.
After this operation, 306 kB of additional disk space will be used.
Get:1 http://mirrors.cloud.aliyuncs.com/ubuntu xenial/universe amd64 dos2unix amd64 6.0.4-1 [68.7 kB]
Fetched 68.7 kB in 0s (819 kB/s)
Selecting previously unselected package dos2unix.
(Reading database ... 104048 files and directories currently installed.)
Preparing to unpack .../dos2unix_6.0.4-1_amd64.deb ...
Unpacking dos2unix (6.0.4-1) ...
Processing triggers for man-db (2.7.5-1) ...
Setting up dos2unix (6.0.4-1) ...
三、连接gitlab
1、域名解析添加
我司只有一个gitlab仓库,存放本地,使用公网ip映射,端口是8083,在阿里云内网jenkins服务器增加本地解析,如下:
appdeploy@saas-cdt-jenkinis:~$ cat /etc/hosts | grep git
61.141.xxx.3    gitlab.smartcharge.com
appdeploy@saas-cdt-jenkinis:~$
2、项目添加gitlab地址

说明:gitlab服务器信息实际为本地办公网服务器10.101.72.226,使用了电信公网ip:61.141.xx.3
http://pkg.jenkins-ci.org/debian-stable binary/

 浙公网安备 33010602011771号