android常见问题
1、广播接收器中启动Activity,需要在intent中添加FLAG_ACTIVITY_NEW_TASK
/**
 * Demo描述:
 * 在BroadcastReceiver中启动Activity的问题
 *
 * 如果在BroadcastReceiver的onReceive()方法中如下启动一个Activity
 * Intent intent=new Intent(context,AnotherActivity.class);
 * context.startActivity(intent);
 * 可捕获异常信息:
 * android.util.AndroidRuntimeException:
 * Calling startActivity() from outside of an Activity context requires the FLAG_ACTIVITY_NEW_TASK flag.
 * Is this really what you want?
 * 它说明:在Activity的context(上下文环境)之外调用startActivity()方法时
 * 需要给Intent设置一个flag:FLAG_ACTIVITY_NEW_TASK
 *
 * 所以在BroadcastReceiver的onReceive()方法中启动Activity应写为:
 * Intent intent=new Intent(context,AnotherActivity.class);
 * intent.setFlags(Intent.FLAG_ACTIVITY_NEW_TASK);
 * context.startActivity(intent);
 *
 *
 * 之前描述了问题的现象和解决办法,现在试着解释一下原因:
 * 1 在普通情况下,必须要有前一个Activity的Context,才能启动后一个Activity
 * 2 但是在BroadcastReceiver里面是没有Activity的Context的
 * 3 对于startActivity()方法,源码中有这么一段描述:
 *   Note that if this method is being called from outside of an
 *   {@link android.app.Activity} Context, then the Intent must include
 *   the {@link Intent#FLAG_ACTIVITY_NEW_TASK} launch flag.  This is because,
 *   without being started from an existing Activity, there is no existing
 *   task in which to place the new activity and thus it needs to be placed
 *   in its own separate task.
 *   说白了就是如果不加这个flag就没有一个Task来存放新启动的Activity.
 *
 * 4 其实该flag和设置Activity的LaunchMode为SingleTask的效果是一样的
 *
 *
 * 如有更加深入的理解,请指点,多谢
 *
 */
该flag和设置Activity的LaunchMode为SingleTask的效果是一样的,这里理解其实并不是非常准确
2、http://stackoverflow.com/questions/4709137/solution-to-install-failed-insufficient-storage-error-on-android
3、
substring(参数)是java中截取字符串的一个方法
有两种传参方式
一种是public String substring(int beginIndex)
返回一个新的字符串,它是此字符串的一个子字符串。该子字符串从指定索引处的字符开始,直到此字符串末尾。
另一种是public String substring(int beginIndex, int endIndex)
返回一个新字符串,它是此字符串的一个子字符串。该子字符串从指定的 beginIndex 处开始,直到索引 endIndex - 1 处的字符。
因此,该子字符串的长度为 endIndex-beginIndex。
4、导入google的第三方jar包:GSON时,出现如下问题:
java.lang.NoClassDefFoundError: com.google.gson.Gson
解决方法:右键点该项目,选Build Path-->Configure Build Path  选上gson,然后ok,然后关闭eclipse,重新打开后即可

4、The value for annotation attribute ViewInject.value must be a consta

添加注解的第三方库library是不要勾选上is library选项

5、 java.lang.IllegalStateException The specified child already has a parent. You must call removeView()
在android开发过程中,有时会在不同情况下遇到同种问题:
- java.lang.IllegalStateException The specified child already has a parent. You must call removeView() on the child's parent first.
- java.lang.IllegalStateException The specified child already has a parent. You must call removeView() on the child's parent first.
也就是非法状态异常,它说这个特定的child已经有一个parent了,你必须在这个parent中首先调用removeView()方法,才能继续你的内容。这里很明显这个child是一个View,一个子(child)View必须依赖于父(parent)View,如果你要使用这个child,则必须通过parent,而你如果就是硬想使用这个child,那么就得让这个child与parent脱离父子关系(即removeView())……算了还是举个简单的例子来说明一下,省的我说的乱七八糟,你听的也晕。
新建一个项目,布局文件中仅包含一个TextView和一个ImageView,布局方式是线性布局(具体可以参考后面的源代码),运行的结果就是显示一个文本和一张图片,
在Activity的onCreate()方法中,我们通常使用以下这种方式来使用布局文件main.xml。
- setContentView(R.layout.main);
这里为了解释今天要讲解的这个异常,换一种布局文件的使用方式,即把上面的那一行代码注释掉,换成以下代码://获取Infalter对象
- LayoutInflater inflater = (LayoutInflater) getSystemService(LAYOUT_INFLATER_SERVICE);
- LinearLayout parent = (LinearLayout) inflater.inflate(R.layout.main, null);
- ImageView child = (ImageView)parent.findViewById(R.id.child);
- setContentView(parent);
LayoutInflater为布局填充类,不明白的可以自己查,或者有机会我将在博客中介绍一下,然后是将main.xml文件inflate为LinearLayout文件,再得到child,即ImageView。然后就是通过调用setContentView(parent)将这个布局main.xml显示出来,这时得到的效果和仅使用setContentView(R.layout.main)这句代码得到的效果一样。下面的操作将会出现异常了,大家注意:
- setContentView(child);
也就是将上文setContentView(parent),中的parent换成child。异常请看如下截图:

而这时在异常中它提示要再parent中调用removeView()。这里我们就听从指挥,在setContentView(child),之前添上一句parent.removeView(child),这时就不会再调用setContentView(child)就不会异常了,当然当前显示的将只是一幅图片了,而这时如果你调用setContentView(parent)的话将只显示文本内容,因为我们已经将child remove掉了嘛。
5、eclipse导入别人的项目,中文总是出现乱码该怎么解决?
菜单栏点击window 选择perferneces  出现个弹出框
选择General 选项中的Workspace 这选项
里面有个Text file encoding  这个选项 此处根据导入代码的中文编码方式来选择,不知道的情况下可以随意尝试一般采用UTF-8或GBK格式
6、使用Genymotion调试出现错误INSTALL_FAILED_CPU_ABI_INCOMPATI
当我们安装好Genymotion后,把Android运用部署到上面调试时,console控制台会报错:Installation error: INSTALL_FAILED_CPU_ABI_INCOMPATIBLE,这是因为系统里缺少了 Google Play 市场等各种谷歌服务应用,其实是因为版权问题,从 2.0 版本开始 Genymotion 提供的虚拟设备都已经移除了 Google Apps 以及 ARM library support ,所以,如果通过软件里下载回来的虚拟机在运行一些必须依靠这些组件运行的 App 时就会出现错误或闪退现象。
解决办法:
-
运行Genymotion,并start你配置好的virtual device
![]()
-
将下载好的Genymotion-ARM-Translation.zip直接拖动到virtual device,然后点击ok:
![]()
-
最后会弹出安装成功的信息
![]()


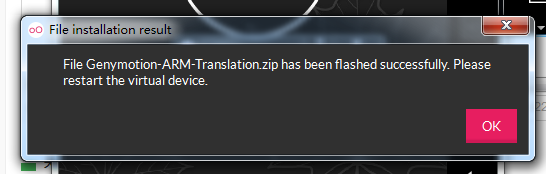
5.关闭virtual device以及Genymotion,重新启动。
再次部署Android应用在上面就可以成功了
6、Suggestion: use tools:overrideLibrary="android.support.v17.leanback" to force usag
Android Studio下修改方法:
在manifest中添加<uses-sdk tools:overrideLibrary="android.support.v17.leanback"/>,不要忘了也要包含xmlns:tools="http://schemas.android.com/tools"。如下图:


 浙公网安备 33010602011771号