GUI基础
AWT
介绍
-
包含很多类和接口
-
元素:窗口,按钮,文本框
-
都在java.awt包下
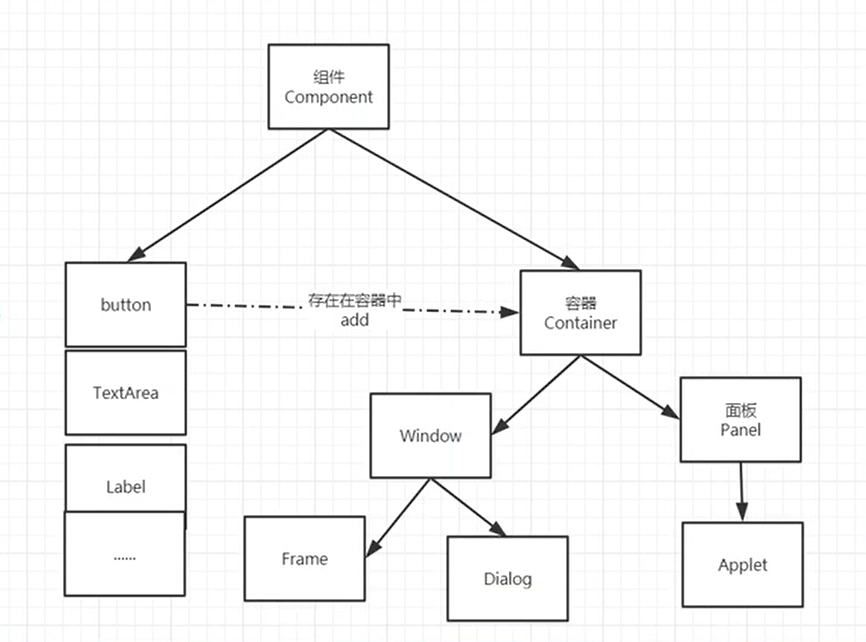
组件和容器
Frame 框架
// Frame
Frame frame = new Frame("我的第一个java图形界面");

// 需要设置可见性
frame.setVisible(true);

// 一般使用 setBounds(200,200,400,400)效果同下两行代码
// 弹出初识位置
frame.setLocation(200,200);
// 设置窗口大小
frame.setSize(400,400);

// 设置颜色背景 Color
frame.setBackground(new Color(87, 206, 239));

// 设置大小固定 默认true,可改变大小
frame.setResizable(false);
Panel 面板
必须放在Frame里
Frame frame = new Frame();
Panel panel = new Panel();

// 设置布局
frame.setLayout(null);  // 删去此行代码则frame全为panel

// 坐标,颜色
frame.setBounds(200,200,500,500);
frame.setBackground(new Color(91, 195, 205));

// panel设置坐标,相对于frame
panel.setBackground(Color.MAGENTA);
panel.setBounds(50,50,400,400);

// frame.add(panel)
frame.add(panel);

frame.setVisible(true);

// 监听事件,监听窗口关闭事件 System.exit(0)
// **适配器模式**,可单独重写某种方法
frame.addWindowListener(new WindowAdapter() {
    // 窗口点击关闭的时候需要做的事情
    @Override
    public void windowClosing(WindowEvent e) {
        // 结束程序
        System.exit(0);
    }
});
布局管理器
Frame和Panel均可使用布局
add()方法里添加布局是元素的布局
// Panel或Frame的布局
Panel p1 = new Panel(new BorderLayout());

// Button(或其他的)在Panel中的布局
p1.add(new Button("btn"), FlowLayout());
-
流式布局:setFlowLayout()
-
东西南北中:setBorderLayout()
-
表格布局:setGridLayout(rows,cols,hgap,vgap)
事件监听器
ActionListener:事件发生时,监听器干什么
implements ActionListener
重写actionPerformed(ActionEvent e)方法
// 添加事件监听,传入ActionListener的实现类
button.addActionListener();

// ActionListener是函数式接口
@Override
public void actionPerformed(ActionEvent e) {
    // 触发监听器后执行的代码
	}
}
按钮监听
两个对象共用一个事件监听
Frame frame = new Frame("开始和停止");
Button btn1 = new Button("start");
Button btn2 = new Button("stop");

// 可以显式的定义出发回返回的命令,如果不显式定义,则会走默认值!
btn2.setActionCommand("button2-stop");

MyMonitor mm = new MyMonitor();

// 添加同一个监视器
btn1.addActionListener(mm);
btn2.addActionListener(mm);


class MyMonitor implements ActionListener {
    @Override
    public void actionPerformed(ActionEvent e){
        // e.getActionCommand()  获得按钮的信息(即按钮的label)
        System.out.println("按钮被点击了:msg==>" + e.getActionCommand());
        if (e.getActionCommand().equals("start")){
            // 代码块
        }
    }
}
输入框监听
TextField:文本框
null是个对象,""是个字符串
textField.addActionListener(myActionListener2);  //textField交给myActionListener2代理


class MyActionListener2 implements ActionListener {
    @Override
    public void actionPerformed(ActionEvent e) {
        // 输入框的对象是 field
        // 获取资源,转成TextField对象
        TextField field = (TextField) e.getSource();  // 获取资源,返回了一个对象
        // 打印
        System.out.println(field.getText());  // 获得输入框的文本
        // 将field设置为""
        field.setText("");

        // 应该有个内嵌循环,又回到textField框
    }
}
组合,内部类
- 组合
opp原则:组合,大于继承
// 继承
class A extends B{

}

//  组合,A可以使用B的全部方法
class A {
    public B b;
}
- 内部类,局部内部类
public class A{
    // 属性

    // 方法(构造器)
    A(){
        // 局部内部类
        public class C{}
    }

    // 内部类
    private class B{
        // 可以直接访问外部类(访问其属性和方法)
    }
}
画笔
新建类继承自Frame,重写Paint方法,通过Graphics g来画画。
class MyPaint extends Frame {
    public void loadFrame() {
        setBounds(200, 200, 600, 500);
        setVisible(true);
    }

    // 画笔
    @Override
    public void paint(Graphics g) {
        // 画笔,需要有颜色,画笔可以画画
        g.setColor(Color.red);
        g.drawOval(100, 100, 100, 100);  // 空心圆
        g.fillOval(300, 300, 100, 100);  // 实心圆
        g.setColor(Color.green);  // 设置颜色
        g.fillRect(400, 400, 200, 200);  // 矩形

        // 用完画笔,将颜色还原最初颜色
        g.setColor(Color.black);

    }
}
监听
new 相应Adapter,重写相应方法
鼠标监听
MouseListener:鼠标监听器
重写方法:
MouseClick:点击
MouseRelease:释放
MousePressed:按下
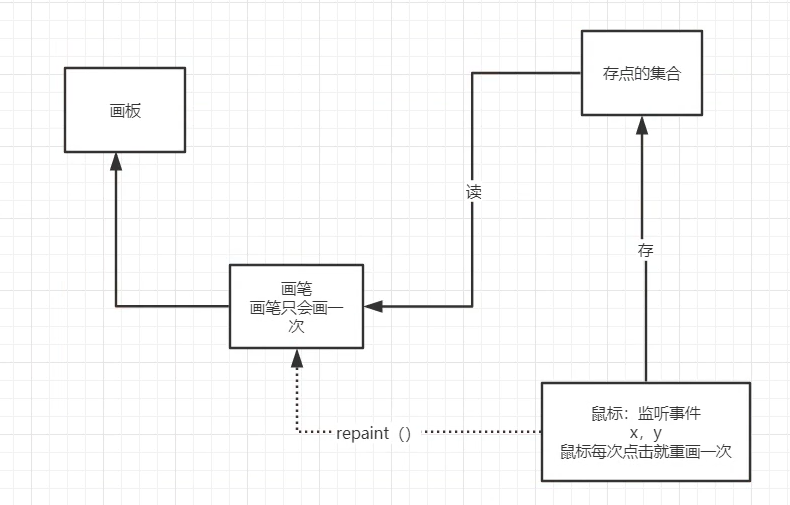
鼠标监听通过e.getX,e.getY获取坐标点
每pressed一次就new一个point
通过方法传入ArrayList集合
通过迭代器获取点
使用画笔画点
// 鼠标监听事件
public class TestMouseListener {
    public static void main(String[] args) {
        new MyFrame("我的paint");
    }
}

// 自己的类
class MyFrame extends Frame {
    // 画画需要画笔,需要监听鼠标当前位置,需要集合来存储这个点
    ArrayList points;

    public MyFrame(String title){
        super(title);
        setBounds(200,200,400,400);

        // 存鼠标点击的点
        points = new ArrayList();

        // 鼠标监听器,监听这个窗口
        this.addMouseListener(new MyMouseListener());

        setVisible(true);
    }

    @Override
    public void paint(Graphics g) {
        // 画画,监听鼠标的事件
        Iterator iterator = points.iterator();
        while (iterator.hasNext()) {
            Point point = (Point) iterator.next();
            g.setColor(Color.red);
            g.fillOval(point.x, point.y,10,10);

        }
    }

    // 添加一个点到界面上
    public void mousePointToPaint(Point point){
        points.add(point);
    }

    // 适配器模式
    private class MyMouseListener extends MouseAdapter {
        // 鼠标 按下click,弹起release,按住不放pressed
        @Override
        public void mousePressed(MouseEvent e) {  // e对象表示当前的鼠标
            // 获取Frame或其子类e.getSource()
            MyFrame frame = (MyFrame) e.getSource();

            // 这个点我们按住不放的时候,会在界面产生一个点
            // 这个点就是鼠标的坐标
            frame.mousePointToPaint(new Point(e.getX(),e.getY())); // 获取点,存入Point,传入mpsp方法

            // 每次点击鼠标,需要重画一遍
            frame.repaint();

        }
    }

}
窗口监听
WindowListener
重写方法:
windowClosing()
windowActivated()
this.addWindowListener(
    // 匿名内部类
    new WindowAdapter() {
        // 关闭窗口
        @Override
        public void windowClosing(WindowEvent e) {
            System.out.println("windowClosing");
            System.exit(0);
        }

        // 激活窗口
        @Override
        public void windowActivated(WindowEvent e) {
            WindowFrame source = (WindowFrame)  e.getSource();
            source.setTitle("被激活了");
            System.out.println("windowActivated!");
        }
    });
键盘监听
KeyListener
重写方法:
KeyTyped:点击
KeyPressed:按下
KeyReleased:释放
@Override
public void keyPressed(KeyEvent e) {
    int keyCode = e.getKeyCode();  // 获取当前键盘按下键的码

    System.out.println(keyCode);  // 输出码

    if (keyCode == KeyEvent.VK_UP) {  // 不用去记录值,直接使用静态属性
        System.out.println("你按下了上键");
    }
Swing
窗口,面板
JFrame:框架
JPanel:面板
在swing里,顶级窗口JFrame是放在容器Container中
getContentsPane():获取容器
JFrame jf = new JFrame("这是JFrame窗口");

// 设置文字
JLabel label = new JLabel("Coline在学习Java");

// 关闭事件
jf.setDefaultCloseOperation(WindowConstants.EXIT_ON_CLOSE);


// 让文本标签居中
label.setHorizontalAlignment(SwingConstants.CENTER);

// 获得一个容器
Container container = this.getContentPane();  // 顶级窗口也是放在容器当中的,在swing里
container.setBackground(Color.red);
弹窗
Dialog:弹窗
class继承自JDialog即可
class MyDialogDemo extends JDialog{
    public MyDialogDemo() {
        this.setVisible(true);
        this.setBounds(100,100,500,500);
        // this.setDefaultCloseOperation(WindowConstants.EXIT_ON_CLOSE);  // 弹窗默认自带了关闭窗口

        Container container = this.getContentPane();
        container.setLayout(null);

        JLabel label = new JLabel("这是container的Label");
        label.setBounds(0,0,100,100);

        container.add(label);

    }
}
标签
JLabel
new JLabel("xxx");
图标Icon
// 小圆点
IconDemo iconDemo = new IconDemo(15, 15);
// 图标放在标签,也可以放在按钮上
JLabel label = new JLabel("icontest", iconDemo, SwingConstants.CENTER);

Container container = getContentPane();
container.add(label);
图片Icon
JLabel label = new JLabel("ImageIcon");
URL url = ImageIconDemo.class.getResource("Lady.jpg");  // 获取图片地址

ImageIcon imageIcon = new ImageIcon(url);  // 创建图片
label.setIcon(imageIcon);  // setIcon方法添加图片

label.setHorizontalAlignment(SwingConstants.CENTER);  // label布局

Container container = getContentPane();
container.add(label);
滚动面板
new JScrollPane(传入元素)
container.add(传入scrollPane)
// 文本域
JTextArea textArea = new JTextArea(20,50);
textArea.setText("欢迎来到JTextArea");

// Scroll面板
JScrollPane scrollPane = new JScrollPane(textArea);

container.add(scrollPane);
按钮
图片变为图标放在按钮上
// 1.将图片变为图标
URL resource = JButtonDemo01.class.getResource("Lady.jpg");
Icon icon = new ImageIcon(resource);

// 2.把这个图标放在按钮上
JButton button = new JButton();
button.setIcon(icon);  // 设置图标
button.setToolTipText("悬停-图片按钮");  // 工具提示文本


// add
container.add(button);
-
单选按钮
-
new JRadioButton():新建单选框
-
new ButtonGroup():新建组
-
group.add(raidoButton):单选框放入组
// 单选框 JRadioButton radioButton1 = new JRadioButton("JRadioButton1"); JRadioButton radioButton2 = new JRadioButton("JRadioButton2"); JRadioButton radioButton3 = new JRadioButton("JRadioButton3"); // 单选框只能选一个,分组 ButtonGroup group = new ButtonGroup(); group.add(radioButton1); group.add(radioButton2); group.add(radioButton3); -
-
复选按钮
new JCheckBox()
JCheckBox checkBox1 = new JCheckBox("checkbox1");
JCheckBox checkBox2 = new JCheckBox("checkbox2");

container.add(checkBox1,BorderLayout.NORTH);
container.add(checkBox2,BorderLayout.SOUTH);
列表
-
下拉框
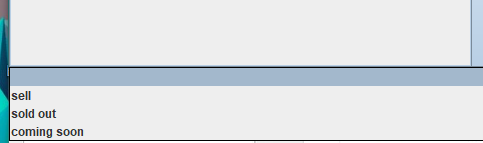
new JComboBox()
JComboBox status = new JComboBox();

// 添加下拉框元素
status.addItem(null);
status.addItem("sell");
status.addItem("sold out");
status.addItem("coming soon");

// 最好放入Panel中
-
列表框
new JList()
// 生成列表的内容
//String[] contents = {"1", "2", "3"};

Vector contents = new Vector();

// 列表中需要放入内容
JList jList = new JList(contents);

contents.add("张三");
contents.add("lisi");
contents.add("jack");

文本框
-
文本框:new JTextField()
-
密码框:new JPasswordField()
-
文本域:new JTextArea()

 浙公网安备 33010602011771号