
ASP.NET: Setup a MVC5 website with MySQL, Entity Framework 6 Code-First and VS2013
The new features available in EF6 allow any developer to build a simple DB-powered website with very few lines of code. There are many tutorials explaining how to do that with SQL Express available on the web, but those who want (or are forced) to use MySQL will most likely find a quite smaller amount of literature. I wrote this simple guide for those who asked me to summarize all the required steps to build a MySQL-powered MV5 website using Visual Studio 2013 and Entity Framework 6. For the first steps I’m gonna quote the old good Getting started with Entity Framework 6 Code First using MVC5 available on www.asp.net website, which also holds the credits for the images I used.
Let’s start with a list of everything we’re gonna need (and their free download links):
- Visual Studio 2013, downloadable here (free 90-days trial edition).
- .NET Framework 4.5 or higher, downloadable here.
- Entity Framework 6 or higher, available on NuGet platform.
- MySQL Server 5.6 or higher, downloadable from the official site, or a free or paid access to a remotely-hosted MySQL database service of your choice.
- MySQL Connector.NET 6.9.4 or higher, downloadable from the official site or using NuGet.
Step 1. Creating a new Web Application
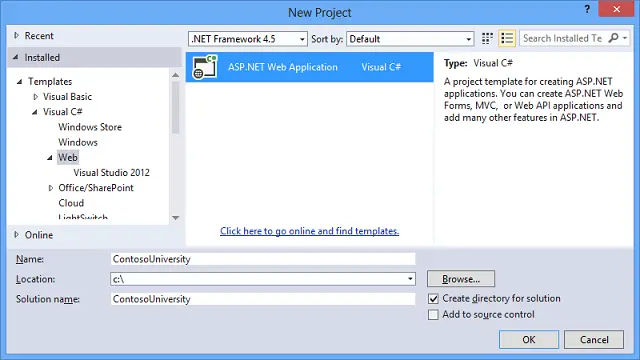
Let’s start Visual Studio 2013 and create a new C# project just like that:
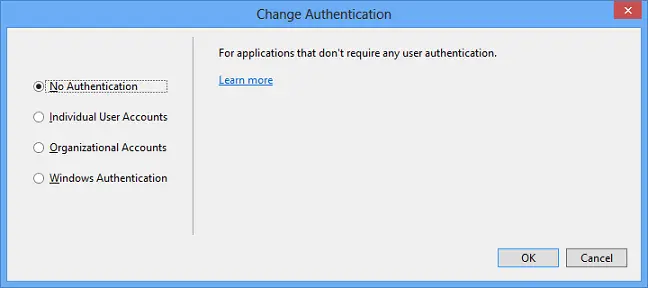
In the following screen we’re gonna choose the MVC template, then we’re click to the Change Authentication… button where we can choose if we want to enable authentication mechanism or not. The answer here depends on the features we need to have in the website we’re building: for this example we do not need any authentication system, so we can choose No Authentication.
The next steps are kinda obvious, we just have to click a couple OKs to end the web application creation phase.
Step 2. Installing the Entity Framework
From the Tools menu, select Library Package Manager and then Package Manager Console. Insert the following command:
> Install-Package EntityFramework
NuGet will automatically download and install the most recent version of the Entity Framework (currently 6.1.1). As soon as the tasks is completed we can start creating our Entities following the code-first approach.
Step 3. Creating the Entity Classes
It’s worth to mention that an Entity isn’t anything more than a class designed to hold all the relevant fields about a single element (i.e. row) of our Database. That’s why before we start creating Entities we definitely need to have a decent idea about what we need and, most importantly, which kind of relationship our elements are gonna have. For this example let’s just flush out an evergreen classic: The Student-Enrollment-Course archive. Here’s what we’re gonna have:
- a list of Students
- signing up to zero-or-more Enrollments
- related to zero-or more Courses
In order to build such a model we need to open the /Models/ folder (creating it if it doesn’t exists) and add the following three classes:
using System;
using System.Collections.Generic;

namespace MyApplication.Models
{
    public class Student
    {
        public int ID { get; set; }
        public string LastName { get; set; }
        public DateTime EnrollmentDate { get; set; }

        public virtual ICollection<Enrollment> Enrollments { get; set; }
    }
}
using System;

namespace MyApplication.Models
{
    public class Enrollment
    {
        public int EnrollmentID { get; set; }
        public int CourseID { get; set; }
        public int StudentID { get; set; }
        [crayon-567743939cb3f039488039 inline="true" ]
        public virtual Course Course { get; set; }
        public virtual Student Student { get; set; }
     }
}
using System.Collections.Generic;
using System.ComponentModel.DataAnnotations.Schema;

namespace MyApplication.Models
{
    public class Course
    {
        [DatabaseGenerated(DatabaseGeneratedOption.None)]
        public int CourseID { get; set; }
        public string Title { get; set; }
        public int Credits { get; set; }

        public virtual ICollection<Enrollment> Enrollments { get; set; }
    }
}
Step 4. Setting up the Database Context
The main class who handles and keeps track of the various Entity Framework operations is known as Database Context. It can be created by adding a new class, deriving it from System.Data.Entity.DbContext and inserting some properties for all the Entities we just created, who will populate the Data Model. Let’s move to the /DAL/ folder (for Data-Access-Layer), creating it if it doesn’t exist already, and add the following two classes:
using MyApplication.Models;
using System.Data.Entity;
using System.Data.Entity.ModelConfiguration.Conventions;

namespace MyApplication.DAL
{
    public class MyDbContext : DbContext
    {

        public MyDbContext() : base("MyDbContextConnectionString")
        {
            Database.SetInitializer<MyDbContext>(new MyDbInitializer());
        }

        public DbSet<Student> Students { get; set; }
        public DbSet<Enrollment> Enrollments { get; set; }
        public DbSet<Course> Courses { get; set; }

        protected override void OnModelCreating(DbModelBuilder modelBuilder)
        {
            modelBuilder.Conventions.Remove<PluralizingTableNameConvention>();
        }
    }
}
public class MyDbInitializer : CreateDatabaseIfNotExists<MyDbContext>
{
    protected override void Seed(MyDbContext context)
    {
        // create 3 students to seed the database
        context.Students.Add(new Student { ID = 1, FirstName = "Mark", LastName = "Richards", EnrollmentDate = DateTime.Now });
        context.Students.Add(new Student { ID = 2, FirstName = "Paula", LastName = "Allen", EnrollmentDate = DateTime.Now });
        context.Students.Add(new Student { ID = 3, FirstName = "Tom", LastName = "Hoover", EnrollmentDate = DateTime.Now });
        base.Seed(context);
    }
}
We can see that the MyDbContext.cs class contains a DbSet for each Entity we previously created. That’s because in the Entity Framework pattern each DbSet is corresponding to a Database Table, while the Entities are the table records (or rows). We can also see that in the constructor initializer we’re instantiating an object of type MyDbInitializer, which is defined in the following class: we need this object to initialize the database the first time we launch the application and also to insert some sample record in the newly created Student table. We can derive the MyDbInitializer from a number of initialization base class made available by the framework, such as:
- CreateDatabaseIfNotExists: This is the default initialized: as the name suggests, it creates the database if it doesn’t exist already. It’s worth to say that if the DB is already present and it’s Model differs from the one specified by the Entities, this initializer will throw an exception. This behaviour makes it an optimal choice for the production environments (where you don’t want the DB to be altered by the EF6 automatic tasks) but not-so-great for the development ones (where the Database Model frequently changes).
- DropCreateDatabaseIfModelChanges: This initializer creates a new database, deleting the previous one (if any), everytime the DataModel is changed since the last initialization. It’s worth to mention that a DataModel “change” everytime one or more Entity class is added, removed or modified in any way. This is an ideal behavior for development and testing environments, where we usually want to reset/update the DB every time we need to change the way we want to store data: for these exact same reasons it should never be used in any production environment in order to avoid data-losses (a small change in one Entity class is all it will take to erase all data in the DB).
- DropCreateDatabaseAlways: As the name suggests, this initializer deletes and re-creates the DB on every initialization, i.e. every time the web application will start. This might be good for those development (or testing) environments designed to work with the same, pre-defined amount of data every time: needless to say, it’s far from ideal in any production environment.
Before going on, notice that MyDbContextConnectionString literal referenced by the constructor initializer of our MyDbContext.cs class: this is the connection string we’ll add to our Web.Config during the next step.
Step 5. Connecting to MySQL
To connect our web application to our MySQL database we need the MySQL Connector.NET, which can be downloaded from the official site or using NuGet. All we need to do is to add its libraries to our project and add a valid connection string to our Web.Config file, just like that:
<connectionStrings>
    <add name="MyDbContextConnectionString" providerName="MySql.Data.MySqlClient" connectionString="server=localhost;UserId=username;Password=password;database=myDatabase;CharSet=utf8;Persist Security Info=True"/>
</connectionStrings>
Step 6. Running the Application and (auto)creating the Database
If all the previous steps have been properly completed the web application will automatically create the database as soon as an object of type MyDbContext will be instantiated. For example:
private MyDbContext db = new MyDbContext();
You can initialize the object inside a Controller, in a singleton class (or in the Global.asax) as a static property or in other parts of the web application depending on developer needs and/or the choosen design pattern and/or IoC/UoW strategies you might want to adopt. In the upcoming posts I’ll talk more about these techniques, as well as explain other useful EF concepts, capabilities & tools such as Data Migrations and more.
http://www.ryadel.com/en/asp-net-setup-mvc5-website-mysql-entity-framework-6-code-first-vs2013/

 浙公网安备 33010602011771号