一.堵塞式与非堵塞式
在传统IO中,将数据由当前线程从客户端传入服务端,由服务端的内核进行判断传过来的数据是否合法,内核中是否存在数据。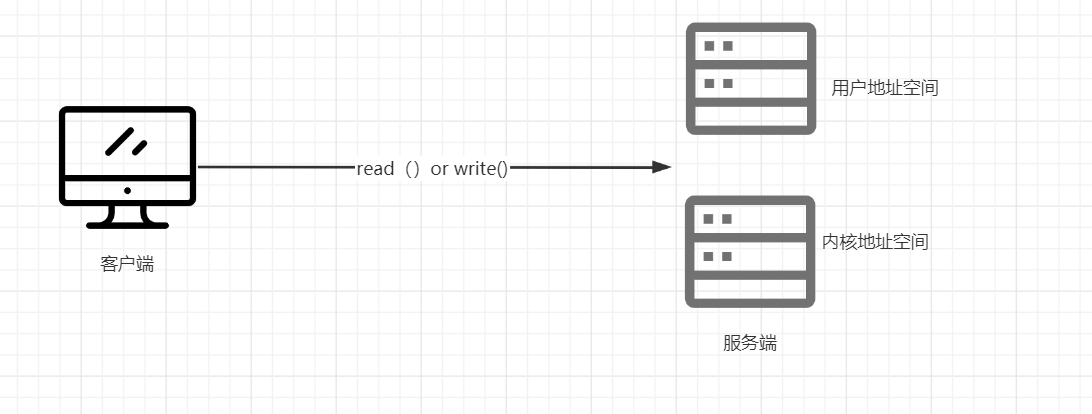
如果不存在数据 ,并且数据并不合法,当前线程将会堵塞等待。当前线程将无法进行下一步传输,进行排队现象。降低系统性能。
为了解决这一步问题,调用资源开辟多个线程传输。
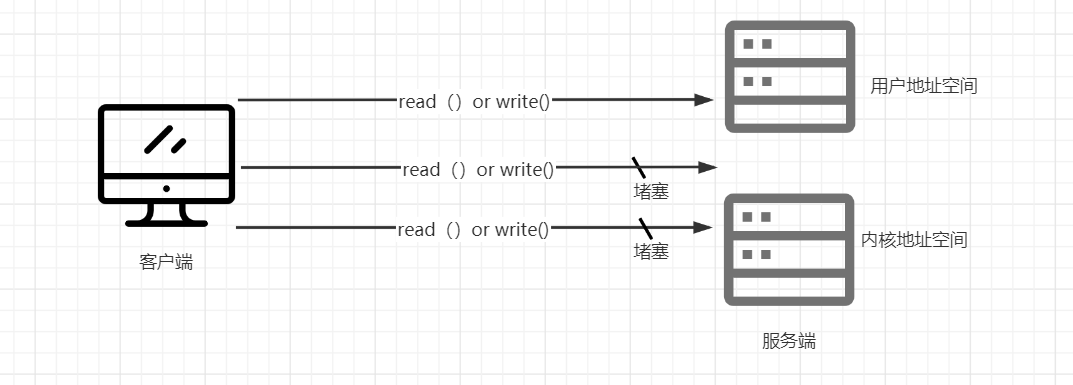
虽然线程的开辟解决了部分堵塞排队的问题,但由于并没有治理根本堵塞的原因,线程数量也是有限的。总会有堵塞的线程 ,形成排队现象。
为了根本解决堵塞的问题。NIO的非堵塞式成为了主要的传输方式。
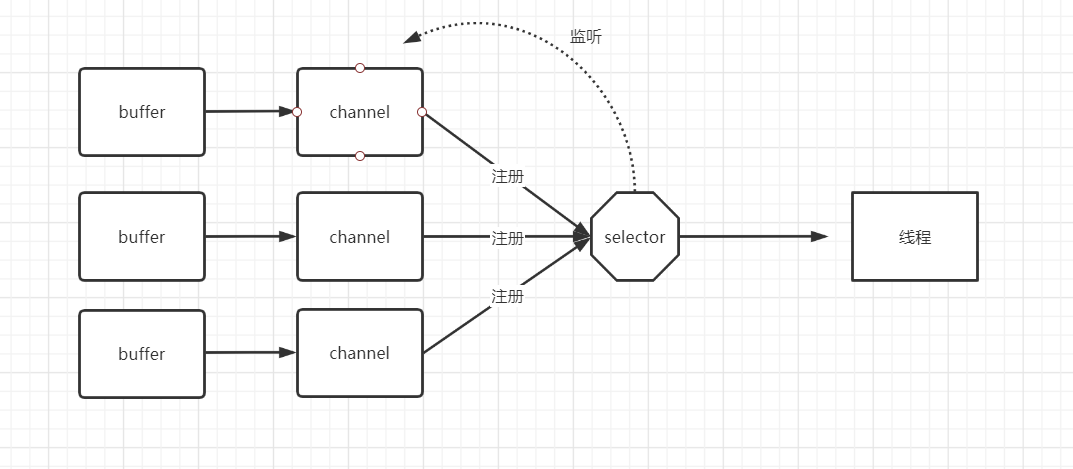
在客户端和服务端之间将通道注册到selector选择器,由选择器进行监听channel是否进行什么操作(read()or write())。
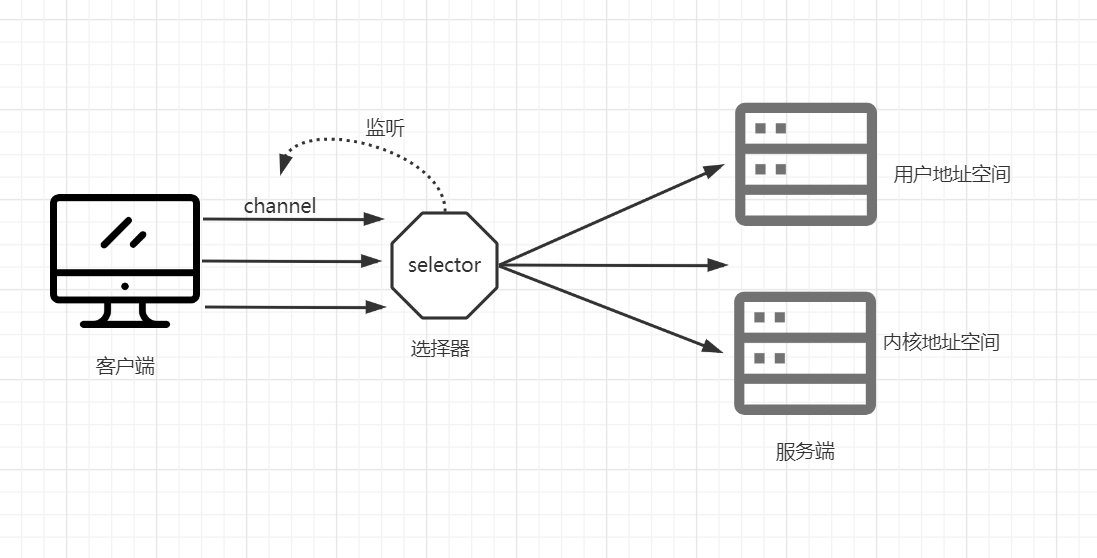
当数据就绪或者准备完成时,由selector进行分配到服务端的一个(或多个)线程上进行相关运行操作。
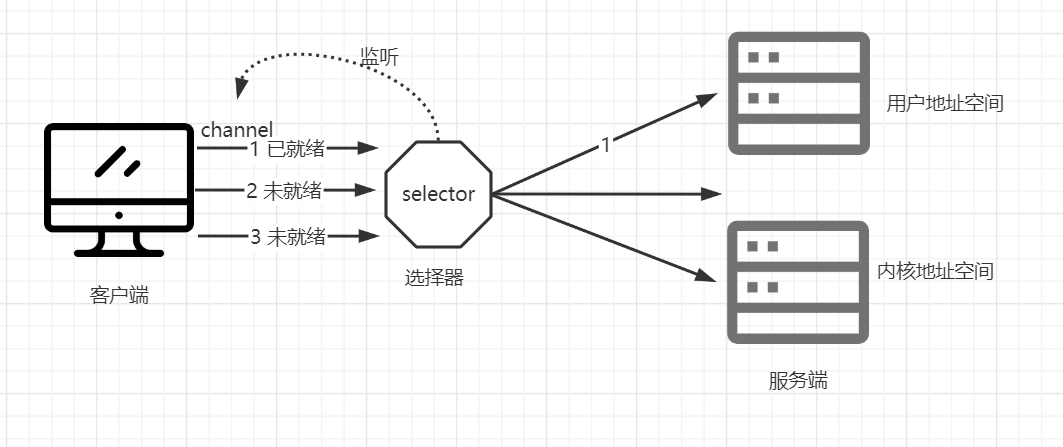
在IO的堵塞后无脑调用线程下。NIO是在准备完成时,才被selector选择分配到一个或者多个线程上传输并被复制到内核地址空间中,由于数据已准备完成或者已就绪,内核就无须被堵塞。
二.Selector(选择器)
也称多路复用器,多条channel复用selector。channe通过注册到selector ,使selector对channel进行监听,
实现尽可能少的线程管理多个连接。减少了 线程的使用,降低了因为线程的切换引起的不必要额资源浪费和多余的开销。
也是网络传输非堵塞的核心组件。
三.Selector的使用
分为客户端和服务端两部分:
先实现客户端吧:
流程: 获取通道绑定主机端口 --> 切换非堵塞状态 --> 开辟buffer容量 --> 将当前时间作为数据写入buffer待传 --> 切换读写方式flip() --> 写入通道 -->清空并关闭
 1  /*
 2     * 客户端发送数据 通过channel通道
 3     * */
 4     @Test
 5     public void Client() throws IOException {
 6
 7         //获取channel通道   并设置主机号和端口号
 8         SocketChannel socketChannel = SocketChannel.open(new InetSocketAddress("127.0.0.1",8080));
 9
10         //因为使用非阻塞NIO  所以必须切换为非阻塞
11         socketChannel.configureBlocking(false);   //默认为true 需要改为非堵塞的
12
13         //开辟缓冲区进行存储数据
14         ByteBuffer byteBuffer = ByteBuffer.allocate(1024);
15
16         //准备工作就绪后,准备发送数据给服务端
17         //打印当前日期转为Byte数据传出
18         byteBuffer.put(new Date().toString().getBytes());
19         //切换读写模式
20         byteBuffer.flip();
21         //写入通道
22         socketChannel.write(byteBuffer);
23         //完毕时,清除缓冲区内容
24         byteBuffer.clear();
25
26     //====================
27         //关闭相关流
28         socketChannel.close();
29
30     }
在获取当前时间是用的new Date();还可以使用java8的获取时间的方法。
LocalDateTime.now().toString().getBytes() //转为Byte字节
因为是网络传输的心形式,所以在获取channel时,使用SocketChannel.open方法。实现方法:
 1   public static SocketChannel open(SocketAddress remote)
 2         throws IOException
 3     {
 4         SocketChannel sc = open();
 5         try {
 6             sc.connect(remote);   //打开一个新的channel时,绑定连接到主机和端口上
 7         } catch (Throwable x) {
 8             try {
 9                 sc.close();  //异常时关闭连接
10             } catch (Throwable suppressed) {
11                 x.addSuppressed(suppressed);
12             }
13             throw x;
14         }
15         assert sc.isConnected();
16         return sc;
17     }
new InetSocketAddress实例创建主机和端口。
   */
    public InetSocketAddress(String hostname, int port) {
        checkHost(hostname);    //检查主机号是否为空 为空返回异常。
        InetAddress addr = null;
        String host = null;
        try {
            addr = InetAddress.getByName(hostname);
        } catch(UnknownHostException e) {
            host = hostname;
        }
        holder = new InetSocketAddressHolder(host, addr, checkPort(port));  //检查端口。
    }


//检查端口方法
private static int checkPort(int port) {
    if (port < 0 || port > 0xFFFF)
        throw new IllegalArgumentException("port out of range:" + port);
    return port;
}

//检查主机号方法
private static String checkHost(String hostname) {
    if (hostname == null)
        throw new IllegalArgumentException("hostname can't be null");
    return hostname;
}
服务端:
流程:使用ServerSocketChannel 的方法获取服务端额channel --> 切换为堵塞状态 --> 为buffer分配容量 --> 绑定端口号 --> 获取selector选择器 --> channel注册进选择器中,并进行监听 --> 选择器进行轮询,进行下一步读写操作。
 1  /*
 2     * 服务端接收客户端传来的数据
 3     * */
 4     @Test
 5     public void server() throws IOException {
 6
 7         //获取channel通道
 8         ServerSocketChannel serverSocketChannel = ServerSocketChannel.open();
 9         //切换为非堵塞状态
10         serverSocketChannel.configureBlocking(false);
11         //分配服务端的缓冲区
12         ByteBuffer serverByteBuffer = ByteBuffer.allocate(1024);
13         //将客户端的InetSocketAddress绑定到通道,不绑定 不统一将获取不到数据
14         serverSocketChannel.bind(new InetSocketAddress(8080));
15         //获取选择器
16         Selector selector = Selector.open();
17         //将通道注册到选择器中,并且制定监听方式
18         serverSocketChannel.register(selector, SelectionKey.OP_ACCEPT);
19         //进行轮询选择器上就绪成功的事件  当存在就绪成功的及进行下一步
20         while (selector.select() > 0){
21             //对已存在的就绪事件进行迭代
22             Iterator<SelectionKey> selectionKeyIterator = selector.selectedKeys().iterator();
23
24             //有元素就进行下一步
25             while (selectionKeyIterator.hasNext()){
26                 //获取到就绪事件
27                 SelectionKey next = selectionKeyIterator.next();
28
29                 //对获取到的就绪事件判断是何种类型
30                 if (next.isAcceptable()){
31
32                     //获取连接
33                     SocketChannel accept = serverSocketChannel.accept();
34
35                     //将获取到的连接切换为非堵塞模式
36                     accept.configureBlocking(false);
37
38                     //将获取到的链接 注册金selector
39                     accept.register(selector,SelectionKey.OP_READ);
40
41                     //判断是否准备好读
42                 }else if (next.isReadable()){
43
44                     //获取已就绪的通道
45                     SocketChannel channel = (SocketChannel) next.channel();
46
47                     //分配缓冲区
48                     ByteBuffer byteBuffer = ByteBuffer.allocate(1024);
49
50                     //读取数据
51                     int length = 0 ;
52                     while ((length = channel.read(byteBuffer)) > 0){
53                         byteBuffer.flip();
54                         System.out.println(new String(byteBuffer.array(),0,length));
55                         byteBuffer.clear();
56                     }
57
58
59                 }
60
61                 //完成传输需要取消选择键,防止下次出问题
62                 selectionKeyIterator.remove();
63
64             }
65         }
66
67
68     }
如何获取选择器?
Selector selector = Selector.open();
实现过程:
 public static Selector open() throws IOException {
        return SelectorProvider.provider().openSelector();
    }


//首先进入此方法判断是否存在选择器
 public static SelectorProvider provider() {
        synchronized (lock) {
            if (provider != null)  //第一次为false
                return provider;
            return AccessController.doPrivileged(
                new PrivilegedAction<SelectorProvider>() {
                    public SelectorProvider run() {
                            if (loadProviderFromProperty())
                                return provider;
                            if (loadProviderAsService())
                                return provider;
                            provider = sun.nio.ch.DefaultSelectorProvider.create();
                            return provider;
                        }
                    });
        }
    }


//false时 跳入如下方法。
public static ServerSocketChannel open() throws IOException {
    return SelectorProvider.provider().openServerSocketChannel();
}
随后将获取到的通道注册到获取到的选择器中,在注册时给定监听方式:
serverSocketChannel.register(selector, SelectionKey.OP_ACCEPT); //可多选监听操作项
selectionKey中定义了四个可操作项:
-
OP_READ 可读就绪
-
OP_WRITE 可写就绪
-
OP_CONNECT 连接就绪
-
OP_ACCEPT 接收就绪
迭代key中已就绪的元素。
Iterator<SelectionKey> selectionKeyIterator = selector.selectedKeys().iterator();
获取到当前就绪事件丛迭代器中获取。
selectionKeyIterator.next()
selectionKey包含四个方法:
-
isReadable():测试此选择键是否可读
-
isWritable():测试此选择键是否可写
-
isConnectable():测试此选择键是否完成
-
isAcceptable():测试此选择键是否可以接受一个新的连接
通过这些相应的方法,单独判断是否可以读写,和进行操作。
最后取消选择键,防止下次获取出现异常情况。(第一次判断可能会为true)
selectionKeyIterator.remove();
四.附加
在上面的例子中,把客户端的代码进行稍微改写一下,使之能够无限输入,并通过传输打印在服务端中。
public static void main(String[] args) throws IOException {
        //获取channel通道   并设置主机号和端口号
        SocketChannel socketChannel = SocketChannel.open(new InetSocketAddress("127.0.0.1",8080));

        //因为使用非阻塞NIO  所以必须切换为非阻塞
        socketChannel.configureBlocking(false);

        //开辟缓冲区进行存储数据
        ByteBuffer byteBuffer = ByteBuffer.allocate(1024);

        //附加输入:
        Scanner scanner = new Scanner(System.in);
        //通过控制台键入数据
        while (scanner.hasNext()){
            String str = scanner.next();
            //准备工作就绪后,准备发送数据给服务端
            //打印当前日期转为Byte数据传出
            byteBuffer.put((new Date().toString()+":--->"+str).getBytes());
            //切换读写模式
            byteBuffer.flip();
            //写入通道
            socketChannel.write(byteBuffer);
            //完毕时,清除缓冲区内容
            byteBuffer.clear();
        }

    }
由于扫描流(scanner)不能用于测试类,所以在main方法下进行测试:
每次输入的内容都会被转为Byte字节进行传输。
客户端输入结果:

服务端输出结果:
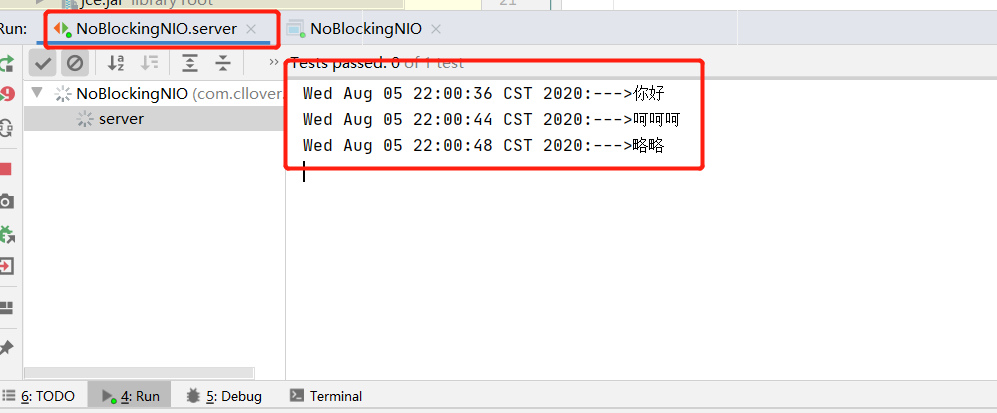
每输入一次便传输一次。
//完成传输需要取消选择键,防止下次出问题
selectionKeyIterator.remove();

 浙公网安备 33010602011771号