如何快速无缝的从 vscode 转向AI编辑器 cursor、kiro、trae 等
如何快速无缝的从 vscode 转向AI编辑器 cursor、kiro、trae 等
如何快速无缝的从 vscode 转向AI编辑器 cursor、kiro、trae 等
如果你之前经常使用 vscode 的话,这篇文章会帮助你开始使用 AI 编辑器 kiro、cursor、trae 等,因为后者的配置和插件等都和 vscode 是共通的。甚至 kiro、cursor 等都是基于开源 vscode 的变种开发而来。
如果你是第一次使用类似 vscode 的编辑器,这篇文章也会帮到你,更快了解如何去安装插件和修改配置。
以下教程都是以 kiro 为例,其他编辑器类似
插件安装
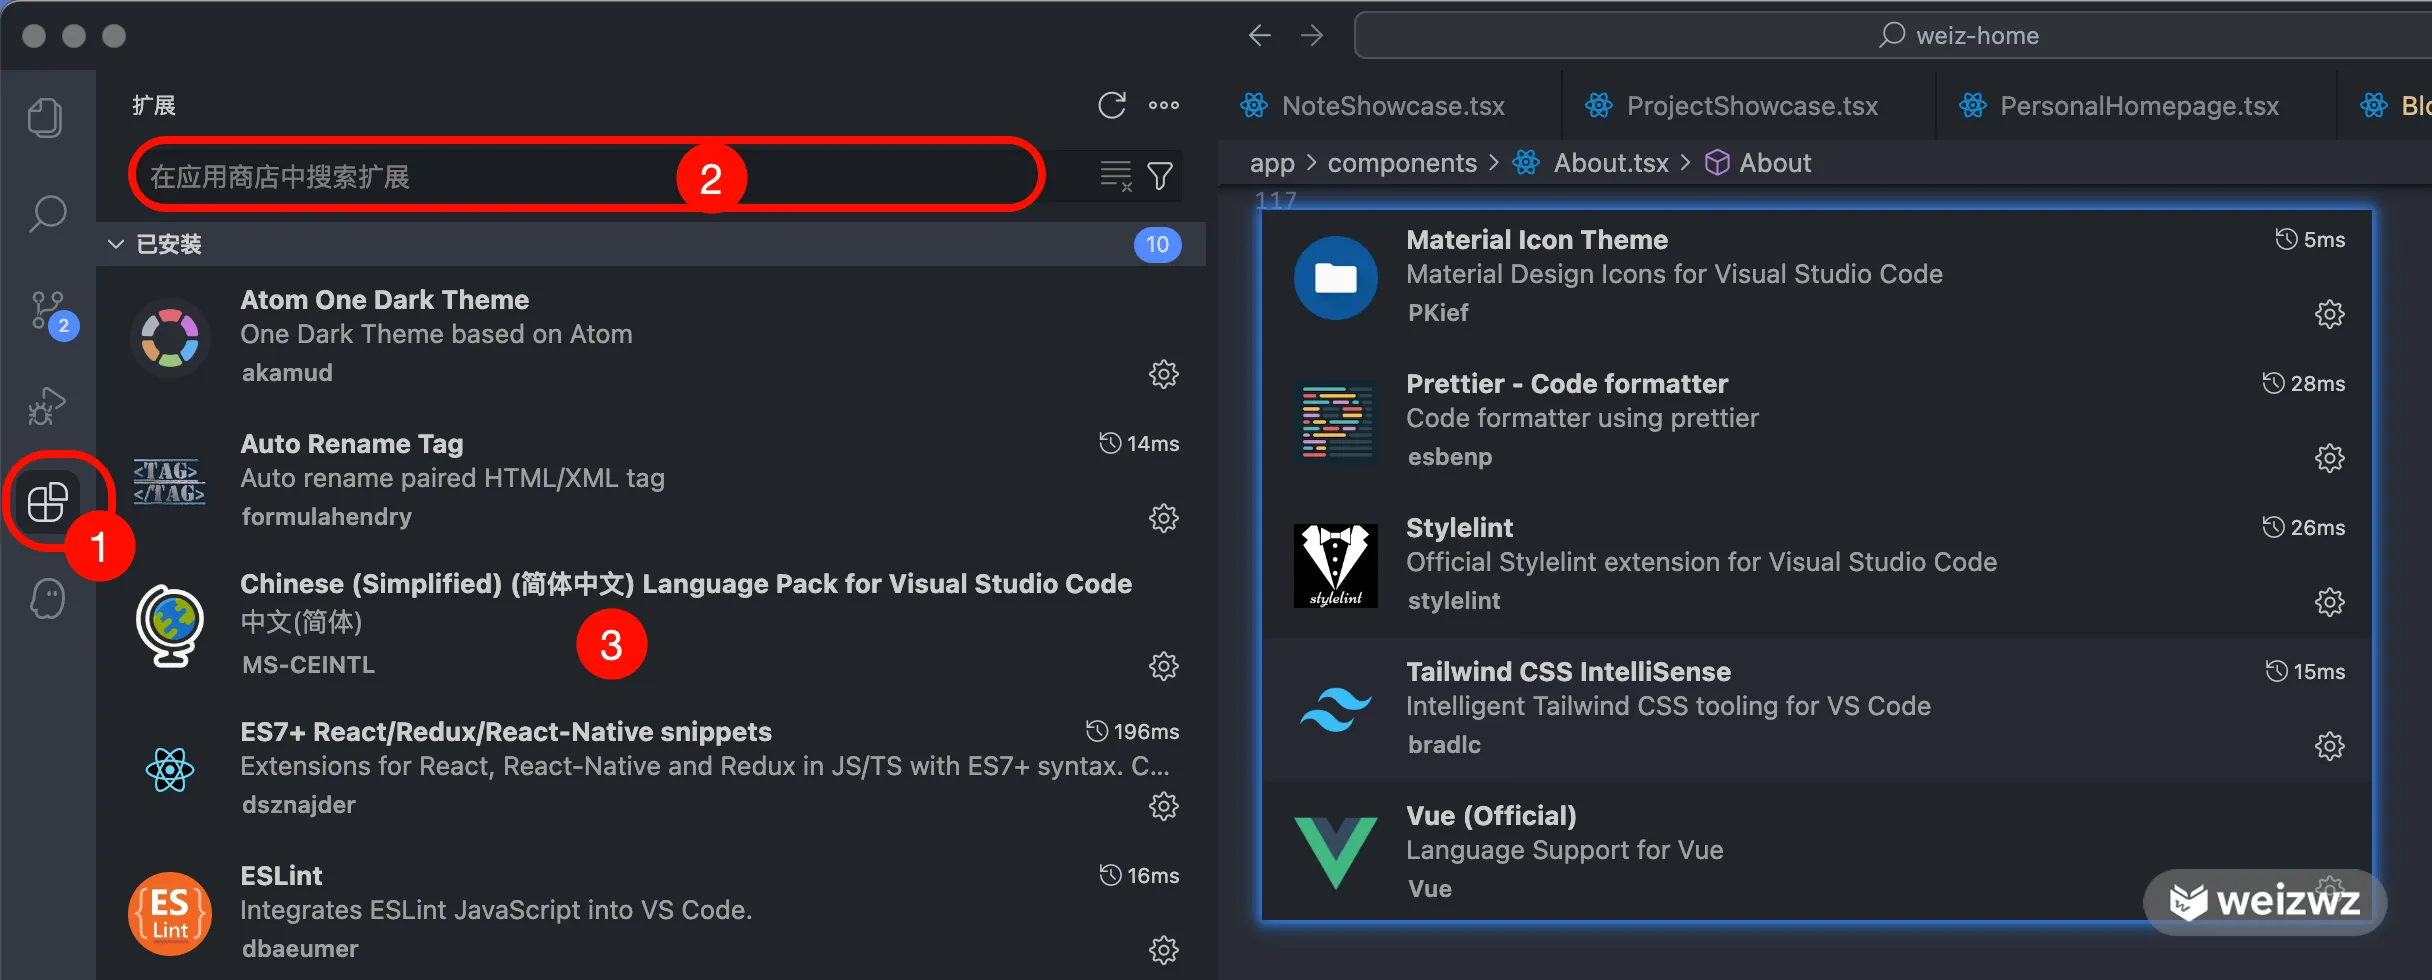
如图,1 即插件商店入口,在 2 所在的位置输入插件名称即可搜索。第一次使用这类编辑器的同学,可以安装中文插件 3,搜索 Chinese 后选择安装。如果你和我一样主攻前端的话,上图中是我建议的插件,直接搜索安装即可。
配置修改
修改配置两种方式,一种是可视化界面修改,如图 1 处,一种是直接修改配置文件(json 文件),如图 2,使用快捷键 shift + command + p 打开
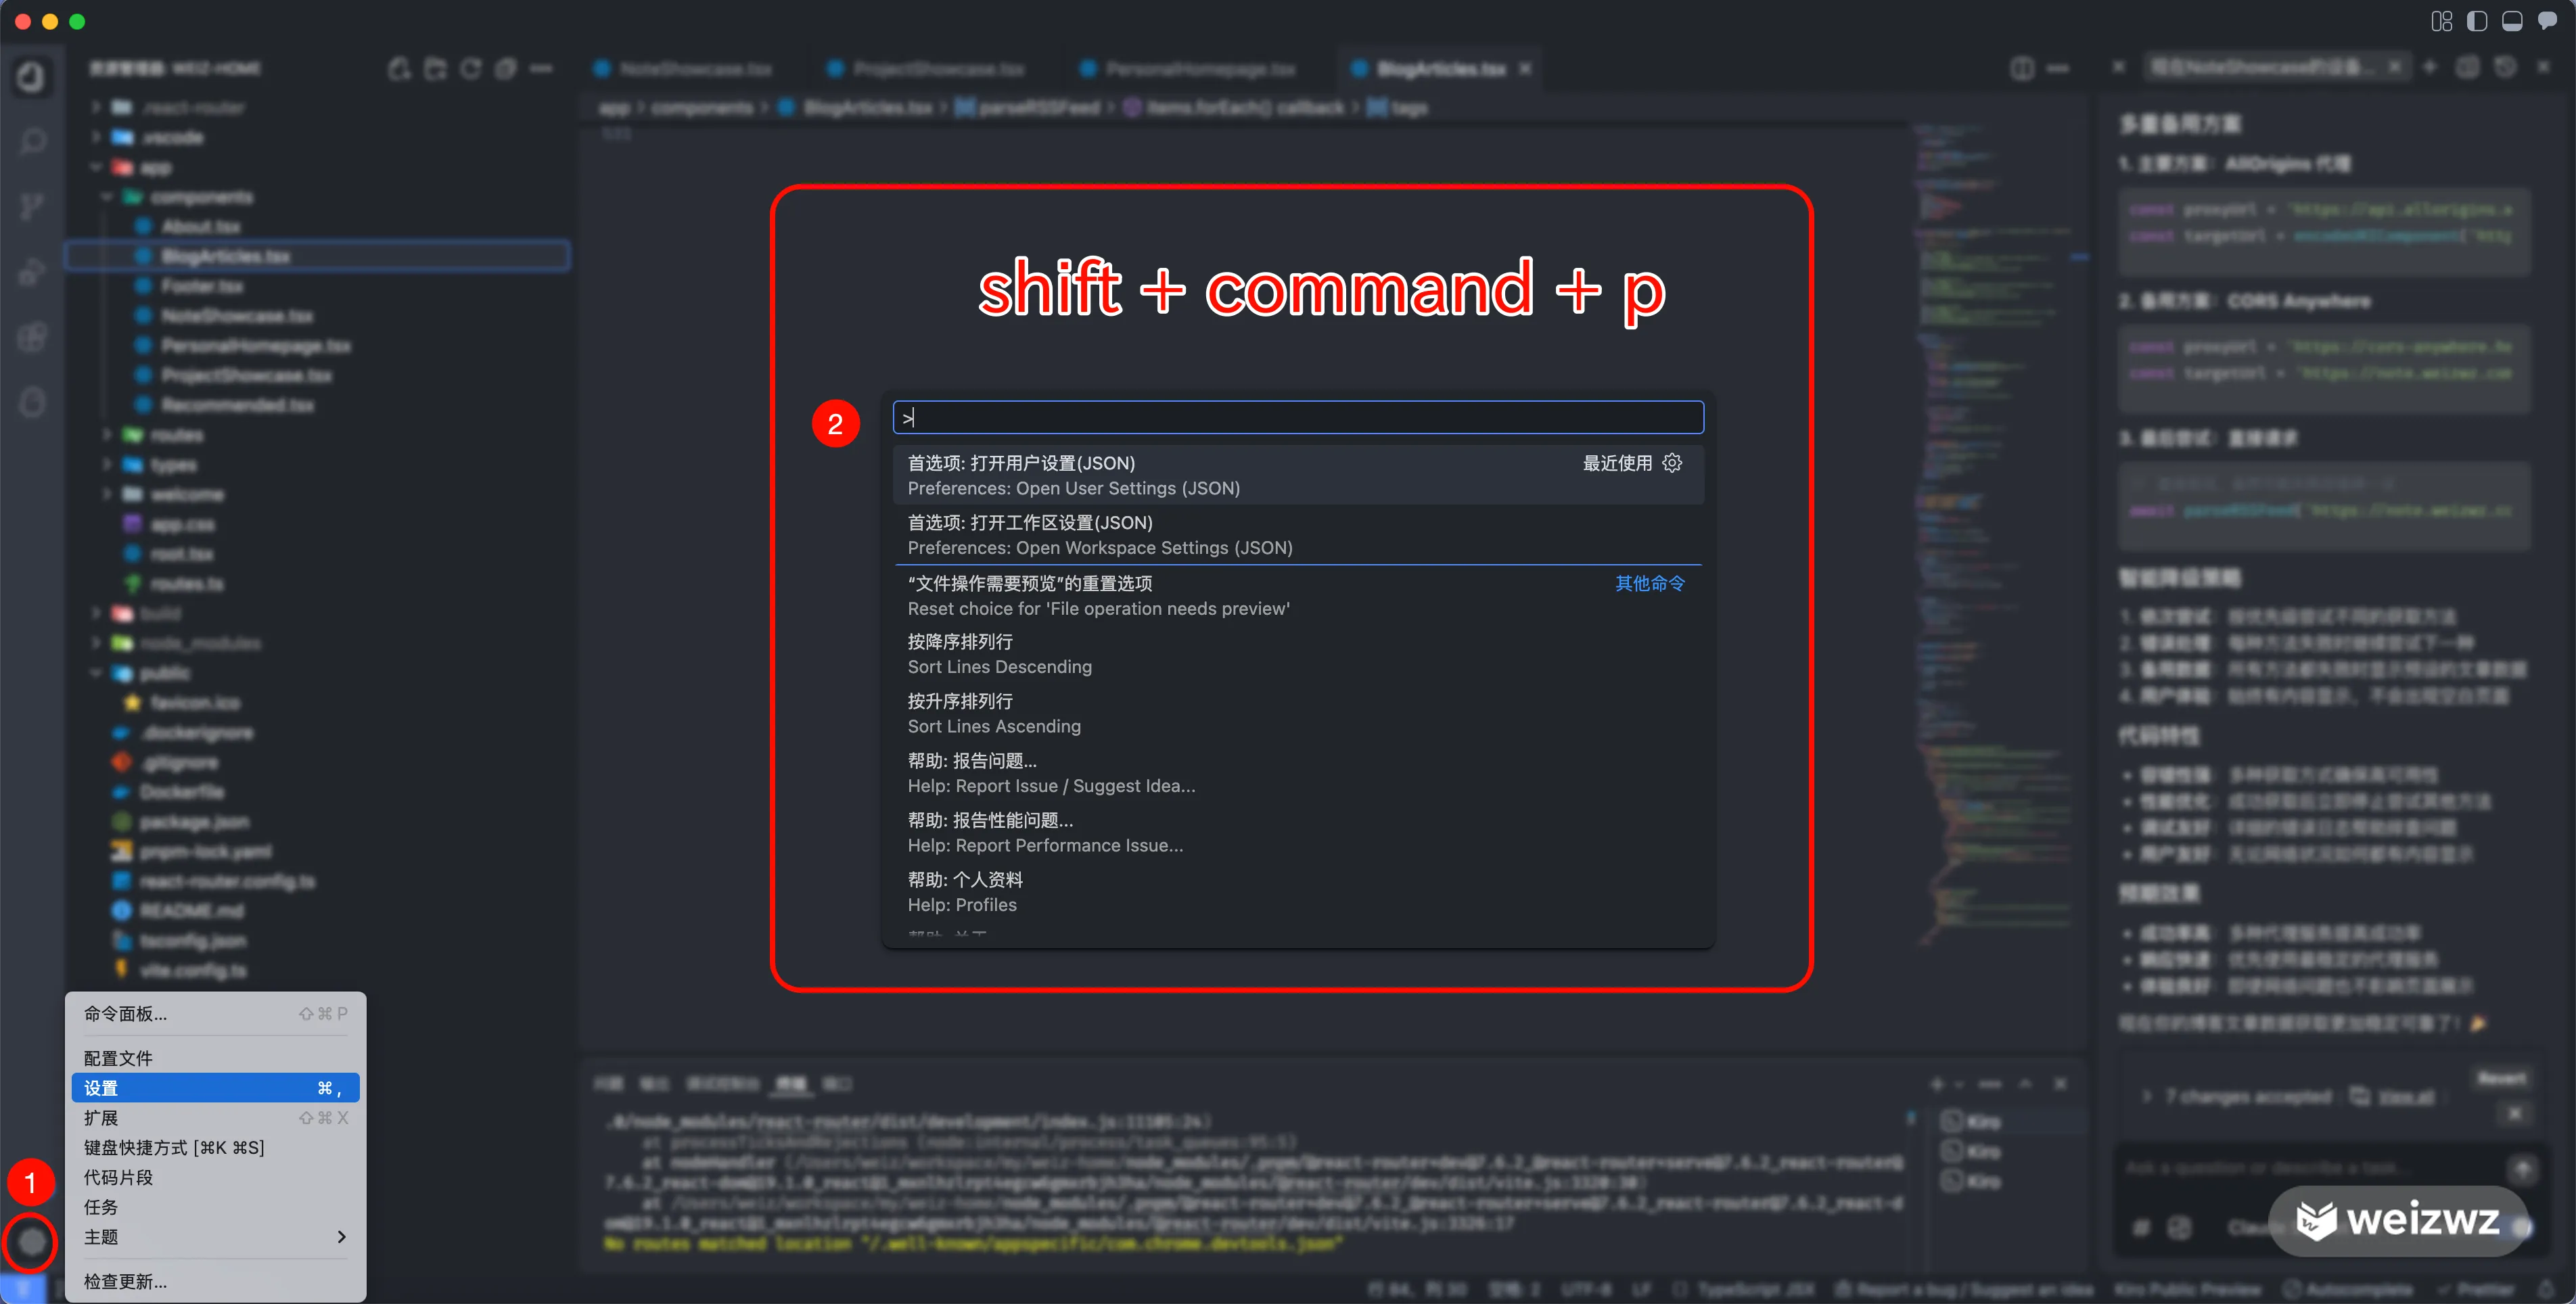
这里建议直接第二种方式,更快速。
如果你之前有使用 vscode 的话,直接打开 vscode 的配置文件,复制过来即可。首次使用的话,可以参考我的配置
| { |
| "workbench.colorTheme": "Atom One Dark", |
| "workbench.startupEditor": "none", |
| "workbench.iconTheme": "material-icon-theme", |
| "material-icon-theme.activeIconPack": "vue", |
| "git.autofetch": true, |
| "git.enableSmartCommit": true, |
| "git.confirmSync": false, |
| "git.ignoreMissingGitWarning": true, |
| "git.openRepositoryInParentFolders": "never", |
| "editor.tabSize": 2, |
| "editor.fontFamily": "FiraCode Nerd Font, Consolas, 'Courier New', monospace", |
| "editor.fontSize": 12, |
| "editor.formatOnSaveMode": "modificationsIfAvailable", |
| "editor.defaultFormatter": "esbenp.prettier-vscode", |
| "javascript.format.semicolons": "remove", |
| // 定义如何处理可选分号。 |
| // - ignore: 不要插入或删除任何分号。 |
| // - insert: 在语句末尾插入分号。 |
| // - remove: 删除不必要的分号。 |
| "javascript.updateImportsOnFileMove.enabled": "always", |
| "typescript.updateImportsOnFileMove.enabled": "always", |
| "[javascript]": { |
| "editor.defaultFormatter": "esbenp.prettier-vscode" |
| }, |
| "[css]": { |
| "editor.defaultFormatter": "vscode.css-language-features" |
| // "editor.defaultFormatter": "esbenp.prettier-vscode" |
| }, |
| "[scss]": { |
| "editor.defaultFormatter": "vscode.css-language-features" |
| }, |
| "[typescriptreact]": { |
| "editor.defaultFormatter": "esbenp.prettier-vscode" |
| }, |
| "[typescript]": { |
| "editor.defaultFormatter": "esbenp.prettier-vscode" |
| }, |
| "[jsonc]": { |
| "editor.defaultFormatter": "esbenp.prettier-vscode" |
| }, |
| "[vue]": { |
| "editor.defaultFormatter": "esbenp.prettier-vscode" |
| }, |
| "[json]": { |
| "editor.defaultFormatter": "vscode.json-language-features" |
| }, |
| "security.workspace.trust.untrustedFiles": "open", |
| "[html]": { |
| "editor.defaultFormatter": "vscode.html-language-features" |
| }, |
| "[less]": { |
| "editor.defaultFormatter": "esbenp.prettier-vscode" |
| }, |
| "[markdown]": { |
| "editor.quickSuggestions": { |
| "comments": "on", |
| "strings": "on", |
| "other": "on" |
| }, |
| "diffEditor.ignoreTrimWhitespace": false |
| }, |
| "prettier.bracketSameLine": true, |
| "prettier.jsxSingleQuote": true, |
| "prettier.semi": false, |
| "prettier.singleQuote": true, |
| "prettier.trailingComma": "none", |
| "prettier.printWidth": 160, |
| "html.format.wrapLineLength": 500, |
| "html.format.wrapAttributes": "preserve-aligned", |
| "files.associations": { |
| "manifest.json": "jsonc", |
| "pages.json": "jsonc" |
| }, |
| "explorer.confirmDelete": false, |
| "diffEditor.ignoreTrimWhitespace": false, |
| "stylelint.packageManager": "pnpm", |
| "terminal.integrated.env.windows": {}, |
| "extensions.ignoreRecommendations": true, |
| "kiroAgent.agentModelSelection": "CLAUDE_SONNET_4_20250514_V1_0", |
| "kiroAgent.trustedCommands": [ |
| "pnpm type-check", |
| "pnpm build", |
| "pnpm lint", |
| "find . -name \"*.d.ts\" -not -path \"./node_modules/*\" -not -path \"./types/*\"", |
| "pnpm dev", |
| "npm run build", |
| "npm run dev", |
| "pnpm run build", |
| "pnpm run dev" |
| ], |
| } |
其中部分配置是需要插件支持的,比如主题 Atom One Dark,比如格式化插件 prettier 等
其他
两种模式
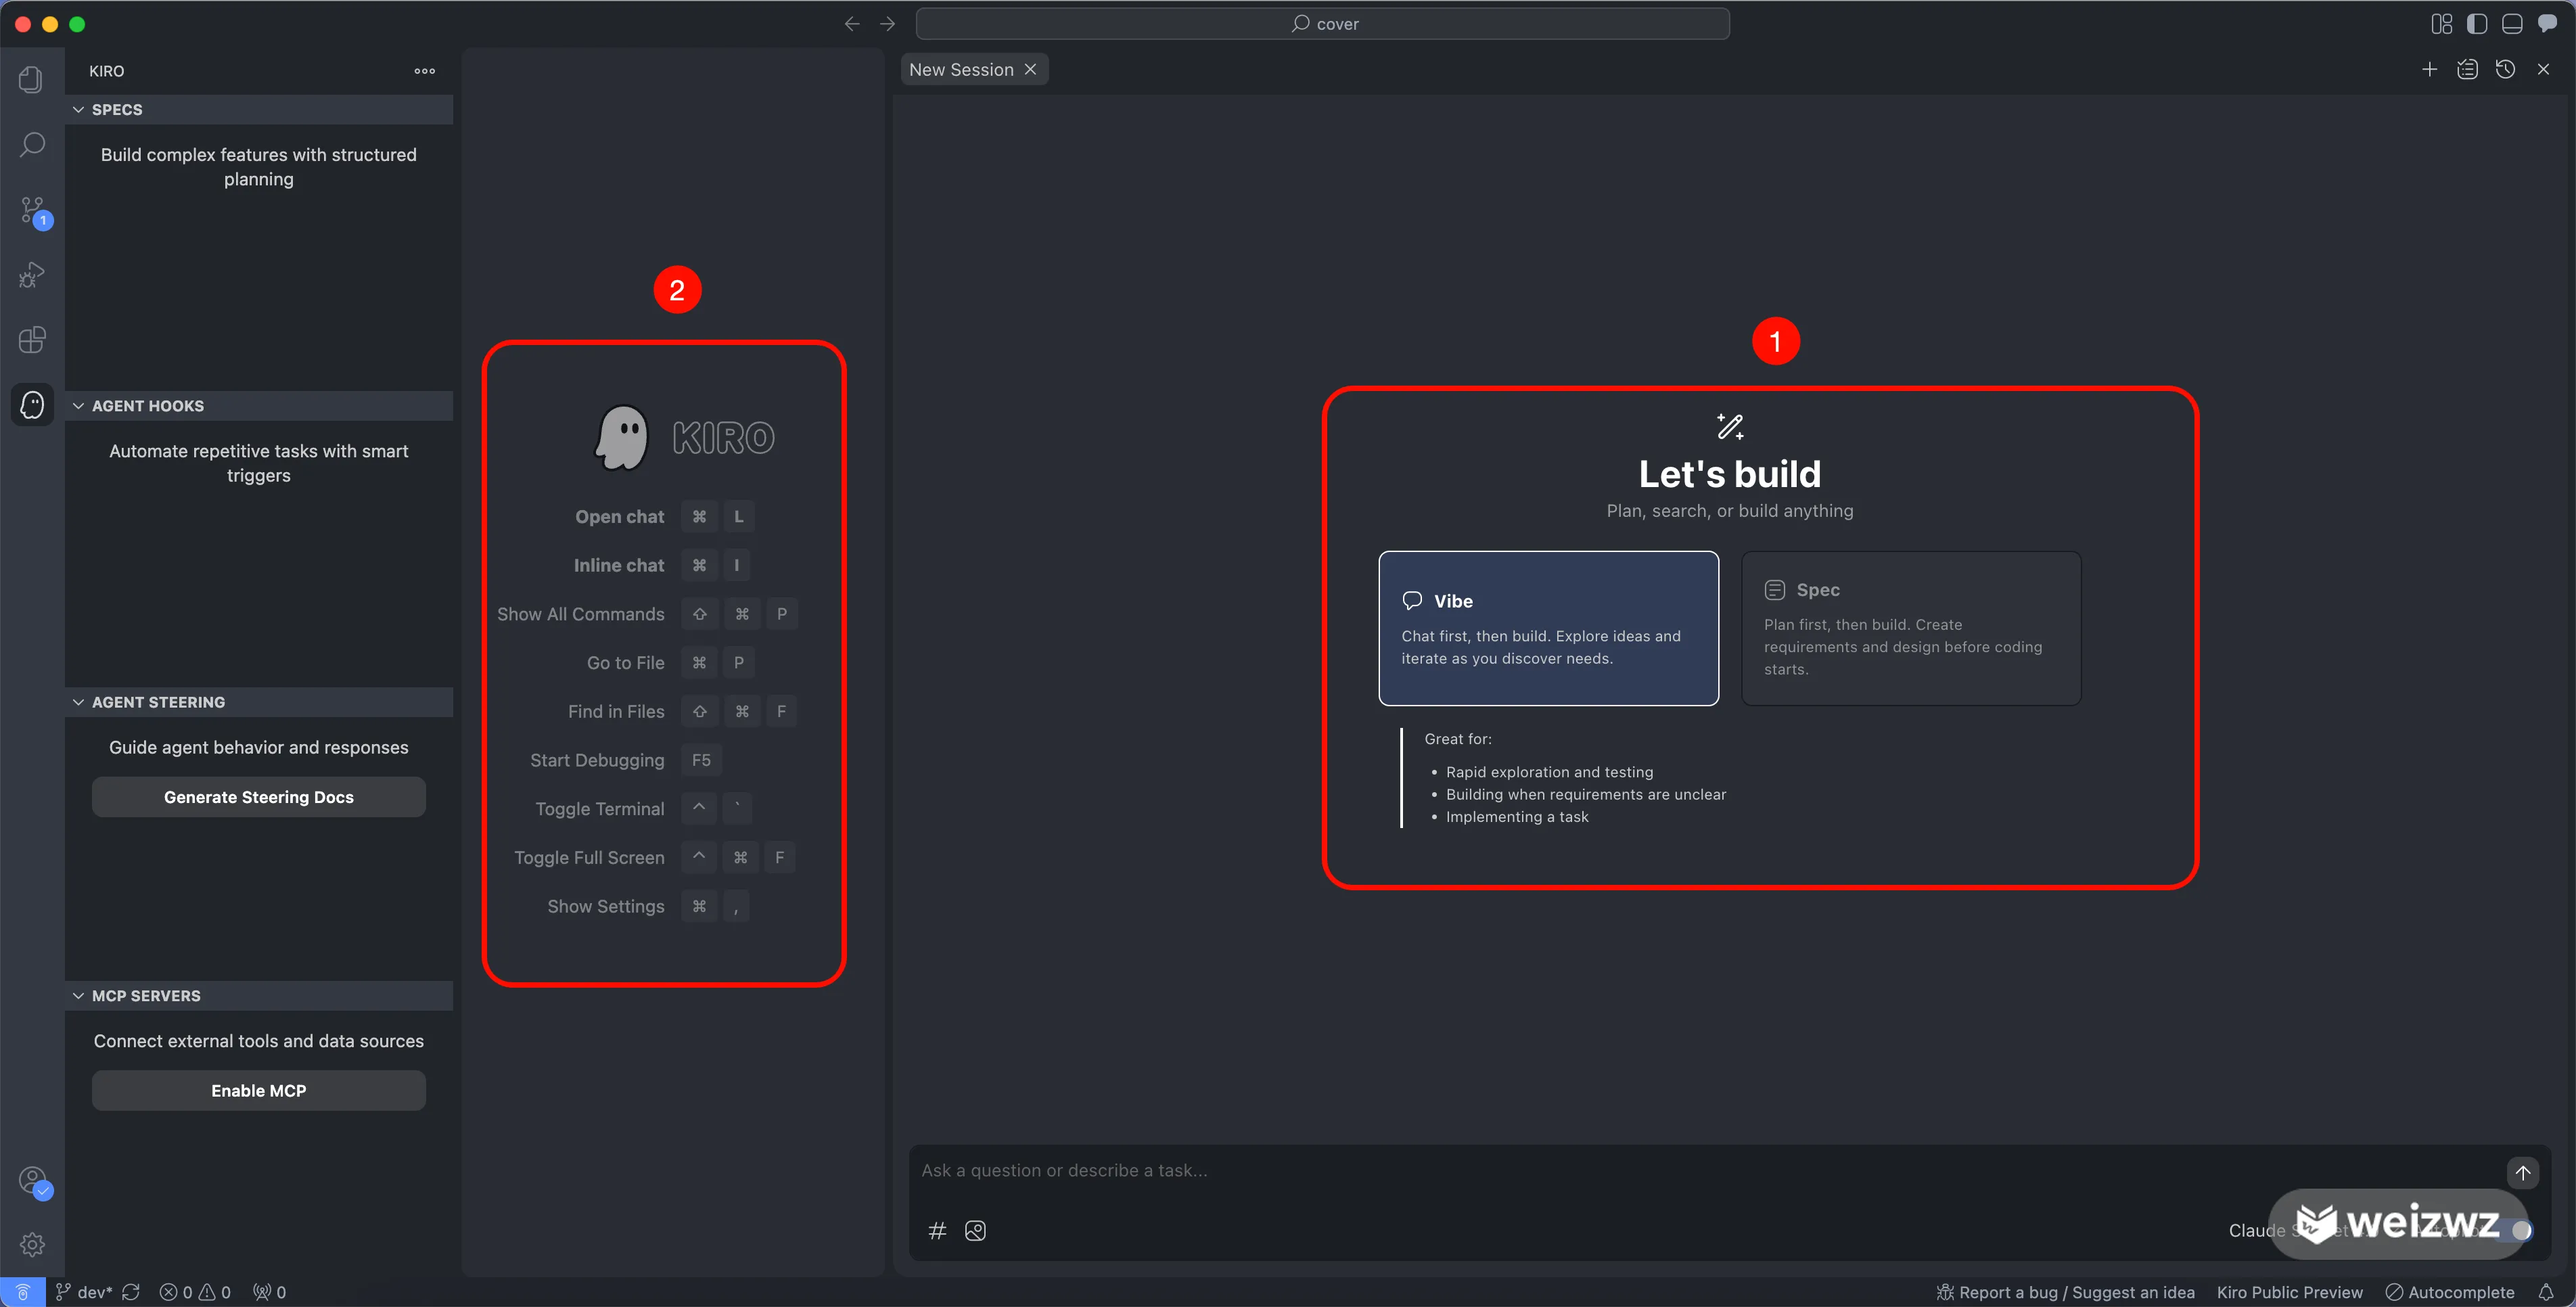
kiro 有两种模式(图中 1 处):vibe 和 spec。
vibe 模式基本和 cursor 差不多,变下达指令边修改,遇到问题可以中止,提出并让他修复
spec 模式是一种全新的模式,它是从需求分析开始,帮你对需求进行整理分析,生成需求文档,然后再设计产品,最后还有任务计划文档,最后再开始执行。spec 模式尝试一种更拟人化的开发模式,对于全栈开发应该有很大的帮助
kiro 对话的快捷键如图中 1 处
命令执行
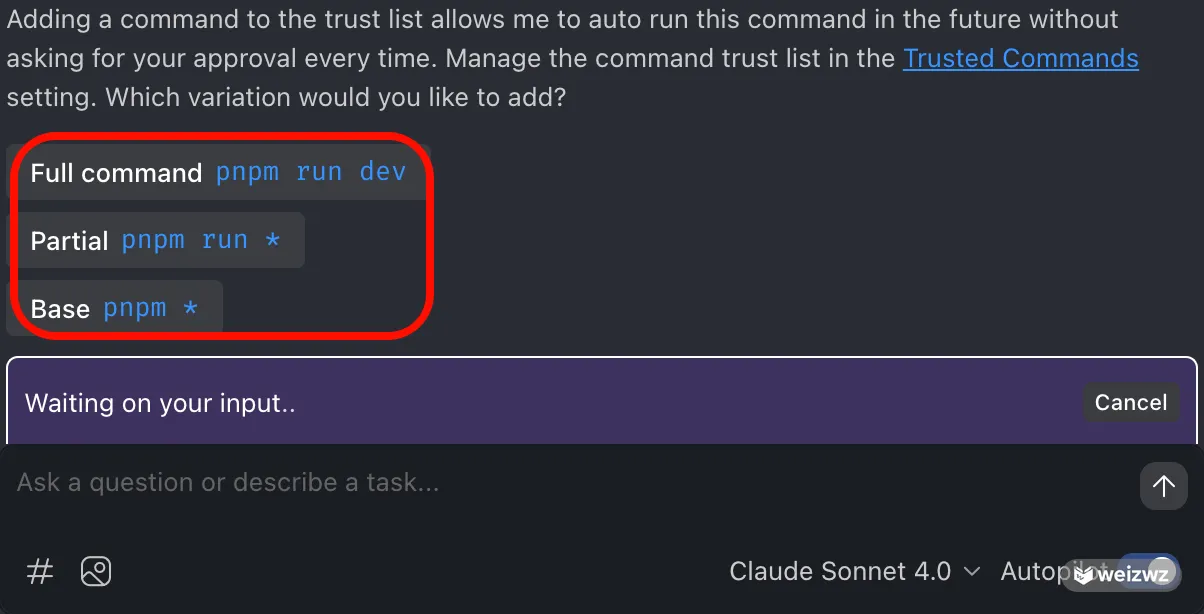
首次使用 kiro,遇到命令执行,它会等待你的授权,需要手动允许。不过你也可以把类似的命令加入信任列表,之后它就会自动执行了。

如上图中 2 处,在设置里搜索 kiroAgent.trustedCommands 后,可以直接添加命令的信任列表
如上图中 1 处,点击 Run 直接执行,点击 Trust 后出现下图,需要继续点击,手动选择是信任 此命令的完全形式还是同类型的,点击后才会开始执行。
Antigravity Skills 全局安装与配置指南
本文将指导你如何为 Antigravity 编辑器安装全局 Skills(技能),特别是强大的 ui-ux-pro-max 设计系统,并演示如何在具体项目中调用它们。
1. 核心概念
在 Antigravity 中,技能系统分为两层:
- Skills (全局库):实际的代码、脚本和指南,存储在系统级目录(如
~/.gemini/antigravity/skills)。它们是“能力”的本体。 - Workflows (项目级):存储在项目根目录的
.agent/workflows中。它们是“遥控器”,定义了如何在当前项目中调用全局的 Skills。
这种分离设计确保了你的项目代码库保持轻量,同时又能复用强大的全局能力。
2. 全局安装 Skills
2.1 准备目录
首先,确保全局 Skills 目录存在。Antigravity 通常使用以下路径:
| mkdir -p ~/.gemini/antigravity/skills |
| cd ~/.gemini/antigravity/skills |
2.2 安装 Anthropic 官方 Skills
这是基础技能库,包含前端设计、文档编写、测试等通用能力。
| git clone https://github.com/anthropics/skills.git |
| # 此时目录结构应为 ~/.gemini/antigravity/skills/skills/... |
2.3 安装 UI-UX-Pro-Max
这是进阶的前端设计技能,包含智能配色、排版和反模式检查。
| git clone https://github.com/nextlevelbuilder/ui-ux-pro-max-skill.git |
| # 此时目录结构应为 ~/.gemini/antigravity/skills/ui-ux-pro-max-skill/... |
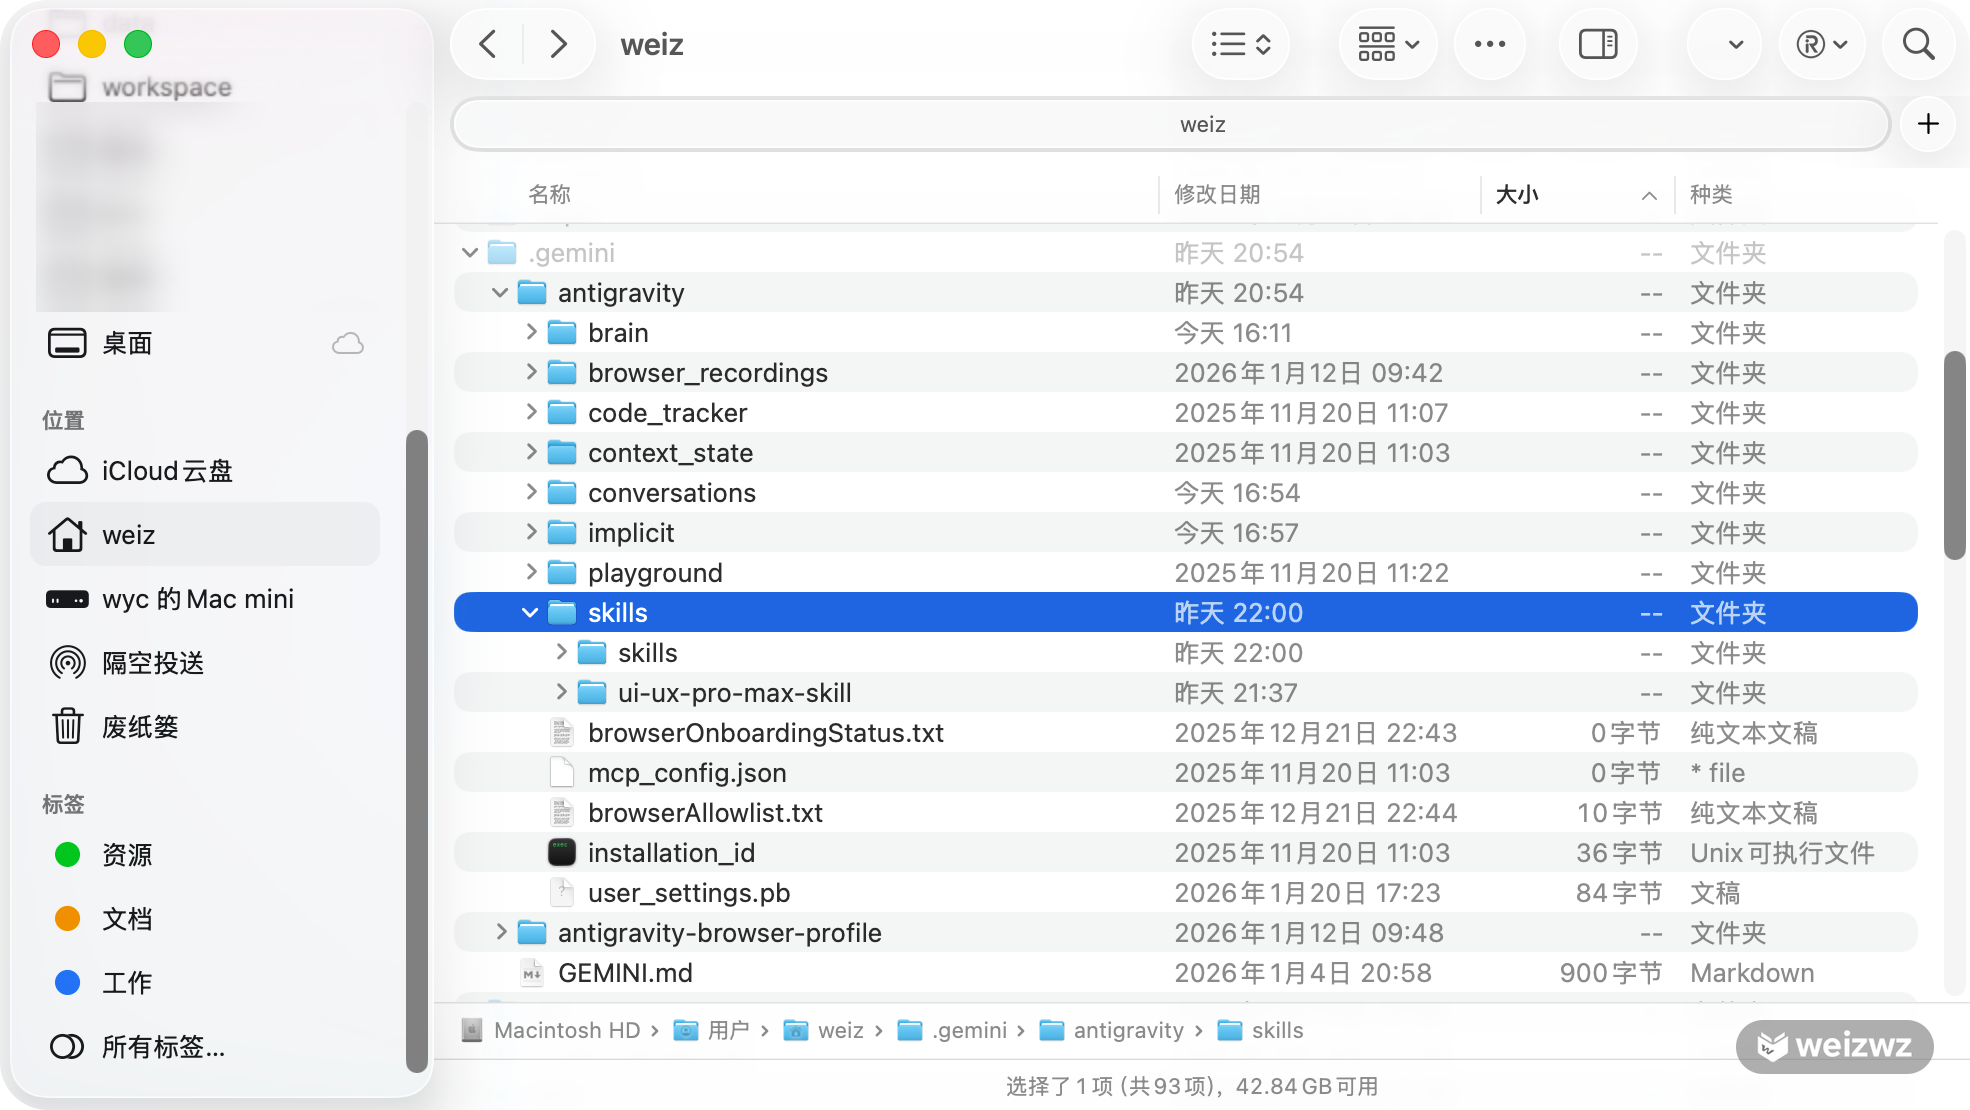
全部安装完成后,目录如下:
3. 项目级配置 (Workflows)
要在某个项目中使用这些技能,你需要创建 Workflow 文件。建议将 .agent/ 添加到 .gitignore 中,以免污染代码库。
3.1 配置 UI-UX-Pro-Max
在项目根目录下创建 .agent/workflows/ui-ux-pro-max.md:
| --- |
| description: Generate a professional design system using UI UX Pro Max skill. |
| --- |
| # UI UX Pro Max Workflow |
| This workflow uses the globally installed `ui-ux-pro-max-skill` to generate a comprehensive design system and implementation guidelines. |
| ## 1. Identify Requirements |
| - **Query**: What is the user trying to build? (e.g., "SaaS landing page", "Crypto dashboard"). |
| - **Stack**: What is the tech stack? (Default: `vue` or `html-tailwind` based on project). |
| ## 2. Generate Design System |
| - Run the search script to generate the design system. |
| - **Command**: |
| ```bash |
| python3 /Users/weiz/.gemini/antigravity/skills/ui-ux-pro-max-skill/src/ui-ux-pro-max/scripts/search.py "[User Query]" --design-system --format markdown --stack vue |
| ``` |
| _(Replace `[User Query]` with the actual request)_ |
| ## 3. Apply Design |
| - Read the output from the script. |
| - Use the generated colors, typography, and patterns to implement the user's request. |
| - **Critical**: Follow the "Anti-patterns" section to avoid generic AI mistakes. |
3.2 配置通用 Skills (如 Frontend Design)
创建 .agent/workflows/frontend-design.md:
| --- |
| description: Apply the frontend-design skill to create distinctive interfaces. |
| --- |
| # Frontend Design Workflow |
| This workflow guides the creation of distinctive, production-grade frontend interfaces, avoiding generic "AI aesthetics". |
| ## 1. Analyze Requirements |
| - **Context**: Understand the user's request (component, page, app). |
| - **Goal**: Identify the problem to solve and the target audience. |
| ## 2. Adopt Design Persona |
| - **Tone**: Choose a bold aesthetic (e.g., Brutalist, Glassmorphism, Neobrutalism, Minimalist Luxury). |
| - **Differentiation**: What makes this design unforgettable? |
| - **Constraint**: Respect technical constraints (Vue/VitePress in this project). |
| ## 3. Aesthetic Guidelines (The "Pro Max" Standard) |
| - **Typography**: Use distinctive font weights and tracking. Avoid generic system font stacks if possible, or style them uniquely. |
| - **Color**: Use cohesive, bold palettes. High contrast or subtle sophisticated gradients. |
| - **Motion**: |
| - Use `transition-all duration-xxx` for smooth state changes. |
| - Add entrance animations (e.g., `animate-fade-in`). |
| - Micro-interactions on hover/active states. |
| - **Composition**: |
| - Use generous negative space. |
| - Break the grid where appropriate. |
| - Use depth (shadows, layers, blur). |
| - **Details**: |
| - Add texture (noise, gradients). |
| - Custom cursors or scrollbars if appropriate. |
| - Glassmorphism (`backdrop-blur`, `bg-opacity`). |
| ## 4. Implementation Steps |
| 1. **Scaffold**: Create the file structure. |
| 2. **Style**: Apply Tailwind classes for the chosen aesthetic. |
| 3. **Interact**: Add Vue logic for state and animations. |
| 4. **Refine**: Review against the "Generic AI" trap. Is it too boring? Add more "juice". |
| ## 5. Review Checklist |
| - [ ] Is the typography distinct? |
| - [ ] Are there micro-interactions? |
| - [ ] Is the layout responsive? |
| - [ ] Does it feel "Premium"? |
3.3 配置技能列表查询
创建 .agent/workflows/list-skills.md:
| --- |
| description: List all available agent skills installed in the global workspace. |
| --- |
| # List Available Skills (Global) |
| 1. **Check Global Skills Directory**: |
| - List directories in `/Users/weiz/.gemini/antigravity/skills/skills/skills`. |
| 2. **Display Skills**: |
| - Show the list of available skills to the user. |
| - Provide a brief description if possible (by reading `SKILL.md`). |
| // turbo 3. **Run Command**: |
| `bash ls /Users/weiz/.gemini/antigravity/skills/skills/skills` |
4. 如何在项目中使用
配置完成后,你可以通过 Slash Commands 或 自然语言 来调用这些能力。
场景 A:设计一个高大上的落地页
指令:
/ui-ux-pro-max 为我的 SaaS 产品设计一个落地页,风格要科技感强
Agent 行为:
- Agent 会自动运行全局的 Python 脚本。
- 脚本分析需求,生成一套包含配色(如深空蓝+霓虹绿)、排版(如 Inter + JetBrains Mono)和布局建议的设计系统。
- Agent 读取这些建议,并直接编写 Vue/React 代码实现页面。
场景 B:查看有哪些能力可用
指令:
/list-skills
Agent 行为:
- 列出所有已安装的全局技能包。
场景 C:日常开发辅助
指令:
使用 frontend-design skill 帮我优化这个按钮的交互
Agent 行为:
- Agent 会参考
frontend-design工作流中的“反平庸”指南。 - 它不会只写一个简单的
:hover,而是可能会添加transform: scale(1.05)、光影流光效果或磁吸效果,确保符合“Pro Max”标准。
5. 总结
通过这种 全局存储 + 本地引用 的方式,你可以:
- 节省空间:不需要在每个项目中重复下载几百 MB 的技能文件。
- 保持整洁:项目代码库中只有轻量级的 Workflow 配置文件。
- 能力复用:一次安装,所有项目受益。

 浙公网安备 33010602011771号