HttpClient 连接池最大连接数配置?
连接池
我们使用连接来进行系统间的交互,如何管理成千上万的连接呢?
服务器可以快 速创建和断开连接,但对于高并发的后台服务器而言,连接的频繁创建与断开,是非 常重的负担。就好像我们正在紧急处理线上故障,给同事打电话一起定位问题时, 般情况下都不会挂断电话,直到问题解决。在时间极度紧张的情况下,频繁地拨打和 接听电话会降低处理问题的效率。在客户端与服务端之间可以事先创建若干连接并提 前放置在连接池中,需要时可以从连接池直接获取,数据传输完成后,将连接归还至 连接池中,从而减少频繁创建和释放连接所造成的开销。例如,RPC服务集群的注册中心与服务提供方、消费方之间,消息服务集群的缓存服务器和消费者服务器之间, 应用后台服务器和数据库之间,都会使用连接池来提升性能。
重点提一下数据库连接池,连接资源在数据库端是一种非常关键且有限的系统资源。连接过多往往会严重影响数据库性能。数据库连接池负责分配、管理和释放连 接,这是 种以内存空间换取时间的策略,能够明显地提升数据库操作的性能。但如 果数据库连接管理不善,也会影响到整个应用集群的吞吐量。连接池配置错误加上慢 SQL,就像屋漏偏逢连夜雨,可以瞬间让一个系统进入服务超时假死音机状态。
如何合理地创建、管理、断开连接呢? 以 Druid 为例, Druid 是阿里巴巴的一个数据库连接池开源框架,准确来说它不仅仅包括数据库连接池,还提供了强大的监控和扩展功能。当应用启动时,连接池初始化最小连接数( MIN );当外部请求到达时,直接使用空闲连接即可。假如并发数达到最大( MAX ),则需要等待,直到超肘。 如果一直未拿到连接,就会抛出异常。
如果 MIN 过小,可能会出现过多请求排队等待获取连接,如果 MIN 过大,会造成资源浪费。如果 MAX 过小,则峰值情况下仍有很多请求处于等待状态;如果 MAX 过大,可能导致数据库连接被占满,大量请求超时,进而影响其他应用,引发服务器连环雪崩。在实际业务中,假如数据库配置的 MAX 是100, 一个请求10ms, 则最大能够处理 10000QPS。增大连接数,有可能会超过单台服务器的正常负载能力。 另外,连接数的创建是受到服务器操作系统的fd(文件描述符)数量限制的。创建更多的活跃连接,就需要消耗更多的fd,系统默认单个进程可同时拥有 1024个fd,该值虽然可以适当调整,但如果无限制地增加,会导致服务器在fd的维护和切换上消耗过多的精力,从而降低应用吞吐量。
懒惰是人的天性,有时候开发工程师为了图省事还会不依不饶地要求调长 Timeout 时间,如果这个数值过大,对于调用端来说也是不可接受的。如果应用服务器超时,前台已经失败返回,但是后台仍然在没有意义地重试,并且还有新的处理请求不断堆积,最终导致服务器崩溃。这明显是不合理的。所以在双十一的场景里,应用服务器的全链路上不论是连接池的峰值处理,还是应用之间的调用频率,都会有相关的限流措施和降级预案。
图所示的是某连接池的监控图。图中连接池最小的连接数是 2, 一个线程 就是 个活跃连接。一般可以把连接池的最大连接数设置在 30 个左右 , 理论上还可以设置更大的值,但是 DBA 一般不会允许,因为往往只有出现了慢 SQL, 才需要使用更多的连接数。这时候通常需要优化应用层逻辑或者创建数据库索引,而不是一昧地采用加大连接数这种治标不治本的做法。极端情况下甚至会导致数据库服务不响应,进而影响其他业务。

从经验上来看,在数据库层面的请求应答时间必须在 IOOms 以内,秒级的 SQL
查询通常存在巨大的性能提升空间,有如下应对方案,
( I ) 建主高效且合适的索引。 索引谁都可以建,但要想建好难度极大。因为索引既有数据特征,又有业务特征,数据量的变化会影响索引的选择,业务特点不一样, 索引的优化思路也不一样。通常某个字段平时不用,但是某种触发场景下命中“索引缺失”的字段会导致查询瞬间变慢。所以,要事先明确业务场景,建立合适的索引。
( 2 )排查连接资源未显式关闭的情形。 要特别注意在 ThreadLocal 或流式计算中使用数据库连接的地方。
( 3 )合并短的请求。 根据 CPU 的空间局部性原理,对于相近的数据,CPU 会一起提取到内存中。另外,合并请求也可以有效减少连接的次数。
( 4 )合理拆分多个表join的SQL, 若是超过三个表则禁止join。 如果表结构建 得不合理,应用逻辑处理不当,业务模型抽象有问题 , 那么三表 join 的数据量由于笛卡儿积操作会呈几何级数增加,所以不推荐这样的做法。另外,对于需要 join 的字段, 数据类型应保持绝对一致。多表关联查询时,应确保被关联的字段要有索引。
( 5 ) 使用临时表。 某种情况下,该方法是一种比较好的选择。曾经遇到一个场景不使用临时表需要执行 1 个多小时 ,使用临时表可以降低至 2 分钟以内。因为在不断的嵌套查询中,已经无法很好地利用现有的索引提升查询效率,所以把中间结果保 存到临时表,然后重建索引 ,再通过临时表进行后续的数据操作。
( 6 ) 应用层优化。 包括进行数据结构优化、并发多线程改造等。
( 7 ) 改用其他数据库。 因为不同数据库针对的业务场景是不同的,比如Cassandra、 MongoDB 。
在apacheHttpClient的连接池管理里面有几个概念需要注意:
Keep-Alive这个是连接的期望的长链接的保持时间.- 连接空闲时间 IdleConnectionTime
- 连接过期时间 ExpiredConnections 相关的时间.
有同学可能(不要问我那个同学是谁)会认为Keep-Alive的时间就是连接池里面的连接的最长可用时间. 因为平时我们也这样认为的,KeepAlive时间来控制连接的生命周期.
比如:
httpClient在发起请求时, 添加了请求头 Keep-Alive: 5s ,此时使用的是一个新连接. 下次我传的Keep-Alive: 10s. 那这个连接会被重用到10秒结束吗.
这些概念比较难梳理清楚. 实际在apacheHttpClient中. HttpClient无法直接控制TCP层面的keep-alive的具体行为,它优先遵循HTTP规范。在HTTP 1.1中,默认所有连接都是持久化的,除非有显式声明关闭(如 Connection: close)。Keep-Alive头部字段在HTTP 1.1规范中实际上没有明确定义,它是在HTTP 1.0中对持久连接的一个扩展。
Keep-Alive: 5s 实际上是一个不太标准的用法,通常客户端和服务端都可能忽略它。即使服务端理解并接受了这个header,它也只是表明服务端在处理完请求后,应该在关闭连接前持续等待5秒以期待可能存在的后续请求。这并不代表客户端保留连接的时间,也无关这个连接是否能被重用。
在下一次请求时,如果传递 Keep-Alive: 10s,并不会影响前一个连接。如果前一个连接在这个时候还是可用的(在最近的5秒内没有新请求,服务端选择关闭连接后,那么它就不再可用),那么它可能被重用。不过实际上,连接是否能够被重用,是由很多因素决定的,不仅仅看设置的Keep-Alive值。
Apache HttpClient执行以下步骤来管理和维护连接池中连接的生命周期:
- 请求连接:当一个请求到来时,并且需要建立一个新的连接,PoolingHttpClientConnectionManager会先检查连接池中是否存在闲置的可重用的连接。如果找到匹配的闲置连接,会直接重用。否则,会尝试创建新的连接。
- 释放连接:当一个请求处理完成,连接会被默认保持开放,并被归还到连接池中,以供后续的请求重复使用。如果请求明确指明了不使用
keep-alive(通过设置Connection: close),连接会在请求处理完成后被关闭,并且不会归还给连接池。 - 过时检查:
PoolingHttpClientConnectionManager有一个管理器线程,会周期性地检查连接池中的连接。如果一个连接被标记为stale(陈旧的,可能已经无法再使用的连接),或者空闲时间超过了maxIdleTime设置的值,则会关闭这个连接。 - 连接过期:每个连接都有一个到期时间,即从被创建开始,在一定时间后,它会被认为是过期的。如果一个连接到了过期时间.(由
connTimeToLive),连接管理器线程会关闭它。
此外,Apache HttpClient还会在发起请求时检查目标连接是否被stale或过期,如果是,则会自动新建一个连接。
总结一下: apacheHttpClient有一个专门的连接有效期的设置时间:connTimeToLive 用来管理每一个链接的实际过期时间. 只要连接的存在的时间超过了这个时间就会直接释放掉,不过连接是否真的有效.
如果把KeepAlive理解为有效期可能错误有十万八千里. 一般的代码会设定: evictIdleConnections 来管理空闲在连接池的空闲连接. 而多半大部分可用会误以为这个就是兜底的逻辑. 因为空闲的链接确实在这里进行释放.

但是, 在版本4.5以后. 每一次请求将不再建议进行连接有效性检验. 也就是以下的这一行代码:

这样,在每一次使用时就有可能连接是无效的. 而这个机制去除后, apacheClient添加了另外一个机制来对连接进行保活探测:
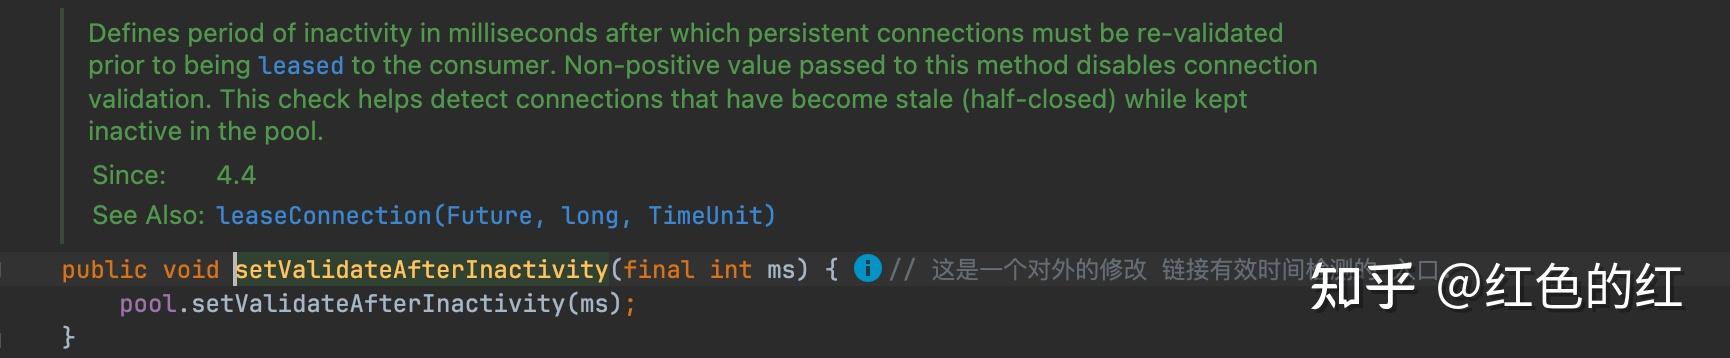
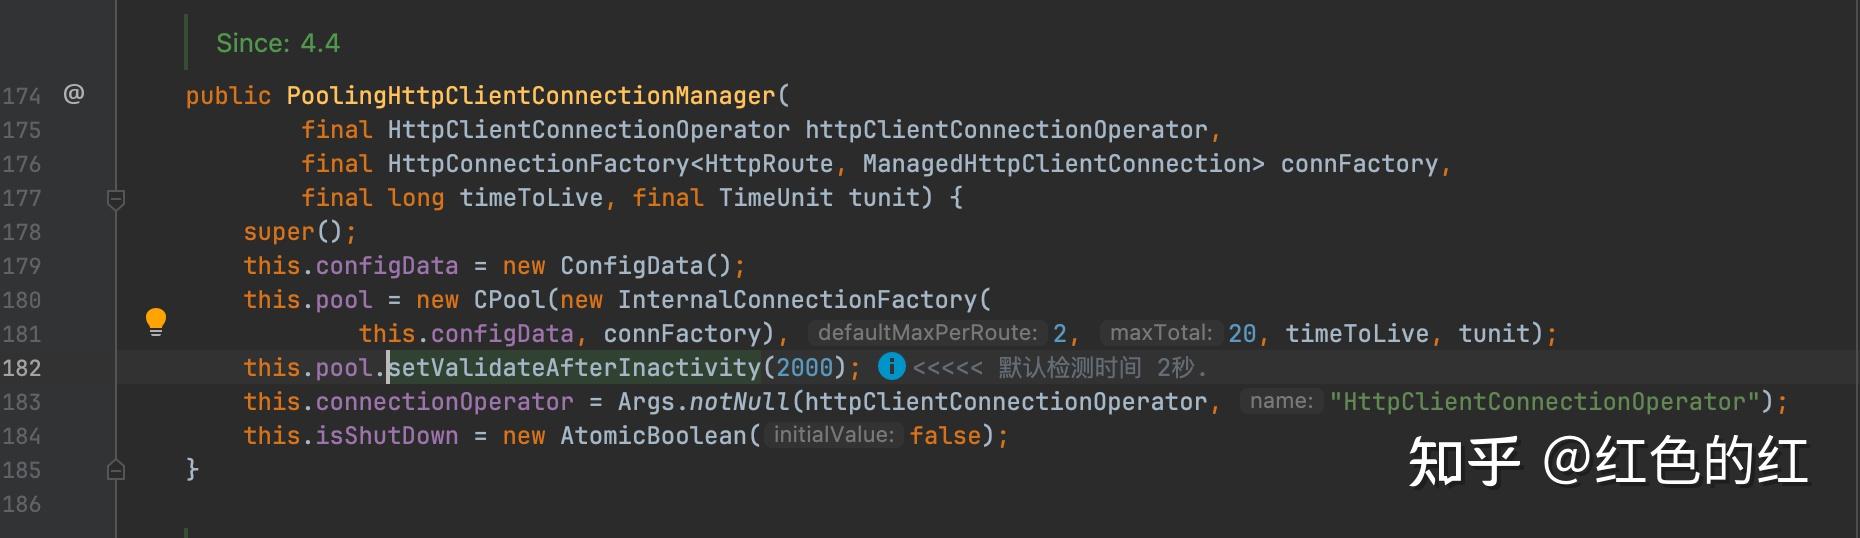
而这个check的配置.如果使用builder来构建httpClient的时候,是没有暴露这参数的配置的. 但是实际内部在初始化的时候是有配置的. 默认时间是2秒.也就是如果一个连接在连接池里面空闲了2秒以上(包含).那在下一次使用的时候就会进行有效性检测.
综合起来, 如果忽略了最长有效时间.那一般可以用:
- maxIdle时间来控制空闲连接的回收.
- 2秒时间的保活探测确保连接是有效的.
但是如果忽略了最长有效期.就会使一个连接最终用到服务端的结束时间. 想象一种场景.一个一直被用的连接.一直被复用. 由于没有最长时间的限制,非常有可能在后期接近或者超过服务端的最长连接时间. 此时服务端就可能会主动断开连接. 而在server端断开,客户端恰好每次使用的时间都低于2秒时. 那就会跳过staleCheck. 最终造成使用一个半连接.(half-close).
所以这个最长有效期的时间非常关键. 如果没有设置会造成client访问的不稳定性.
以下是我的一个完整的配置. 你也可以直接参考(copy)使用:
    /**
     * 构造默认的构造函数
     *
     * @param connTimeout 连接超时时间
     * @param readTimeout 读超时时间
     * @param maxTotal    最大连接数
     * @param maxPerRoute 每个路由的最大链接数
     * @param openDefinitionExceptionRetry 开启重试的异常;如开启多个异常重试,值是 HttpRequestRetryHandler 中retry常量值的或运算结果
     * @param retryCount 重试次数
     * @return HttpsClientV2
     */
    public static HttpsClientV2 createHttpsClient(int connTimeout,
                                                  int readTimeout,
                                                  int maxTotal,
                                                  int maxPerRoute,
                                                  boolean defaultRetry,
                                                  int openDefinitionExceptionRetry,
                                                  int retryCount,
                                                  Integer keepAliveTime) {

        ForceKeepAliveStrategy forceKeepAliveStrategy = new ForceKeepAliveStrategy(
                keepAliveTime != null ? keepAliveTime : DEFAULT_KEEP_ALIVE_TIME
        );

        // 参考初始化方式: https://blog.csdn.net/wanghuiqi2008/article/details/55260073
        X509TrustManager x509TrustManager = new X509TrustManager() {
            @Override
            public void checkClientTrusted(X509Certificate[] x509Certificates, String s) throws CertificateException {

            }

            @Override
            public void checkServerTrusted(X509Certificate[] x509Certificates, String s) throws CertificateException {

            }

            @Override
            public X509Certificate[] getAcceptedIssuers() {
                return new X509Certificate[0];
            }
        };

        SSLConnectionSocketFactory socketFactory = null;

        try {
            SSLContext sslContext = SSLContext.getInstance("SSL");
            sslContext.init(null, new TrustManager[]{x509TrustManager}, new SecureRandom());
            socketFactory = new SSLConnectionSocketFactory(sslContext,
                                                           NoopHostnameVerifier.INSTANCE);
        } catch (NoSuchAlgorithmException | KeyManagementException e) {
            logger.error("初始化出错,无法支持 HTTPS 特殊配置.降级为普通 httpClient.....", e);
        }

        ConnectionConfig connectionConfig = ConnectionConfig.custom()
            //.setBufferSize(8192)
            .build();

        /**
         * 连接池配置: 对于无法进行兜底的 StaleConnectionCheck,可以通过设置 validateAfterInactivity 来进行控制.
         * 见: {@link org.apache.http.impl.conn.PoolingHttpClientConnectionManager#setValidateAfterInactivity(int)}
         */
        RequestConfig requestConfig = RequestConfig.custom()
            .setConnectTimeout(connTimeout)                                     // 连接目标超时connectionTimeout
            .setConnectionRequestTimeout(DEFAULT_CONNECTION_REQUEST_TIMEOUT)    // 从连接池中获取可用连接超时
            .setSocketTimeout(readTimeout)                                      // 等待响应超时(读取数据超时)socketTimeout
            //.setStaleConnectionCheckEnabled(true)                             // 新版本从4.5开始,不推荐使用 stale 检测
            .setCookieSpec(CookieSpecs.IGNORE_COOKIES)                          // 忽略所有 cookie
            .build();

        // PoolingHttpClientConnectionManager cm = new PoolingHttpClientConnectionManager();
        /**
         * 过期链接的清理在线程: {@link org.apache.http.impl.client.IdleConnectionEvictor}. 这个除了清理空闲超时的连接外.还会清理过期的连接.
         * 文档1: https://blog.csdn.net/u012760435/article/details/124858901
         * 文档2: https://www.cnblogs.com/fifty-two-hertz/p/14097822.html
         */
        HttpClientBuilder httpClientBuilder = HttpClients
            .custom()
            .setDefaultConnectionConfig(connectionConfig)
            .setDefaultRequestConfig(requestConfig)           //
            .setUserAgent(DEFAULT_USER_AGENT)                 // 查看覆盖情况是否影响
            .setMaxConnTotal(maxTotal)                        // can be overridden by the {@link #setConnectionManager
            .setMaxConnPerRoute(maxPerRoute)
            .setRetryHandler(new HttpRequestRetryHandler(retryCount, false, openDefinitionExceptionRetry))
            .setKeepAliveStrategy(forceKeepAliveStrategy)     // 长连接保持时间
            .evictExpiredConnections()                        // 探测过期链接清理( 默认是 DEFAULT_KEEP_ALIVE_TIME / 15s )
            .setConnectionTimeToLive(DEFAULT_KEEP_ALIVE_TIME, TimeUnit.MILLISECONDS)
            .evictIdleConnections(DEFAULT_IDLE_CONNECT_TIME, TimeUnit.SECONDS);// 空闲链接探测时间.3s 不用的链接认为是空闲链接 (这个时间会决定 background 线程的频率)

        /* ssl 工厂类构建失败时,不配置独立的工厂类,使用默认的工厂类 **/
        if (socketFactory != null) {
            httpClientBuilder.setSSLSocketFactory(socketFactory);
        }

        /* 是否自动重试(默认会自动重试,传 false 会禁用此功能) **/
        if (!defaultRetry) {
            httpClientBuilder.disableAutomaticRetries();
        }

        CloseableHttpClient httpClient = httpClientBuilder.build();

        try {
            // Note: 不做具体的业务信息. 这里打印一下默认的链接池信息. 默认链接在放回到连接池超过2s就会检查连接的有效性.
            Field connManagerF = httpClient.getClass().getDeclaredField("connManager");
            connManagerF.setAccessible(true);
            PoolingHttpClientConnectionManager connectionManager = (PoolingHttpClientConnectionManager) connManagerF.get(httpClient);
            logger.info("httpsV2Client.ValidateAfterInactivity {}ms", connectionManager.getValidateAfterInactivity());
        } catch (Exception e) {
            logger.warn("获取链接池信息失败", e);
            // do nothing
        }

        return new HttpsClientV2(httpClient,requestConfig);
}众所周知,httpclient是开发中非常常见的一种访问网络资源的方式了。这里不再赘述httpclient强大的功能使用了,比如读取网页(HTTP/HTTPS)内容,以GET或者POST方式向网页提交参数,处理页面重定向,模拟输入用户名和口令进行登录,提交XML格式参数,通过HTTP上传文件,访问启用的页面以及httpclient在多线程下的使用.
这里说一下多线程模式下使用httpclient连接池的使用注意事项:
org.apache.http.impl.conn.PoolingClientConnectionManager;
使用这个类就可以使用httpclient连接池的功能了,其可以设置最大连接数和最大路由连接数。
public final static int MAX_TOTAL_CONNECTIONS = 400; public final static int MAX_ROUTE_CONNECTIONS = 200; -
cm = new PoolingClientConnectionManager();
-
cm.setMaxTotal(MAX_TOTAL_CONNECTIONS);
-
cm.setDefaultMaxPerRoute(MAX_ROUTE_CONNECTIONS);
最大连接数就是连接池允许的最大连接数,最大路由连接数就是没有路由站点的最大连接数,比如:
- HttpHostgoogleResearch=newHttpHost("research.google.com",80);
- HttpHostwikipediaEn=newHttpHost("en.wikipedia.org",80);
- cm.setMaxPerRoute(newHttpRoute(googleResearch),30);
- cm.setMaxPerRoute(newHttpRoute(wikipediaEn),50);
并且可以设置httpclient连接等待请求等待时间,相应时间等。
说几个要注意点:
1.首先配置最大连接数和最大路由连接数,如果你要连接的url只有一个,两个必须配置成一样,否则只会取最小值。(这是个坑,默认最大连接是20,每个路由最大连接是2)
2.最好配置httpclient连接等待时间,和相应时间。否则就会一直等待。
-
httpParams = new BasicHttpParams();
-
httpParams.setParameter(CoreConnectionPNames.CONNECTION_TIMEOUT,CONNECT_TIMEOUT);
-
httpParams.setParameter(CoreConnectionPNames.SO_TIMEOUT, READ_TIMEOUT);
3 httpclient必须releaseconnection,但不是abort。因为releaseconnection是归还连接到连接池,而abort是直接抛弃这个连接,而且占用连接池的数目。(一定要注意)
HttpGet httpGet = new HttpGet(searchurl);httpGet.releaseConnection();4 (一定要注意)httpclient设置的最大连接数绝对不能超过tomcat设置的最大连接数,否则tomcat的连接就会被httpclient连接池一直占用,直到系统挂掉。
5 可以使用tomcat的长连接和htppclient连接池和合理使用来增加系统响应速度。
连接池技术作为创建和管理连接的缓冲池技术,目前已广泛用于诸如数据库连接等长连接的维护和管理中,能够有效减少系统的响应时间,节省服务器资源开销。其优势主要有两个:其一是减少创建连接的资源开销,其二是资源的访问控制。连接池管理的对象是长连接,对于HTTP连接是否适用,我们需要首先回顾一下长连接和短连接。
所谓长连接是指客户端与服务器端一旦建立连接以后,可以进行多次数据传输而不需重新建立连接,而短连接则每次数据传输都需要客户端和服务器端建立一次连接。长连接的优势在于省去了每次数据传输连接建立的时间开销,能够大幅度提高数据传输的速度,对于P2P应用十分适合,但是对于诸如Web网站之类的B2C应用,并发请求量大,每一个用户又不需频繁的操作的场景下,维护大量的长连接对服务器无疑是一个巨大的考验。而此时,短连接可能更加适用。但是短连接每次数据传输都需要建立连接,我们知道HTTP协议的传输层协议是TCP协议,TCP连接的建立和释放分别需要进行3次握手和4次握手,频繁的建立连接即增加了时间开销,同时频繁的创建和销毁Socket同样是对服务器端资源的浪费。所以对于需要频繁发送HTTP请求的应用,需要在客户端使用HTTP长连接。
HTTP连接是无状态的,这样很容易给我们造成HTTP连接是短连接的错觉,实际上HTTP1.1默认即是持久连接,HTTP1.0也可以通过在请求头中设置Connection:keep-alive使得连接为长连接。既然HTTP协议支持长连接,我们就有理由相信HTTP连接同样需要连接池技术来管理和维护连接建立和销毁。HTTP Client4.0的ThreadSafeClientConnManager实现了HTTP连接的池化管理,其管理连接的基本单位是Route(路由),每个路由上都会维护一定数量的HTTP连接。这里的Route的概念可以理解为客户端机器到目标机器的一条线路,例如使用HttpClient的实现来分别请求 www.163.com 的资源和 www.sina.com 的资源就会产生两个route。缺省条件下对于每个Route,HttpClient仅维护2个连接,总数不超过20个连接,显然对于大多数应用来讲,都是不够用的,可以通过设置HTTP参数进行调整。
HttpParams params = new BasicHttpParams();
//将每个路由的最大连接数增加到200
ConnManagerParams.setMaxTotalConnections(params,200);
// 将每个路由的默认连接数设置为20
ConnPerRouteBean connPerRoute = new ConnPerRouteBean(20);
// 设置某一个IP的最大连接数
-
HttpHost localhost = new HttpHost("locahost", 80);
-
connPerRoute.setMaxForRoute(new HttpRoute(localhost), 50);
-
ConnManagerParams.setMaxConnectionsPerRoute(params, connPerRoute);
-
SchemeRegistry schemeRegistry = new SchemeRegistry();
-
schemeRegistry.register( new Scheme("http", PlainSocketFactory.getSocketFactory(), 80));
-
schemeRegistry.register( new Scheme("https", SSLSocketFactory.getSocketFactory(), 443));
-
ClientConnectionManager cm = new ThreadSafeClientConnManager(params, schemeRegistry);
-
HttpClient httpClient = new DefaultHttpClient(cm, params);
可以配置的HTTP参数有:
1) http.conn-manager.timeout 当某一线程向连接池请求分配线程时,如果连接池已经没有可以分配的连接时,该线程将会被阻塞,直至http.conn-manager.timeout超时,抛出ConnectionPoolTimeoutException。
2) http.conn-manager.max-per-route 每个路由的最大连接数;
3) http.conn-manager.max-total 总的连接数;
连接的有效性检测是所有连接池都面临的一个通用问题,大部分HTTP服务器为了控制资源开销,并不会
永久的维护一个长连接,而是一段时间就会关闭该连接。放回连接池的连接,如果在服务器端已经关闭,客
户端是无法检测到这个状态变化而及时的关闭Socket的。这就造成了线程从连接池中获取的连接不一定是有效的。这个问题的一个解决方法就是在每次请求之前检查该连接是否已经存在了过长时间,可能已过期。但是这个方法会使得每次请求都增加额外的开销。HTTP Client4.0的ThreadSafeClientConnManager 提供了
closeExpiredConnections()方法和closeIdleConnections()方法来解决该问题。前一个方法是清除连接池中所有过期的连接,至于连接什么时候过期可以设置,设置方法将在下面提到,而后一个方法则是关闭一定时间空闲的连接,可以使用一个单独的线程完成这个工作。
public static class IdleConnectionMonitorThread extends Thread{
  private final ClientConnectionManagerconnMgr;
  privatevolatilebooleanshutdown;
  public IdleConnectionMonitorThread(ClientConnectionManagerconnMgr){
    super();
    this.connMgr=connMgr;
  }
  @Override
  public void run(){
    try{
      while(!shutdown){
        synchronized(this){
          wait(5000);//关闭过期的连接connMgr.closeExpiredConnections();//关闭空闲时间超过30秒的连接connMgr.closeIdleConnections(30,
          TimeUnit.SECONDS);
        }
      }
    }catch(InterruptedExceptionex){
      //terminate
    }
  }
public void shutdown(){
    shutdown=true;
    synchronized(this){
      notifyAll();
    }
刚才提到,客户端可以设置连接的过期时间,可以通过HttpClient的setKeepAliveStrategy方法设置连接的过期时间,这样就可以配合closeExpiredConnections()方法解决连接池中连接失效的。
DefaultHttpClient httpclient=newDefaultHttpClient();
httpclient.setKeepAliveStrategy(new ConnectionKeepAliveStrategy(){
public long getKeepAliveDuration(HttpResponseresponse,HttpContextcontext){
//Honor'keep-alive'headerHeaderElementIteratorit=newBasicHeaderElementIterator(response.headerIterator(HTTP.CONN_KEEP_ALIVE));while(it.hasNext()){
HeaderElement he=it.nextElement();
String param= he.getName();
String value=he.getValue();
if(value!=null&¶m.equalsIgnoreCase("timeout")){
try{
return Long.parseLong(value)*1000;
}catch(NumberFormatExceptionignore){
}
}
}
HttpHost target=(HttpHost)context.getAttribute(ExecutionContext.HTTP_TARGET_HOST);
if("www.163.com".equalsIgnoreCase(target.getHostName())){
//对于163这个路由的连接,保持5秒return5*1000;
}else{
//其他路由保持30秒return30*1000;
}
}
})Apache HttpClient 5 使用详细教程 - 知乎
超文本传输协议(HTTP)可能是当今互联网上最重要的协议之一,Web 服务、微服务以及支持网络的各种设备上的服务几乎都是 HTTP 协议,HTTP 协议已经从 Web 浏览器走向了更广泛的使用场景。
虽然 java.net 包已经提供了 HTTP 访问资源的基本功能,但是它不够灵活,而且不能随心所欲的进行自定义。Apache HttpClient 5 是一个开源的 HTTP 工具包,可以支持最新 HTTP 协议标准,且有丰富的 API 和强大的扩展特性,可以用于构建任何需要进行 HTTP 协议处理的应用程序。
这篇文章介绍 Apache HttpClient 5 中最为常见的一些用法,通过这篇文章可以快速的入门使用 HttpClient 5,主要内容包括 HttpClient 5 的 Get 请求、Post 请求、如何携带参数、JSON 参数、设置超时、异步请求、操作 Cookie、表单登录、基本认证、Digest 认证以及自定义 HTTP 请求拦截器等。
HttpClient 5 依赖
HttpClient 5 Maven 依赖
<!-- https://mvnrepository.com/artifact/org.apache.httpcomponents.client5/httpclient5 -->
<dependency>
    <groupId>org.apache.httpcomponents.client5</groupId>
    <artifactId>httpclient5</artifactId>
    <version>5.1.3</version>
</dependency>
<!-- https://mvnrepository.com/artifact/org.apache.httpcomponents.client5/httpclient5-fluent -->
<dependency>
    <groupId>org.apache.httpcomponents.client5</groupId>
    <artifactId>httpclient5-fluent</artifactId>
    <version>5.1.3</version>
</dependency>
HttpClient 5 Gradle 依赖
implementation 'org.apache.httpcomponents.client5:httpclient5:5.1.3'
implementation 'org.apache.httpcomponents.client5:httpclient5-fluent:5.1.3'
HttpClient 5 GET 请求
package com.wdbyte.httpclient;

import java.io.IOException;

import org.apache.hc.client5.http.classic.methods.HttpGet;
import org.apache.hc.client5.http.impl.classic.CloseableHttpClient;
import org.apache.hc.client5.http.impl.classic.CloseableHttpResponse;
import org.apache.hc.client5.http.impl.classic.HttpClients;
import org.apache.hc.core5.http.HttpEntity;
import org.apache.hc.core5.http.ParseException;
import org.apache.hc.core5.http.io.entity.EntityUtils;

/**
 * @author https://www.wdbyte.com
 */
public class HttpClient5Get {

    public static void main(String[] args) {
        String result = get("http://httpbin.org/get");
        System.out.println(result);
    }

    public static String get(String url) {
        String resultContent = null;
        HttpGet httpGet = new HttpGet(url);
        try (CloseableHttpClient httpclient = HttpClients.createDefault()) {
            try (CloseableHttpResponse response = httpclient.execute(httpGet)) {
                // 获取状态码
                System.out.println(response.getVersion()); // HTTP/1.1
                System.out.println(response.getCode()); // 200
                System.out.println(response.getReasonPhrase()); // OK
                HttpEntity entity = response.getEntity();
                // 获取响应信息
                resultContent = EntityUtils.toString(entity);
            }
        } catch (IOException | ParseException e) {
            e.printStackTrace();
        }
        return resultContent;
    }

}
响应信息:
HTTP/1.1
200
OK
{
  "args": {},
  "headers": {
    "Accept-Encoding": "gzip, x-gzip, deflate",
    "Host": "httpbin.org",
    "User-Agent": "Apache-HttpClient/5.1.3 (Java/17)",
    "X-Amzn-Trace-Id": "Root=1-62bb1891-5ab5e5376ed960471bf32f17"
  },
  "origin": "47.251.4.198",
  "url": "http://httpbin.org/get"
}
HttpClient 5 Fluent GET
使用 Apache HttpClient 5 提供的 Fluent API 可以更便捷的发起 GET 请求,但是可操作的地方较少。
依赖:
<!-- https://mvnrepository.com/artifact/org.apache.httpcomponents.client5/httpclient5-fluent -->
<dependency>
    <groupId>org.apache.httpcomponents.client5</groupId>
    <artifactId>httpclient5-fluent</artifactId>
    <version>5.1.3</version>
</dependency>
示例:
package com.wdbyte.httpclient;

import java.io.IOException;

import org.apache.hc.client5.http.fluent.Request;
import org.apache.hc.client5.http.fluent.Response;

/**
* @author https://www.wdbyte.com
 */
public class HttpClient5GetFluent {

    public static void main(String[] args) {
        System.out.println(get("http://httpbin.org/get"));
    }

    public static String get(String url) {
        String result = null;
        try {
            Response response = Request.get(url).execute();
            result = response.returnContent().asString();
        } catch (IOException e) {
            e.printStackTrace();
        }
        return result;
    }

}
输出信息:
{
  "args": {},
  "headers": {
    "Accept-Encoding": "gzip, x-gzip, deflate",
    "Host": "httpbin.org",
    "User-Agent": "Apache-HttpClient/5.1.3 (Java/17)",
    "X-Amzn-Trace-Id": "Root=1-62bb190e-1ba46a92645843a04c55da32"
  },
  "origin": "47.251.4.198",
  "url": "http://httpbin.org/get"
}
HttpClient5 GET 请求参数
使用 URIBuilder 的 addParameters() 方法来构建 GET 请求的参数。
package com.wdbyte.httpclient;

import java.io.IOException;
import java.net.URI;
import java.net.URISyntaxException;
import java.util.ArrayList;
import java.util.List;

import org.apache.hc.client5.http.classic.methods.HttpGet;
import org.apache.hc.client5.http.impl.classic.CloseableHttpClient;
import org.apache.hc.client5.http.impl.classic.CloseableHttpResponse;
import org.apache.hc.client5.http.impl.classic.HttpClients;
import org.apache.hc.core5.http.HttpEntity;
import org.apache.hc.core5.http.NameValuePair;
import org.apache.hc.core5.http.ParseException;
import org.apache.hc.core5.http.io.entity.EntityUtils;
import org.apache.hc.core5.http.message.BasicNameValuePair;
import org.apache.hc.core5.net.URIBuilder;

/**
* @author https://www.wdbyte.com
 */
public class HttpClient5GetParams {

    public static void main(String[] args) {
        String result = get("http://httpbin.org/get");
        System.out.println(result);
    }

    public static String get(String url) {
        String resultContent = null;
        HttpGet httpGet = new HttpGet(url);
        // 表单参数
        List<NameValuePair> nvps = new ArrayList<>();
        // GET 请求参数
        nvps.add(new BasicNameValuePair("username", "wdbyte.com"));
        nvps.add(new BasicNameValuePair("password", "secret"));
        // 增加到请求 URL 中
        try {
            URI uri = new URIBuilder(new URI(url))
                .addParameters(nvps)
                .build();
            httpGet.setUri(uri);
        } catch (URISyntaxException e) {
            throw new RuntimeException(e);
        }

        try (CloseableHttpClient httpclient = HttpClients.createDefault()) {
            try (CloseableHttpResponse response = httpclient.execute(httpGet)) {
                // 获取状态码
                System.out.println(response.getVersion()); // HTTP/1.1
                System.out.println(response.getCode()); // 200
                System.out.println(response.getReasonPhrase()); // OK
                HttpEntity entity = response.getEntity();
                // 获取响应信息
                resultContent = EntityUtils.toString(entity);
            }
        } catch (IOException | ParseException e) {
            e.printStackTrace();
        }
        return resultContent;
    }
}
输出信息:
{
  "args": {
    "password": "secret",
    "username": "wdbyte.com"
  },
  "headers": {
    "Accept-Encoding": "gzip, x-gzip, deflate",
    "Host": "httpbin.org",
    "User-Agent": "Apache-HttpClient/5.1.3 (Java/1.8.0_151)",
    "X-Amzn-Trace-Id": "Root=1-62ecc660-69d58a226aefb1b6226541ec"
  },
  "origin": "42.120.75.185",
  "url": "http://httpbin.org/get?username=wdbyte.com&password=secret"
}
下面是通过抓包得到的请求响应信息格式:
// 请求信息
GET /get?username=wdbyte.com&password=secret HTTP/1.1
Accept-Encoding: gzip, x-gzip, deflate
Host: httpbin.org
Connection: keep-alive
User-Agent: Apache-HttpClient/5.1.3 (Java/1.8.0_151)

// 响应信息
HTTP/1.1 200 OK
Date: Fri, 05 Aug 2022 07:27:30 GMT
Content-Type: application/json
Content-Length: 405
Connection: keep-alive
Server: gunicorn/19.9.0
Access-Control-Allow-Origin: *
Access-Control-Allow-Credentials: true

{
  "args": {
    "password": "secret",
    "username": "wdbyte.com"
  },
  "headers": {
    "Accept-Encoding": "gzip, x-gzip, deflate",
    "Host": "httpbin.org",
    "User-Agent": "Apache-HttpClient/5.1.3 (Java/1.8.0_151)",
    "X-Amzn-Trace-Id": "Root=1-62ecc660-69d58a226aefb1b6226541ec"
  },
  "origin": "42.120.75.185",
  "url": "http://httpbin.org/get?username=wdbyte.com&password=secret"
}
HttpClient 5 POST 请求
下面演示发起一个 POST 请求,并携带表单参数。
参数:username=wdbyte.com&password=secret
package com.wdbyte.httpclient;

import java.io.IOException;
import java.util.ArrayList;
import java.util.List;

import org.apache.hc.client5.http.classic.methods.HttpPost;
import org.apache.hc.client5.http.entity.UrlEncodedFormEntity;
import org.apache.hc.client5.http.impl.classic.CloseableHttpClient;
import org.apache.hc.client5.http.impl.classic.CloseableHttpResponse;
import org.apache.hc.client5.http.impl.classic.HttpClients;
import org.apache.hc.core5.http.HttpEntity;
import org.apache.hc.core5.http.NameValuePair;
import org.apache.hc.core5.http.ParseException;
import org.apache.hc.core5.http.io.entity.EntityUtils;
import org.apache.hc.core5.http.message.BasicNameValuePair;

/**
* @author https://www.wdbyte.com
 */
public class HttpClient5Post {

    public static void main(String[] args) {
        String result = post("http://httpbin.org/post");
        System.out.println(result);
    }
    public static String post(String url) {
        String result = null;
        HttpPost httpPost = new HttpPost(url);
        // 表单参数
        List<NameValuePair> nvps = new ArrayList<>();
        // POST 请求参数
        nvps.add(new BasicNameValuePair("username", "wdbyte.com"));
        nvps.add(new BasicNameValuePair("password", "secret"));
        httpPost.setEntity(new UrlEncodedFormEntity(nvps));
        try (CloseableHttpClient httpclient = HttpClients.createDefault()) {
            try (CloseableHttpResponse response = httpclient.execute(httpPost)) {
                System.out.println(response.getVersion()); // HTTP/1.1
                System.out.println(response.getCode()); // 200
                System.out.println(response.getReasonPhrase()); // OK

                HttpEntity entity = response.getEntity();
                // 获取响应信息
                result = EntityUtils.toString(entity);
                // 确保流被完全消费
                EntityUtils.consume(entity);
            }
        } catch (IOException | ParseException e) {
            e.printStackTrace();
        }
        return result;
    }

}
输出信息:
HTTP/1.1
200
OK
{
  "args": {},
  "data": "",
  "files": {},
  "form": {
    "password": "secret",
    "username": "wdbyte.com"
  },
  "headers": {
    "Accept-Encoding": "gzip, x-gzip, deflate",
    "Content-Length": "35",
    "Content-Type": "application/x-www-form-urlencoded; charset=ISO-8859-1",
    "Host": "httpbin.org",
    "User-Agent": "Apache-HttpClient/5.1.3 (Java/17)",
    "X-Amzn-Trace-Id": "Root=1-62bb1ac8-489b2100728c81d70797a482"
  },
  "json": null,
  "origin": "183.128.136.89",
  "url": "http://httpbin.org/post"
}
下面是通过 Wireshark 抓包得到的请求信息:
POST /post HTTP/1.1
Accept-Encoding: gzip, x-gzip, deflate
Content-Length: 35
Content-Type: application/x-www-form-urlencoded; charset=ISO-8859-1
Host: httpbin.org
Connection: keep-alive
User-Agent: Apache-HttpClient/5.1.3 (Java/17)

username=wdbyte.com&password=secret
HttpClient 5 Fluent POST
使用 Apache HttpClient 5 提供的 Fluent API 可以更便捷的发起 POST 请求,但是可操作的地方较少。
一样发送一个简单的表单参数:username=wdbyte.com&password=secret
package com.wdbyte.httpclient;

import java.io.IOException;

import org.apache.hc.client5.http.fluent.Request;
import org.apache.hc.core5.http.message.BasicNameValuePair;

/**
* @author https://www.wdbyte.com
 */
public class HttpClient5PostFluent {

    public static void main(String[] args) {
        String result = post("http://httpbin.org/post");
        System.out.println(result);
    }

    public static String post(String url) {
        String result = null;
        Request request = Request.post(url);
        // POST 请求参数
        request.bodyForm(
            new BasicNameValuePair("username", "wdbyte.com"),
            new BasicNameValuePair("password", "secret"));
        try {
            result = request.execute().returnContent().asString();
        } catch (IOException e) {
            e.printStackTrace();
        }
        return result;
    }
}
输出信息:
{
  "args": {},
  "data": "",
  "files": {},
  "form": {
    "password": "secret",
    "username": "wdbyte.com"
  },
  "headers": {
    "Accept-Encoding": "gzip, x-gzip, deflate",
    "Content-Length": "35",
    "Content-Type": "application/x-www-form-urlencoded; charset=ISO-8859-1",
    "Host": "httpbin.org",
    "User-Agent": "Apache-HttpClient/5.1.3 (Java/17)",
    "X-Amzn-Trace-Id": "Root=1-62bb1c8a-7aee8c004f06919f31a2b533"
  },
  "json": null,
  "origin": "183.128.136.89",
  "url": "http://httpbin.org/post"
}
HttpClient5 POST JSON 参数
使用 StringEntity 类存入 JSON 参数。
package com.wdbyte.httpclient;

import java.io.IOException;

import org.apache.hc.client5.http.classic.methods.HttpPost;
import org.apache.hc.client5.http.impl.classic.CloseableHttpClient;
import org.apache.hc.client5.http.impl.classic.CloseableHttpResponse;
import org.apache.hc.client5.http.impl.classic.HttpClients;
import org.apache.hc.core5.http.ParseException;
import org.apache.hc.core5.http.io.entity.EntityUtils;
import org.apache.hc.core5.http.io.entity.StringEntity;

/**
* @author https://www.wdbyte.com
 */
public class HttpClient5PostWithJson {

    public static void main(String[] args) {
        String json = "{"
            + "    \"password\": \"secret\","
            + "    \"username\": \"wdbyte.com\""
            + "}";
        String result = post("http://httpbin.org/post", json);
        System.out.println(result);
    }

    public static String post(String url, String jsonBody) {
        String result = null;
        HttpPost httpPost = new HttpPost(url);
        httpPost.setEntity(new StringEntity(jsonBody, ContentType.APPLICATION_JSON));

        try (CloseableHttpClient httpclient = HttpClients.createDefault()) {
            try (CloseableHttpResponse response = httpclient.execute(httpPost)) {
                // 获取响应信息
                result = EntityUtils.toString(response.getEntity());
            }
        } catch (IOException | ParseException e) {
            e.printStackTrace();
        }
        return result;
    }

}
输出信息:
{
  "args": {},
  "data": "{    \"password\": \"secret\",    \"username\": \"wdbyte.com\"}",
  "files": {},
  "form": {},
  "headers": {
    "Accept-Encoding": "gzip, x-gzip, deflate",
    "Content-Length": "55",
    "Content-Type": "text/plain; charset=ISO-8859-1",
    "Host": "httpbin.org",
    "User-Agent": "Apache-HttpClient/5.1.3 (Java/17)",
    "X-Amzn-Trace-Id": "Root=1-62bb1dbb-5a963c1d798b06be3ee1a15e"
  },
  "json": {
    "password": "secret",
    "username": "wdbyte.com"
  },
  "origin": "183.128.136.89",
  "url": "http://httpbin.org/post"
}
下面是通过 Wireshark 抓包得到的请求响应信息:
// 请求信息
POST /post HTTP/1.1
Accept-Encoding: gzip, x-gzip, deflate
Content-Length: 55
Content-Type: application/json; charset=UTF-8
Host: httpbin.org
Connection: keep-alive
User-Agent: Apache-HttpClient/5.1.3 (Java/17)

{    "password": "secret",    "username": "wdbyte.com"}

// 响应信息
HTTP/1.1 200 OK
Date: Tue, 28 Jun 2022 15:30:17 GMT
Content-Type: application/json
Content-Length: 573
Connection: keep-alive
Server: gunicorn/19.9.0
Access-Control-Allow-Origin: *
Access-Control-Allow-Credentials: true

{
  "args": {},
  "data": "{    \"password\": \"secret\",    \"username\": \"wdbyte.com\"}",
  "files": {},
  "form": {},
  "headers": {
    "Accept-Encoding": "gzip, x-gzip, deflate",
    "Content-Length": "55",
    "Content-Type": "application/json; charset=UTF-8",
    "Host": "httpbin.org",
    "User-Agent": "Apache-HttpClient/5.1.3 (Java/17)",
    "X-Amzn-Trace-Id": "Root=1-62bb1e89-64db55730a0361c720232ccd"
  },
  "json": {
    "password": "secret",
    "username": "wdbyte.com"
  },
  "origin": "183.128.136.89",
  "url": "http://httpbin.org/post"
}
HttpClient 5 设置超时
使用 RequestConfig 对象来配置超时时间。
package com.wdbyte.httpclient;

import java.io.IOException;

import org.apache.hc.client5.http.classic.methods.HttpGet;
import org.apache.hc.client5.http.config.RequestConfig;
import org.apache.hc.client5.http.impl.classic.CloseableHttpClient;
import org.apache.hc.client5.http.impl.classic.CloseableHttpResponse;
import org.apache.hc.client5.http.impl.classic.HttpClients;
import org.apache.hc.core5.http.HttpEntity;
import org.apache.hc.core5.http.ParseException;
import org.apache.hc.core5.http.io.entity.EntityUtils;
import org.apache.hc.core5.util.Timeout;

/**
* @author https://www.wdbyte.com
 */
public class HttpClient5GetWithTimeout {

    public static void main(String[] args) {
        String result = get("http://httpbin.org/get");
        System.out.println(result);
    }

    public static String get(String url) {
        String resultContent = null;
        // 设置超时时间
        RequestConfig config = RequestConfig.custom()
            .setConnectTimeout(Timeout.ofMilliseconds(5000L))
            .setConnectionRequestTimeout(Timeout.ofMilliseconds(5000L))
            .setResponseTimeout(Timeout.ofMilliseconds(5000L))
            .build();
        // 请求级别的超时
        HttpGet httpGet = new HttpGet(url);
        //httpGet.setConfig(config);
        //try (CloseableHttpClient httpclient = HttpClients.createDefault()) {
        // 客户端级别的超时
        try (CloseableHttpClient httpclient = HttpClients.custom().setDefaultRequestConfig(config).build()) {
            try (CloseableHttpResponse response = httpclient.execute(httpGet)) {
                // 获取状态码
                System.out.println(response.getVersion()); // HTTP/1.1
                System.out.println(response.getCode()); // 200
                System.out.println(response.getReasonPhrase()); // OK
                HttpEntity entity = response.getEntity();
                // 获取响应信息
                resultContent = EntityUtils.toString(entity);
            }
        } catch (IOException | ParseException e) {
            e.printStackTrace();
        }
        return resultContent;
    }

}
HttpClient 5 异步请求
下面演示三种 HttpClient 5 异步请求方式。
package com.wdbyte.httpclient;

import java.io.IOException;
import java.nio.CharBuffer;
import java.util.concurrent.CountDownLatch;
import java.util.concurrent.ExecutionException;
import java.util.concurrent.Future;

import org.apache.hc.client5.http.async.methods.AbstractCharResponseConsumer;
import org.apache.hc.client5.http.async.methods.SimpleHttpRequest;
import org.apache.hc.client5.http.async.methods.SimpleHttpRequests;
import org.apache.hc.client5.http.async.methods.SimpleHttpResponse;
import org.apache.hc.client5.http.impl.async.CloseableHttpAsyncClient;
import org.apache.hc.client5.http.impl.async.HttpAsyncClients;
import org.apache.hc.core5.concurrent.FutureCallback;
import org.apache.hc.core5.http.ContentType;
import org.apache.hc.core5.http.HttpException;
import org.apache.hc.core5.http.HttpResponse;
import org.apache.hc.core5.http.nio.AsyncRequestProducer;
import org.apache.hc.core5.http.nio.support.AsyncRequestBuilder;

/**
 * HttpClient 5 异步请求
* @author https://www.wdbyte.com
 * @date 2022/06/25
 */
public class HttpClient5Async {

    public static void main(String[] args) {
        getAsync1("http://httpbin.org/get");
        getAsync2("http://httpbin.org/get");
        getAsync3("http://httpbin.org/get");
    }

    /**
     * 异步请求
     *
     * @param url
     * @return
     */
    public static String getAsync1(String url) {
        try (CloseableHttpAsyncClient httpclient = HttpAsyncClients.createDefault()) {
            // 开始 http clinet
            httpclient.start();
            // 执行请求
            SimpleHttpRequest request1 = SimpleHttpRequests.get(url);
            Future<SimpleHttpResponse> future = httpclient.execute(request1, null);
            // 等待直到返回完毕
            SimpleHttpResponse response1 = future.get();
            System.out.println("getAsync1:" + request1.getRequestUri() + "->" + response1.getCode());
        } catch (IOException | ExecutionException | InterruptedException e) {
            throw new RuntimeException(e);
        }
        return null;
    }

    /**
     * 异步请求,根据响应情况回调
     *
     * @param url
     * @return
     */
    public static String getAsync2(String url) {
        try (CloseableHttpAsyncClient httpclient = HttpAsyncClients.createDefault()) {
            // 开始 http clinet
            httpclient.start();
            // 根据请求响应情况进行回调操作
            CountDownLatch latch = new CountDownLatch(1);
            SimpleHttpRequest request = SimpleHttpRequests.get(url);
            httpclient.execute(request, new FutureCallback<SimpleHttpResponse>() {
                @Override
                public void completed(SimpleHttpResponse response2) {
                    latch.countDown();
                    System.out.println("getAsync2:" + request.getRequestUri() + "->" + response2.getCode());
                }

                @Override
                public void failed(Exception ex) {
                    latch.countDown();
                    System.out.println("getAsync2:" + request.getRequestUri() + "->" + ex);
                }

                @Override
                public void cancelled() {
                    latch.countDown();
                    System.out.println("getAsync2:" + request.getRequestUri() + " cancelled");
                }

            });
            latch.await();
        } catch (IOException | InterruptedException e) {
            throw new RuntimeException(e);
        }
        return null;
    }

    /**
     * 异步请求,对响应流做点什么
     *
     * @param url
     * @return
     */
    public static String getAsync3(String url) {
        try (CloseableHttpAsyncClient httpclient = HttpAsyncClients.createDefault()) {
            // 开始 http clinet
            httpclient.start();
            // 根据请求响应情况进行回调操作
            SimpleHttpRequest request = SimpleHttpRequests.get(url);

            CountDownLatch latch = new CountDownLatch(1);
            AsyncRequestProducer producer = AsyncRequestBuilder.get("http://httpbin.org/get").build();
            AbstractCharResponseConsumer<HttpResponse> consumer3 = new AbstractCharResponseConsumer<HttpResponse>() {

                HttpResponse response;

                @Override
                protected void start(HttpResponse response, ContentType contentType) throws HttpException, IOException {
                    System.out.println("getAsync3: 开始响应....");
                    this.response = response;
                }

                @Override
                protected int capacityIncrement() {
                    return Integer.MAX_VALUE;
                }

                @Override
                protected void data(CharBuffer data, boolean endOfStream) throws IOException {
                    System.out.println("getAsync3: 收到数据....");
                    // Do something useful
                }

                @Override
                protected HttpResponse buildResult() throws IOException {
                    System.out.println("getAsync3: 接收完毕...");
                    return response;
                }

                @Override
                public void releaseResources() {
                }

            };
            httpclient.execute(producer, consumer3, new FutureCallback<HttpResponse>() {

                @Override
                public void completed(HttpResponse response) {
                    latch.countDown();
                    System.out.println("getAsync3: "+request.getRequestUri() + "->" + response.getCode());
                }

                @Override
                public void failed(Exception ex) {
                    latch.countDown();
                    System.out.println("getAsync3: "+request.getRequestUri() + "->" + ex);
                }

                @Override
                public void cancelled() {
                    latch.countDown();
                    System.out.println("getAsync3: "+request.getRequestUri() + " cancelled");
                }

            });
            latch.await();
        } catch (IOException | InterruptedException e) {
            throw new RuntimeException(e);
        }
        return null;

    }
}
输出结果:
getAsync1:/get->200
getAsync2:/get->200
getAsync3: 开始响应....
getAsync3: 收到数据....
getAsync3: 收到数据....
getAsync3: 收到数据....
getAsync3: 接收完毕...
getAsync3: /get->200
HttpClient 5 获取 Cookie
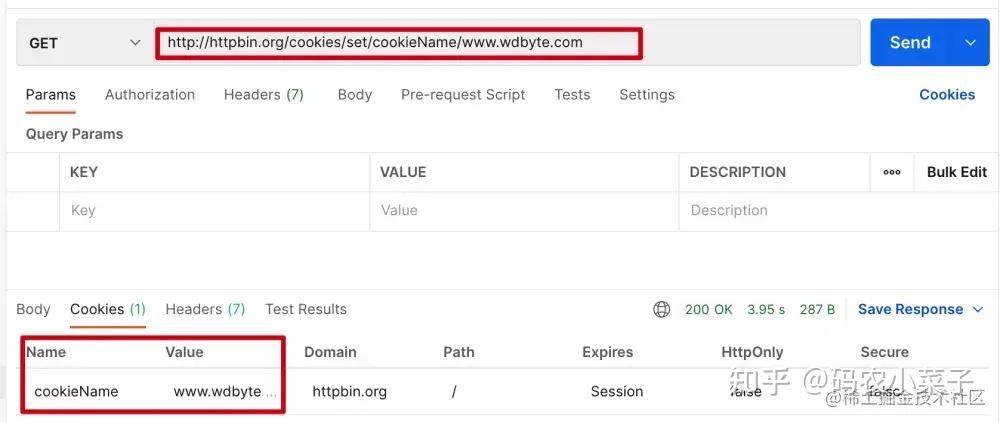
请求 http://httpbin.org/cookies/set/cookieName/www.wdbyte.com 的响应中会带有一个Cookie 信息,其中 name 为 cookieName,value 为 www.wdbyte.com,我们以此用作测试。
Postman 请求测试,可以看到响应了 Cookie 信息。
下面编写 Java 代码进行请求测试
package com.wdbyte.httpclient;

import java.util.List;

import org.apache.hc.client5.http.classic.methods.HttpGet;
import org.apache.hc.client5.http.cookie.BasicCookieStore;
import org.apache.hc.client5.http.cookie.Cookie;
import org.apache.hc.client5.http.cookie.CookieStore;
import org.apache.hc.client5.http.impl.classic.CloseableHttpClient;
import org.apache.hc.client5.http.impl.classic.CloseableHttpResponse;
import org.apache.hc.client5.http.impl.classic.HttpClients;
import org.apache.hc.client5.http.impl.cookie.BasicClientCookie;
import org.apache.hc.client5.http.protocol.HttpClientContext;
import org.apache.hc.core5.http.io.entity.EntityUtils;

/**
 * 这个例子演示了使用本地HTTP上下文填充, 自定义属性
 */
public class HttpClient5WithCookie {

    public static void main(final String[] args) throws Exception {
        try (final CloseableHttpClient httpclient = HttpClients.createDefault()) {
            // 创建一个本地的 Cookie 存储
            final CookieStore cookieStore = new BasicCookieStore();
            // BasicClientCookie clientCookie = new BasicClientCookie("name", "www.wdbyte.com");
            // clientCookie.setDomain("http://httpbin.org/cookies");
            // 过期时间
            // clientCookie.setExpiryDate(new Date());
            // 添加到本地 Cookie
            // cookieStore.addCookie(clientCookie);

            // 创建本地 HTTP 请求上下文 HttpClientContext
            final HttpClientContext localContext = HttpClientContext.create();
            // 绑定 cookieStore 到 localContext
            localContext.setCookieStore(cookieStore);

            final HttpGet httpget = new HttpGet("http://httpbin.org/cookies/set/cookieName/www.wdbyte.com");
            System.out.println("执行请求 " + httpget.getMethod() + " " + httpget.getUri());

            // 获取 Coolie 信息
            try (final CloseableHttpResponse response = httpclient.execute(httpget, localContext)) {
                System.out.println("----------------------------------------");
                System.out.println(response.getCode() + " " + response.getReasonPhrase());
                final List<Cookie> cookies = cookieStore.getCookies();
                for (int i = 0; i < cookies.size(); i++) {
                    System.out.println("Local cookie: " + cookies.get(i));
                }
                EntityUtils.consume(response.getEntity());
            }
        }
    }

}
输出结果:
执行请求 GET http://httpbin.org/cookies/set/cookieName/www.wdbyte.com
----------------------------------------
200 OK
Local cookie: [name: cookieName; value: www.wdbyte.com; domain: httpbin.org; path: /; expiry: null]
HttpClient 5 读取文件内容请求
准备一个 JSON 内容格式的文件 params.json。
{"name":"www.wdbyte.com"}读取这个文件作为请求参数发起请求。
package com.wdbyte.httpclient;

import java.io.File;
import java.io.FileInputStream;

import org.apache.hc.client5.http.classic.methods.HttpPost;
import org.apache.hc.client5.http.impl.classic.CloseableHttpClient;
import org.apache.hc.client5.http.impl.classic.CloseableHttpResponse;
import org.apache.hc.client5.http.impl.classic.HttpClients;
import org.apache.hc.core5.http.ContentType;
import org.apache.hc.core5.http.io.entity.EntityUtils;
import org.apache.hc.core5.http.io.entity.FileEntity;
import org.apache.hc.core5.http.io.entity.InputStreamEntity;

/**
 * 加载数据流作为 POST 请求参数
 */
public class HttpClient5ChunkEncodedPost {

    public static void main(final String[] args) throws Exception {
        String params = "/Users/darcy/params.json";

        try (final CloseableHttpClient httpclient = HttpClients.createDefault()) {
            final HttpPost httppost = new HttpPost("http://httpbin.org/post");

            final InputStreamEntity reqEntity = new InputStreamEntity(new FileInputStream(params), -1,
                ContentType.APPLICATION_JSON);
            // 也可以使用 FileEntity 的形式
            // FileEntity reqEntity = new FileEntity(new File(params), ContentType.APPLICATION_JSON);

            httppost.setEntity(reqEntity);

            System.out.println("执行请求 " + httppost.getMethod() + " " + httppost.getUri());
            try (final CloseableHttpResponse response = httpclient.execute(httppost)) {
                System.out.println("----------------------------------------");
                System.out.println(response.getCode() + " " + response.getReasonPhrase());
                System.out.println(EntityUtils.toString(response.getEntity()));
            }
        }
    }
}
输出结果:
执行请求 POST http://httpbin.org/post
----------------------------------------
200 OK
{
  "args": {},
  "data": "{\"name\":\"www.wdbyte.com\"}\n",
  "files": {},
  "form": {},
  "headers": {
    "Accept-Encoding": "gzip, x-gzip, deflate",
    "Content-Length": "26",
    "Content-Type": "application/json; charset=UTF-8",
    "Host": "httpbin.org",
    "User-Agent": "Apache-HttpClient/5.1.3 (Java/1.8.0_151)",
    "X-Amzn-Trace-Id": "Root=1-62ee4d95-1f956d4303cea09c52694c86"
  },
  "json": {
    "name": "www.wdbyte.com"
  },
  "origin": "42.120.74.238",
  "url": "http://httpbin.org/post"
}
HttpClient 5 表单登录
表单登录可以理解为发起一个携带了认证信息的请求,然后得到响应的 Cookie 的过程。当然这里不仅仅适用于表单登录,也可以是简单的发起一个携带了表单信息的请求。
本应该使用 POST 请求发送表单参数测试,但是在 http://httpbin.org 中没有对应的接口用于测试,所以这里换成了 GET 请求
示例代码:
package com.wdbyte.httpclient;

import java.util.ArrayList;
import java.util.List;

import org.apache.hc.client5.http.classic.methods.HttpGet;
import org.apache.hc.client5.http.cookie.BasicCookieStore;
import org.apache.hc.client5.http.cookie.Cookie;
import org.apache.hc.client5.http.entity.UrlEncodedFormEntity;
import org.apache.hc.client5.http.impl.classic.CloseableHttpClient;
import org.apache.hc.client5.http.impl.classic.CloseableHttpResponse;
import org.apache.hc.client5.http.impl.classic.HttpClients;
import org.apache.hc.core5.http.HttpEntity;
import org.apache.hc.core5.http.NameValuePair;
import org.apache.hc.core5.http.io.entity.EntityUtils;
import org.apache.hc.core5.http.message.BasicNameValuePair;

/**
 * 演示基于表单的登录
 *
 * @author https://www.wdbyte.com
 */
public class HttpClient5FormLogin {

    public static void main(final String[] args) throws Exception {
        final BasicCookieStore cookieStore = new BasicCookieStore();
        try (final CloseableHttpClient httpclient = HttpClients.custom()
                .setDefaultCookieStore(cookieStore)
                .build()) {

            // 本应该使用 POST 请求发送表单参数,但是在 httpbin.org 中没有对应的接口用于测试,所以这里换成了 GET 请求
            // HttpPost httpPost = new HttpPost("http://httpbin.org/cookies/set/username/wdbyte.com");
            HttpGet httpPost = new HttpGet("http://httpbin.org/cookies/set/username/wdbyte.com");
            // POST 表单请求参数
            List<NameValuePair> nvps = new ArrayList<>();
            nvps.add(new BasicNameValuePair("username", "wdbyte.com"));
            nvps.add(new BasicNameValuePair("password", "secret"));
            httpPost.setEntity(new UrlEncodedFormEntity(nvps));

            try (final CloseableHttpResponse response2 = httpclient.execute(httpPost)) {
                final HttpEntity entity = response2.getEntity();

                System.out.println("Login form get: " + response2.getCode() + " " + response2.getReasonPhrase());
                System.out.println("当前响应信息 "+EntityUtils.toString(entity));;

                System.out.println("Post 登录 Cookie:");
                final List<Cookie> cookies = cookieStore.getCookies();
                if (cookies.isEmpty()) {
                    System.out.println("None");
                } else {
                    for (int i = 0; i < cookies.size(); i++) {
                        System.out.println("- " + cookies.get(i));
                    }
                }
            }
        }
    }
}
输出结果:
Login form get: 200 OK
当前响应信息 {
  "cookies": {
    "username": "wdbyte.com"
  }
}

Post 登录 Cookie:
- [name: username; value: wdbyte.com; domain: httpbin.org; path: /; expiry: null]
HttpClient 5 Basic Authorization
HTTP 基本认证(Basic Authorization)是一种比较简单的认证实现,主要流程如下
- 请求一个需要进行基本认证的 HTTP 接口,但是没有携带认证信息。
- 此时会响应 401 状态码,并在响应 header 中的 WWW-Authenticate 提示需要进行基本认证。
- 用户把需要提交认证信息进行冒号拼接,然后进行 base64 编码,再在得到的字符串开头拼接上 Basic 放入请求头 Authorization 中。
- 认证成功,响应成功。
你可以通过浏览器打开下面这个 URL 进行基本认证测试。
httpbin.org/basic-auth/…
在 Apache HttpClient 5 中的实现方式。
package com.wdbyte.httpclient;

import org.apache.hc.client5.http.auth.AuthScope;
import org.apache.hc.client5.http.auth.UsernamePasswordCredentials;
import org.apache.hc.client5.http.classic.methods.HttpGet;
import org.apache.hc.client5.http.impl.auth.BasicCredentialsProvider;
import org.apache.hc.client5.http.impl.classic.CloseableHttpClient;
import org.apache.hc.client5.http.impl.classic.CloseableHttpResponse;
import org.apache.hc.client5.http.impl.classic.HttpClients;
import org.apache.hc.core5.http.io.entity.EntityUtils;

/**
 * 一个简单的示例,它使用HttpClient执行HTTP请求;
 * 一个需要进行用户身份验证的目标站点。
 */
public class HttpClient5BasicAuthentication {

    public static void main(final String[] args) throws Exception {
        final BasicCredentialsProvider credsProvider = new BasicCredentialsProvider();
        credsProvider.setCredentials(
                new AuthScope("httpbin.org", 80),
                new UsernamePasswordCredentials("admin", "123456".toCharArray()));
        try (final CloseableHttpClient httpclient = HttpClients.custom()
                .setDefaultCredentialsProvider(credsProvider)
                .build()) {
            final HttpGet httpget = new HttpGet("http://httpbin.org/basic-auth/admin/123456");

            System.out.println("执行请求" + httpget.getMethod() + " " + httpget.getUri());
            try (final CloseableHttpResponse response = httpclient.execute(httpget)) {
                System.out.println("----------------------------------------");
                System.out.println(response.getCode() + " " + response.getReasonPhrase());
                System.out.println(EntityUtils.toString(response.getEntity()));
            }
        }
    }
}
输出结果:
执行请求GET http://httpbin.org/basic-auth/user/passwd
----------------------------------------
200 OK
{
  "authenticated": true,
  "user": "user"
}
通过抓包可以看到完整的 HTTP 请求响应过程。
// 请求
GET /basic-auth/user/passwd HTTP/1.1
Accept-Encoding: gzip, x-gzip, deflate
Host: httpbin.org
Connection: keep-alive
User-Agent: Apache-HttpClient/5.1.3 (Java/1.8.0_151)
// 响应
HTTP/1.1 401 UNAUTHORIZED
Date: Sat, 06 Aug 2022 08:25:33 GMT
Content-Length: 0
Connection: keep-alive
Server: gunicorn/19.9.0
WWW-Authenticate: Basic realm="Fake Realm"
Access-Control-Allow-Origin: *
Access-Control-Allow-Credentials: true
// 请求
GET /basic-auth/user/passwd HTTP/1.1
Host: httpbin.org
Connection: keep-alive
User-Agent: Apache-HttpClient/5.1.3 (Java/1.8.0_151)
Authorization: Basic dXNlcjpwYXNzd2Q=
// 响应
HTTP/1.1 200 OK
Date: Sat, 06 Aug 2022 08:25:33 GMT
Content-Type: application/json
Content-Length: 47
Connection: keep-alive
Server: gunicorn/19.9.0
Access-Control-Allow-Origin: *
Access-Control-Allow-Credentials: true

{
  "authenticated": true,
  "user": "user"
}
HttpClient 5 Digest Authorization
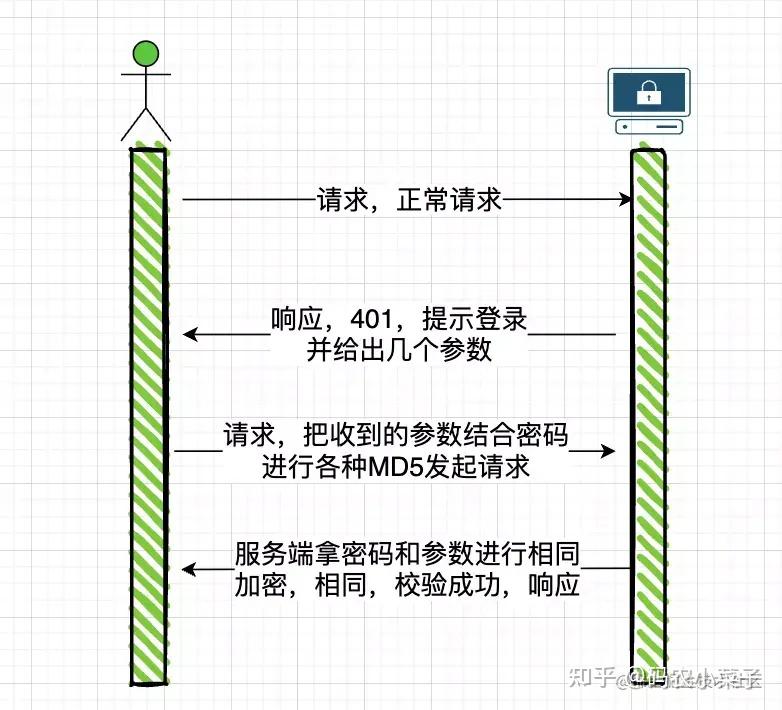
HTTP Basic Authorization 的缺点显而易见,密码通过明文传输存在一定的安全风险,Digest Authorization 认证方式解决了明文传输的问题,这里不过多介绍 Digest 的相关内容,通过一个图简单的示意 Digest 认证方式的流程。
下面是代码演示。
package com.wdbyte.httpclient;

import org.apache.hc.client5.http.auth.AuthExchange;
import org.apache.hc.client5.http.auth.AuthScheme;
import org.apache.hc.client5.http.auth.AuthScope;
import org.apache.hc.client5.http.auth.UsernamePasswordCredentials;
import org.apache.hc.client5.http.classic.methods.HttpGet;
import org.apache.hc.client5.http.impl.auth.BasicCredentialsProvider;
import org.apache.hc.client5.http.impl.auth.DigestScheme;
import org.apache.hc.client5.http.impl.classic.CloseableHttpClient;
import org.apache.hc.client5.http.impl.classic.CloseableHttpResponse;
import org.apache.hc.client5.http.impl.classic.HttpClients;
import org.apache.hc.client5.http.protocol.HttpClientContext;
import org.apache.hc.core5.http.HttpHost;
import org.apache.hc.core5.http.io.entity.EntityUtils;

/**
 *
 * HttpClient如何验证多个请求的示例
 * 使用相同的摘要方案。在初始请求/响应交换之后
 * 共享相同执行上下文的所有后续请求都可以重用
 * 要向服务器进行身份验证的最后一个摘要nonce值。
 */
public class HttpClient5PreemptiveDigestAuthentication {

    public static void main(final String[] args) throws Exception {
        try (final CloseableHttpClient httpclient = HttpClients.createDefault()) {

            final HttpHost target = new HttpHost("http", "httpbin.org", 80);

            final HttpClientContext localContext = HttpClientContext.create();
            final BasicCredentialsProvider credentialsProvider = new BasicCredentialsProvider();
            credentialsProvider.setCredentials(
                    new AuthScope(target),
                    new UsernamePasswordCredentials("admin", "123456".toCharArray()));
            localContext.setCredentialsProvider(credentialsProvider);

            final HttpGet httpget = new HttpGet("http://httpbin.org/digest-auth/auth/admin/123456");

            System.out.println("执行请求 " + httpget.getMethod() + " " + httpget.getUri());
            for (int i = 0; i < 2; i++) {
                try (final CloseableHttpResponse response = httpclient.execute(target, httpget, localContext)) {
                    System.out.println("----------------------------------------");
                    System.out.println(response.getCode() + " " + response.getReasonPhrase());
                    EntityUtils.consume(response.getEntity());

                    final AuthExchange authExchange = localContext.getAuthExchange(target);
                    if (authExchange != null) {
                        final AuthScheme authScheme = authExchange.getAuthScheme();
                        if (authScheme instanceof DigestScheme) {
                            final DigestScheme digestScheme = (DigestScheme) authScheme;
                            System.out.println("Nonce: " + digestScheme.getNonce() +
                                    "; count: " + digestScheme.getNounceCount());
                        }
                    }
                }
            }
        }
    }

}
通过抓包工具可以清晰的看到 2 次请求的流程,在最后一次请求中,直接共享了认证信息,没有再次的重新认证的流程。
// 1\. 请求
GET /digest-auth/auth/admin/123456 HTTP/1.1
Accept-Encoding: gzip, x-gzip, deflate
Host: httpbin.org
Connection: keep-alive
User-Agent: Apache-HttpClient/5.1.3 (Java/1.8.0_151)
// 2\. 详情,提示认证,给出参数
HTTP/1.1 401 UNAUTHORIZED
Date: Fri, 12 Aug 2022 07:11:06 GMT
Content-Type: text/html; charset=utf-8
Content-Length: 0
Connection: keep-alive
Server: gunicorn/19.9.0
WWW-Authenticate: Digest realm="me@kennethreitz.com", nonce="8dc5e7974a86a6fcc3cf73230b0c4a93", qop="auth", opaque="64b7f68b386c3acc38131f7472aa2079", algorithm=MD5, stale=FALSE
Set-Cookie: stale_after=never; Path=/
Set-Cookie: fake=fake_value; Path=/
Access-Control-Allow-Origin: *
Access-Control-Allow-Credentials: true
// 3\. 参数+密码 加密后再次请求
GET /digest-auth/auth/admin/123456 HTTP/1.1
Host: httpbin.org
Connection: keep-alive
User-Agent: Apache-HttpClient/5.1.3 (Java/1.8.0_151)
Cookie: fake=fake_value; stale_after=never
Authorization: Digest username="admin", realm="me@kennethreitz.com", nonce="8dc5e7974a86a6fcc3cf73230b0c4a93", uri="/digest-auth/auth/admin/123456", response="7c6726f8ac54c1ba28e19c71b2fc7338", qop=auth, nc=00000001, cnonce="2fa61501d47a9d39", algorithm=MD5, opaque="64b7f68b386c3acc38131f7472aa2079"
// 4\. 认证成功,响应
HTTP/1.1 200 OK
Date: Fri, 12 Aug 2022 07:11:08 GMT
Content-Type: application/json
Content-Length: 48
Connection: keep-alive
Server: gunicorn/19.9.0
Set-Cookie: fake=fake_value; Path=/
Set-Cookie: stale_after=never; Path=/
Access-Control-Allow-Origin: *
Access-Control-Allow-Credentials: true

{
  "authenticated": true,
  "user": "admin"
}
// 5\. 再次请求,共享了登录状态。
GET /digest-auth/auth/admin/123456 HTTP/1.1
Accept-Encoding: gzip, x-gzip, deflate
Host: httpbin.org
Connection: keep-alive
User-Agent: Apache-HttpClient/5.1.3 (Java/1.8.0_151)
Cookie: fake=fake_value; stale_after=never
Authorization: Digest username="admin", realm="me@kennethreitz.com", nonce="8dc5e7974a86a6fcc3cf73230b0c4a93", uri="/digest-auth/auth/admin/123456", response="9955ac79f6a51a876a326449447f549d", qop=auth, nc=00000002, cnonce="2fa61501d47a9d39", algorithm=MD5, opaque="64b7f68b386c3acc38131f7472aa2079"
// 5\. 认证成功,响应
HTTP/1.1 200 OK
Date: Fri, 12 Aug 2022 07:11:09 GMT
Content-Type: application/json
Content-Length: 48
Connection: keep-alive
Server: gunicorn/19.9.0
Set-Cookie: fake=fake_value; Path=/
Set-Cookie: stale_after=never; Path=/
Access-Control-Allow-Origin: *
Access-Control-Allow-Credentials: true

{
  "authenticated": true,
  "user": "admin"
}
HttpClient 5 拦截器
HttpClient 5 中的拦截器可以对请求过程的各个阶段进行拦截处理,通过 HttpClientBuilder 中的关于 Interceptor 的方法可以看到可以进行拦截的节点。
[图片上传失败...(image-bf15ae-1662340876907)]
下面编写一个示例,发起三次请求,每次请求都在请求头 herader 中增加一个 request-id 参数,然后对 request-id 值为 2 的请求直接响应 404 结束。
package com.wdbyte.httpclient;

import java.io.IOException;
import java.util.concurrent.atomic.AtomicLong;

import org.apache.hc.client5.http.classic.ExecChain;
import org.apache.hc.client5.http.classic.ExecChain.Scope;
import org.apache.hc.client5.http.classic.ExecChainHandler;
import org.apache.hc.client5.http.classic.methods.HttpGet;
import org.apache.hc.client5.http.impl.ChainElement;
import org.apache.hc.client5.http.impl.classic.CloseableHttpClient;
import org.apache.hc.client5.http.impl.classic.CloseableHttpResponse;
import org.apache.hc.client5.http.impl.classic.HttpClients;
import org.apache.hc.core5.http.ClassicHttpRequest;
import org.apache.hc.core5.http.ClassicHttpResponse;
import org.apache.hc.core5.http.ContentType;
import org.apache.hc.core5.http.EntityDetails;
import org.apache.hc.core5.http.Header;
import org.apache.hc.core5.http.HttpEntity;
import org.apache.hc.core5.http.HttpException;
import org.apache.hc.core5.http.HttpRequest;
import org.apache.hc.core5.http.HttpRequestInterceptor;
import org.apache.hc.core5.http.HttpStatus;
import org.apache.hc.core5.http.io.entity.EntityUtils;
import org.apache.hc.core5.http.io.entity.StringEntity;
import org.apache.hc.core5.http.message.BasicClassicHttpResponse;
import org.apache.hc.core5.http.protocol.HttpContext;

/**
 * 展示如何在请求和响应时进行拦截进行自定义处理。
 */
public class HttpClient5Interceptors {

    public static void main(final String[] args) throws Exception {
        try (final CloseableHttpClient httpclient = HttpClients.custom()
            // 添加一个请求 id 到请求 header
            .addRequestInterceptorFirst(new HttpRequestInterceptor() {
                private final AtomicLong count = new AtomicLong(0);
                @Override
                public void process(
                    final HttpRequest request,
                    final EntityDetails entity,
                    final HttpContext context) throws HttpException, IOException {
                    request.setHeader("request-id", Long.toString(count.incrementAndGet()));
                }
            })
            .addExecInterceptorAfter(ChainElement.PROTOCOL.name(), "custom", new ExecChainHandler() {
                // 请求 id 为 2 的,模拟 404 响应,并自定义响应的内容。
                @Override
                public ClassicHttpResponse execute(
                    final ClassicHttpRequest request,
                    final Scope scope,
                    final ExecChain chain) throws IOException, HttpException {

                    final Header idHeader = request.getFirstHeader("request-id");
                    if (idHeader != null && "2".equalsIgnoreCase(idHeader.getValue())) {
                        final ClassicHttpResponse response = new BasicClassicHttpResponse(HttpStatus.SC_NOT_FOUND,
                            "Oppsie");
                        response.setEntity(new StringEntity("bad luck", ContentType.TEXT_PLAIN));
                        return response;
                    } else {
                        return chain.proceed(request, scope);
                    }
                }
            })
            .build()) {

            for (int i = 0; i < 3; i++) {
                final HttpGet httpget = new HttpGet("http://httpbin.org/get");

                try (final CloseableHttpResponse response = httpclient.execute(httpget)) {
                    System.out.println("----------------------------------------");
                    System.out.println("执行请求 " + httpget.getMethod() + " " + httpget.getUri());
                    System.out.println(response.getCode() + " " + response.getReasonPhrase());
                    System.out.println(EntityUtils.toString(response.getEntity()));
                }
            }
        }
    }

}
输出结果。
----------------------------------------
执行请求 GET http://httpbin.org/get
200 OK
{
  "args": {},
  "headers": {
    "Accept-Encoding": "gzip, x-gzip, deflate",
    "Host": "httpbin.org",
    "Request-Id": "1",
    "User-Agent": "Apache-HttpClient/5.1.3 (Java/1.8.0_151)",
    "X-Amzn-Trace-Id": "Root=1-62f615ba-658ccd42182d22534dbba82c"
  },
  "origin": "42.120.75.221",
  "url": "http://httpbin.org/get"
}

----------------------------------------
执行请求 GET http://httpbin.org/get
404 Oppsie
bad luck
----------------------------------------
执行请求 GET http://httpbin.org/get
200 OK
{
  "args": {},
  "headers": {
    "Accept-Encoding": "gzip, x-gzip, deflate",
    "Host": "httpbin.org",
    "Request-Id": "3",
    "User-Agent": "Apache-HttpClient/5.1.3 (Java/1.8.0_151)",
    "X-Amzn-Trace-Id": "Root=1-62f615bb-4eb6ba10736ace0e21d0cb8c"
  },
  "origin": "42.120.75.221",
  "url": "http://httpbin.org/get"
}
Apache HttpClient框架常用组件介绍-腾讯云开发者社区-腾讯云
1、简介
HttpClient 是 Apache Jakarta Common 下的子项目,用来提供高效的、最新的、功能丰富的支持 HTTP 协议的客户端编程工具包,并且它支持 HTTP 协议最新的版本和建议。HttpClient 已经应用在很多的项目中,比如 Apache Jakarta 上很著名的另外两个开源项目 Cactus 和 HTMLUnit 都使用了 HttpClient。
HttpClient 相比传统 JDK 自带的 URLConnection,增加了易用性和灵活性,它不仅是客户端发送 HTTP 请求变得容易,而且也方便了开发人员测试接口(基于 HTTP 协议的),即提高了开发的效率,也方便提高代码的健壮性。因此熟练掌握 HttpClient 是很重要的必修内容,掌握 HttpClient 后,相信对于 HTTP 协议的了解会更加深入。
2、引入依赖
HttpClient 是三方工具,首先需要引入依赖。如下:
<!-- 此处使用的是 5.x 版本,可以根据自身情况引入版本 -->
<dependency>
     <groupId>org.apache.httpcomponents.client5</groupId>
     <artifactId>httpclient5</artifactId>
     <version>5.1.1</version>
</dependency>
3、常用组件
- HttpClientBuilder:
- 用于创建和配置
HttpClient实例的工厂类。 - 允许用户设置各种参数,如连接管理器、连接超时、重试策略等。
- 用于创建和配置
- HttpClient:
- HTTP客户端的核心接口。
- 负责执行HTTP请求并返回HTTP响应。
- 内部使用连接管理器(如
PoolingHttpClientConnectionManager)来管理HTTP连接。
- CloseableHttpClient:
HttpClient的一个具体实现,它实现了AutoCloseable接口。- 提供了额外的关闭连接的方法,以确保资源得到正确释放。
- HttpRequest:
- 表示HTTP请求。
- 包含请求行、请求头和请求体。
- HttpResponse:
- 表示HTTP响应。
- 包含状态行、响应头和响应体。
- HttpGet 和 HttpPost:
HttpRequest的具体实现,分别对应HTTP的GET和POST方法。
- HttpClientConnectionManager:
- 负责管理HTTP连接。
- 提供了获取连接、释放连接等方法。
- PoolingHttpClientConnectionManager:
HttpClientConnectionManager的一个具体实现。- 提供了连接池功能,以复用HTTP连接。
- HttpClientConnectionOperator:
- 负责创建和管理底层的HTTP连接(如
ManagedHttpClientConnection)。
- 负责创建和管理底层的HTTP连接(如
- ManagedHttpClientConnection:
- 表示底层的HTTP连接。
- 封装了与远程服务器的通信过程。
- HttpHost:
- 表示目标服务器的地址信息。
- 包含主机名、端口号和协议类型。
- InetSocketAddress:
- Java标准库中的类,用于表示IP地址和端口号的组合。
- 在HttpClient中用于将
HttpHost转换为具体的网络地址。
- SocketConfig:
- 定义了套接字连接的相关配置。
- 如超时时间、TCP参数等。
- HttpContext:
- 提供在HTTP请求执行期间传递上下文信息的机制。
- 允许用户在请求之间共享状态信息。
- DnsResolver:
- 负责将主机名解析为IP地址。
4、设计原则
- 模块化与解耦:将HTTP客户端的不同功能划分为独立的组件和类,使得代码更加清晰、易于维护和扩展。每个组件和类都有明确的职责,并且它们之间的依赖关系相对简单,便于测试和替换。
- 灵活性:通过HttpClientBuilder,用户可以轻松地配置HttpClient的各种参数,以适应不同的使用场景和需求。这种灵活性使得HttpClient库能够适用于各种复杂的HTTP通信场景。
- 性能优化:通过引入连接池(如PoolingHttpClientConnectionManager),HttpClient库能够复用HTTP连接,减少了建立和关闭连接的开销,从而提高了性能。此外,底层的ManagedHttpClientConnection和SocketConfig也提供了对底层网络通信的精细控制,进一步优化了性能。
- 可扩展性:HttpClient库的设计允许用户自定义和扩展组件。例如,用户可以实现自己的DnsResolver或HttpClientConnectionOperator来提供自定义的DNS解析或连接管理策略。这种可扩展性使得HttpClient库能够适应不断变化的需求和技术发展。
5、组件交互过程
- 使用HttpClientBuilder构建HttpClient:
- 用户通过HttpClientBuilder配置HttpClient的各种参数,如连接池、超时设置等。
- 构建完成后,用户获取到一个配置好的HttpClient实例。
- 创建HttpRequest:
- 用户根据需要创建具体的HttpRequest实例,如HttpGet或HttpPost。
- 每个HttpRequest实例都关联一个HttpHost,指明了请求的目标服务器。
- 执行请求并获取HttpResponse:
- 用户调用HttpClient的execute方法,并传入HttpRequest实例。
- HttpClient使用底层的HttpClientConnectionOperator和ManagedHttpClientConnection来建立和管理与远程服务器的连接。
- 如果需要解析主机名,HttpClient会调用DnsResolver来解析HttpHost中的主机名。
- HttpClient通过底层的连接发送HttpRequest,并等待服务器的响应。
- 一旦收到响应,HttpClient将其封装为HttpResponse对象,并返回给用户。
- 处理响应和释放连接:
- 用户从HttpResponse中获取响应数据,并进行相应的处理。
- 请求执行完毕后,HttpClient会负责释放底层的ManagedHttpClientConnection,以便后续请求可以复用。
综合示例
下面是一个使用这些组件的综合示例:
import org.apache.http.HttpHost;
import org.apache.http.client.config.RequestConfig;
import org.apache.http.client.methods.CloseableHttpResponse;
import org.apache.http.client.methods.HttpGet;
import org.apache.http.impl.client.CloseableHttpClient;
import org.apache.http.impl.client.HttpClients;
import org.apache.http.impl.conn.PoolingHttpClientConnectionManager;
import org.apache.http.util.EntityUtils;

public class HttpClientExample {
    public static void main(String[] args) throws Exception {
        // 创建连接池管理器
        PoolingHttpClientConnectionManager connManager = new PoolingHttpClientConnectionManager();
        // 设置最大连接数等参数(这里仅为示例)
        connManager.setMaxTotal(100);
        connManager.setDefaultMaxPerRoute(20);

        // 创建 HttpClientBuilder 并设置连接池管理器
        CloseableHttpClient httpClient = HttpClients.custom()
                .setConnectionManager(connManager)
                .build();

        // 创建 HttpGet 请求
        HttpGet httpGet = new HttpGet("http://example.com");

        // 设置请求配置(可选)
        RequestConfig requestConfig = RequestConfig.custom()
                .setConnectTimeout(5000)
                .setSocketTimeout(5000)
                .build();
        httpGet.setConfig(requestConfig);

        try (CloseableHttpResponse response = httpClient.execute(httpGet)) {
            // 检查响应状态码
            int statusCode = response.getStatusLine().getStatusCode();
            System.out.println("Status Code: " + statusCode);

            // 获取响应内容并输出
            String responseBody = EntityUtils.toString(response.getEntity(), "UTF-8");
            System.out.println("Response: " + responseBody);
        }

        // 关闭 HttpClient(如果是 CloseableHttpClient)
        httpClient.close();
    }
}
在这个示例中:
- 使用
PoolingHttpClientConnectionManager创建了一个连接池管理器,并设置了最大连接数等参数。 - 使用
HttpClients.custom()创建了一个HttpClientBuilder,并通过setConnectionManager方法设置了连接池管理器。
HttpClient javax.net.ssl.SSLPeerUnverifiedException: peer not authenticated-CSDN博客
最近在调用一些https的接口,然后采用的认证方式是用户名+密码。
这个时候调用接口则会提示httpclient未认证的错误,导致接口无法调用:
HttpClient javax.net.ssl.SSLPeerUnverifiedException: peer not authenticated。
出现此问题主要是在请求过程中证书的问题,程序使用的客户端并未安装服务器要求的证书,所以会产生此问题。
下面是我找到的解决方法。
方法一: httpClient jar包版本为4.1.x
-
public static HttpClient getHttpClient(HttpClient base) {
-
try {
-
SSLContext ctx = SSLContext.getInstance("SSL");
-
X509TrustManager tm = new X509TrustManager() {
-
public java.security.cert.X509Certificate[] getAcceptedIssuers() {
-
return null;
-
}
-
-
public void checkClientTrusted(X509Certificate[] chain, String authType) throws CertificateException {}
-
-
public void checkServerTrusted(X509Certificate[] chain, String authType) throws CertificateException {}
-
};
-
-
ctx.init(null, new TrustManager[] { tm }, null);
-
SSLSocketFactory ssf = new SSLSocketFactory(ctx, SSLSocketFactory.ALLOW_ALL_HOSTNAME_VERIFIER);
-
ClientConnectionManager mgr = base.getConnectionManager();
-
SchemeRegistry registry = mgr.getSchemeRegistry();
-
registry.register(new Scheme("https", 443, ssf));
-
return new DefaultHttpClient(mgr, base.getParams());
-
} catch (Exception e) {
-
logger.warn("{}", e);
-
return null;
-
}
-
}
调用的方法如下:
HttpClient httpClient = ToolUtil.getHttpClient(new DefaultHttpClient());
此时问题已经完美解决了。
然而在之后的使用过程中,我发现4.1版本的httpClient jar包里面没有httpPatch,但最新的4.5版本是有的。于是果断用最新的4.5.3版本的httpClient包。
用了这个jar包之后满屏幕的删除线,很多代码都被@Deprecated注解掉了。改!
解决HttpClient javax.net.ssl.SSLPeerUnverifiedException: peer not authenticated这个问题的代码当然也是要随着一起改的了,于是乎我找到了方法二。
方法二: httpClient jar包为4.5.x版本。
-
public static CloseableHttpClient getHttpClient() {
-
try {
-
SSLContext sslContext = SSLContext.getInstance("SSL");
-
sslContext.init(null, new TrustManager[]{new X509TrustManager() {
-
-
public void checkClientTrusted(X509Certificate[] x509Certificates, String s) throws CertificateException {
-
-
}
-
-
-
public void checkServerTrusted(X509Certificate[] x509Certificates, String s) throws CertificateException {
-
-
}
-
-
-
public X509Certificate[] getAcceptedIssuers() {
-
return new X509Certificate[0];
-
}
-
}}, new SecureRandom());
-
SSLConnectionSocketFactory socketFactory = new SSLConnectionSocketFactory(sslContext, NoopHostnameVerifier.INSTANCE);
-
CloseableHttpClient closeableHttpClient = HttpClientBuilder.create().setSSLSocketFactory(socketFactory).build();
-
return closeableHttpClient;
-
} catch (Exception e) {
-
logger.warn("create closeable http client failed!");
-
return HttpClientBuilder.create().build();
-
}
-
}
调用示例:
httpClient = ToolUtil.getHttpClient();
在这个里面我遇到的最大问题是SSLSocketFactory.ALLOW_ALL_HOSTNAME_VERIFIER 竟然也被@Deprecated注释了。然后终于找到了一个替代方案:用NoopHostnameVerifier.INSTANCE替换之。这个是在 http://stackoverflow.com/questions/23201648/httpclient-4-3-x-fixing-deprecated-code-to-use-current-httpclient-implementatio 最下面一个答案中找到的。
最后附上完整的java代码,主要是给出import头文件。
-
import org.apache.http.client.HttpClient;
-
import org.apache.http.conn.ClientConnectionManager;
-
import org.apache.http.conn.scheme.Scheme;
-
import org.apache.http.conn.scheme.SchemeRegistry;
-
import org.apache.http.conn.ssl.NoopHostnameVerifier;
-
import org.apache.http.conn.ssl.SSLConnectionSocketFactory;
-
import org.apache.http.conn.ssl.SSLSocketFactory;
-
import org.apache.http.impl.client.CloseableHttpClient;
-
import org.apache.http.impl.client.DefaultHttpClient;
-
-
import javax.net.ssl.SSLContext;
-
import javax.net.ssl.TrustManager;
-
import javax.net.ssl.X509TrustManager;
-
import java.io.UnsupportedEncodingException;
-
import java.security.SecureRandom;
-
import java.security.cert.CertificateException;
-
import java.security.cert.X509Certificate;
-
-
import org.apache.http.impl.client.HttpClientBuilder;
-
import org.slf4j.Logger;
-
import org.slf4j.LoggerFactory;
-
-
-
public class ToolUtil {
-
private static final Logger logger = LoggerFactory.getLogger(ToolUtil.class);
-
-
public static HttpClient getHttpClient(HttpClient base) {
-
try {
-
SSLContext ctx = SSLContext.getInstance("SSL");
-
X509TrustManager tm = new X509TrustManager() {
-
public java.security.cert.X509Certificate[] getAcceptedIssuers() {
-
return null;
-
}
-
-
public void checkClientTrusted(X509Certificate[] chain, String authType) throws CertificateException {}
-
-
public void checkServerTrusted(X509Certificate[] chain, String authType) throws CertificateException {}
-
};
-
-
ctx.init(null, new TrustManager[] { tm }, null);
-
SSLSocketFactory ssf = new SSLSocketFactory(ctx, SSLSocketFactory.ALLOW_ALL_HOSTNAME_VERIFIER);
-
ClientConnectionManager mgr = base.getConnectionManager();
-
SchemeRegistry registry = mgr.getSchemeRegistry();
-
registry.register(new Scheme("https", 443, ssf));
-
return new DefaultHttpClient(mgr, base.getParams());
-
} catch (Exception e) {
-
logger.warn("{}", e);
-
return null;
-
}
-
}
-
-
-
public static CloseableHttpClient getHttpClient() {
-
try {
-
SSLContext sslContext = SSLContext.getInstance("SSL");
-
sslContext.init(null, new TrustManager[]{new X509TrustManager() {
-
-
public void checkClientTrusted(X509Certificate[] x509Certificates, String s) throws CertificateException {
-
-
}
-
-
-
public void checkServerTrusted(X509Certificate[] x509Certificates, String s) throws CertificateException {
-
-
}
-
-
-
public X509Certificate[] getAcceptedIssuers() {
-
return new X509Certificate[0];
-
}
-
}}, new SecureRandom());
-
SSLConnectionSocketFactory socketFactory = new SSLConnectionSocketFactory(sslContext, NoopHostnameVerifier.INSTANCE);
-
CloseableHttpClient closeableHttpClient = HttpClientBuilder.create().setSSLSocketFactory(socketFactory).build();
-
return closeableHttpClient;
-
} catch (Exception e) {
-
logger.warn("create closeable http client failed!");
-
return HttpClientBuilder.create().build();
-
}
-
}
-
-
-
}
本文参考:

 浙公网安备 33010602011771号